The Red Scarlett red-skinned potato variety is currently one of the most popular, both among avid gardeners and those who simply enjoy delicious potatoes. This easy-to-grow, high-yielding variety, which also boasts excellent flavor, is a real find.
Basic information about the variety
| Parameter | Meaning |
|---|---|
| Ripening period | Early maturing (70-80 days) |
| Productivity | 16-19 kg/m² |
| Growing regions | Southern and central regions of Russia |
| Time for digging up young tubers | 40-45 days after germination |
The Red Scarlet potato variety is the work of Dutch breeders. It thrives in warm, sunny locations. High yields—up to 19 kg per square meter—are noted in southern and central Russia, where the climate conditions are ideal for normal development and growth.
This is an early-ripening variety. Young tubers are dug up 40-45 days after sprouting and used for food. The main harvest occurs after 70-80 days.
Description and characteristics
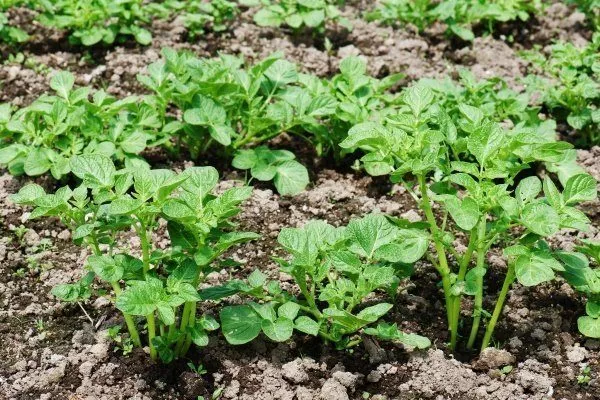
The bush is low and semi-erect, with medium-sized, dark green leaves with wavy edges. The flowers are red-violet or lilac. Each bush produces 18-20 tubers.
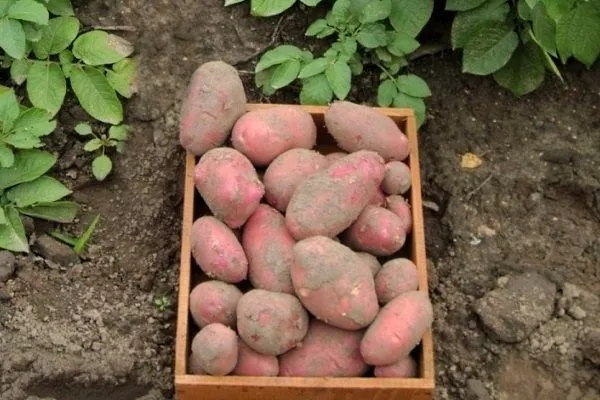
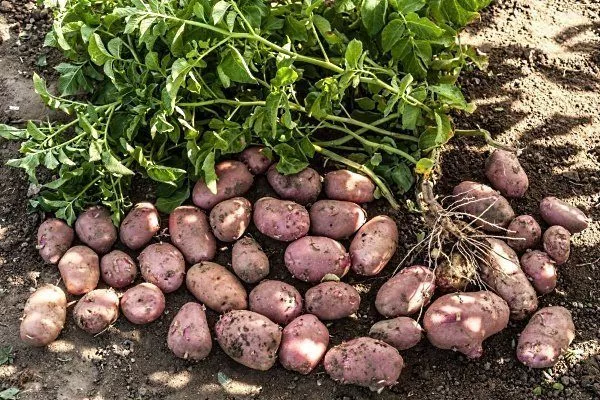
Red Scarlet potato tubers are oval, elongated, and large. Small potatoes are produced in very small numbers. A single tuber can weigh up to 150 g, but typically ranges from 80 g to 120 g.
A plus for those who love cooking is that potatoes have small, shallow eyes, making them easy to peel. Furthermore, the flesh doesn't darken for a long time when exposed to air.
The skin is smooth, red in color, which is reflected in the name of the variety (Red Scarlet translates as “crimson red”) with slight peeling, the flesh is light yellow.
When cooked, it barely softens and retains its shape. So, you can't make mashed potatoes or cutlets with it, but it's ideal for French fries, fried potatoes, and chips.
Red Scarlet is a table potato variety with a starch content of 11-15%. The potato harvest has excellent shelf life (up to 98%), and its flavor remains unchanged over time.
The tubers are resistant to damage and rot diseases. After the sprouts are broken off for the first time, they rarely re-sprout. Their red color prevents them from turning green as much in sunlight. With a marketability rate of 95%, this potato variety is often grown commercially.
The plant is resistant to viral diseases such as golden nematode, potato cancer, and others. However, it is not resistant to scab and Alternaria, more commonly known as "black rot" or "black spot." The variety's response to late blight is ambiguous. While the tubers are rarely infected, the above-ground portions are not immune.
Advantages and disadvantages of the variety
The advantages of this variety include:
- excellent appearance;
- resistance to common potato diseases;
- high productivity;
- long-term storage;
- does not lose its marketable appearance during transportation.
The disadvantages are:
- the variety is selective to climatic conditions and is not suitable for cultivation in many regions;
- requires treatment against late blight and scab;
- additional care - loosening;
- suffers from attack by the Colorado potato beetle;
- When planting, whole tubers are used; when dividing them, the seedlings are uneven.
Growing rules
To ensure your harvest doesn't disappoint, it's essential to purchase high-quality seed material—either store-bought tubers or growing them yourself from seed. Growing from seed is a labor-intensive and time-consuming process, but it offers several advantages:
- the seed material is of high quality;
- The price of seeds is many times less than that of tubers.
- Year 1: Obtaining mini-tubers (yield 300-400 g/bush)
- Year 2: Growing super-super elite (800-900 g/plant)
- Year 3: Super Elite Production (1.2-1.5 kg/plant)
- Year 4: Obtaining elite (1.8-2.3 kg/bush)
- Year 5: First reproduction (maximum yield)
Growing schedule from seeds
Growing from seeds
Purchased seeds are planted for seedlings in early spring, coinciding with tomato sowing. They are best planted in a flat tray filled with fertile soil. As soon as the first shoots emerge, provide them with good light. The soil must be loosened. Water moderately; high humidity can cause blackleg. Fertilize the seedlings several times with mineral fertilizers before planting them in their permanent location.
Next, the process goes through the following stages:
- A month after the seedlings emerge, they are pricked out into pots. In May, the grown seedlings are planted in the ground, spaced 40 cm apart, and planted deep down to the top leaves. During frosts, cover the potato seedlings with plastic or covering material on arches.
- By autumn, mini-tubers form, suitable for culinary purposes. But since we're interested in growing high-quality material, we reserve them for planting next year.
- In the second year, the mini-tubers are planted in the usual manner. By autumn, clean seed material, known as double super-elite, is collected.
- In the third year, they plant the super-super-elite and get the super-elite, which is also a high-quality material.
- In the fourth year of planting super-elite tubers, the elite variety is obtained. This is considered the most productive type of planting material. Only in the fifth year of growing potatoes from seed do the first reproduction tubers, which are the most common planting material, are obtained.
- Next, a second reproduction is obtained, which is usually used entirely for commercial purposes, since each year more and more viruses and diseases accumulate in the tubers, which negatively affect the yield and quality of potatoes.
That's why some gardeners, having purchased low-quality planting material, are disappointed with the variety. All the characteristics provided by the manufacturer apply to potatoes grown from high-quality seed.
Since the seed material is grown for 4-6 years, it must be kept in good condition until the next season to avoid loss of tubers.
Red Scarlet has a good shelf life, but if the room provides favorable storage conditions:
- the room must be insulated;
- optimal air temperature +1…+5 °C;
- there must be no sunlight;
- air access to the tubers from all sides is essential.
Preparation of seed material
| Germination parameter | Optimal value |
|---|---|
| Temperature | +12…+15°C |
| Humidity | 85-90% |
| Lighting | Diffused light 8-10 hours/day |
| Length of sprouts | 1.5-2 cm |
| Vernalization period | 25-30 days |
Before planting in the ground, the tubers must be prepared: the potatoes are laid out in a single layer in a well-lit room with a temperature of +15 °C.
In poor lighting, the sprouts grow thin and fragile, and, consequently, the bushes will not be healthy and strong.
At this stage, discard tubers that develop spots; these may be the first signs of late blight. Turn them regularly to ensure uniform germination. If some tubers are missing sprouts, it is recommended to warm them at 40°C (104°F) to awaken the growing points.
Red Scarlet tubers ready for planting have thick, strong sprouts reaching 2 cm in length.
Landing site
This variety thrives on warmth and sun. Therefore, choose a sunny spot away from shade from buildings or other plants. Although the variety is drought-resistant, it requires watering during hot weather. Therefore, choose a location that allows for easy watering.
It's best to take your time with planting; it's best to plant it in well-warmed soil after the last frost has passed. Depending on the region, the planting period is mid-May to early June.
Landing features
Red Scarlet yielded the highest when planted in high ridges. The soil is thoroughly cleared of weeds, and nitrogen and potassium fertilizers are added as needed. If the area is infested with wireworms, special chemicals are added. The soil is dug over again and ridges are formed to a height of 12 cm.
Make small holes 8 cm deep in them, add a cup of ash to each, and lay the tuber out with the sprouts facing up. Cover the holes shallowly, to a depth of 4-5 cm.
To provide each bush with sufficient light, the distance between holes and rows should be at least 60 cm.
Care
As soon as the seedlings emerge, the ridges are cleared of weeds. As the bush grows, weeding becomes unnecessary, as the plant itself will suppress weed growth. A week after the first plants appear, weeding is carried out. hilling, the ridge is raised to a height of 20 cm. Throughout the growing season, ensure that the soil is loose and well-drained by water and air.
This variety does not belong to the “plant and forget” category; it requires constant loosening, weeding and double hilling.
Water the plants before and during flowering, and a week after flowering. If the drought lasts for a long time, water the potatoes twice a month, followed by a thorough loosening of the soil.
| Growth stage | Loosening depth | Frequency |
|---|---|---|
| Before germination | 3-4 cm | Once every 5 days |
| After germination | 5-6 cm | Once every 7-10 days |
| Before flowering | 6-8 cm | After each watering |
| After flowering | 4-5 cm | Once every 2 weeks |
Typically, fertilizer is applied 2-3 times per season. The first application of mineral fertilizer is one month after planting. For 1 square meter, you'll need:
- urea - 2 teaspoons;
- potassium sulfate - 2 teaspoons;
- superphosphate - 4 teaspoons.
The second feeding is carried out before budding, the third, if necessary, is carried out after the buds have fallen.
Diseases and pests
Potatoes of this variety are susceptible to attack by the Colorado potato beetle and the mole cricket, and among the diseases - late blight and scab.
Control of the beetle begins before buds appear on the bushes. Use a designated insecticide or prepare a water-tar solution (100 g of tar per 10 liters of water) and spray the bushes in several stages.
The mole cricket causes significant damage to the root system, tearing it apart, and to the tubers, where it chews out large cavities. To evict it from the site, flood the burrows with a soapy solution. Dissolve 4 tablespoons of phosphate-free laundry detergent in 10 liters of water. Pour up to 2 liters of the solution into each burrow.
Watering with an infusion of onion peels will also help repel insects. Add 1 kg of peels to 10 liters of water, stir, and let steep for 5 days. Then dilute the infusion with water 1:5 and water the potatoes 3-4 times weekly. Before watering, pre-water the area or treat it after rain.
To combat scab and late blight, purchase special preparations and treat potatoes according to the manufacturer's instructions.
To reduce the risk of late blight, which is promoted by high humidity and warm weather, only healthy material is planted.
Folk remedies are effective against late blight. Bushes are sprayed with an aqueous solution of copper sulfate (2 g per 10 liters of water) every 10 days. Alternatively, a solution of potassium permanganate, boric acid, and copper sulfate can be prepared. Take 1 tablespoon of each component in separate containers and pour 1 liter of boiling water over them. Cool the solutions, pour them into a 10-liter container, and top up with water. The bushes are sprayed with the resulting solution twice. The first time is in late July or early August, and then the treatment is repeated after 10 days.
Harvesting
To ensure potato tubers survive transportation and long-term storage, their skins need to mature. To achieve this, two weeks before harvest, all the tops are cut off, leaving the tubers intact. During this time, the skins will become firm.
The crop is harvested by hand, spreading the ridges. The harvested potatoes are cleaned of soil and dried in the shade. After removing damaged and diseased tubers, the harvest is shipped. for storage.
Reviews from gardeners and farmers
Reviews of the Red Scarlet potato variety are overwhelmingly positive, provided you follow the planting and harvesting guidelines and find the optimal temperature conditions for the tubers. Here are some gardener reviews: