Hilling potatoes is essential for a good, healthy harvest. Experienced gardeners claim that early soiling of the lower portions of the plants can replace weeding and loosening the soil. Another important benefit of hilling is weed control and protection of the tubers from sunlight and temperature fluctuations.

Necessity of the procedure
Hilling potatoes is an important step in growing this nightshade crop. The process involves covering the bottom of the plants with soft, loosened soil. This practice is considered an environmentally friendly alternative to herbicides. Furthermore, it increases yields by 30%.
Potatoes need hilling much more than other vegetables.
You need to sprinkle the lower parts of the plant with loosened soil in order to:
- reduce the leaching of nutrients from the soil;
- accelerate the growth of shoots;
- improve bush lighting;
- protect plants from drying out;
- improve soil aeration;
- protect bushes from pests;
- protect tubers from ultraviolet rays and sudden temperature changes;
- prevent weed growth;
- create additional space for plants;
- increase plant resistance to winds and spring frosts.
Why does hilling increase yields? Potatoes have lateral shoots called stolons, which grow below the soil level. They grow quickly and die just as quickly. These lateral shoots produce other shoots, which are the tubers.
When hilling, these young shoots are buried under the soil, forcing the plant to produce new shoots. This encourages new roots and tubers to emerge, and moisture is retained. Furthermore, a strong root system develops, developing and producing a robust foliage.
Hilling potatoes will only be effective if the soil is loamy or clayey. If the crop is growing in sandy soil, liquid fertilizer and water will run off and not reach the root system.
When is hilling not required?
This procedure is not necessary in all cases. It should be avoided in the following cases:
- If high temperatures persist, with the soil temperature reaching 26 degrees, and also if there is little moisture in the soil and there is no good irrigation system, under such conditions hilling will only do harm;
- if the potatoes were planted under a black non-woven covering material.
To determine whether the hilling method is suitable in each specific case, it is recommended to conduct the following experiment: hill up half of the bed with potato bushes, and only loosen the other half and observe the result.
Tools for hilling potatoes
The procedure can be performed using different tools.
| Tool | Soil type | Plot area | Efficiency | Price |
|---|---|---|---|---|
| Chopper or shovel | Any | Small | Low | Low |
| Manual mechanical hiller | Any | Average | Average | Average |
| Walk-behind tractor | Any | Big | High | High |
| Hand plow | Any | Average | Average | Average |
| Automatic or mechanical cultivator | Easy | Small | Average | Average |
Chopper or shovel
Hilling potatoes with these tools is the most difficult. They must have a sharp edge and a wide working surface.
Using a hoe, hilling is done as follows: first, cultivate one side of a row, then move on to the other. At the end of each row, create a small mound to retain moisture between the rows.
The process of hilling with a shovel is shown in this video:
Manual mechanical hiller
It can be purchased at gardening stores. The device consists of two metal discs positioned at an angle to each other.
To hill potatoes, two people are required: one to pull the mechanism, and the other to apply pressure and guide it. Hilling is simple and time-saving. An entire row of potato plants can be cultivated in a single pass.
This video shows how to improve a manual hiller and make the process easier using a motor winch:
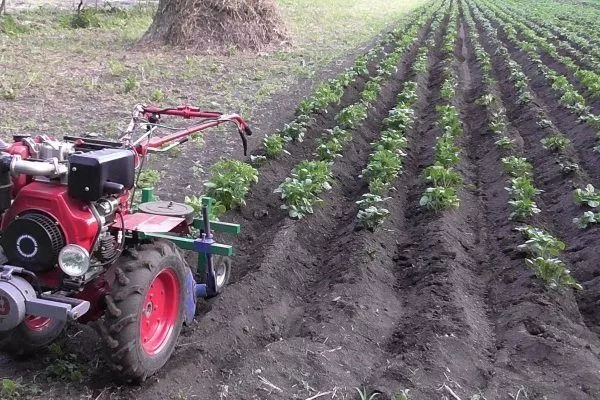
Walk-behind tractor
This machine isn't cheap, but it's essential for large-scale potato growing. A walk-behind tractor significantly simplifies the job and saves the gardener time.
The principle of operation of the device is that there are wheels or a cutter in front that loosen the soil, and a plow is placed behind that throws soil onto the lower part of the bushes.
A walk-behind tractor can only be used if the distance between rows of potato bushes is equal; otherwise, there is a high risk of damaging the tubers.
Watch the video on how to hill potatoes with a walk-behind tractor:
Hand plow
This tool allows you to cultivate one side of each adjacent row in a single pass. The plow consists of a frame to which the blade, wheel, and drawbar are attached.
When cultivating a plot of land, the gardener pushes the structure, causing the plow to cut the soil. The side blades distribute the loosened soil onto the root zone of the potato plants.
The process of hilling potatoes using a hand plow with additional weight is shown in this video:
Automatic or mechanical cultivator
They are cheaper than walk-behind tractors, and their design is simpler. These machines are used on small plots with light soil.
The principle of operation is as follows: first, the soil is loosened using a cutter, then the cutter is replaced with a plow and hilling is carried out.
When choosing a tool for hilling potato bushes, you need to focus on the type of soil on the site, as well as its area.
When and how many times should potatoes be hilled?
When deciding to hill up potatoes to increase yield, you need to keep in mind that this process needs to begin at a specific time.
The first treatment is recommended when the stems reach 14-20 cm in height. Early hilling will replace weeding and loosening the soil. Furthermore, the seedlings, covered with soil, will withstand the drop in temperature, which usually occurs in the second half of May.
Hilling after rain will maximize moisture retention and stimulate the formation of lateral shoots. In hot summers with no rain, it is recommended to hill the bushes after watering.
It's best to perform this agricultural procedure after rain, when the soil has dried slightly. Avoid hilling potatoes on a hot day: the soil will be completely dry, and under such conditions, it's easy to damage the plant. At high temperatures, the crop is especially susceptible to damage.
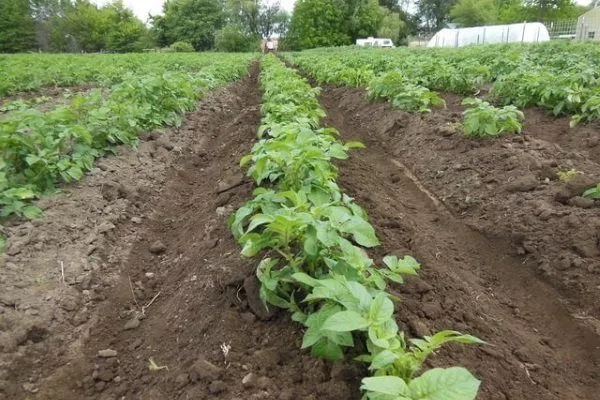
The classic technique involves two hilling procedures throughout the potato's development period. The first is performed after the seedlings emerge, and the second is done 2-3 weeks later, when the plants begin to flower. This is the most important time for hilling, as it is during this period that small tubers form on the stolons.
If a walk-behind tractor and cultivator are used to add soil to the lower part of the bushes, then hilling is carried out once per season, during the flowering period.
If the first hilling was carried out very early, then 2-3 more repetitions will be required in the future.
The technology of proper hilling
Proper hilling technique is key to increasing yields. Improper approach can damage the crop and cause further harm to the plant.
If you are leveling potatoes manually using simple tools, such as a hoe, you should follow these rules:
- Remove all weeds beforehand. Grass can be left on the ground; once it dries, it will provide shade for the bushes.
- Sprinkle each bush individually with soil from the space between the rows on all sides. This creates a raised area around the plant.
- When performing work, you need to act carefully so as not to damage the potato root system.
- Remove all weeds before starting work.
- Sprinkle each bush with soil from between the rows on all sides.
- Proceed carefully to avoid damaging the root system.
- Create a raised area around each plant.
- Create a dam-like structure at the end of each row to retain moisture.
Traditional hilling looks like this:
- The space between the furrows is dug up with a flat cutter.
- The beds are hilled in one direction. The gardener, moving along the beds, rakes the soil from the space between the rows to one side of the bushes.
- The beds are hilled from the other, uncovered side. The soil from the space between the rows is raked toward the other side.
- The soil is raked up around the bush with a hoe from all sides. This should result in a wide, high mound, from which a cluster of stems can be seen.
- At the end of each row, a dam-like structure is poured: this structure will retain moisture after rain or watering.
If hilling is done with a shovel, then dig between the rows to a depth of one third of the shovel blade and sprinkle the potato bushes with soil.
Another hilling method is fan-shaped hilling. This method can be used when the stems reach 15-20 cm. For the fan-shaped method, it's best to use a shovel. The procedure is as follows:
- The stems are spread apart with their hands and laid out on the ground in a fan shape in different directions.
- Using a shovel, take soil from between the rows and pour it directly into the center of the bush.
- The soil is distributed in such a way that only the tops remain at the top.
- Weeds pulled from the space between the rows are scattered on top. This is done to retain moisture in the soil. Furthermore, the weeds also serve as additional fertilizer.
Gardeners share tips for making hilling truly beneficial and effective. Consider these recommendations:
- if the first hilling is carried out when the bushes reach a height of 15-20 cm, then the mound of soil should be at least 15-18 cm;
- the second hilling, when the bushes reach a height of 25-30 cm, should be carried out in such a way that the mound reaches 17-20 cm;
- The bushes should be hilled no later than 10 am in the morning or in the evening, after 6 am.
Hilling potatoes will increase their yield and protect them from early temperature fluctuations and UV rays. This agricultural procedure is performed using a hoe, shovel, cultivator, or walk-behind tractor. The choice of tool depends on the size of the potato plot.