Quail breedingQuail, even at home, are an excellent alternative to chicken and eggs. Not least because they don't require a large coop—50 adult quail can be comfortably housed in an area of about 1 square meter. They are best kept in cages, which can be placed in an apartment, attic, or shed.
Cell requirements
Before building a cage for these miniature birds, let's consider the necessary living conditions. It's important that the room they live in has a constant temperature of 18-20 degrees Celsius, is well-ventilated, warm, bright, and inaccessible to rodents.
There are several basic requirements that a quail cage must meet:
- The frame elements must be firmly secured and not wobble.
- Feeders and drinkers are located behind the front wall of the structure.
- The distance between the bars of the front wall should be such that only the bird's head fits through it (for access to food and water).
- The cage height should be no more than 20 cm. This is necessary to protect the quails from the sudden jumps typical of the species, which could result in injury.
- Since quails lay eggs directly on the floor, the structure must be equipped with a tray into which the eggs will roll.
- Place droppings trays under the cage's mesh floor to make cleaning much easier.
- The design must provide for the possibility of additional heating and lighting for the birds.
One of the first signs of improper care is feather loss in quail. They become practically bare, and egg production drops significantly.
What can a cage be made of?
There are several types and designs of cages available for keeping quail. They are generally made of metal, wood, plastic, or a combination of these:
1Metal cages
All-metal cages can be made using steel, aluminum, or duralumin. They are durable (especially nickel-plated steel), hygienic (easy to clean), and allow sufficient light to pass through.
Typically, they are constructed using a frame made of angle iron with metal rods attached to it. The mesh floor is installed at an angle to allow the eggs to roll into a collection tray. These cages can be treated with boiling water, various disinfectants, or cleaned using heat (a blowtorch or heat gun).
However, such cages have their drawbacks. They cool significantly during cold weather. Making them at home is quite labor-intensive, requiring welding and the necessary skills.
2Wooden cages
For wooden cages, it's best to use hardwood (oak, birch, beech). Wooden structures can be quite beautiful.
It is not recommended to use materials that may contain harmful adhesives and other mixtures (chipboard).
Wooden cages also have their drawbacks. They don't last long—if kept in damp rooms, the wood will absorb moisture and swell. They're also much more difficult to clean than metal cages.

3Plastic cages
Nowadays, plastic has become quite common in quail housing. This option offers several advantages over wood:
- longer service life;
- increased hygiene;
- moisture resistance.
| Material | Service life | Difficulty of manufacturing | Hygiene |
|---|---|---|---|
| Metal | 10+ years | High (welding required) | Excellent |
| Tree | 3-5 years | Average | Low |
| Plastic | 5-7 years | Low | High |
| Combined | 7-10 years | Average | Good |
Cage designs for quails of different ages
There are a huge number of cage design options. To avoid getting lost in the nuances of all the existing designs, we'll outline the basic concepts and dimensions that will allow you to easily build a cage for any living environment, whether in an apartment or a summer house:
- The optimal cage area should be 10 sq. cm per bird.
- When keeping a large number of birds, it is best to plan prefabricated blocks of cages that can be stacked on top of each other.
- No more than 30 quail per cage. Its dimensions should be within 1 m (length) by 0.4 m (width). Depending on the bird breed, these dimensions may vary by +/- 5 cm. The height of the back wall is 20 cm, and the front wall is 25 cm.
- The angle of the floor towards the egg collection tray is 8-10 degrees.
- The egg collector should protrude by 7-10 cm and have sides (to prevent the eggs from falling out).
- The front wall, attached with hinges or simple wire, serves as a door. This saves significant space.
You don't need to buy special feeders and waterers. To reduce the cost, you can make them yourself using materials you have on hand (like drywall profiles or a plastic bottle).
Particular attention should be paid to cages for chicks Quails are kept in these cages until they are 30-40 days old. They are typically equipped with electric heaters.
The walls are covered with a metal mesh with 10x10 mm mesh. The front wall is divided horizontally into two sections. The lower section, which prevents the quail from falling out, is permanently attached (70-100 mm high). The upper section is hinged to the lower section. It serves as a door and opens from top to bottom.
Waterers and feeders for the chicks are installed inside the structure. The cage floor is made of mesh (preferably with a PVC coating). The mesh size is 10x10 mm.
For the first seven days, the chicks' feet will be prone to falling through, so it's important to cover the floor with thick paper. Corrugated cardboard is best. It's easy to lay out flat, and the chicks won't be able to hide under it. The paper should be changed daily.
Using mesh floors with smaller mesh openings (e.g., 5x5 mm) is only practical for raising quail during the first 3-4 days, when they are still very small. Later, the droppings will not drain well, so they will need to be cleaned out daily.
The smallest chicks (from birth to 10 days) are often kept in so-called brooders. These are enclosed on three sides with plywood and are equipped with a heater and 24-hour lighting.
Meat-breed quail should be kept in lower cages, as this will limit their movement and allow them to gain weight faster. Reduced physical activity delays the birds' sexual maturity, which will positively impact meat quality.
Step-by-step instructions for making cages from various materials
Now let's take a closer look at how to make a quail cage with your own hands from all the above materials.
Metal mesh structure
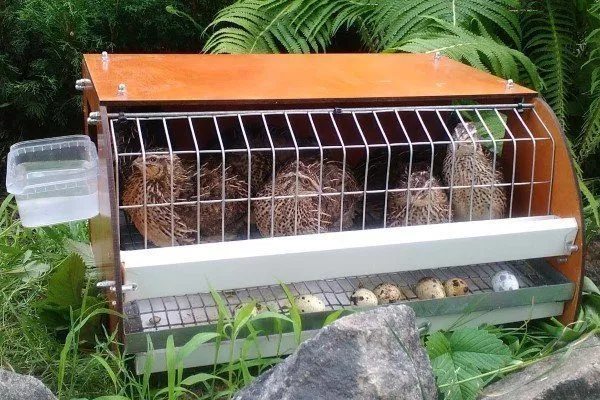
The proposed design allows for a cage to hold 20 adult birds. It is ideal for beginning poultry farmers.
It's assembled using a frame made of 25mm angle iron. Depending on the space available, the cage's dimensions can be adjusted slightly for convenience. For the floor, use mesh with at least 16x24mm mesh, while for the walls and ceiling, use larger mesh to allow room for the bird's head.

The manufacturing process itself contains the following stages:
- We prepare the corner according to the dimensions we need and weld it into a frame, as shown in the diagram:
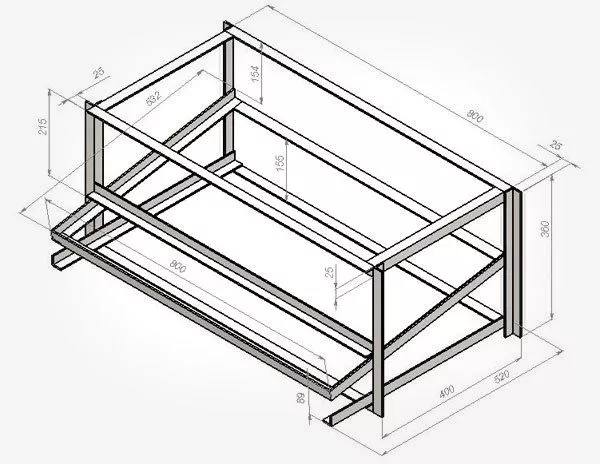
- We cut the metal mesh to the size of our walls and attach it to the planks with wire so that the curled tendrils are on the outside.
- Cutting the corner to size (4 vertical posts + horizontal crossbars).
- Welding the frame (checking the diagonals).
- Cut out the mesh (walls, ceiling, floor with egg collector).
- Fastening the mesh with galvanized wire (step 10-15 cm).
- Installing the door (hinges + locking mechanism).
- Installation of a pallet (galvanized steel 0.5-0.7 mm).
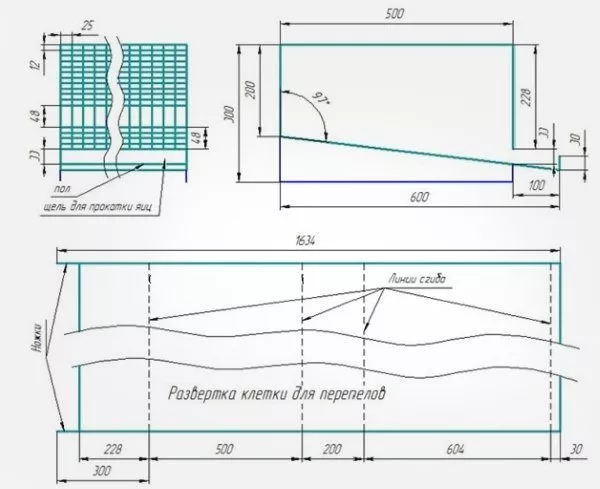
- When cutting the floor, allow for an egg collector up to 100 mm long. Bend its end upward by 30-40 mm to secure the eggs, and cover both sides with side rails. Leave a gap of up to 30 mm between the front wall and the egg collection tray. The eggs will pass through this gap.
- We make a rectangular hole in the center of the front wall so that you can reach any point of the cage through it.
- We cut a door out of the mesh and fix it from above using either galvanized strips (20x40) or hinges.
- We cut a rectangle out of galvanized sheet metal and folded the sides in on all sides. This should create a regular tray, the same width and length as our cage. It's placed underneath the structure and will serve as a waste collection point.
Work plan for the manufacture of a metal cage
It also takes place frameless cage For quail, its manufacture is less labor-intensive, although its design is not as robust as the first option. Here's a cutting diagram and construction procedure:
- We bend the metal mesh into the shape of a box without side parts, which we later attach using wire.
- The egg collection tray is an extension of the floor, sloped toward the front, and is similar to the frame method. Its size is up to 100 mm. Also, don't forget to include a safety edge to prevent eggs from falling.
- We additionally cut out the bottom from a finer mesh.
- As in the first option, we install a door and a litter tray.
You can clearly see all the steps for constructing a quail cage discussed above in the following video. An experienced farmer also offers helpful tips for beginners:
Plywood cage
Such a cage can be made either using a metal frame or by connecting them together using wooden blocks:
- From plywood, we cut out side walls measuring 35x20 cm, an end wall measuring 70x20 cm, and a lid measuring 70x35 cm. For lighting and ventilation, we make holes in the planes (diameter - about 3 cm).
- We cover all parts with water-based varnish.
- Assembly is carried out using self-tapping screws, which secure the walls to the beams located at the inner corners of the structure. For added security, the joints can be treated with glue.
- Cut the floor out of metal mesh with a mesh size of at least 16x24 mm. Attach it with small nails or a furniture stapler, taking into account the angle of the slope.
- In place of the front wall, we cut out a door from the mesh, which we attach to hinges or galvanized strips.
Plastic
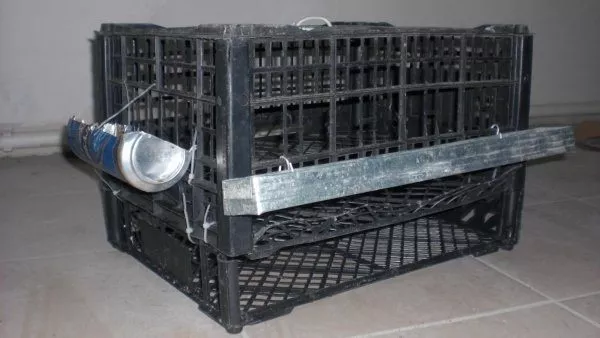
Due to its simplicity and affordability, making a quail cage from mesh plastic boxes used for transporting and storing vegetables is an excellent option. To construct one cage, you'll need two low boxes and one at least 170 mm high:
- Using a hacksaw, we cut off the corners that protrude from the top of the drawers.
- We place the large box on top of one of the smaller ones; this will serve as a tray. We top it with a second small box; this will become our ceiling. It goes without saying that all the boxes should be the same width and length. We secure the structure with wire. To prevent injury to the birds, the "antennae" of the twists should be on the outside.
- We cut three of the four sides of the top drawer. This will become the door, and the fourth (uncut) side will serve as the hinge.
- Using a knife, enlarge the openings in the cage. The quails will feed through the openings in the front part of the cage; the bird's head should fit through them.
I would like to tell beginning poultry farmers that the hassle associated with breeding quail is worth it because you will have your own (small at first) poultry farm, full of nimble birds, from caring for which, in addition to commercial benefits, you will receive a lot of joyful moments.