Chicken slaughter begins with preparation and ends with processing. This entire process requires adherence to a number of rules, otherwise the resulting meat may be of poor quality, for example, due to putrefactive processes occurring in the intestines. So, how do you prepare and slaughter a chicken, and then remove its feathers and butcher the carcass, we'll find out further.
Selection of poultry and preparation for slaughter
First, it's necessary to select the birds for slaughter. An experienced farmer can determine by eye which chickens are suitable for slaughter, but beginners should base their selection on the bird's weight—it should be at least 2-2.5 kg. Suitable birds should be caught from the flock and transferred to a separate facility 24 hours before slaughter. They should be kept according to the following rules:
- Approximately 24 hours before slaughter, feed the chickens wheat bran or rye flour (approximately 25% of their main feed). Then, fast the chickens. It should be noted that some farmers use another method to speed up digestion in poultry: administer a 2% Glauber's salt solution 24 hours before fasting.
- Before slaughter, do not feed the chickens for about 18 hours to cleanse their intestines and stomach.
- Provide chickens with adequate fluid intake, as it helps cleanse their digestive tract, digest feed waste, and retain water in their muscles. Furthermore, depriving birds of fluid will lead to weight loss.
To further speed up digestion in chickens, some farmers turn off the lights the night before slaughter. The darkness disorients their bodies, which accelerates the digestion of food residue. Water bowls must be kept full during this time.
Requirements for the slaughter site
The slaughtering area must be prepared in advance. It must strictly comply with sanitary and hygienic standards. This will require:
- wash tables, walls and floors using 2% bleach;
- treat the instruments by boiling them for about 15 minutes;
- disinfect the feather removal machine;
- wash the special clothing that will be worn during slaughter (apron and gown).
The premises must be cleaned before and after slaughter.
Experienced farmers equip the area where poultry is slaughtered with the following items:
- hooks that are attached to the wall so that chickens can be hung on them;
- table;
- a large saucepan;
- slaughter cone;
- with a bucket or basin;
- with a cellophane bag or cloth;
- tools (axe, sharp knives, gutting forks);
- a refrigerator with a freezer and a smokehouse to store the meat later.
It's also a good idea to prepare plenty of water in advance to rinse the processed carcasses, as well as to clean the dishes, tools, tables, and the wall. You'll also need warm water (around 90°C) to scald the birds before plucking, if necessary.
Methods of slaughter
There are several techniques for slaughtering chicken, the choice of which should be made depending on how long the meat will be stored. For example, if the meat won't be stored for a long time before cooking, poultry farmers recommend a relatively simple method: removing the bird's head with a cleaver (axe). If the meat is to be stored for a long time, slaughter should be performed externally. Let's examine each technique separately.
Head removal
The most popular method involves removing the chicken's head with a cleaver (axe). The chicken typically dies immediately, so this method is considered quite humane. The procedure is simple, so any farmer can handle it. Here's what to do:
- Place the bird on a stump and hold it firmly to prevent it from escaping. If you lack the necessary experience, you can initially have another person hold the bird for you.
- Swing and strike the cleaver in the middle of the neck. To avoid torturing the bird, it's crucial to cut off its head the first time.
- Even without a head, the bird may begin to struggle and convulse. At this point, it's important not to let go of it.
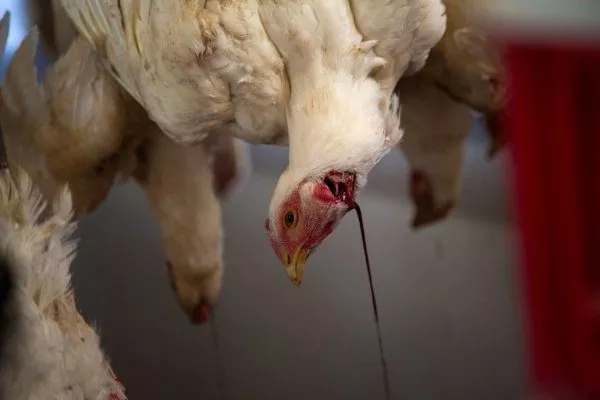
- Once the head is cut off, hang the chicken by the legs on a hook and place a bucket underneath to collect the blood.
This technique allows the bird to be cut through the airway, causing instant death without the bird having time to feel pain. However, this method also has a downside: chicken meat cannot be stored for long periods of time, as the open neck incisions allow microbes to enter and cause it to spoil quickly.
Internal method ("in the split")
This method involves rapid blood removal, resulting in high-quality meat with an excellent marketable appearance. The method involves slaughtering the bird through a hawse, which is carried out according to the following instructions:
- Stun the bird with a strong blow to the head using a blunt, heavy object. This procedure is mandatory when slaughtering large breeds of chicken. If slaughtering small birds, stunning is optional, although it can be done for humane reasons.
- Use your left hand to grab the bird's head and then turn its beak towards you, that is, in the direction from which you plan to slaughter it.
- With a sharp movement of your right hand, insert a long, narrow, and well-sharpened knife into the chicken's beak, severing the connection between the two veins—the jugular and the pontine. The incision can be made with scissors with sharpened tips.
- Pull the instrument toward you and inject to the right and slightly lower to reach the anterior cerebellum through the palatine fissure. These simple manipulations will relax the bird's muscles, speed up bleeding, and make plucking the feathers easier, as they won't be clinging tightly to the skin.
- Hang the bird upside down and place a basin underneath to collect any remaining blood.
- After bleeding, insert a swab of cloth or cotton wool into the beak to absorb any remaining blood.
The internal slaughter method is also not used in cases where the intended outcome is meat for long-term storage.
External method
Many farmers more often use the external slaughter method, especially when slaughtering large chickens, including broilers. This method produces marketable meat that can be stored for a long time. This is because external slaughter requires only small incisions, preventing germs from penetrating the bird and contaminating the meat.
It's worth noting that external slaughter of chickens can be done either unilaterally or bilaterally. Each method has its own nuances, so it's worth considering both instructions.
Single-sided slaughter using the external method is performed in the following order:
- Grab the bird's neck with your left hand, closer to the head.
- Take a sharp knife in your right hand and make a 1.5-2 cm incision. The optimal location for the incision is 2 cm below the left earlobe. Insert the knife deeper to reach and sever the blood flow pathways—the jugular (venous) and arterial (facial and carotid) blood vessels.
The two-sided method is carried out according to the following instructions:
- With your left hand, grab the bird's neck.
- Take a knife or scissors in your right hand and pierce the chicken skin at a point that is 1 cm below the earlobe.
- Point the blade to the right to simultaneously cut both carotid arteries and the jugular veins. This ensures the knife passes right through. To perform the necessary manipulations in one motion, the blade must be perfectly sharp. The optimal cut depth is up to 1.5 cm.
Regardless of the method of external slaughter, after it is carried out, the workplace will not be stained with blood, since there are no blood spatters.
Application of the cone
At home, you can use a special cone-shaped device made of metal to slaughter poultry. Hang it up, and then insert the chicken's head through the bottom opening. This device securely holds the bird, preventing it from flapping its wings and injuring itself. A bucket can be placed underneath to collect the blood after slaughter. Slaughter can be performed with scissors or a knife using one of the techniques described above.
What exactly is a poultry slaughter cone? You can see it clearly in the following video:
Methods of plucking poultry
After slaughtering and bleeding the bird, the feathers must be plucked quickly and efficiently. This procedure becomes significantly more difficult if the bird has cooled. Plucking can be done manually or using a special device.
Manual methods
There are several methods used to manually remove chicken feathers:
- After the blood has drained, place the carcass on a board and begin palpating it. Move in the following order: tail, wings, back and chest, neck, and legs. To avoid damaging the skin, pluck a small number of feathers at a time.
- After slaughtering, place the chicken carcass in a bucket of boiling water for 30-40 seconds, then transfer it to a bowl and begin palpating. It is not recommended to soak the carcass longer than this, as the skin may cook, making plucking much more difficult. Remove feathers and down in the same manner as cold plucking. To make feather removal easier, it is recommended to pluck them in the direction of feather growth. This method is best used when slaughtering hens intended for egg production. These hens are usually older, so their feathers are firmly attached.
This type of palpation will emit an unpleasant odor, so the procedure should be carried out outdoors, not indoors.
- Place the drained bird in hot water for 30 seconds, then place it in a sealed plastic bag for 15 minutes. This creates a steam bath, which helps the skin soften. After this, remove the feathers in the order described above. This method significantly reduces the plucking time.
- After the blood has drained, wrap the chicken in a cloth. Place a steam iron over it and turn on the steam setting. Heat the chicken carcass with steam. The pores in the skin will open, making the feathers easier to remove.
The methods listed are suitable for processing no more than 2-3 birds, as each chicken takes approximately 30 minutes. For large-scale slaughter, mechanical methods should be used.
Mechanical method
This is done using a special device, a rotating brush with silicone bristles. The cat's body is held close to it and gently rotated as the bristles, or fingers, rotate to remove the fluff.
The palpation process takes little time, but there is one drawback: mechanically removing feathers can sometimes damage the skin. If the bird is not being sold, this won't cause any concern. However, if the carcass is being prepared for sale, extreme care must be taken to avoid damaging its marketable appearance.
Removal of remaining droppings and singeing
This procedure is called "carcass toileting." To do this, press on the bird's abdomen while simultaneously changing the paper swab in its mouth to absorb any remaining blood clots. If excrement gets on the chicken's legs, rinse them with water without touching the body itself.
After grooming, singe the bird to remove the fine feathers. A gas torch can be used for this. If one is not available, singeing can be done over a fire. Rub the bird with flour first, as this will help remove the soot from the skin more quickly. Once all the down is removed, rinse the chicken. This will cause it to turn pink.
Processing the carcass
Once all the feathers have been removed, it's time to gut the carcass. This complex procedure is performed according to the following instructions:
- Cool the chicken carcass in cold water for 10 minutes. Otherwise, the capillaries will fill with blood, causing the carcass to take on an unpleasant dark color.
- Place the bird belly up.
- Make a circular incision in the cloaca, and then a large longitudinal incision, which in adult birds and young birds is usually 4 cm.
- Remove the giblets, starting with the intestines and cloaca. Remove the gallbladder very carefully, otherwise it may be damaged. If this happens, the bile will spread throughout the carcass, and the meat will have to be discarded, as it will taste bitter.
- Of all the removed entrails, save the liver, heart, and stomach. This will require carefully and without tearing the stomach from the end of the duodenum. It is recommended to discard the remaining entrails or give them to pets.
- Rinse the heart and liver and use them for various dishes. Cut the stomach in half with a sharp knife, remove any stones or glass, then rinse, scald with boiling water, and remove the outer layer. Only after these steps can it be used in cooking.
- Make an incision in the neck to remove the trachea and esophagus. Also make a small hole near the larynx to remove the crop.
- After removing the internal organs, rinse the carcass thoroughly and wipe dry.

After processing, it's time to let the meat "mature." This should be done by leaving it at room temperature for several hours. If cooked after this process, it will be juicy and flavorful.
Storing meat
If you plan to cook the chicken in a few hours, you can simply transfer it to the refrigerator. To prevent the meat from drying out during this time, place it in a plastic bag or wrap it in a cloth soaked in vinegar or apple cider vinegar. Be careful not to let the cloth dry out. For longer-term storage, you can use other methods:
- FreezingWithout it, poultry can be stored for no more than 3 days. You can freeze the whole bird or cut it into pieces, separating the wings, thighs, drumsticks, breast, and back. In winter, the bird can be kept outside for 24 hours, then dipped in cold water and returned to the open air. Repeat this process several times, then wrap the chicken in clean paper and store in a cool place.
The carcass can be kept in the cellar, but no longer than 5 days. To prevent rotting, wrap it in a clean cloth soaked in vinegar.
- SaltingIf the meat needs to be stored for a long time, the chicken can be salted. To do this, prepare a brine solution and inject it into the chicken through the beak using a syringe. Then, tie the neck and hang the chicken upside down. Let it salt for 24 hours, then drain the brine.
- Cold smokingCut the carcass in half and sprinkle with salt. Let it sit for 48 hours, then place a weight on top. Curing should continue for 3 to 7 days. Then rinse the carcass, dry it with a towel, and smoke it for about 2-3 days using cold smoke at 20°C.
- Hot smokingTo achieve this, the smoking temperature should be maintained at approximately 80°C for the first hour, then reduced to 40°C. The smoking process lasts for 4 hours. To remove carbon deposits and soot, it is recommended to wipe the chicken with a cloth or towel. Smoked chickens are stored suspended, with the air temperature not exceeding 5°C.
So, slaughtering poultry at home isn't the most difficult task, making it fairly easy for rural residents and farmers to get used to. However, it's important to follow proper slaughter and processing procedures to ensure excellent quality meat with an attractive presentation.