Raising birds is a complex undertaking that requires a number of requirements, including proper watering. In addition to feed, the coop or cage must be stocked with a waterer with fresh drinking water, providing at least 0.5 liters per day per bird. Such a waterer can be purchased or made yourself using the instructions below.

Requirements for drinking bowls
To ensure chickens have comfortable access to water, it is important to use drinkers that have a number of characteristics, namely:
- They have a practical shapeThe container should always be filled with water, either automatically or manually, so both the chickens and the person themselves should have free access to it.
- ResistantChicken coop dishes often shift or tip over, for example, when chickens fight. To minimize the likelihood of such accidents, install stable waterers.
- Prevent water pollutionTo ensure that the animals drink clean water, it's important to prevent dust and other contaminants from entering it. To achieve this, the water should be closed, as open structures are much more susceptible to microbial contamination, as well as dust and bird droppings.
- Made of safe and durable materialIf the waterer is made of breakable or splinterable material, it could shatter into pieces when dropped, causing harm to the bird. Furthermore, metal structures should be avoided, as they can release toxic fumes when reacting with animal feces. Therefore, plastic is the best option.
You can make a waterer that meets the above requirements yourself. Beginners can start with simple models, while more experienced crafters can create vacuum, nipple, or drip waterers.
- ✓ Water temperature should be between 10-15°C for optimal consumption.
- ✓ The pH level of the water should be neutral (6.5-7.5) to prevent diseases.
Simple drinking bowls made from scrap materials
To save time and money on specialized equipment, you can create a simple waterer from a bucket or bottle. Let's look at each option separately.
From a plastic canister
Making a drinking bowl like this is as easy as pie:
- Wash the empty plastic canister thoroughly without using detergents.
- Screw on the lid and lay the canister on its side.
- Using a utility knife, cut rectangular holes on the sides, as shown in the photo below. Fill the container with water.
A similar waterer can be made from a 5-liter bottle. However, the bottle will stand upright rather than lie on its side.
- Cut rectangular horizontal holes in the eggplant at a height of 10 cm from the bottom.
- Fill the container with water.
Methods for manufacturing vacuum drinkers
If you have a small flock of birds (5-10), it's a good idea to use a vacuum waterer. It's designed so that water is released automatically under atmospheric pressure. A variety of containers can be used to make a vacuum waterer, from an old gas can to a plastic lemonade bottle. We'll explore these options below.
From two bottles
The following materials need to be prepared:
- 1 bottle of 2.5 l;
- 1 bottle of 5 l;
- 2 screws.
The structure is assembled as follows:
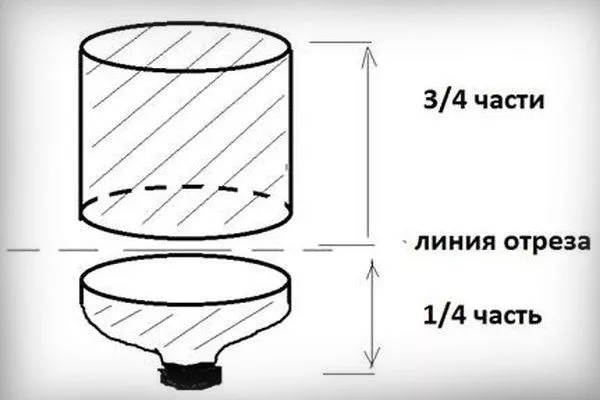
- Cut a 5-liter bottle as shown in the picture. Only the bottom part with the lid will be used later.
- Unscrew the lid from the second container and attach it to the inside of the 5-liter bottle lid using screws.
- Prepare a hole with a diameter of 6-7 mm in a 2.5-liter bottle:
- Screw the lid onto the 5-liter container with the lid from the second vessel attached.
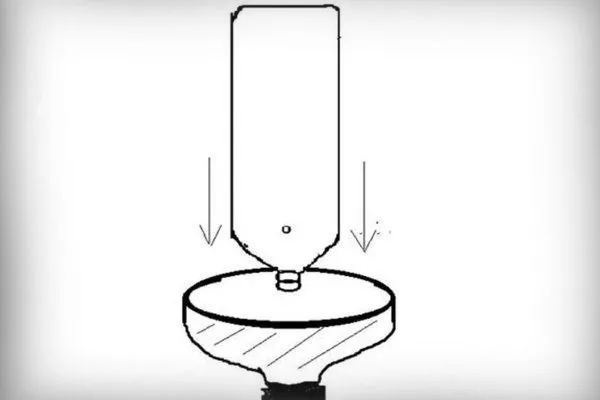
- Place the smaller bottle into the cut-off 5-liter bottle and screw on the lid. In the future, when using the waterer, to fill the 2.5-liter bottle with water, you'll need to unscrew the lid on the larger bottle again. If the bottle is full, water will flow from the cut-off hole into the cut-off container, filling it to the very top of the hole.
- Secure the prepared structure to any support, such as a wall. A 2.5-liter bottle can be suspended using a wire loop, and the waterer itself can be mounted on two rods screwed into the wall.
When making such a vacuum drinker, it is necessary to ensure that the sides of the 5-liter bottle are located above the hole for water flow.
The following video clearly demonstrates how to assemble a vacuum waterer from two bottles:
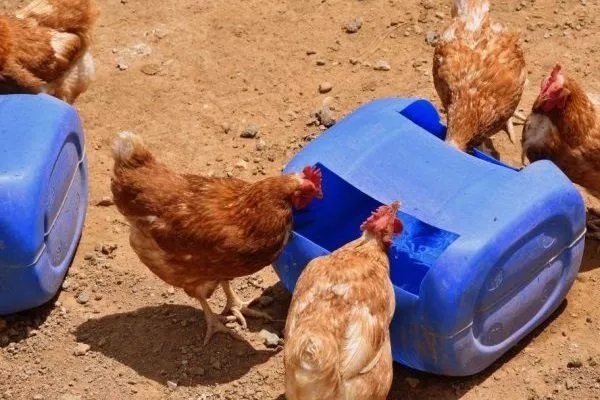
From a tray and a bottle
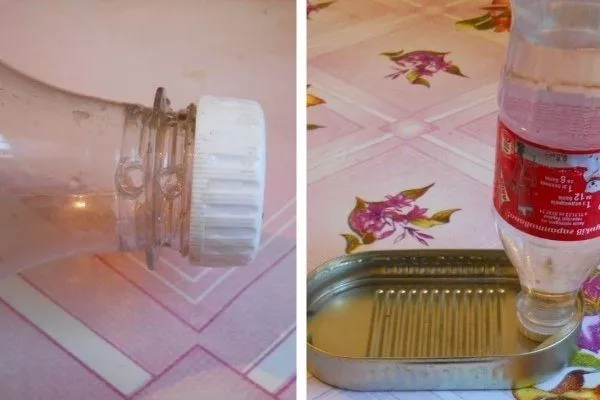
Using a tray (such as a shallow tin can) and a 1-2 liter plastic bottle, you can make an automatic waterer, which is used in many farms. It's important to choose the right-sized tray. It shouldn't be too wide, and the sides shouldn't be too low, as this will encourage the chickens to bathe in it.
The instructions for making a drinking bowl are simple:
- Make several small holes in the lid (approximately 3 mm in diameter).
- Place the bottle upside down in the tin can. Mark the fill level of the can with a dot on the neck of the bottle. Make one round hole, and another one 5 mm below that.
- Fill the bottle with water and place it in the bath. Once the birds have drunk some of the water, it will refill as water spills from the container down to the opening. If the bottle runs empty, you can refill it with water.
A similar waterer can be assembled from a small bowl and a 3-liter jar. The size of the bowl and container can be adjusted depending on the number of birds.
How to make nipple drinkers?
Similar designs are also automated, but they have a more complex structure, although they are popular for both adult and young chickens. Before assembling such a mechanism, it's worth assessing its strengths and weaknesses.
Characteristics
The advantages of such drinkers are as follows:
- Saving waterThis is achieved through its metered delivery, ensuring each bird receives the required amount of water. Compared to other types of drinkers, the nipple design reduces water consumption by approximately 20-30 times. Furthermore, consumption can be further reduced by equipping the system with a drip collector.
- Protecting water from pollutionThe drinking bowl is closed, so the water does not become contaminated with dust, droppings, etc.
- Ease of operationMaintenance of the nipple system consists only of periodically adding clean water to the tank.
- Structural stabilityThis type of waterer is often attached to the cage bars, so you don't have to worry about the chickens tipping it over or it tipping over in a strong wind.
The disadvantage of the nipple system is that only a limited number of hens can drink water at a time. During the summer, this can lead to crowding around the waterer, especially after feeding. Of course, this can be avoided by properly calculating the hens' needs and the optimal number of nipples in advance.
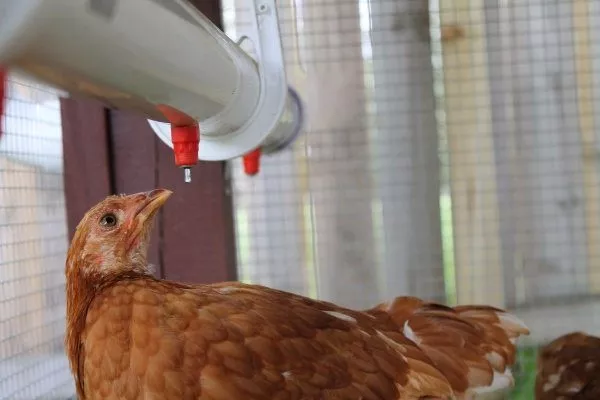
Made from plastic pipes
You can assemble a complete nipple drinker for chickens using these instructions:
- Take a small piece of plastic pipe with a diameter of 2-3 cm. Measure 60 cm with a tape measure, and mark every 10 cm with a simple marker. These are the locations where the nipples will be installed.
- Cut off the excess pipe using a metal saw or a special pipe cutter (pipe shears). The cut may be uneven. If this happens, be sure to straighten it by trimming off any excess with a sharp knife.
- Use a drill to drill holes in the marked areas of the pipe. Be careful not to drill all the way through the plastic. After drilling, blow out the pipe to remove any plastic shavings.
- Screw the nipples into the prepared holes. It's best to do this by hand at first, but you can use a wrench later. The waterer doesn't require a lot of water pressure, so there's no need for seals.
- Place a cap on one end of the pipe and a special wick, available for purchase at the store, on the other. To securely fasten the elements, you can use a special soldering iron for plastic pipes.
- Check the waterer's functionality by blowing hard into the wick. If everything is working properly, install the special latches and attach the waterer to a suitable location.
- ✓ Nipples must be made of stainless steel to prevent corrosion.
- ✓ The diameter of the nipple hole should correspond to the size of the bird's beak for ease of drinking.
If there are a lot of chickens on the farm, you should make several nipple drinkers and install them in different areas. chicken coop.
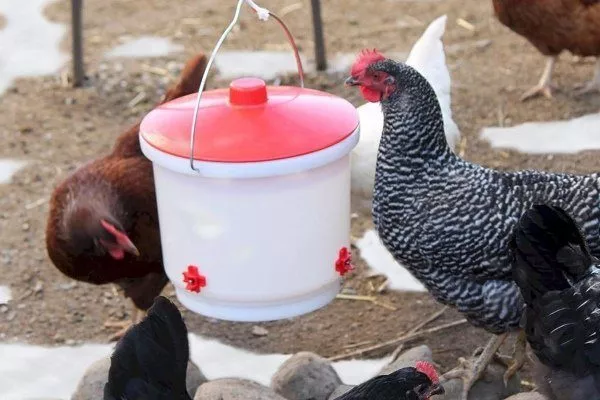
From the bucket
It can be an old bucket or tank, but it must be solid. It can be converted into a waterer in two steps:
- Cut 5-6 holes in the bottom of the container. The optimal diameter is 9 mm.
- Screw the nipples into the holes. This part is designed so that water flows only when the nipple is moved, saving water.
Hang this bucket in the chicken coop and fill it with water, allowing several chickens to drink at once. To make this design more convenient, use aluminum wire or strong rope to create a handle for the waterer.
To protect such a structure from contamination, it is worth choosing a container whose upper edge is at the same level as the back of the birds being raised.
It's important to keep in mind that the size of the waterer may vary depending on the temperature in the coop or the feed used. For example, if the room temperature never drops below 18 degrees Celsius, the waterer capacity should not exceed 300 ml. Using this calculation, you can determine the optimal waterer size for your coop.
From the bottle
A plastic bottle or 5-liter jug is used. Here are the instructions for making the waterer:
- Drill a 9mm diameter hole in the lid.
- Screw the nipple into the hole.
- Close the bottle with a lid and cut off its bottom.
- Drill two small, symmetrical holes near the edges of the container. Pull a strong rope through the holes and secure it with a knot. This will create a convenient handle for the waterer, allowing you to hang it in the coop or pen and then fill it with water.
To see how to install a nipple into a lid, watch the video below:
Long drinking bowl made from sewer pipe
The manufacturing principle of this waterer is similar to that of a nipple system, but it uses a longer plastic pipe and is open-type. To assemble it, follow these instructions:
- Take a plastic pipe 1.5 m long and 15 cm in diameter. Install a plug on one end and a bend on the other.
- Place a building level on the pipe and draw straight lines on both sides with a marker.
- Take a small rectangular block 25-35 cm long. Use it to mark the locations of the future holes, with the first one being 10-20 cm from the end of the pipe. Additionally, mark with an X the parts that need to be cut out. These marks will help you avoid making mistakes and damaging the pipe.
- Use a drill or screwdriver to make small holes along the edges of the marked rectangles. To prevent the drill bit from slipping, it's a good idea to first make small indentations with a nail or awl.
- After preparing the holes, use a jigsaw to cut the desired shape on the pipe surface. If any uneven areas appear, smooth them out with sandpaper to avoid scratching or cutting the pipe or causing harm to the chickens.
- After cutting all the holes, install special fasteners or latches, which are then attached to the wooden stand.
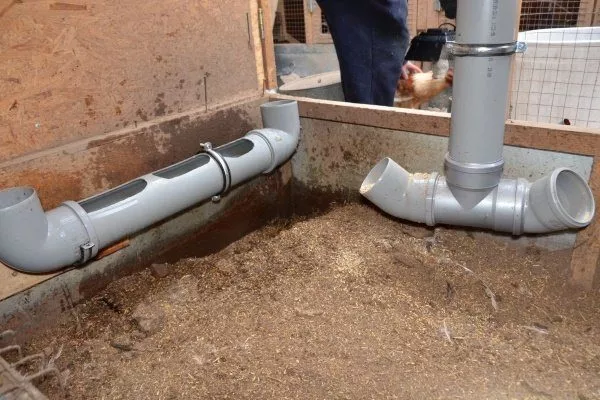
The finished waterer can be placed on the ground, and water can be poured through the bend. If desired, the pipe can be connected to an existing water supply to simplify the filling process.
This type of waterer is not the best option for chickens, as they may choke on water or drown.
Features of chicken drinkers
The best option for them is a vacuum or nipple-type waterer. However, even when using such devices, care should be taken to prevent the chicks from choking in the container into which the water flows from the bottle. To ensure maximum safety during the watering process, choose a container with not too high sides. It's also important to avoid giving the chicks water from a simple saucer with high edges, as this can cause choking or drowning.
Regardless of the type, the waterer must be securely fastened to prevent the chicks from tipping it over. Such an accident could result in injuries and various illnesses for the chicks due to wet litter.
The following video explains in detail how to make the perfect chicken waterer from household items:
So, there are many DIY chicken waterer options available. Vacuum and nipple systems are the most popular. For larger farms, a long waterer is more practical, and if you plan to raise chickens, drip models are the best option.