Beekeeper Vladimir Tsebro has developed his own method for keeping bees and maximizing honey production. This method is suitable for beginning beekeepers, as it's very convenient thanks to a monthly calendar that outlines all beekeeping activities. Tsebro recommends using special hive designs and offers many helpful tips.
What is the essence of the method - 10 important excerpts
In beekeeping circles, the name Tsebro is no empty name. He developed a unique method of apiary management, a unique methodology that has led to impressive success. He published a multi-volume collection of instructions containing detailed diagrams, examples, descriptions, calculations, and management tips.

To understand the essence of the famous beekeeper's method, it's necessary to thoroughly study his works. From Tsebro's work, one can compile a list of the method's main principles:
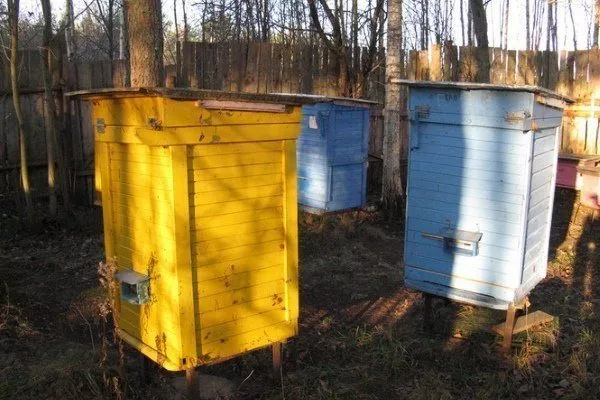
- It's important to build spacious three-body hives, as they need to be spacious enough to accommodate the bees. These spacious "bee houses" are called Tsebro hives.
- If the hive consists of two bodies, in the spring you can create two families by dividing the bees in half and adding a young queen to the new family.
- When the colonies begin to grow in the spring, many begin to increase the number of supers, but it is better to build an additional body on top of the hive.
- Only strong bee colonies should be kept in the apiary, and the weak ones should be removed without mercy.
- Strong colonies need quality food, so it is better to leave them full frames with honey and bee bread.
- At the end of the bribe, introduce a new queen and colonies into the family.
- Pay special attention to how your bees overwinter. This is the key to a successful season next summer. It's also recommended to combine colonies into a single hive for overwintering, ensuring stronger colonies and greater productivity in the future.
- For wintering, it is better to assemble hives with two bodies: in the lower section, arrange the store, and in the upper section, place the nesting frames.
- For a two-week queen cell, arrange 2 divisions, and there is no need to search for a queen.
- Provide excellent ventilation in the hives and prevent drafts.
By following these guidelines, you can expand your apiary without acquiring additional queens and produce a truly large amount of honey without swarming. By the time the honey harvest rolls around, your bee colonies can triple in size.
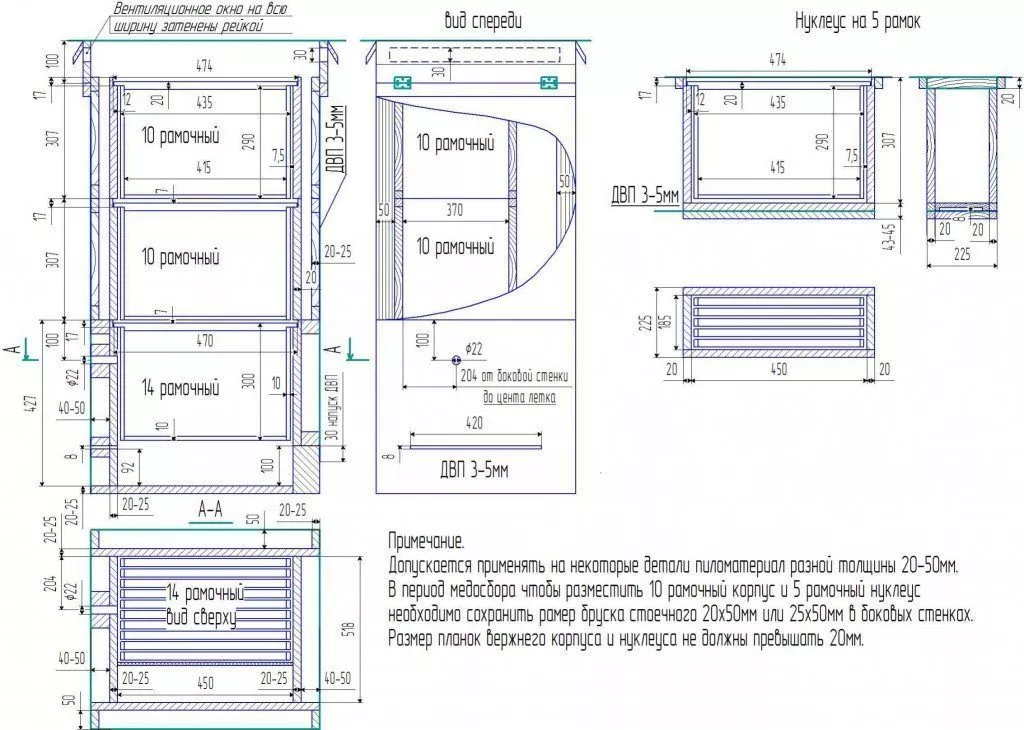
Construction of the hive
The Tsebro hive has the following characteristics:
- stationary, since it is not transferred for the winter and is not insulated (the author believes that double walls provide sufficient frost resistance);
- consists of 3 tiers in spring and summer, and only 2 in winter;
- It contains 14 Dadant frames and 2 walls;
- the lid is attached with a hinge, so it can be folded back, which is convenient when removing the tray;
- The lid has holes for ventilation;
- The side wall is equipped with a folding opening mechanism.
| Hive type | Climate conditions | Advantages |
|---|---|---|
| Three-body hive | Temperate and cold climate | Provides comfort to bees and improves wintering |
| Double-body hive | Warm climate | Simplifies care and promotes rapid family development |
A mini-veranda can be constructed on the upper flight hole.
An optimal structure for bees can be constructed according to the following plan:
- Prepare an internal nest box using tongue and groove boards or a single wall hive.
- Attach the bottom to the body and transfer the structure into a casing made of plywood.
- Leave the back wall untreated, making a hole in it for installing and removing the tray during the warm season.
- Attach blocks to the bottom of the hive and its corners, then place plywood sheets on them. There's no need to fill the air space with insulation, as the resulting structure will already create a suitable climate for the bees.
- Nail the planks to the casing so that they protrude slightly from the back of the hive.
- Nail wooden corners to the corners of the casing to protect the ends of the plywood from getting wet in rainy weather.
If desired, the design can be supplemented with a magazine. In this case, Tsebro suggests a 10-frame magazine. The hive design looks like this:

You can see an example of a 14-frame hive in the video:
Reproduction of queens
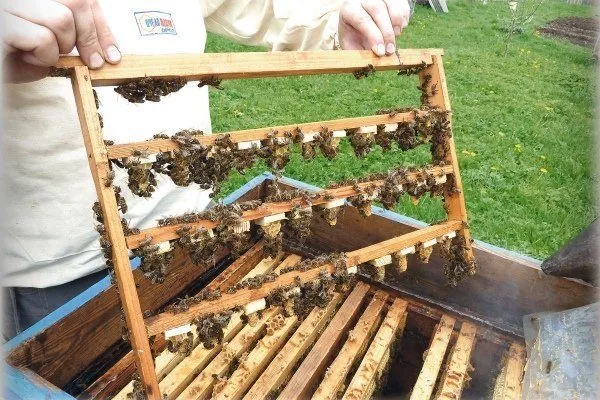
The method in question involves breeding your own queens, for which you need to implement the following plan:
- Place the honeycombs on the hive lid, cut into pieces and leave the rows where the two-day-old larvae live.
- Thin out all the egg strips and then glue the grafting frames to them. These should be placed at the bottom of the well where the queen cell is located.
- After 14 days from the start of grafting, change the queen cell, creating an anti-swarm colony.
- When the family size exceeds 9 frames, introduce a second body using dividing grids.
- Place two frames of supplementary food in each enclosure. Based on this configuration, the queen should be bred in the lower compartments.
- Transfer several worker bees, reared queens, frames with food, and brood to the second level. It's important to use screens to securely separate all levels and maintain favorable conditions.
- After 8 days, locate the hatched queen in the breeding colony. She should be moved to an isolated location free of brood. The queen cage itself should be positioned so that a colony can form.
- In the lower section, between the brood frames, there's a well where you can place a grafting frame. Tsebro recommends doing this in the morning, while the bees are sluggish and passive. Then, take two or three brood frames from the lower sections and transport them up. It's important to ensure that there are no working arms in them, as this can trigger the urge to breed.
- 6-9 hours after the last manipulations, inoculate the two-day-old larvae.
This technology for breeding queens differs from its analogues in two respects:
- Paternal bee colonyIt is formed with the aim of producing young and healthy dronesIt's important to properly insulate the hive and provide it with ample food and bait. The frames with the cells are attached to the center of the nest.
- The mother bee colonyShe is considered the nurse. In the paternal colony, all brood cells are sealed, after which the maternal colony emerges. Queens and drones leave the cells, becoming sexually mature almost simultaneously. Key points when breeding queens
- ✓ Use only healthy and strong colonies for breeding queens.
- ✓ Monitor the temperature and humidity in the hive during hatching.
Raising queens from two-day-old larvae is Vladimir Tsebro's innovation. However, it is crucial to strictly follow all the rules and sequence of actions; otherwise, conflict may arise within the bee swarm, leading to the inevitable demise of the entire population.
Beekeeping without a swarm
This method produces excellent results, as proven by experience—there have been cases where a single colony yielded 200 kg of honey. Of course, this requires a number of steps from the beekeeper. The procedure is as follows:
- April 27-30, remove the films from the cases and install the second cases.
- After 10 days, remove one comb, install the isolator, queens, and brood frame. Carefully inspect the lower boxes, removing any stray or unwanted queen cells. Cover the grates and insulate.
- After two days, form a colony with a breeding queen. The mother colony must be used for this. Remove four frames from the second brood boxes and transfer them to a plastic box with the bees. This will allow the queens to fly out of the isolator. Place grafting frames between the brood frames, and cut and insulate the lower boxes.
- On the day of grafting, it is worth moving the remaining queens to the lower body, and sending the nucleus with the breeding queen to a 10-frame hive.
- Three days after grafting, inspect the second brood boxes to confirm the colony's health. Select three colonies for each foster colony for intermediate rearing. Install a brood well with brood of different ages in the second brood box. Remove weak larvae and insulate the colony.
- On the fourth day, move the nurses from the lower frame to the second. Remove any stray queen cells from all frames. There should be no bars between the frames. Carefully select healthy colonies from the lower frame, including eggs and larvae.
- On the 9th day after grafting, the first colony divisions are formed from the head of the colony. Inspect all frames to ensure the queen is not present. Also, check the swarm connections. A nucleus hive should be provided for every third colony.
- On the 3rd day after the previous stage, a nucleus is formed.
- After 4 days, hatch the queens in the nucs and colonies. If they don't want to hatch, they need access to spare, unfertilized cells.
- Create control frames for the laterals. If a queen is absent, a fistula-like queen cell will form and must be removed.
- Before collecting honey, the second colonies should be joined to the first ones, as well as to the main family.
This method will work well if the bees can easily survive the winter.
Organizing wintering of bees
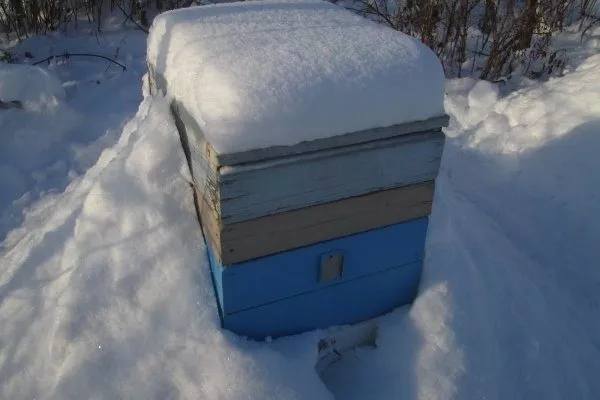
Many beekeepers build moss houses to overwinter their bees, but Vladimir Tsebro believes they're completely unnecessary. He recommends leaving the hives where they were installed, as the bees are able to create the necessary temperature inside their "home" themselves.
This is because the hive is enclosed by a protective cover to protect it from strong winds and frost. The hive entrances are completely enclosed. The upper hive is insulated with glass, and the lower hive is insulated with a slat, although a 5-6 cm gap is left for ventilation. The lower hive entrance measures 1.2 x 42 cm, while the upper hive entrance measures 1.2 x 10 cm.
Tsebro asserts that the most important thing is that the bees are provided with high-quality food. According to his technology, if the bees are well-fed, they are able to maintain their own temperature. The insects often huddle together, creating a heat exchange. Furthermore, good nutrition allows the bees to release the energy they absorb, so they warm themselves at each other's expense.
The author has proven empirically that even in cold winter weather (around -30 degrees), bees inside the hive can provide themselves with a comfortable temperature.
- Check the condition of the hives and repair any damage.
- Provide bees with sufficient amounts of high-quality food.
- Insulate the hives, but leave ventilation holes.
Tsebro Calendar (types of work by month)
Below is a shortened and complete schedule of the main tasks required in an apiary. The schedule begins with winter, as expected.
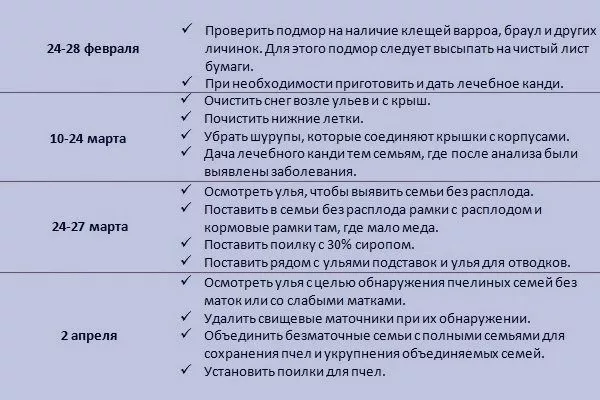
January
The first month of winter has arrived. The hives are in the apiary, covered in a dusting of snow. The beekeeper needs to do the following:
- Control dead bees.
- Check how much feed is left.
- If necessary, adjust ventilation.
- Set up baits to eliminate parasites.
- If necessary, it is better to insulate the nest by narrowing the flight holes.
- If the pillows were damaged by mice, replace them with new ones.
- Make sure that the entrances do not attract the attention of predators, tits and woodpeckers.
To carry out the work you will need a rubber tube through which you can listen to the entrance.
February
There are fewer jobs this month, but they are very important:
- Continue monitoring how bees cope with winter conditions.
- Conduct a family count.
- If diseases are detected, arrange for treatment of bees.
- Contribute top dressing bees, adding medicinal candy.
March
We need to start preparing families for the flight:
- Inspect the condition of the hive and bees.
- Continue feeding them Candy.
- Use chalk to mark weak and sick families.
- If the hive cover is connected to the body, remove the screws.
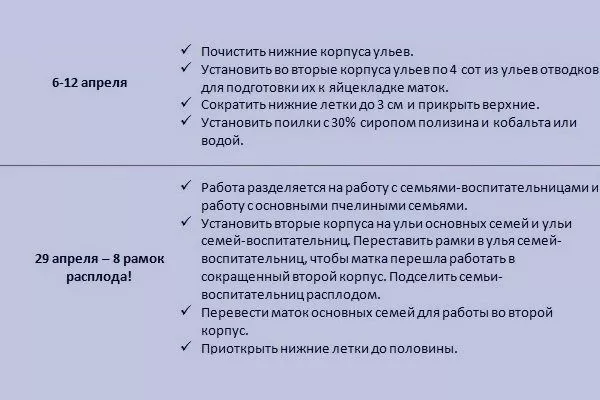
April
The month is marked by the unification of families:
- Inspect bee colonies to identify those that are left without queens.
- Clear the hive of pestilence.
- If insufficient brood is detected, add frames with larvae.
- Combine bee colonies according to the principle of “strong with weak”.
- Clean out the bees' nests by adding honeycomb.
- If ascospherosis is detected, begin treatment.
- Start preparing drinking bowls and feeders, taking into account their availability for each family.
- Prepare the box.
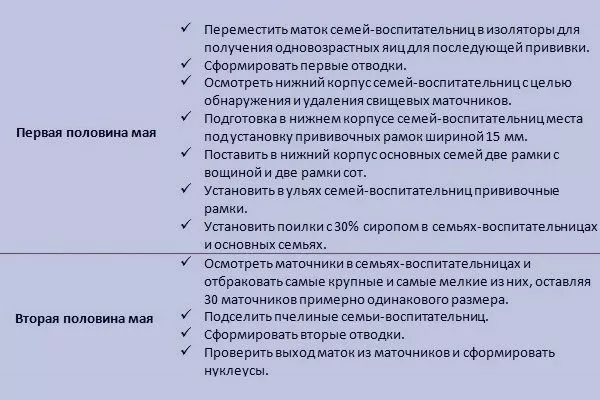
May
The work consists of the following:
- Update the queens and start breeding them.
- Start forming the layers.
- When breeding queens, add them to families.
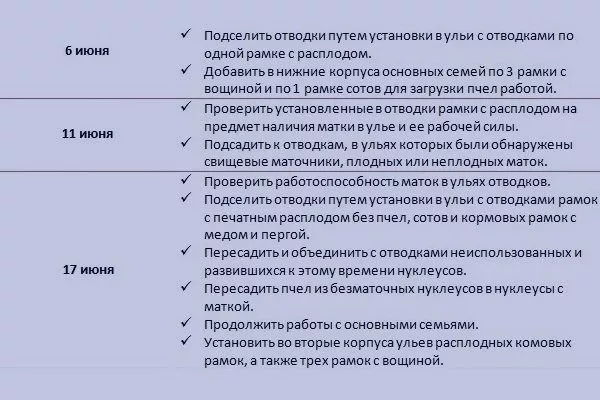
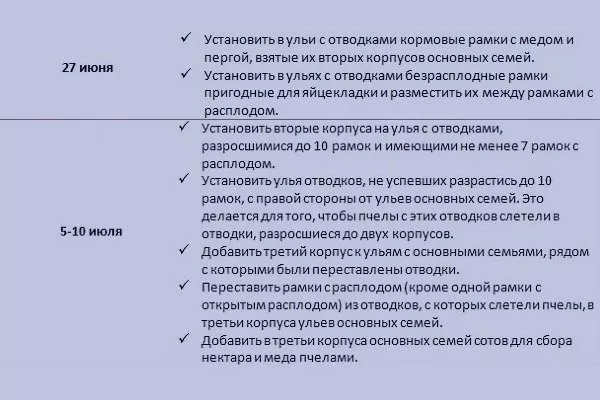
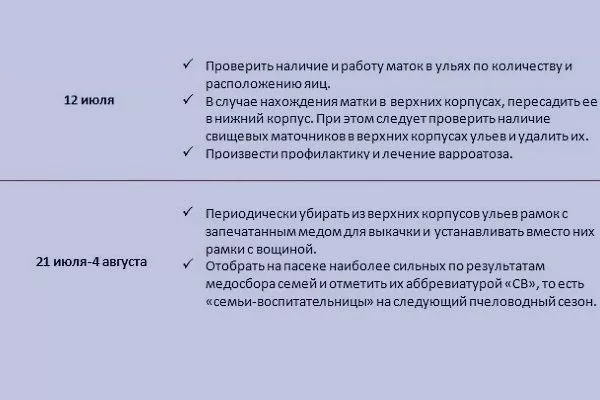
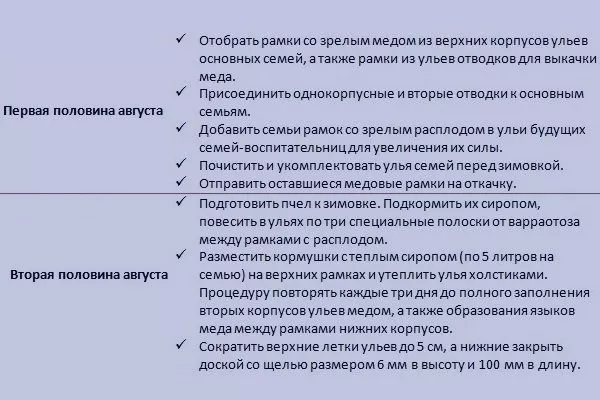
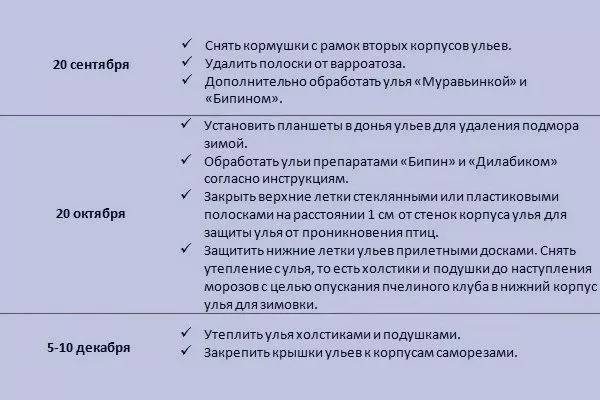
June
In June, only the brood queens need to be replaced.
See below for the full schedule of required work on the apiary using the Tsebro method:

Practical recommendations and advice
By following the recommendations and advice of the famous beekeeper, you can achieve 100% results. The main thing is to follow his method in everything and not deviate from it even a single step:
- Most beekeepers worry about how to protect their bees from diseases and parasites. It turns out that much depends on proper hive maintenance. It's essential to ventilate the hives frequently and ensure proper ventilation. This doesn't require covering the hive entrances. This dries out the hive walls, and parasites thrive in damp conditions.
- Leave free space under the frames and to the bottom of the case, but no more than 3 cm, so that cold air does not “wander” from below.
- If you need to repopulate your bee colony, a second swarm is used. This has several advantages, as it contains a new queen and many more bees. The queen is removed from the first swarm, and the bees are returned to their original hive.
- A screen is an important recommendation in double-box hives. It will prevent the queen from reaching the upper tier, otherwise the bees will want to swarm again.
- First, it is necessary to collect honey, form families, and then begin preparing the bees for winter by replenishing winter supplies.
- Queens need to be replaced with new ones every year. It's crucial that they come from strong colonies.
- Many people don't know how to distinguish between a fertile and a non-fertile queen. It turns out, you need to pay attention to their movements: a fertile queen drags her abdomen and moves with difficulty, while a non-fertile queen is more mobile and lighter.
- To ensure that eggs hatch in the isolator and are suitable for further work, it is necessary to select white combs without any defects, so that there are no drone cells in them.
- The queen is introduced into a new family using a cap, and candy is used as a supplementary food.
- To ensure better honey extraction, heat full frames to 27 degrees.
- A honey extractor is used to extract honey. Mechanical ones exist, but electric ones are considered the best.
- To remove bee bread and wax crumbs, pass the honey through a sieve and then through damp gauze.
- It's advisable to take the collected dead bees to a laboratory to determine the cause of the bee deaths. There, the diseases that led to the colony's demise are determined. Common diseases include ascospherosis, nosematosis, and varroosis.
- It is advisable to attach the apiary calendar to a visible place and strictly follow its instructions.
Video: Formation of the first branch
The following video shows in detail how the first division is formed according to Tsebro, and how the bees behave during this process:
So, by following the Tsebro method, you can beekeeping enthusiastically and productively, harvesting valuable products such as honey, bee bread, propolis, and dead bees. The key is to strictly follow all recommendations, as this method precludes individual adjustments.