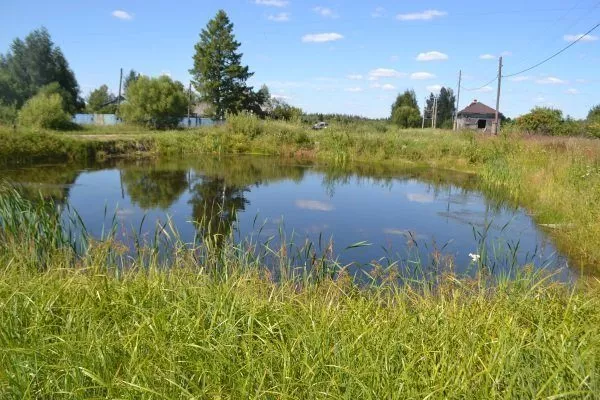
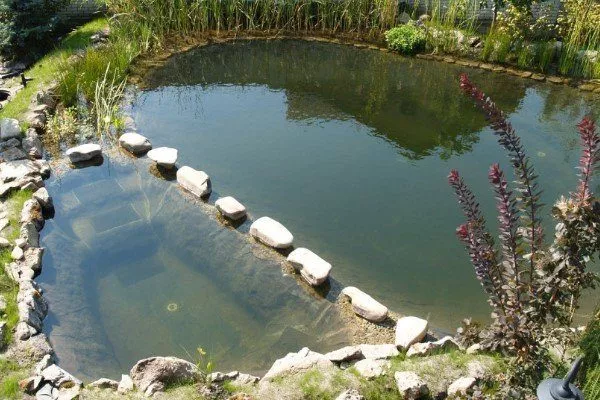
A fish pond can be created artificially. This not only provides high-quality fish for the table or for sale, but is also aesthetically pleasing – a beautifully designed pond can become a beautiful addition to a property. There are several types of fish ponds. To create a pond, you need to choose the right location and follow the instructions.
Types of ponds for fish farming
| Name | Water supply type | Bottom type | Purpose |
|---|---|---|---|
| Spawning | Key | Natural | Spawning |
| Nagulny | Brook | Artificial | Fattening |
| Wintering | Dug | Natural | Wintering |
| Growing up | Dug | Artificial | growth |
There are many types of ponds suitable for fish farming. They are classified according to various criteria:
- the purpose of the pond is for spawning, fattening, wintering, and growth;
- pond water supply – spring (fills a natural spring), brook (natural stream), dug (groundwater, rainwater, flood water);
- The bottom of the pond is artificial or natural.
You can create a pond yourself using various technologies:
- without concreting (without lining) - the borders of the dug pond are lined with clay and turf;
- concrete – practicality and durability, the organization of such a reservoir is quite labor-intensive;
- with PVC film - a simple option, but with a limited service life;
- Plastic – limited size, suitable for breeding small and ornamental fish.
Selecting a site for creating a reservoir
To create an artificial pond, it's important to choose the right site. The following factors are important:
- Elevation. The pond site should never be lower than the rest of the property, otherwise all the dirt and rainwater will end up in the pond. If the property is level, an elevated surface can be created artificially.
- No trees or shrubs. These shouldn't be near the pond, as fallen leaves will fall into the pond and rot, which will negatively impact the pond's inhabitants. If it's impossible to keep the pond away from such vegetation, regular cleaning will be necessary.
- Proper lighting. Sunlight should reach the water for a maximum of 7 hours per day. Shade can be created using artificial barriers—this option is the most effective. A complete lack of light is also undesirable, as it will slow the growth of pond flora and stunt the development of fish.
- Soil characteristics. A clay base is ideal for a pond. It's best to choose a site free of rocks.
- Correctly calculate the pond's area. This requires taking into account the number of fish planned for cultivation. Overcrowding the pond is unacceptable. This can lead to increased feed consumption and excessive fish waste, which can lead to algae.
DIY Fish Pond Creation Techniques
When building a fish pond yourself, you first need to decide on the technology. When choosing, consider not only your needs but also your capabilities.
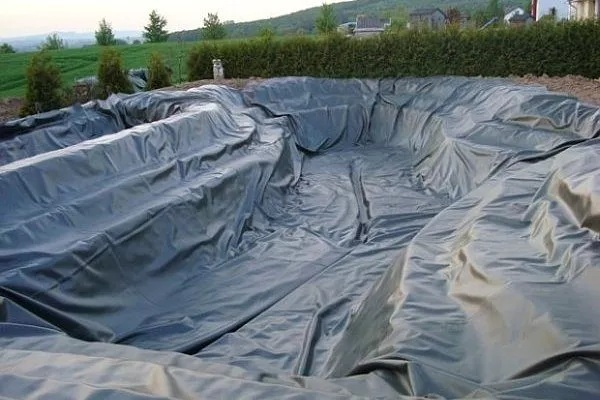
With film
To create a pond with a PVC liner, you first need to select the material. It should be fairly thick – 2-3 mm. Black liner is cheaper. The size of the material is also important – it should be one large piece or several large pieces that need to be joined together. Large banners are a good choice, but first, check the integrity of the material.
You will also need:
- shovel;
- sand;
- a special soldering iron or glue (sealant) for joining the seams of the film;
- stapler with staples;
- two flat boards;
- a strip of polyethylene 10-15 cm.
- ✓ Geotextile under the film to protect against roots and stones.
- ✓ A pump for water circulation if the pond is more than 3 meters in diameter.
First, you need to dig a pit for the future pond and shape it accordingly. The advantage of liner is that it's very flexible, allowing you to implement any design idea.
When shaping the future pond, avoid excessive bends. Angles sharper than 130 degrees are not recommended.
A sand cushion should be created at the bottom of the pit. A 10-centimeter layer of sand is sufficient. The sides of the pond should be leveled to ensure there are no sharp rocks or roots protruding from them, as this could tear the liner.
The next step is the main one. It involves joining the individual pieces of film. If you're using a soldering iron, simply press the edges of the material for 3-5 seconds. You can also make a second seam.
When using adhesive (sealant) to join seams, it's important to first degrease the surface. Acetone, gasoline, and other liquids with similar properties can be used for this. After degreasing, the treated surface should be wiped dry and left in the sun to dry—the material to be bonded must be completely dry.
The next step is to clean the surface. For this, use sandpaper with a fine grit.
Glue the pieces of film together, overlapping them at intervals of 10-15 cm. Boards are effective for this – they must be perfectly flat. Attach the piece of film to the board using a stapler, and prepare the second piece of material in the same manner. Use a strip of polyethylene as a spacer. Thoroughly coat both sides of the strip with adhesive, and apply adhesive only to the sides of the film that will be touching. Then, join all the pieces together and place a heavy board on top. The drying time for the adhesive is indicated on the packaging, but it is recommended to wait at least 24 hours.
The liner must be carefully laid out. It should extend beyond the edges of the pond. The ends of the liner should be dug under, and stones or bricks should be placed on top. The entire pond can be lined with stones, but this must be done very carefully to avoid damaging the liner.
The video below shows an example of creating a pond using PVC liner:
Without concrete
This option can be used if the soil is waterlogged and the groundwater level is high. To create an artificial pond, you will need the following materials and tools:
- shovel;
- turf;
- clay;
- water;
- mixing spatula;
- drain pipes.
First, you need to mark the boundaries of the future pond and dig a pit of the required depth. A pond can be built on a natural ravine on the property—it needs to be widened and deepened, and an earthen dam needs to be built. This should be filled in 15-20 cm layers along the entire length and carefully compacted. The dam should be half a meter above the water level in the pond. The end of the dam should be surrounded by a ditch that will divert floodwaters.
After preparing the pit, you need to proceed according to the following algorithm:
- Make holes for the tubes and install them.
- The walls and bottom of the pond must be covered with diluted clay – the layer should be 10-15 cm thick. Then the walls must be evenly covered with turf.
- Another option is to mix equal parts clay and turf and dilute the mixture with water. The consistency should be thick enough to prevent spreading. Apply the mixture evenly to the sides and bottom of the pit.
- Fill the pond with water. Don't add any fish yet—the pond needs to sit for at least a month. This is done so that the pond bottom becomes silted up and plants can be planted that will thrive.
- After the allotted time, the water should be drained and the pond refilled. Once the desired conditions (suitability of the aquatic environment) are established, the fish can be introduced.
When creating inlet and bypass ditches, concrete gutters can be used. If a natural ravine was used to create the pond, a shoreline is created on the dam crest. This is achieved by adding sand 10-15 cm thick. The shoreline can be up to a meter wide.
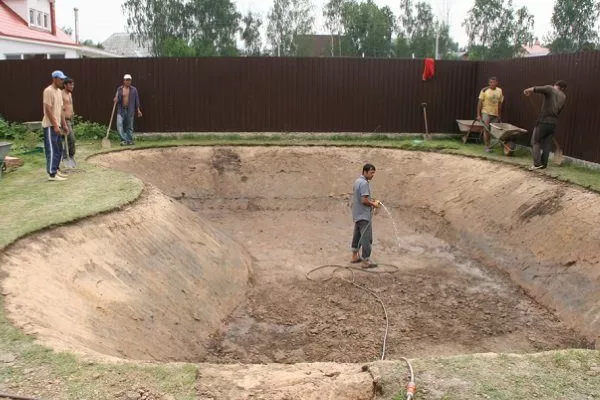
With concreting
This type of artificial pond is attractive due to its long service life, but its construction requires considerable time and effort. To create a pond with a concrete base, you will need the following materials and tools:
- shovel;
- crushed stone;
- sand;
- components for concrete coating: cement, sand, water;
- reinforcing mesh;
- spatula;
- waterproofing film;
- pipes (drain, water intake).
It's best to make the concrete mix yourself. Truck-delivered concrete is ideal for large ponds, as there will be a lot of concrete to be poured.
The creation of an artificial pond with concreting is carried out according to the following algorithm:
- Marking the boundaries. The future pond can be of any shape, but given the specifics of the work ahead, sharp curves will be extremely difficult to achieve.
- Dig a pit. At this stage, keep in mind that the concrete layer will take up a certain amount of space, so the reservoir's capacity will be reduced. It's important to maintain the slope of the side surfaces—it should be 20 degrees.

- Remove all debris and tree roots.
- Drill holes to allow water to be drawn into and drained from the reservoir. Tubes should be installed in these holes.
- Compact the soil. You can do this with your feet, but it's much faster and more effective to use a compactor.
- To create a pond in soft soil, first lay a thin layer of crushed stone, then create a sand bed—a 1 cm layer is sufficient. Soil compaction should only begin after this preparatory stage.
- Create waterproofing. To do this, lay out some plastic film on the bottom and press it against the walls. Use sharp pegs or stones to secure the edges at the top.
- Prepare the concrete mix. For every part concrete, use three times as much aggregate (crushed stone, sand). Add enough water to make the mixture fairly thick.
- Apply the first layer of concrete and wait for it to harden. Repeat this process several times to create a 10-centimeter concrete layer.
- Before the concrete layer dries, apply the reinforcing mesh to the pond walls. Simply place it on the desired area and press lightly. This step is optional, but it ensures good support.
- Another layer of concrete must be placed on top of the reinforcement – 5 cm thick is sufficient.
- Level out any uneven areas with a spatula, using the same concrete mixture.
- Wait until all layers of the material have completely hardened. If the weather is sunny, too hot, or too dry, you should lay grass or cover the concrete with damp burlap. In hot weather, you can spray the concrete with plain water—this will prevent cracks from appearing in the material, which is highly undesirable.
In the following video, the author shares his experience building a concrete pond:
Plastic
This option for setting up an artificial fish pond is simple. The only difficulty lies in finding a container of the appropriate size. These are usually small, suitable for fish farming. Any color and shape are possible. A custom-made structure of any design is available. The plastic used must be sufficiently durable.
In addition to a plastic container, you'll need a shovel and tubing to create an artificial pond. Mark the boundaries of the chosen area and dig a pit of the appropriate shape and size. It's recommended to leave a 5 cm (2 in) allowance on each side.
In the excavated pit, make holes for the tubes. They should be inserted after the frame is installed. The space between the plastic container and the soil should be tightly filled with soil.
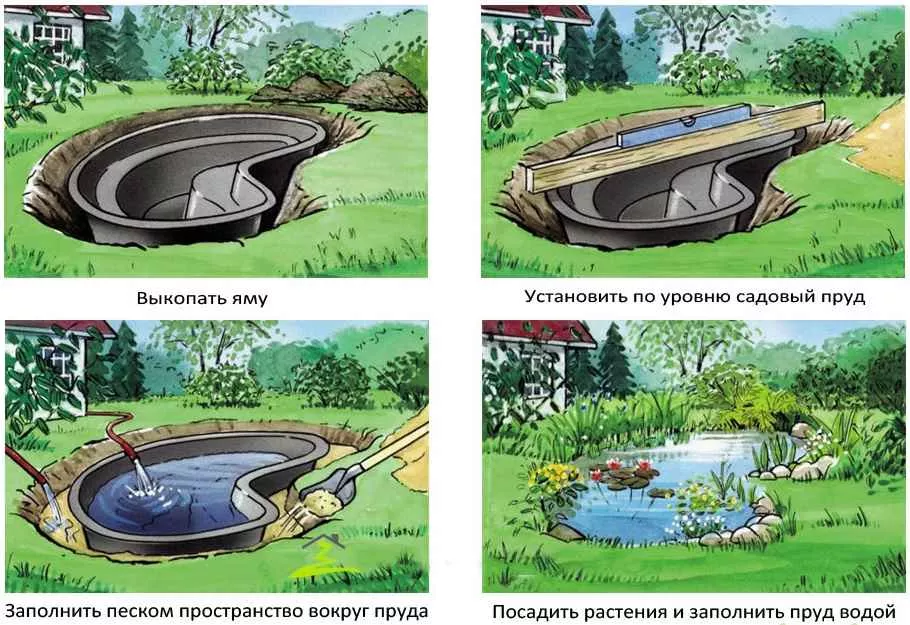
If the soil is soft enough, compacting it after digging a suitable pit is recommended. The gaps between the frame and the soil should be filled tightly to prevent the plastic from warping when the container is completely filled with water.
Conditions for fish breeding in an artificial pond
It's important not only to choose and implement the right technology for creating an artificial fish pond, but also to create the necessary living conditions for the pond's inhabitants. Otherwise, their growth and reproduction may slow down, and there's a risk of death.
The following conditions are important for fish reproduction in an artificially created reservoir:
- Oxygen. Without it in the water, pond fish will simply die. Various aquatic plants provide oxygen. Water lilies, water hyacinth, and water chestnuts are preferred. Plants beneficial for an artificial pond should be purchased from a specialist store. If you use plants from a natural pond, there's a high risk of them dying in the unfamiliar conditions.
- If you plan to plant your pond, choose plants appropriate to the depth of the pond. For a shallow pond, water lily, water lily, and bur-reed are good choices. Medium-depth ponds are best filled with water lilies or pondweed. If you're planning a deep pond, you can use meadowsweet, Siberian celandine, and loosestrife.
You may also be interested in reading about fertilizer for ponds and their correct use.
- Timely cleaning of artificial ponds. It is necessary to remove debris, fallen leaves, and grass. Otherwise, rotting processes will begin, which negatively impact oxygen levels in the pond and can lead to the death of its inhabitants.
- Optimal pH level. This depends on the type of fish you intend to breed. A neutral pH is ideal.
- Presence of essential elements in water. Proper feeding of pond fish This will help maintain a healthy population. Fish require iron, phosphorus, potassium salts, and nitrogen compounds. It's important to properly supply them to the pond. Special supplements are available at a specialist store; dosage and other instructions for use are indicated on the packaging. You can also make your own food. Making your own pond fish food - this is not an easy task, but it will cost less than expensive feeds.
- Water temperature. Fish can be added only after the water in the artificial pond has warmed up to 24 degrees Celsius.
- A silt layer forms when a pond has been filled with water for at least a month. After this, it's recommended to change the water, but leave the silt layer alone. After changing the water, wait a few more days.
- ✓ Availability of shallow water zones (up to 0.5 m) for spawning.
- ✓ The water temperature to stimulate spawning should be 2-3 degrees higher than usual.
It's recommended to introduce fish into an artificial pond in stages. Start with just a few individuals—4-5 fish is sufficient. They should be monitored closely to ensure all the necessary conditions for aquatic life are met. If the fish are doing well, the remaining individuals can be added.
Other care instructions depend on the specific species of fish being kept. Each has its own unique characteristics, so it's recommended to research all the necessary information beforehand.
Building an artificial pond for fish farming is not difficult. It's important to choose the right site for the pond, prepare the necessary materials, and carry out the necessary work. Creating optimal conditions for the fish is essential for their successful survival and reproduction.