Leaf celery is a flavorful herb popular in cooking and widely grown by gardeners and farmers. Below, we'll learn which variety is best to choose and how to properly plant and grow this herb. Knowing the key aspects of growing it can help you achieve a bountiful and high-quality harvest.
Description of celery
Celery is a herbaceous plant from the Apiaceae family. There are about two dozen species of celery, the most famous of which is the celery plant. This vegetable crop is easily recognized by its distinctive aroma. It is grown for its leaves or aromatic roots—the variety is selected depending on the purpose.
In addition to leaf celery, there is also petiole and root celery.
Celery plants include biennials and perennials. Cultivated celery is grown as an annual. They prefer moist soil and can grow up to 1 m in height. Botanical characteristics:
- Root system. A thickened, rounded taproot.
- Leaves. Pinnately dissected.
- Stem. Branched and furrowed.
- Flowers. Miniature greenish-white flowers are collected in an umbrella-shaped inflorescence.
- Reproduction. The seeds form only in the second year of life. The harvest—leaves, petioles, and roots—is obtained in the first year of planting.
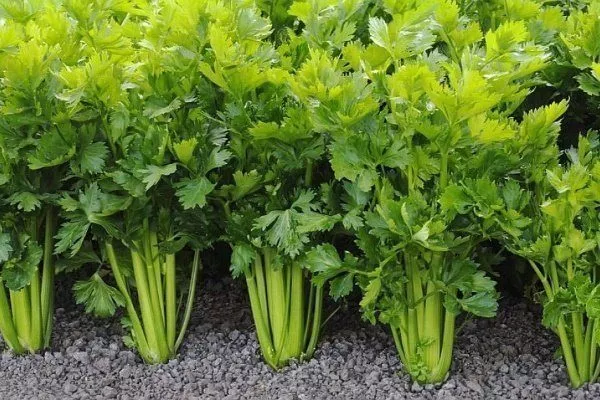
Leaf celery is grown for its leaves, which are used in soups, salads, and sauces. This crop is highly productive—the greens can be harvested several times during the season.
Popular varieties for growing
| Name | Ripening period | Yield (kg/m2) | Resistance to flowering |
|---|---|---|---|
| Openwork | 75-80 days | 2.6-2.8 | Yes |
| Sail | 72-80 days | 4.7 | Yes |
| Athena | 78 days | 1.8-2.1 | No data |
| Zakhar | 150-160 days | No data | Yes |
| Samurai | 75 days | 4.0 | Yes |
| Eccentric | 100-104 days | 2.5 | No data |
| Kartuli | 65 days | No data | Yes |
Celery varieties offered by producers differ in maturity time, yield, and flavor nuances. Leafy varieties are the most popular among gardeners:
- Openwork. An early variety with large vertical rosettes. The leaves are dark green. They are ready for harvesting 75-80 days after germination. One plant weighs 85 g. 2.6-2.8 kg of greens are produced per square meter. Excellent flavor and aroma. Regrows quickly after harvesting.
- Sail. A mid-season variety. It reaches technical maturity in 72-80 days. The leaves are green and clustered in rosettes. It is prized for its exquisite flavor and resistance to leaf-sprouting. It has a long shelf life. This variety is very productive, yielding up to 4.7 kg per square meter.
- Athena. Medium ripening time. Leaves are harvested as early as 78 days after germination. The leaves are bright green and medium-sized. They have excellent flavor and aroma. Yield: 1.8-2.1 kg of green mass.
- Zakhar. A mid-season variety for fresh consumption and all types of processing. Harvesting begins 150-160 days after germination. The leaves have deeply dissected edges. The rosettes are medium-sized. Excellent flavor and aroma. This is one of the most popular leaf celery varieties.
- Samurai. A mid-season variety with a high yield. Harvest begins in 75 days. It yields up to 4 kg of green mass per square meter. This very low-maintenance variety is resistant to low temperatures and can withstand mild water stress.
- Eccentric. Mid-season celery. Ready for harvesting 100-104 days after germination. The rosette contains corrugated leaves on thin petioles. One plant weighs up to 120 g. Yield: 2.5 kg per square meter.
- Cartuli. A mid-season variety bred in Georgia. The first leaves are harvested 65 days after germination. This variety tolerates heat and moisture deficits well.
Preparing and sowing seeds for seedlings
To speed up the growth of greens and ensure uniform germination, gardeners use seedlings. They can be purchased at the market or grown at home. To grow strong and resilient seedlings, the seeds undergo special preparation. If all agricultural practices are followed correctly, a bountiful harvest of greens can be achieved.
The procedure for preparing seeds:
- When seed preparation begins, there's still snow outside. After collecting a bucket of snow, they wait for it to melt, creating meltwater.
- When the water has warmed up to room temperature, soak the celery seeds in it.
- Soaking time: 10-12 hours. Maximum time: 24 hours.
- The water is changed hourly. The seeds are alternately soaked in melted water and then in a weak solution of potassium permanganate.
- Once the soaking is complete, the seeds are transferred to a thick gauze pad, previously moistened with water. They will remain here for another 24 hours to fully "wake up."
Celery has trouble sprouting due to the essential oils in its seeds, which inhibit germination. To improve germination, special treatments are required to boost growth.
Seeds for seedlings are sown not in regular garden soil, but in a special soil mixture prepared in advance. It is recommended that the mixture contain the following ingredients:
- humus;
- sand;
- garden soil;
- peat.
Take all ingredients in equal parts and mix until the mixture is smooth. If you don't want to bother with preparing your own potting mix, you can buy a ready-made product at a specialty store.
To ensure seedlings grow on time, sow seeds no later than early to mid-March. If you wait, the seedlings won't have time to reach the required strength by the time they're planted.
Useful information about sowing seeds for seedlings:
- The seeds are not planted deep, but only pressed lightly into the soil, as they require light to grow.
- A "greenhouse effect" is created for the seeds. To achieve this, the container containing the planted seeds is covered with glass or film.
- In the miniature greenhouse where the seeds will germinate, the temperature should be between 19-24 degrees.
- Seedlings appear in 12-14 days. Once this occurs, the temperature is reduced, but greenhouse conditions are maintained for another two weeks.
- When 2-3 leaves appear, the glass/film is removed.
- The plants are pricked out and replanted; there should be 5 cm between adjacent seedlings.
The video below shows an example of soaking and sowing celery seeds for seedlings:
If desired, each plant can be planted in a separate pot. A peat pot is ideal, and the pot remains in the soil during planting. If you sow seeds in portable peat boxes, pricking out is not necessary. Simply thin out the emerging seedlings promptly to ensure they have enough space to grow and develop.
Caring for seedlings
Principles of caring for celery seedlings:
- To prevent the seedlings from stretching excessively as they grow, the ambient temperature is maintained at 15-16°C.
- Regular watering and loosening.
- Celery loves light, so seedlings are grown under artificial lighting.
- The first thinning is when two leaves appear.
To ensure that celery is juicy and flavorful, it needs plenty of sun throughout the growing season.
What kind of soil should it be?
Celery prefers light, loose, fertile soil. The beds should be located in a sunny area. Before planting the seedlings, prepare the area in advance:
- In the fall, the soil is dug over, evenly distributing organic and mineral fertilizers. 4 kg of humus/compost and 20 g of double superphosphate are added per square meter.
- In spring, the soil under celery is loosened, adding complex mineral fertilizers to it - 40 g per 1 sq. m.
- Place a small amount of clay and mullein mixture at the bottom of the holes where the plant will be planted. This mixture will retain moisture in the root zone and simultaneously provide the plant with additional nutritional energy.
- ✓ The optimal soil pH level should be between 6.0-6.5 to ensure the best absorption of nutrients.
- ✓ The soil should have a high water-holding capacity, but at the same time be well-drained to avoid water stagnation.
Crop rotation rules:
- Undesirable predecessors: celery's umbelliferous relatives. Celery grows poorly after dill, parsley, parsnips, and carrots.
- Desirable predecessors: cabbage, tomatoes, cucumbers and beans.
To ensure celery grows well and produces large harvests, you even need to take care of your neighbors:
- Favorable. Tomatoes, spinach, cucumbers, beets, lettuce, bush beans and chives.
- Unfavorable. Potatoes, parsley, carrots.
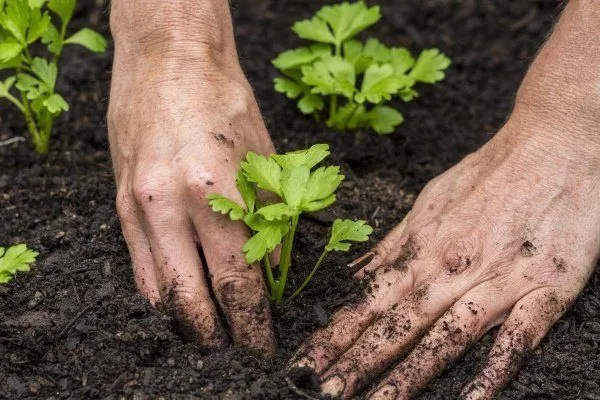
Planting celery in the ground
It's recommended to plant finished seedlings outdoors in the morning, preferably on a cloudy day. This will prevent unnecessary stress on the plant. When planting, it's important to follow the planting pattern and principles:
- The leaves of neighboring seedlings should not interfere with each other.
- There should be free space between plants to ensure proper ventilation and to prevent the appearance of parasites (aphids, caterpillars, spiders).
- The optimal distance between adjacent plants is 10-12 cm.
- The distance between rows is at least 30-40 cm.
There is an opinion that celery grows well with a “square” planting pattern – 20x20 cm.
Features of planting seedlings in open ground:
- The holes should be deep enough to not only accommodate the plant's root system but also leave a little space - about 3 cm.
- After placing the seedling in the hole, it is covered with soil and compacted.
- For several days after planting, the plants are shaded if the weather is sunny.
Caring for a plant in the ground
Celery seedlings planted in the ground require care not only during the adaptation period. The plant requires attention throughout the entire growing season.
Care for celery is aimed at:
- Creating optimal conditions for growth.
- Protection from negative factors:
- extreme and adverse weather conditions;
- pests and diseases.
Features of caring for celery in open ground:
- Weeding. Regular weed control – weeds should not interfere with the growth of greenery.
- Watering. The soil should never become hard and dry. Water at a rate of 20 liters per square meter per week. Water directly at the roots. Water frequently, but sparingly.
- Mulching. Mulch the soil to prevent rapid moisture evaporation. Sawdust, peat, or grass clippings are commonly used as mulch. Mulch is spread immediately after planting.
- Top dressing. The frequency of fertilization depends on the specific soil characteristics. Typically, two applications per season are sufficient. The first application is two weeks after planting the seedlings, and the second one month after the first application. The fertilizing mixture (per 10 liters of water) consists of:
- ammonium nitrate – 15 g;
- superphosphate – 40 g;
- potassium salt – 20 g.
Feed celery once per season with poultry manure—chicken or pigeon manure will do. However, it must be diluted 1:50 with water. Do not add undiluted manure, as it will simply "burn" the plant.
- Protection. Plants are treated with special slug-repellent compounds, which are available at any garden supply store.
Here are some more helpful tips:
- To protect plants and prevent leaves from bending toward the ground, wrap them in foil or paper. This is especially useful if the plant is bushy and dense. The wrapping helps the plant grow vertically without spreading out. Remove the wrapping 1-2 days before cutting the foliage.
- After each feeding, the celery is doused with water from a hose or watering can - not a single grain of fertilizer should remain on it.
- If celery grows without protective “wrapping”, excess leaves are regularly trimmed.
- Leaf celery, unlike root celery, does not require frequent loosening – the soil already establishes a favorable moisture and density ratio.
- ✓ Yellowing of the lower leaves may indicate a nitrogen deficiency.
- ✓ Leaf curling is often a sign of potassium deficiency.
Growing on a windowsill
Celery is easy to grow indoors, without planting it outdoors. The cultivation techniques for growing celery on a windowsill are similar to those for growing seedlings for open ground. However, there's a catch: leaf celery can be grown indoors not only from seeds, but also from petioles or root vegetables. Moreover, the latter method yields a quicker harvest than when sowing seeds.
Plants grown from seeds have an advantage over their petiole and root counterparts: they provide a longer supply of greenery throughout the year. Root vegetables and petioles are planted every 2-3 months to ensure a continuous supply of greenery.
Options for planting celery for home growing:
- Seeds. If you want to grow celery from seeds on your windowsill, it's best to choose early-ripening varieties. The seeds are treated in the same way as for seedlings. After treatment, they are placed in a moistened substrate to a depth of 0.5 cm and covered with plastic wrap. The first greens will appear in 45 days.
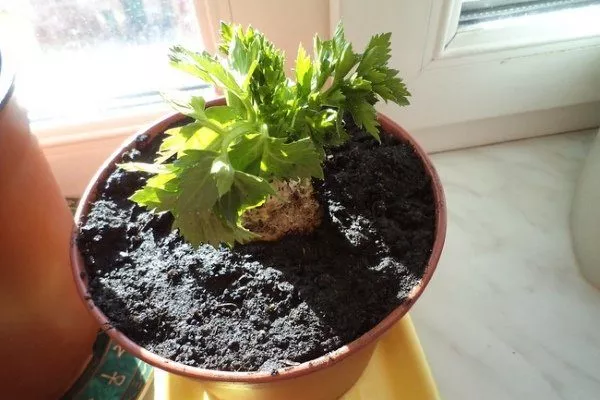
- Root vegetable. Place the root vegetable deep into the pot with the substrate. Its top should be visible above the soil. Firm it down and water. After three weeks, you'll be able to taste the first greens.
- Petioles. The easiest method. The cuttings are first germinated in water for 4-6 days, then planted in substrate. The first harvest occurs in 20-25 days.
Growing in a greenhouse
Celery is a biennial plant, so its life doesn't end with the onset of winter. It can be grown in a heated greenhouse during the winter in two ways:
- Growing up. The plant's lifespan is extended by transplanting it from open ground to a greenhouse. Fresh greens are produced until December—45-60 days.
- Forcing. Plants grown in the ground are harvested and stored until April in the dark at a temperature of 3°C. They are transplanted into a greenhouse in the winter, maintaining a temperature of 12-18°C and humidity of 60-80%. The harvest is ready after 20 days.
Diseases, pests and prevention
Celery, like any garden crop, is susceptible to pests and dangerous diseases that can destroy the entire harvest. Common diseases and pests, along with control measures, are listed in the table.
Table
| Name of disease/pest | Peculiarities | Control and prevention |
| Celery fly | It appears in late May. It lays its eggs directly into the leaves. Soon, "pimples" appear there—the larvae develop there. As they grow, they eat the leaves, leaving tunnels in them. |
|
| Carrot fly | In spring, it lays eggs as soon as the first true leaf appears. The larvae eat the roots, petioles, and leaves. |
|
| Carrot psyllid | It flies from coniferous trees. By sucking the juice from celery leaves, the psyllid destroys the plant, causing it to become deformed and look depressed. | Similar measures to those used to combat carrot fly. |
| Bean aphid | The largest aphid. A generation develops in one week. | Spraying with a decoction of potato, tomato and dandelion tops. |
| Cercospora leaf spot | Spots appear on the leaves. The spots are round and have a red border. |
|
| Septoria | The appearance of yellow spots on the entire plant. | Similar to cercospora leaf spot, it's recommended to plant savory or nasturtium next to celery. |
| Powdery mildew | White or gray coating. The disease is aggravated by high humidity. |
|
| Cucumber mosaic | A viral disease transmitted by aphids. | Spray with a decoction of tomato tops (2 kg per 10 l). |
| Rust | The plant becomes covered with reddish-brown, powdery spots. | Spraying with Fitosporin-M. |
| Boron deficiency | The growth point dies along with the leaves. | Spraying with 0.04% borax. |
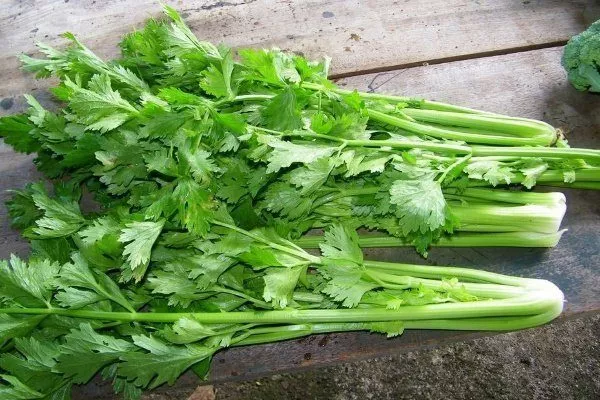
Harvesting and storage
Leaf celery is harvested as the greens begin to grow. The first harvest is two months after planting the seedlings. A total of four harvests can be made per season. If grown from seeds rather than seedlings, two to three harvests are possible. Leaves are cut when they reach 30-40 cm in length. The cutting height is 5-7 cm above the ground. Cutting the leaves lower can damage the central leaves and create favorable conditions for rot. Celery can be trimmed to the ground for sale or during the final harvest.
You can store and prepare celery for future use in the following ways:
- In the refrigerator. This is how you store greens that you'll be using soon. In the refrigerator, celery wrapped in foil will keep for up to 10 days. Celery wrapped in plastic wrap will stay fresh for up to 4 days.
- Drying. Dried herbs shrink in volume and don't necessarily need to be refrigerated. Dry the leaves in a single layer under a canopy, away from direct sunlight. It's important to allow air to pass through the herbs during drying, turning them periodically. When the leaves change color and begin to crumble, stop drying. If you dry herbs at home, this process takes a full month.
- Freezing. Frozen celery loses some vitamins and minerals, but retains its beauty. Thawed celery is used as a garnish for dishes. The green leaves are finely chopped, covered with water, and placed in the freezer.
- Pickling. For every 0.5 kg of leaves, add 100 g of salt. Place the salted leaves in a glass container and let them steep for two weeks. There's no need to refrigerate the pickled celery—salt is an excellent preservative, preventing it from spoiling.
Common mistakes
Most mistakes occur during the seedling growing period. The most common mistakes when growing celery are:
- Violation of thermal conditions. The plant will not germinate on time if a comfortable temperature of 18-20°C is not provided.
- Incorrect watering. Don't pour water directly on the seedlings—they'll stick to the ground and won't rise again. Water should be poured under the roots or through a sieve.
- Dryness of the soil. If the soil is allowed to dry out, the plant will not develop.
- Planting seedlings too deeply when transplanting or transplanting. Covering the central bud with soil will prevent germination, slowing or even stopping plant growth.
- Lack of light. It causes plants to stretch and turn pale. Seeds are sown in March, when daylight hours are still short. The problem can be solved by installing artificial lighting.
- Neglect of hardening. Even the strongest seedlings need to be hardened off before being planted in the ground. They are taken outdoors before being transplanted into the ground.
Reviews
By planting leaf celery in open or closed soil, you can add the leaves of this highly beneficial plant to your dishes at any time. Using various growing techniques, you'll have a supply of celery greens year-round.
I really liked the article. Everything is laid out clearly, all that's left is to use the material in my own garden. Thank you.