Before propagating peonies, carefully familiarize yourself with all the methods and information about which flower species are best suited to each method. There are several methods, each with its own characteristics, advantages, and disadvantages, which are important to be aware of in advance.
Dividing the bush
This technique is most often used during plant repotting to prevent unnecessary stress. The optimal age for this is between 3 and 7 years.
- ✓ The optimal soil moisture for dividing the bush should be at least 60%, but not more than 80%.
- ✓ The air temperature on the day of division should not exceed 25°C to minimize stress for the plant.
| Name | Root system depth | Optimal age for division | Number of buds per division |
|---|---|---|---|
| Tree peony | 60-80 cm | 3-7 years | 4 |
| Peony lactiflora | 50-70 cm | 4-6 years | 3-5 |
Features, advantages and disadvantages
Peonies have a well-developed and powerful root system, reaching an average depth of 60-80 meters. However, the root shoots also grow vigorously laterally. Therefore, special care must be taken when removing the bushes from the bed.
The main requirement is that the plant should have time to bloom 2-3 times. After this, the roots have time to receive a full supply of nutrients, develop, and grow the number of shoots necessary for division. Keep in mind that 3-year-old bushes are much easier to dig up than 7-year-old ones.
Nuances:
- the bush must have at least 8 healthy stems;
- the circumference occupied by the stems should not be more than 9 cm;
- The distance between the stems should not be less than 6 cm, otherwise it will be impossible to separate the roots.
What tools will you need:
- bayonet shovel;
- shovel with a curved end;
- large knife;
- pruning shears;
- a couple of buckets.
Dividing a bush is considered the most simplified method of propagation, but it also has other advantages:
- high degree of efficiency;
- adult bushes are planted immediately;
- no rooting process is required, since the root system is fully formed;
- flowering can be obtained in the year of propagation;
- rapidity.
There are few disadvantages to this method – you need to act correctly, otherwise the plant will not take root; you will have to wait until it is at least 3 years old.
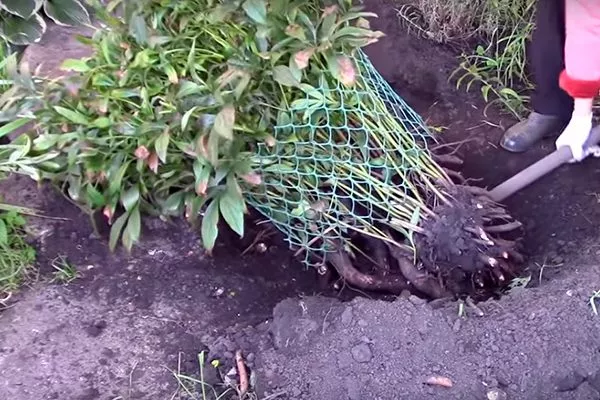
How to dig up the roots of a peony?
To ensure successful propagation, it's important to preserve as many roots as possible and avoid damaging the main stems. Here's how to proceed:
- Dig a groove around the tree trunk.
- Use a bayonet shovel to dig up the bush to the depth of its roots.
- Remove excess soil.
- Using two shovels, carefully remove the plant from the hole.

- Place the bushes on the ground.
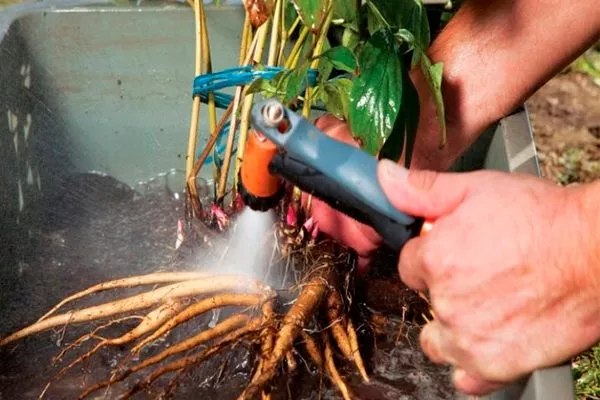
- Thoroughly rinse the roots with water to remove any soil. You can use a barrel filled with water, a watering can, or a hose for this.
- Place the bush on a dry surface to dry. This takes several hours—more indoors, less outdoors.
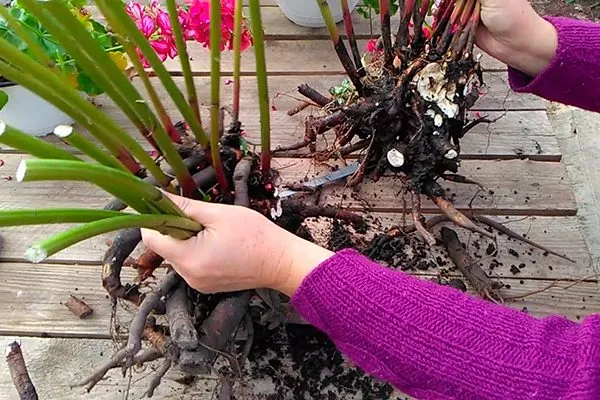
How to divide a bush correctly?
The first thing to do after the roots have dried and wilted slightly is to trim the shoots. They should remain about 8-10 cm long – this will make working with the plant easier and safer.

Peculiarities:
- It is better not to cut the roots of young peonies, but to separate them by hand, having first made a light cut;
- the separation points must have jumpers;
- the number of parts from one bush is about 8 pieces;
- each planting unit should have at least 4 buds left;
- the divisions should have 1-2 roots 18-20 cm long;
- After dividing the bush, all cuts are treated with wood ash powder, which prevents infection and promotes rapid healing of living tissue.
When is the best time to plant and divide peonies?
The best time to divide a bush is late summer or fall, when the underground buds are fully formed but new roots have not yet begun to grow. This period is from August 20 to September 15. Digging later significantly reduces the survival rate.
But if the summer was too dry, the timing of bud formation shifts. Consequently, dividing the bush can even take place in October.
Gardeners once believed that dug-up bushes should be buried in the ground and divided in the spring. But modern research has proven otherwise. It turns out that the small, invasive roots that supply moisture and nutrients to the plant develop most actively in the fall. Therefore, rooting is more effective.
Planting cuttings
Initially, planting holes for the new bushes are prepared in the standard manner for peonies. After cutting the roots, each division is transferred to a new location and planted as seedlings.
You can visually study how peonies are propagated by dividing the bush in our video:
Propagation of peonies by stem cuttings
This technology allows for maximum preservation of the mother plant. This method is particularly often used when propagating valuable peony varieties. The optimal time for this is before budding, 7-15 days before.
Features, advantages and disadvantages
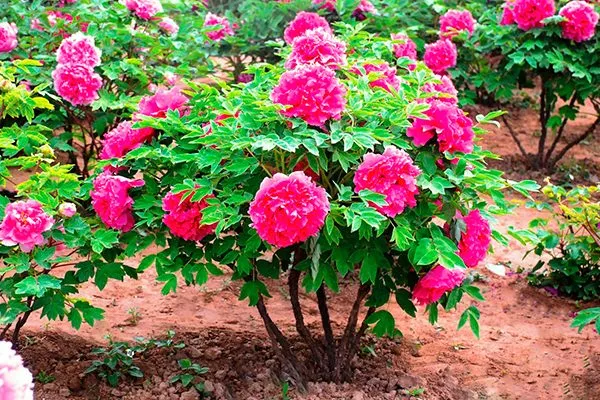
Tree peony varieties are best suited for propagation by stem cuttings. Please note the following:
- cuttings should be placed in the soil mixture at a slight angle;
- depth – about 4 cm;
- When rooting, it is necessary to provide the cuttings with special temperature conditions;
- minimum age of mother bush is 4 years;
- It is permissible to obtain no more than 15 cuttings from one plant, but from plants older than 6 years, 2-3 times more can be cut.
The main advantage is that the bush remains unharmed and undamaged. You can use shoots remaining after scheduled pruning, allowing you to produce a large number of seedlings at once. However, there is a drawback: rooting requires indoor conditions and special soil. Furthermore, special care techniques will be required.
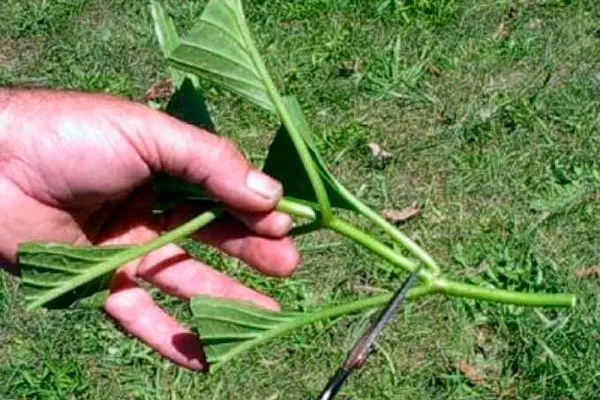
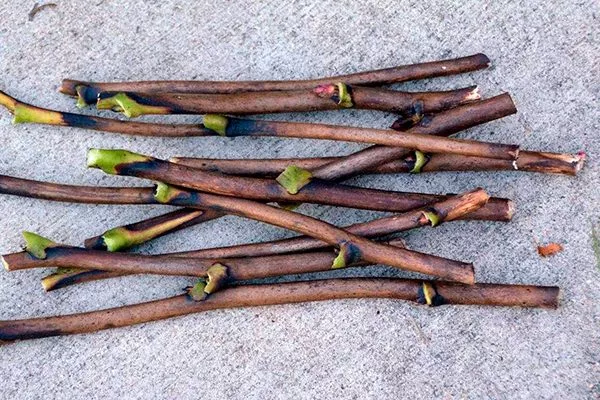
How to prepare cuttings?
To obtain the most productive seedlings, it's best to select shoot sections located in the middle of the stems. Features:
- each cutting must have at least 2 internodes;
- the cut at the bottom, where the roots will begin to grow, is made at an angle of 45 degrees, the top should be extremely straight;
- only 2 cuttings can be cut from one shoot;
- It is important to make the lower cut under the leaf cushions, and the upper cut must be made above the leaf (about 2 cm higher).
- ✓ Cuttings must have at least two internodes for successful rooting.
- ✓ The top cut of the cutting should be straight, and the bottom cut should be at a 45-degree angle to increase the area for moisture absorption.
Processing cuttings
Preparatory measures before rooting are important. They help neutralize bacteria that can cause disease and speed up the rooting process. What to do:
- Disinfection. To do this, prepare a pink solution of water and potassium permanganate. Dip the cuttings upside down or spray them completely, then dry the wetted areas.
- Stimulation of root growth. You can use any rooting agent—Epin, Kornevin, etc. The main thing is to prepare the solution correctly. For example, if you purchased Heteroauxin, you'll need about 100 mg per 10 liters of water. In this case, the cuttings are kept with the bottom cut end up for about 8-10 hours.
If you're short on time, try this: make a highly concentrated solution of 100 mg of the drug in 1 liter of water. Leave it for no more than 2 hours.
Planting and caring for cuttings
Planting cuttings is carried out as follows:
- Identify the stems on the mother plant that will be used for propagation.
- Make the cut using sharp pruning shears or a knife.
- From the middle part, cut 2 cuttings according to the requirements.
- Treat the cuttings. And on the mother plant, dust the cut areas with crushed wood ash.
- Remove the bottommost leaf from the cuttings and cut the one located on top in half.
- Prepare the substrate. It should be loose and permeable. You can buy a special or universal one, or make your own from equal parts river sand, turf soil, peat, and humus.
- Take the containers, make drainage holes in them and disinfect them.
- Add the substrate.
- Moisturize it.
- Place the cuttings and sprinkle the surface of the soil with sand.
- Cover each seedling with a plastic bag or a cut-off plastic bottle to create a greenhouse effect.
Cuttings can be rooted in a greenhouse or even in open garden beds, but in the latter case, creating favorable conditions is challenging. However, experienced gardeners do this, and you can learn how from our video:
Cuttings require special care. Remember a few basic rules:
- the optimal air temperature is 23-25 degrees;
- the cover is removed every day for a short time for ventilation;
- Do not allow condensation to accumulate on the film;
- The cover should be removed when the first leaves begin to appear;
- It is important to water the cuttings with warm, settled water three times a day during the first 2 weeks;
- callus develops over 40 days, and roots are formed after 2 months;
- drafts must not be allowed.
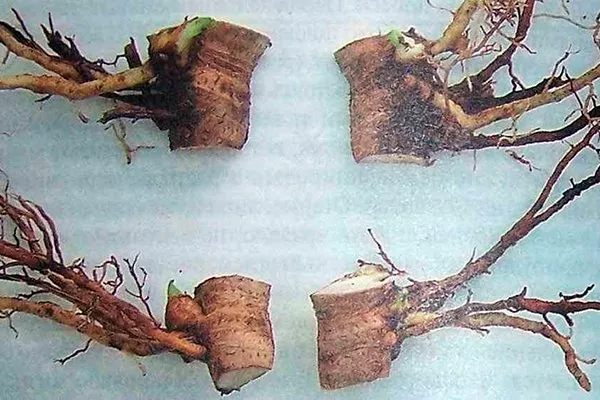
Propagation by root cuttings
This propagation technique is only suitable for replanting or dividing a bush, as the planting material is root cuttings. These are pieces of root with a pair of buds.
Features, advantages and disadvantages
The advantage of this method is that the root cuttings quickly take root, with an average survival rate of 80%, which is quite good. The process is not very complicated and is suitable for beginner gardeners. However, there is a significant drawback: the bush doesn't bloom until at least the fourth year.
Nuances:
- cuttings placement pattern – 15x15 cm;
- the bush is at least 4 years old;
- the segment must have at least 1 adventitious root;
- minimum spine length – 5-6 cm.
When are cuttings selected for planting?
Since dividing the bush or replanting peonies is carried out in August-October, root cuttings are also carried out during the same period.
How to prepare root cuttings?
After removing the bush from the ground, do the following:
- Clean the root system from soil by washing.
- Dry the roots.
- Select a piece with roots, renewal buds and shoots.
- Cut into pieces with a sharp knife.
- Inspect the elements carefully. If there are any damaged areas, trim them off.
- Disinfect the root cuttings in the same way as the stem cuttings. Additionally, treat them with a rooting hormone.
Planting and caring for cuttings
Root cuttings are planted directly in open beds, but this location is temporary, as the seedlings will need to be transplanted to a permanent location in a couple of years. The root cuttings are buried 5 cm deep, then moistened and covered with plastic film. Subsequent care is identical to that for stem cuttings.
To learn more about how to propagate peonies from root cuttings, watch our video:
Propagation of peonies by layering
Peonies are easily and profitably propagated by lateral layering. There are two methods for this: the classic method and Shlomin's. However, the first method, lateral layering, is the most optimal and effective. The mother plant should be at least six years old. Buds should begin to develop and branches should form.
Features, advantages and disadvantages
To ensure the success of your event, you need to take into account some details:
- choose bushes with loose and fertile soil around them, otherwise the cuttings will not develop;
- there should be no weeds nearby;
- After the primary shoots appear, thoroughly loosen the soil, since without oxygen the root system will stop growing;
- The cuttings are transplanted after 2-4 months;
- In the first couple of years after transplantation, flowering should not be allowed - the buds need to be cut off;
- Young shoots are carefully wrapped up for the winter even in the southern regions of the country.
This technique has many advantages:
- the mother bush does not suffer and continues to bloom;
- simplicity;
- obtaining several layers from one shoot;
- no further growing is required, as the cuttings immediately reach the required size;
- rapid formation of the root system.
Flower growers do not note any critical deficiencies.
How to ensure growth of cuttings?
To ensure the formation of cuttings, favorable conditions must be created. Experienced gardeners do the following:
- First, you need to prepare the soil - add organic matter (10 kg of humus, rotted manure or compost per 1 sq. m), and additionally add superphosphate (200-300 g per 1 sq. m);
- You need to loosen the soil frequently to allow oxygen to enter;
- It is essential to hill up the areas where the cuttings will form;
- if buds develop, pinch them off;
- Water constantly – do not allow the soil surface to dry out even slightly.
When is the best time to plant cuttings?
The optimal time to begin propagation is from late May to late June. The prepared cuttings can be transplanted in late August or early October.
Rules of reproduction
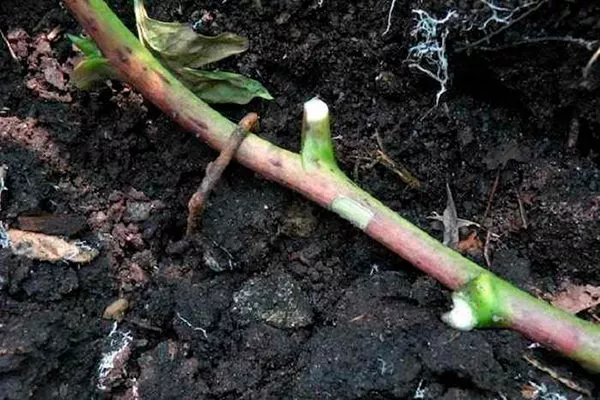
The classic method of propagating peonies by lateral layering includes the following steps:
- Select the side shoots, which should be the healthiest and most viable.
- Around them, form long furrows up to 10 cm deep.
- Place the branches in the grooves.
- Make several small cuts along the shoot. This is where the shoots and roots will form.
- Sprinkle the shoots with soil and moisten them thoroughly.
See how experienced gardeners do it in the video:
Seed propagation
It's considered the most labor-intensive and time-consuming process, which is its main drawback. Despite this, many gardeners use it because growing seedlings from seeds is a fascinating endeavor.
Features, advantages and disadvantages
The seed method of propagating peonies has many disadvantages and features:
- The planting material has a very tough shell, making it difficult for the sprouts to break through. This forces gardeners to perform a lot of manipulation to activate the embryo.
- Seedlings develop excessively slowly and slowly. They grow about 5-10 cm per year.
- Bushes grown from seeds begin to bloom for the first time around the fifth year.
- The maternal characteristics are not preserved, and it is unknown what kind of peonies will be produced.
- Not all types of peonies produce seeds.
- Peony seeds have a maximum germination rate of 50%, so you'll have to plant a huge amount of seed at once. Some seeds may take as long as 3-4 years to germinate.
But the technology also has a positive side: you can experiment and create a completely new variety, becoming an amateur breeder.
Proper seed preparation is crucial for successful planting. Here are some tips:
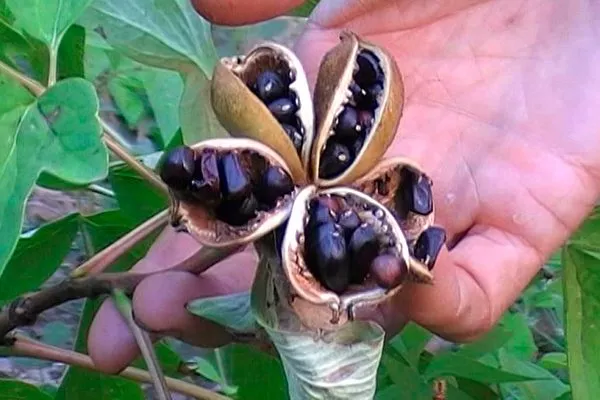
- seeds are ready for harvesting after August 15;
- you need to cut the seed pods in the shape of a star as carefully as possible;
- if the seeds are not ripe, they will go dormant for several years;
- It is easy to determine the full ripening of seeds: the seed pod should “move” at the seams;
- To extract the seeds, simply break the capsule over paper or a container;
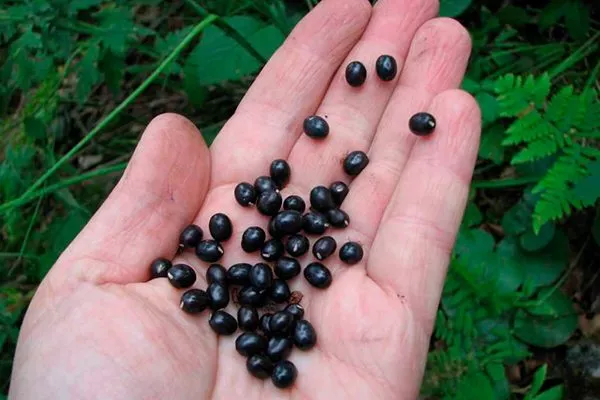
- the seeds are quite small – 5-10 mm;
- their surface should be smooth, evenly colored and shiny.
Which species and varieties reproduce by seeds?
Not all peony species and varieties are capable of producing seeds and seed pods. Only lactiflora, black, thin-leaved, and declining peonies are suitable for propagation by seed. Tree peonies can also be used, but keep in mind that the first bloom will occur in the seventh year.
Seed preparation and planting
Preparatory work involves several steps. One of them is disinfection, which doesn't take much time. To do this, prepare a pink solution of potassium permanganate and soak the seeds in it for half an hour.
Stratification is a completely different matter, as it takes a significant amount of time. If you don't artificially stimulate germination, seedlings may only appear after 1-5 years. Natural conditions are created for this purpose. Step-by-step instructions for stratification and planting:
- Perform heat treatment. To do this, take a container or box and fill it with disinfected river sand. Place the seeds on the surface and cover with another layer of sand. Moisten and place the container in a room with a temperature of 28-32 degrees Celsius.
Keep the planting material in this manner for at least 8 weeks, maximum 10 weeks. Water periodically, preventing the sand from drying out. - Perform a cold treatment to stimulate the development of growth points. To do this, remove the seeds, which should already be slightly sprouted, from the container. Transfer them to peat pots or pellets. Fill the container with potting soil and place in a cool room or refrigerator.
The optimal temperature is around 6-7 degrees Celsius. The cold treatment period is 90 days. - When you see the first fully developed sprouts, remove the container and place it in a warm place—around 17 degrees Celsius. Continue caring for the seedlings until spring.
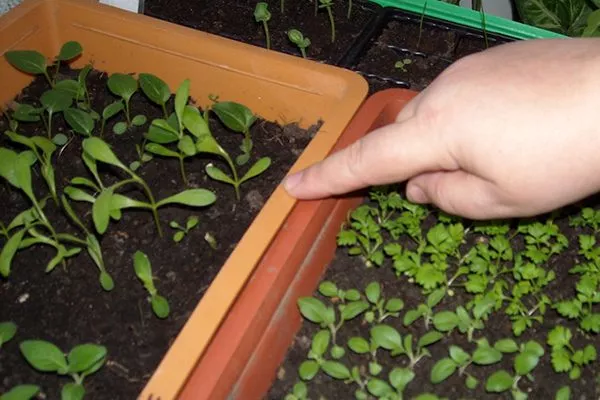
Transplantation to a permanent location and care measures
Further care of the seedlings also requires a lot of effort: when the bushes reach two leaves, they need to be pricked out into separate cups, watered periodically, etc. And the seedlings are transplanted when the threat of recurrent frosts has passed and the air temperature has stabilized at +15-17 degrees.
How to transplant:
- Moisten the soil in the pots with seedlings.
- Allow the water to soak in completely.
- Remove the seedlings from the containers along with the root system.
- Prepare the area for peonies in advance – remove weeds, leaves, branches, and debris.
- Now, dig the planting holes. Their diameter and depth should correspond to the size of the root system and the root ball (the parameters vary significantly for different varieties and species).
- Be sure to mix the excavated soil with organic matter and add a mineral complex as required by the variety.
- Plant the bushes, cover with soil and water.
During the growing season, seedlings require special care. Please note the following:
- The soil should not dry out completely—while mature peonies can easily withstand short-term drought, young bushes will die from it. Water frequently and in small amounts.
- In hot weather, mulch the tree's trunk area to prevent moisture from evaporating and weed growth. This will also prevent unnecessary insect attacks.
- If you find weeds, remove them immediately. Be sure to loosen the soil after watering.
- During the first year, seedlings need to be protected from the harsh effects of direct sunlight. It's best to initially plant them in a spot that receives partial shade after 11 a.m. If this isn't possible, or the time has already passed, create artificial shade.
- Fertilize in spring and summer with a solution of 10 liters of water and 50 g of urea. Occasionally, add superphosphate and similar fertilizers. Frequency and dosage depend on the specific variety's requirements.
- Before they reach one year of age, seedlings in garden beds are susceptible to gray mold. To prevent this, spray the bushes with a 1% Bordeaux mixture once a month.
- Before wintering, thoroughly mulch the soil. It's best to use straw, peat moss, and humus (the ingredients must be dry). Be sure to create a cover of lutrasil or agrofibre.
Some gardeners plant seeds directly into open ground. Watch the video to learn how:
Propagation of peonies by pruning
Few people know about this method of peony propagation—only the most experienced gardeners. Although this technique is considered the easiest and most simplified, it's also effective. The procedure can be started in April or September.
Algorithm of actions:
- Identify a healthy and vigorous peony bush.
- Remove all debris, fallen branches, leaves, and weeds from around the bush.
- Dig to a distance of 15-20 cm and to the same depth.
- Trim off the upper parts of the rhizome, which should contain renewal buds and root shoots. The cut should be horizontal and located 6 cm below the bud growth.
- Disinfect the cut areas.
- Divide the cut piece of the bush into individual shoots.
- Cover the exposed roots of the mother bush with fertile soil.
- Plant each stem in separate holes.
Peonies are versatile plants that can be propagated in a variety of ways. Carefully study the specifics of each technique and choose the most optimal and suitable option for you. This will allow you to save money on expensive planting materials and quickly grow a whole flowerbed of your favorite plants.