Jerusalem artichoke (or Jerusalem artichoke) is a hardy and extremely useful plant, unfairly ignored by most vegetable growers. Jerusalem artichoke tubers are edible, and the greens can be used as livestock feed. Growing this crop is simple—even the most inexperienced gardener can master it.
Jerusalem artichoke plant description
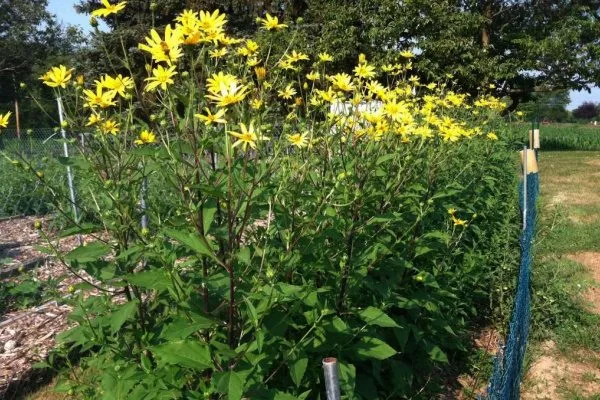
Jerusalem artichoke A fairly close relative of the sunflower, this perennial plant belongs to the genus Sunflower and the family Asteraceae.
Brief description of Jerusalem artichoke:
- plant height - up to 3 m;
- stem - straight, strong, pubescent, branching at the top;
- leaves are serrate-toothed, pubescent;
- flowers are yellow, 10-15 cm in diameter;
- fruit - achene (ripens in August-September);
- the root system is powerful;
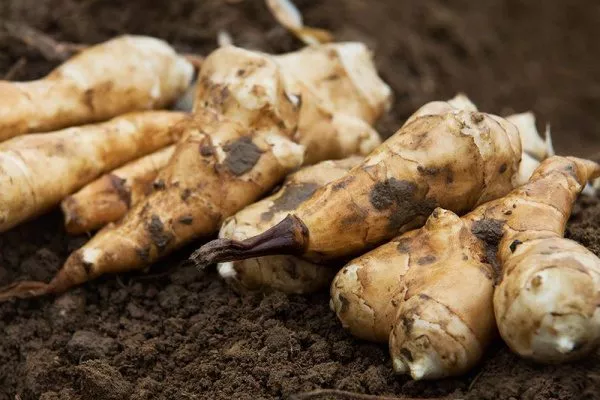
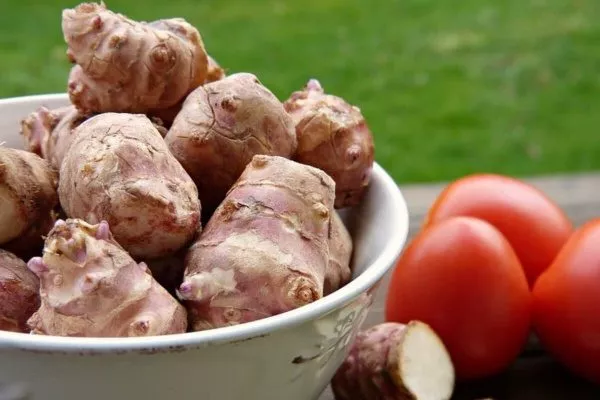
- tubers are irregular in shape, similar to ginger;
- The taste of the tubers is reminiscent of turnips or cabbage stalks.
Jerusalem artichokes have quite a beautiful bloom, with bright yellow flowers blooming at the tops. However, they are not grown for their flowers, but for their tubers, which grow in the ground and can be fried, boiled, stewed, or eaten raw. They have powerful healing properties.
The product is grown in many countries. Its composition is similar to that of potatoes, but its nutritional value surpasses even that of beets.
History of the origin of culture
Jerusalem artichoke is considered native to North America, where it still grows wild. Jerusalem artichokes appeared in Europe and Russia in the 17th century. Here, the plant was initially used exclusively as a medicinal and ornamental plant.
When Jerusalem artichokes arrived in our country, they were long considered an exotic crop. Over time, they began to be cultivated over larger areas, but they never achieved the popularity they deserved.
Benefits and harms
Jerusalem artichoke is a unique healing remedy and an effective dietary supplement. Most importantly, this plant contains a natural insulin analogue—inulin.
Jerusalem artichoke is rich in:
- proteins;
- organic acids;
- amino acids;
- iron;
- pectins;
- inulins;
- fiber.
Jerusalem artichoke is considered an excellent detoxifier—it effectively cleanses the body of toxins and waste. It is highly recommended for people suffering from diabetes, obesity, anemia, gout, and kidney disease.
Jerusalem artichoke has no contraindications, other than individual intolerance. The only thing to remember is to avoid overeating, as the root vegetable can cause flatulence.
Conditions for growing Jerusalem artichoke
Jerusalem artichoke grows best in the south of the country, but, being distinguished by its remarkable cold and frost resistance, it is also successfully grown in the northern regions.
What you need to know about growing conditions for Jerusalem artichoke:
- Jerusalem artichoke tolerates frost well. Down to -4 to -5°C, and down to -7 to -8°C in autumn. Tubers can safely overwinter in the ground even in temperatures as low as -40°C. Unlike potatoes, they can freeze and thaw while remaining viable.
- Jerusalem artichoke is a short-day plant. Therefore, in the north, with long days and lower temperatures, tuber formation is delayed. Meanwhile, the green mass grows vigorously.
- The plant easily tolerates short-term summer droughts. This allows it to be grown in dry regions.
- Insufficient light can negatively impact crop yields. This applies to both tubers and green mass.
Recommended varieties of Jerusalem artichoke
| Name | Growing period (days) | Tuber yield (kg per 1 sq. m) | Green mass yield (kg per 1 sq. m) |
|---|---|---|---|
| Interest | Late | 2.6-3.8 | 4.3-5.6 |
| Early ripening | 120 | 2.5-3 | 3-3.5 |
| Solar | 160 | 4 | 3 |
| Pasko | Late | High | Not specified |
| Omsk White | Average | 50 g | Not specified |
There are approximately 300 Jerusalem artichoke varieties and hybrids. While they share common biological characteristics, they differ from one another in yield, amount of green mass, ornamental qualities, tuber color, and flavor.
All existing Jerusalem artichoke varieties are divided into three groups: forage, tuber, and tuber-silage. The former are grown for their foliage, the latter for their tubers.
Popular varieties:
- Interest. It produces white, smooth tubers with medium-sized eyes. The yield of tubers/green mass is 2.6-3.8 kg/4.3-5.6 kg per square meter. This late-ripening variety ripens only in the south of the country, in November. It is heat-resistant, grows quickly, and requires moisture.
- Early ripening. The growing season is 120 days. Dig in September. Suitable for temperate climates and suitable for mechanical harvesting. Tuber/green mass yield is 2.5-3/3-3.5 kg per square meter.
- Solar. The growing season lasts 160 days. They are dug in October to early November. The tubers are elongated, white, and weigh 40-60 g. The yield of tubers/green mass is 4/3 kg per square meter.
- Pasko. A productive tuber variety. It's a late-ripening variety, harvested in November. The tubers are white and round, weighing up to 80 g.
- Omsk white. A relatively short variety, with stems reaching 2.3 m in height. The tubers are spherical and white, weighing 50 g. They are harvested in September and October.
Today, breeders strive to develop varieties with compactly arranged tubers and thick stems that are used as livestock feed.
Peculiarities of planting Jerusalem artichokes in open ground on a plot
Jerusalem artichokes are undemanding in terms of planting location and care. When choosing a corner for them, it's important to consider the plant's height, which can cause it to shade neighboring crops.
Soil for Jerusalem artichoke
If Jerusalem artichokes are being planted in the fall, the site should be prepared 2-3 weeks in advance. For spring planting, it is also recommended to prepare the soil in the fall.
Features of soil preparation for Jerusalem artichoke:
- the soil is dug up to the depth of a shovel blade;
- organic matter is added during digging - compost or humus (20-30 l per 1 sq. m);
- If the site is being prepared for spring, the clods of dug soil are not broken up - this will be done in the spring;
- Phosphorus-potassium fertilizers are applied immediately before planting.
- ✓ The soil pH level should be strictly within the range of 6.0-7.5, deviations can significantly reduce yield.
- ✓ The soil must be well drained, as stagnant water leads to rotting of the tubers.
Choosing a location for growing
Jerusalem artichoke is exceptionally hardy and can thrive in the most unfavorable conditions and climates. It grows equally well in sun and partial shade. However, Jerusalem artichoke thrives best in well-lit areas.

Features of choosing a place:
- The soil can be almost any - Jerusalem artichoke shows good yield even on clay soils, and grows best on sandy loams and loams, loose and fertile soils.
- The soil should be neutral or slightly alkaline, pH 6.0-7.5.
- Salt marshes, acidic soils, and flooded lowlands are absolutely unsuitable for planting Jerusalem artichoke—the tubers and roots will rot there.
- Jerusalem artichoke is a perennial plant; it does not need to be replanted; it needs to be given a permanent place in the garden.
Jerusalem artichokes are most often planted at the edge of a garden, where they won't shade other crops. They're also often grown along the perimeter of a plot or along a boundary or fence.
Crop rotation
Jerusalem artichoke grows best after potatoes, cabbage, cucumbers, and legumes. Cereals and green manure crops are also considered good predecessors.
Landing dates
Jerusalem artichokes are planted outdoors in the fall—2-3 weeks before the onset of sustained cold weather—or in the spring, as soon as the soil warms. In the fall, only whole tubers are planted, but in the spring, they can be cut into pieces.
Landing
Jerusalem artichokes are grown from tubers, like potatoes. They are planted in furrows or ridges. The former is used in southern regions, while the latter is used in areas with typical rainy summers, as well as in areas with high groundwater levels.
First, prepare the tubers for planting:
- Select specimens free from damage and signs of disease. Prefer medium-sized tubers.
- Pour warm water over wilted or dried tubers for 10 minutes.
- To disinfect the tubers, treat them in a dark solution of potassium permanganate.
- A couple of hours before planting, spray the tubers with a growth biostimulant - Epin-extra or its analogues.
Treatment with growth stimulants strengthens the plant's immunity, its readiness to environmental attacks, and accelerates shoot development.
In pre-prepared beds, make furrows 15 cm deep. The distance between rows is 60-80 cm (depending on the variety). Next:
- Place the tubers in furrows at intervals of 40 cm.
- Mix the soil with bone meal and fill the furrows with tubers with the resulting mixture.
- Water the beds generously.
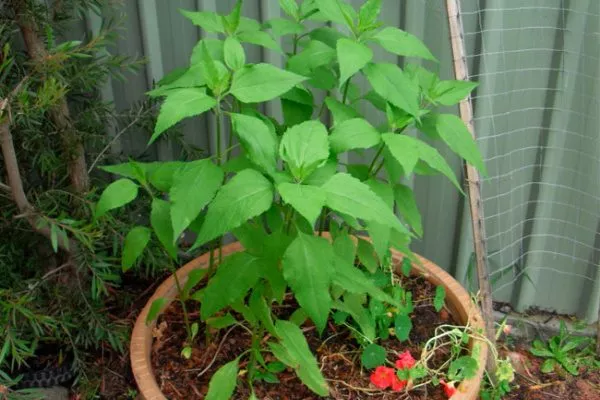
Growing Jerusalem artichoke in boxes
Jerusalem artichokes can be grown in large containers or pots. Each plant requires a container approximately 40 cm in diameter and depth.
How to plant Jerusalem artichoke in a box:
- Place a drainage layer of broken brick, expanded clay, pebbles or sand on the bottom of the container.
- Top with 10 cm of nutritious soil. If you're using garden soil, be sure to mix it with equal parts humus and sand. Alternatively, use a special soil—flower soil or seedling soil. You can buy it at any grocery store.
- Place the tuber on the ground, water it, and then cover it with soil (10 cm thick).
- Place the box in a warm place and water the plantings periodically.
- When seedlings emerge, add soil to the container so that approximately 10 cm of the plant is above the surface. Continue adding soil until the container is filled to the top.
In a similar manner, Jerusalem artichoke can be planted in a tub, barrel, pot or other container placed outdoors.
Care Features
Jerusalem artichokes don't present any particular challenges for gardeners. Compared to other crops, Jerusalem artichokes require minimal care. However, to ensure a good harvest, they do require some attention—watering, weeding, fertilizing, etc.
- In early spring, mulch the soil with humus or compost to a layer of 5 cm.
- During the budding period, apply potassium fertilizers at a rate of 20 g per square meter.
- After harvesting in the fall, leave some of the tubers in the ground for natural propagation.
Loosening and weeding the soil
Before and after emergence, the soil is loosened shallowly. This procedure is very beneficial for young plants. Loosening removes the surface crust and allows air to reach the roots. This helps the tubers germinate faster. When the Jerusalem artichoke seedlings reach 20 cm, the beds are hilled.
After rain and watering, it's recommended to loosen the space between the rows. Weeds are removed at the same time. The first weeding should begin only after the seedlings emerge. Then, weed the beds every two weeks. Mature plants don't need weeding—they can choke out any other plants on their own.
Watering
Jerusalem artichoke has strong roots, making them resilient to drought. This plant can grow and bear fruit well without artificial watering—it thrives on the moisture it receives from rainfall.
If severe drought occurs, Jerusalem artichokes should be watered. Mature plants should be watered every 10 days. The recommended watering rate is 15 liters per plant. If the temperature drops below -15°C, it's best to avoid watering.
Fertilization
Jerusalem artichoke does not particularly require additional feeding, but if the soil is poor, you will have to add some fertilizer to get a good harvest.
Table 1. Recommended fertilizing regime:
| When to apply fertilizer? | Fertilizer | How to apply and in what quantities? |
| During site preparation | humus or rotted manure | 5 kg per 1 sq. m |
| After emergence | wood ash | powdering |
| At the budding stage | infusion of herbs (nettle or dandelion) | from 5 liters per adult plant |
| In case of insufficient growth | ammophos | according to the instructions |
| With long-term growth of culture in one place | ash, peat, rotted manure | mulching |
Tying up bushes
When the plants reach 1 m in height, it is recommended to tie them up. This will prevent the tops from falling over due to wind and will make the plantings more neat.
To tie up a free-growing plant, install a vertical support near it and tie the stem to it with twine, preferably in several places.
For large plantings, it is recommended to install trellises - wire is stretched on vertical poles installed at the ends of the beds.
Pest control
Jerusalem artichoke is a vigorous and hardy plant, highly resistant to disease. However, in adverse weather and active pathogen spread, the crop can become susceptible to powdery mildew, white rot, or early blight.
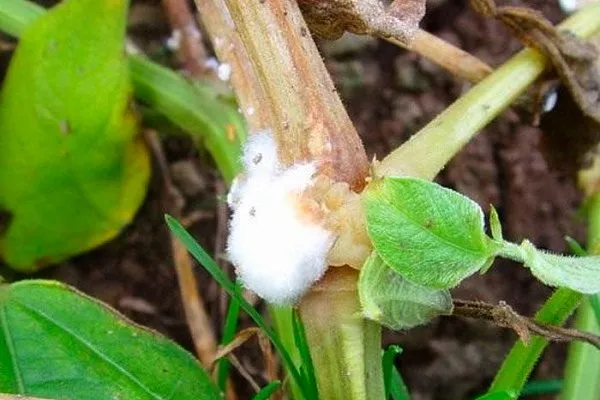
Table 2. Jerusalem artichoke diseases and their control.
| Disease | Symptoms | Risk factors | How to fight? |
| White rot | Felt coating, seedlings die, and stems break. | Low temperatures combined with high humidity. | Compliance with agricultural technology and crop rotation (do not plant after sunflower). |
| Alternaria | Spots on leaf veins, drying of petioles. | Heat combined with rain. | Spraying with Abiga-peak or Bravo. |
| Powdery mildew | White coating on leaves. | Sudden changes in temperature or excess nitrogen. | Spraying with Topaz or Topsin. |
Jerusalem artichokes have few enemies, but they can cause serious damage to crops. Most commonly, the plant is attacked by click beetles and cockchafer larvae.
Table 3. Jerusalem artichoke pests and methods of control.
| Pest | Damage | How to fight? |
| Slugs | They gnaw leaves, buds and shoots. | Weed and thin out plantings, attract birds, install mechanical barriers, and in case of widespread infestation, treat with Groza (according to the instructions). |
| Mole cricket | They damage tubers and destroy seedlings. | Dig the soil deeply and fill the holes with soapy water (10 g of laundry soap per 10 liters of water). |
| May beetle | They damage the roots of the plant (larvae) and eat the leaves (adult beetles). | The soil is carefully dug up, the larvae are collected by hand, and the soil and plants are treated with Aktara, Decis, or similar products. |
| Wireworm (click beetle larvae) | They damage stems and tubers. | Crop rotation is observed, the soil is dug deeply, plant debris is removed from the area, plantings are weeded on time, watered with a solution of potassium permanganate (2 g per 10 liters of water), and sprayed with Decis, Actellic, and Karate. |
Harvesting and storage
Jerusalem artichokes take about four months to ripen. They should not be harvested early, as tubers dug up prematurely will not fully ripen. Jerusalem artichokes are dug in the spring, before the soil warms, or in the fall, when the ground begins to freeze.
Dug tubers can be stored in different ways:
- In the basement or cellar. The specimens are placed in boxes with moistened sand, sawdust or peat.
- In the freezer. Here Jerusalem artichoke can be stored for 2-3 weeks or more.
- In piles and earthen trenches. This method is used for storing Jerusalem artichoke forage. The bottom of the trenches is lined with spruce branches. The boxes containing the tubers are placed in the trenches and then covered with spruce branches, hay, or roofing felt.
- On balconies and loggias. The tubers are placed in boxes filled with sand, where they can retain their nutritional value for about two months.
The tubers can be preserved by grating them and then drying them at 50°C. Jerusalem artichokes make excellent preserves and are even used in desserts.
Tasting Jerusalem artichoke
Some consider Jerusalem artichokes tasteless. But this only applies to raw tubers. When roasted, Jerusalem artichokes acquire the flavor of toasted chestnuts. The roots become soft and slightly sweet, with a delicate texture. They taste similar to boiled sweet potatoes.
Raw Jerusalem artichoke tubers are used in salads. They are also used to make soups, purees, sauces, chips, and powder.
Growing Jerusalem artichoke as a business
Jerusalem artichoke is unfairly relegated to the margins of the agricultural industry. Yet, its yield and biochemical properties are significantly higher than those of other crops. Jerusalem artichoke cultivation yields over 300%, while costs are minimal.
Economists estimate that developing a 50-hectare plot requires approximately 800 million rubles. This includes the cost of seeds, fuel, fertilizers, etc. Income from selling tubers depends on the yield and price of the product. The plant can produce up to 1,000 centners per hectare of green mass and up to 400 centners per hectare of tubers.
How to make money on Jerusalem artichoke:
- Cultivate for processing into biofuel. This option is suitable for large plots of land and the availability of mechanization.
- Grow tubers for sale. They can be sold raw—for consumption and for planting. Some of the produce can also be processed into powder. This powder can be sold to the public as a dietary supplement or medicine.
Where and how much can I buy tubers for sowing?
Almost every region has companies and entrepreneurs involved in growing and cultivating Jerusalem artichokes. These are the places where you can purchase planting tubers, either locally or online.
The approximate cost of Jerusalem artichokes for planting varies by region and company. In Ryazan, for example, you can buy tubers for 5-15 rubles per kilogram, while in Moscow, they cost 30-35 rubles.
Common mistakes when growing Jerusalem artichoke
Despite the simplicity of Jerusalem artichoke cultivation techniques, mistakes are often made when growing it. Most of these are due to inadequate plant care.
Table 4. Mistakes in growing Jerusalem artichoke:
| Violation of agricultural technology | How to fix? |
| Lack of watering | Water at least once a month, generously. |
| Thickening of plantings | Thin out the plantings when the seedlings reach 10 cm in height. |
| Lack of loosening and formation of a dense crust | Carefully loosen the beds. |
| Lack of fertilizers | Feed the plantings in early spring and in the second half of summer with urea, ash, chicken manure, bone meal, and potassium fertilizers. |
| Cutting off the above-ground part in autumn | Do not cut off the above-ground part until harvesting, as it promotes the ripening of the tubers, which remain in the soil until next year. |
Reviews from vegetable growers
Jerusalem artichokes are champions in terms of ease of maintenance and nutrient content. This crop doesn't require much time or effort, making it not only an attractive addition to your garden but also a great business opportunity.