Tomatoes require support to produce a full harvest. While some varieties benefit from it, others simply cannot grow or bear fruit without it. This article will explain the different types of support available for greenhouse and field-grown tomatoes and their specific features.
Why do you need to tie up tomatoes?
Experienced gardeners who have been growing tomatoes for years know that staking is an important step, directly affecting the quantity and quality of the harvest. Staking is especially important for medium-sized and tall varieties, as their bushes can bear several kilograms of fruit, the weight of which can cause the plants to break and die.
Why do you need to tie up tomatoes?
- unloading the stem and branches – part of the weight of the fruit is transferred to the supports;
- protecting fruits from slugs;
- protection against diseases that are transmitted to plants through close contact with the soil;
- preventing fruit spoilage due to fungal infection;
- more sun penetrates to the fruits, they ripen faster;
- It is convenient to collect ripening fruits.
Rules for tying up tomatoes
There are several methods for tying up tomatoes, each with its own unique materials and equipment. Regardless of the method, the process follows the same rules.
Rules for tying up tomato bushes:
- It's important to adhere to the timing of the event. It's important to choose the right moment to avoid overloading the bushes.
- The supports or frames are installed in moist soil. This prevents soil cracking, which can damage the delicate roots.
- The garter is carried out in stages: first, the central stem is tied, and as soon as the fruits begin to form, the fruiting branches are tied up.
- A separate rule for tall varieties is that they need to be tied up 4-6 days after transplanting the seedlings into the ground.
- Low-growing varieties are tied up after the first ovaries appear.
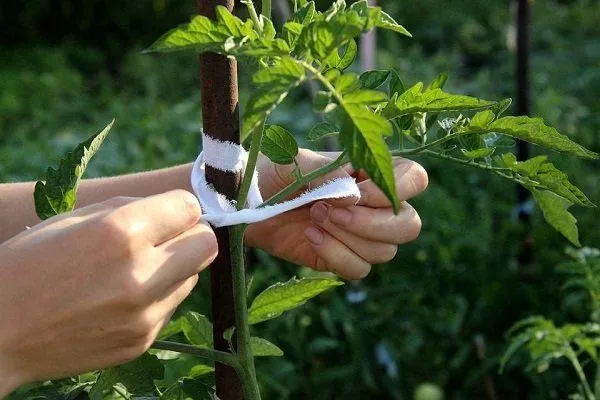
- The garter is made loosely, it should not tighten the stem.
- The loop with which the bush is attached to the support is made in the shape of the number 8.
- Tall bushes are first secured under the lower cluster, and as they grow, several more fastenings are made.
- Low-growing bushes are attached to the middle part of the stem.
- Garter materials are used once; at the end of the season they are collected and disposed of.
- Before tying up, the bushes are pruned. Side shoots are lateral shoots that grow in the leaf axils. They reduce fruiting intensity and should therefore be removed (called side shoots).
- When tying up bushes, you need to leave free space between them and the supports in anticipation of further growth.
- The number of garters depends on the variety and can range from 2 to 4 times.
Materials and equipment
When tying up tomatoes, it's important not only to follow the proper technology, but also to choose the right materials to support the bushes.
Tips for choosing garter material:
- Do not use wire, thin twine, or fishing line as tying materials. These can dig into the stems of the bushes, damaging and deforming them. Materials 4-5 cm wide are recommended.
- Don't use last year's garters. They may harbor pathogens that shouldn't be passed on to new plants.
- Natural fabrics should not be used. They tend to rot and harbor insects, fungi, and bacteria.
- The optimal option is a synthetic material with a low rigidity coefficient:
- nylon cord;
- leg-split;
- wide and thick rope;
- old nylon stockings.
- Clips (clothespins) can be used to support the bush. They support the entire stem and individual branches. Clips come in wood and plastic. They can be used to attach the stem to a rope hanging from the greenhouse ceiling. Plus, clips can be easily adjusted to adjust the attachment level.
Before use, the bandaging material must be disinfected - washed and boiled.
Along with tying materials, you'll need support devices to tie the bushes to plastic and metal structures. These may include:
- stakes;
- grids;
- frames.
Deadlines
Staking begins when 8-10 true leaves appear and the stem reaches a diameter of 1 cm at its base. The timing of staking depends on the early maturity of the variety.
Timing of the first garter depending on the maturity group:
- early – 35-40 days after planting in the ground;
- average – on the 50-60th day;
- late – on the 70-80th day.
The number of subsequent supports will depend on the size of the bush and how quickly and vigorously it grows. If the bush is short and compact, one support may be sufficient, while some varieties do not require it at all.
Methods for tying up tomatoes in a greenhouse
Tomatoes are a heat-loving and demanding crop. Today, even in southern regions, they are preferred for growing under plastic covers. To make more efficient use of space, gardeners plant tall varieties in greenhouses, which yield approximately five times more fruit—10-12 kg per plant.
Tall tomato bushes, reaching up to 2 meters in height, cannot grow tall without support. There are many methods for staking tomatoes in a greenhouse, and the final choice depends on the number of plants and the gardener's preferences.
Using a support on the ceiling/wall
To support the bushes this way, rigid crossbars must be installed in the greenhouse to which ropes are attached. The support structures can be constructed from metal pipes, channels, or angle iron. Each row should have its own linear support, which is attached to metal crossbars secured at opposite ends of the greenhouse.
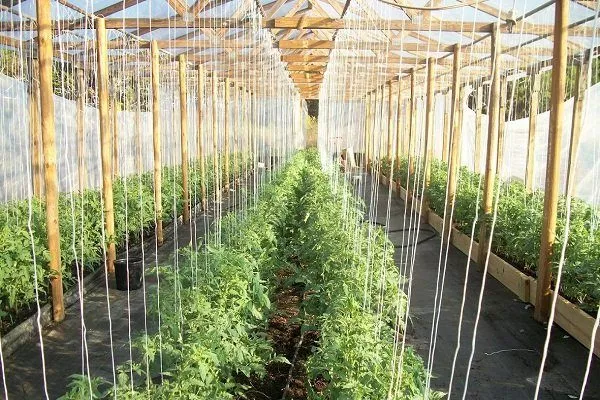
This method of tying is convenient both in narrow greenhouses, where bushes separated by a passage grow in two rows, and in large greenhouse structures, where multi-row planting is implemented (4-6 rows or more).
There are various ways to tie a bush to a support. Let's look at tying tomatoes to a support attached to the ceiling:
- One end of the rope is tied to a support in such a way that it can be tightened or loosened.
- The second end is secured just above the base of the stem.
- If the tension of the rope changes, it is adjusted by untying and tying the upper end again.
- When the bushes have several branches, each one is tied up individually.
Other options for fastening to linear supports are carried out according to the principle described above:
- First, tie a rope to the stem, then lift it up and secure it to a linear support.
- The lower end of the rope is placed in the hole so that the roots will entwine it.
- The upper end first lies on the ground, and then it is lifted and secured to a support or tied immediately so that it does not interfere with the care of the bushes.
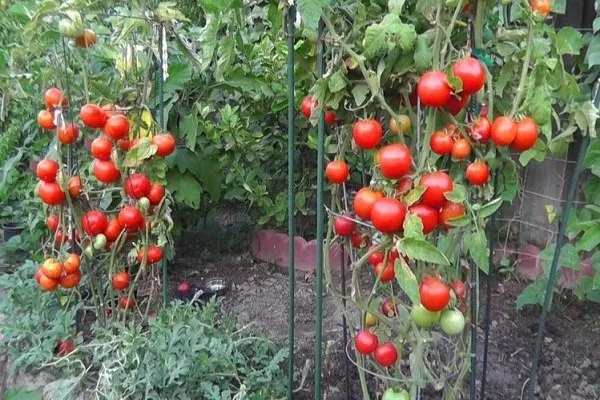
Using pegs
This is the most popular method of tying up tomato plants, which involves tying each plant to an individual stake. It's not exactly the most efficient, but it's the simplest and least expensive.
The length of the support depends on the height of the bushes and should be 30-50 cm higher.
The order of garter:
- The supports are installed before planting the seedlings in the greenhouse. They are positioned so that the bushes are 10-15 cm away.
- The stem is tied to the stakes using a figure-eight twisted tie. The stems and branches are not tied tightly, but wrapped around the stakes, tying them to the support without tension.
- As the bush grows, the garter is repeated.
When individually tying up tall tomatoes, you will need supports 2.5-3 m high.
- ✓ The height of the support should exceed the maximum height of the plant by 30-50 cm.
- ✓ The need for additional fastenings as the plant grows.
You can also learn about tying up tomatoes with stakes in the following video:
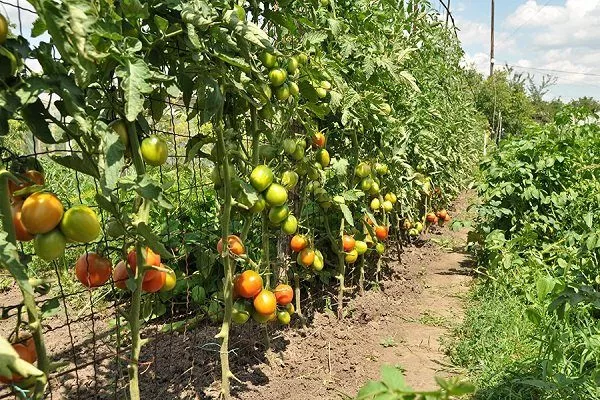
On horizontal and vertical trellises
The trellis method is used on large areas with tall tomatoes. Its advantage is the ability to support large numbers of tomatoes with minimal effort. Moreover, the materials and equipment—everything except the rope—can be reused.
How to do it horizontal trellises:
- Install two metal supports at the edges of the greenhouse. Dig them into the ground to a depth of approximately 0.5 m.
- Stretch twine or wire horizontally between the supports at intervals of 30 cm. The bottom row should be 25 cm from the ground.
- If the distances between the support stakes are large, intermediate stakes can be added. The twine/wire should wrap around the stakes on both sides.
- Secure the bushes to horizontally stretched supports using clips or simply by passing them between adjacent horizontal wires.
- As the bushes grow, tie additional horizontal supports to the stakes.
Vertical trellises Used for growing tall tomatoes. How to make vertical trellises:
- Install two tall metal supports along the edges of the bed.
- Tie metal wire to the tops of the supports.
- Place stakes near each bush.
- Tie one end of the rope to the wire, and secure the other to a separate stake. Tie each bush to its own vertical supports.
You can learn how to build a trellis for tall tomatoes in the following video:
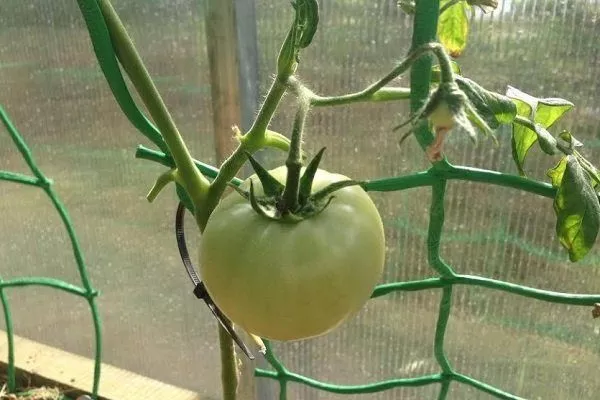
On the grid
To avoid the hassle of setting up trellises and tying dozens or hundreds of wires to metal supports, gardeners use a special material called trellis mesh. It's sold in 100-meter rolls and is 1.7 meters wide.
The structure is installed in a matter of minutes:
- Place metal supports along the edges of the beds.
- Stretch a net between the supports.
- To make the structure stronger and more rigid, wire is pulled through the top edge of the mesh and secured to the tops of the supports.
- You don't need to tie the bushes; instead, you can pass their tops through large mesh netting. The netting and the bushes become a single, rigid structure that can support any weight of fruit.
On the bars (cages)
This method isn't particularly popular among gardeners. It's expensive, as each bush requires a separate wire frame—a "cage." Furthermore, harvesting the fruit is more difficult, as many of them end up trapped within the lattice frame.
How the frame garter is formed:
- A wire frame with large cells is placed around the bush, enclosing the tomato plant in a "cage."
- The lower part of the frame is dug (or rather pressed) into the soil so that the structure has a strong hold.
- A bush surrounded by a trellis won't twist or fall over. The shoots don't need to be tied down. The frame acts as a self-sufficient support structure.
The advantages of the design are mobility and reusability.
Using caps
Like the previous method, the cap method requires a lot of resources and effort. It's not used for large-scale cultivation. This option may be suitable for gardeners who grow tall tomatoes in small quantities.
The design looks like a cap. How to make it:
- Place three supports around the bush, such as plastic stakes or tubes.
- Connect the upper ends of the supports to form the base of the “cap”.
- Braid the resulting frame with rope or wire. Space adjacent rows of horizontal elements 30-40 cm apart.
The "caps" are installed during the seedling planting stage. The distance between adjacent structures is 1 m. Several bushes can be planted near a single frame.
The growth of branches should be controlled so that they do not grow into the frame, otherwise it will be difficult to collect the fruits.
Tying up tomatoes in open ground
In open ground, large producers and many home gardeners try to grow tomato varieties that can grow without support. These are also called superdeterminate or limited-growth varieties. The downside of these tomatoes is their small yields.
Features of garter in open ground:
- In vegetable gardens, the same tying methods can be used as in greenhouses.
- If there are only a few bushes, it's best to use cloches or wire frames. For hundreds of bushes, these methods aren't suitable; trellises must be installed.
- The requirements for trellises in open ground are more stringent than in greenhouses. In addition to the weight of the bushes, they must withstand gusty winds, rain, and other natural disasters.
- Trellis are installed for one year, as it's not recommended to grow tomatoes in one place. Because of this, few gardeners use the trellis method. There are, however, portable versions, but their construction requires specific knowledge, skills, and expense.
- Plastic netting isn't suitable for staking. Tall bushes tear it, and short ones don't need it. Installing the netting annually is even more difficult than setting up a trellis.
- For gardeners growing tomatoes in open ground, the most popular method remains tying them onto individual stakes.
Mistakes when tying up tomatoes
Many gardeners, without understanding the specifics of tomato cultivation techniques, make mistakes when staking their tomatoes. This results in damage to the plants, reduced yields, and diminished flavor.
Typical mistakes when tying up tomatoes:
- They tie the bushes with unsuitable materialMaterials that are too hard damage the stems and shoots. The plants begin to wither and eventually die.
- They use last year's garters and don't disinfect them. As a result, young plants can become infected with pathogenic microbes.
- Tie the ropes lower than necessary and do not change the garter as the bushes grow.When growing tall varieties, a single staking is not enough; it must be repeated several times during the growing season.
- They install supports that do not correspond to the characteristics of the varietyFor example, there is no point in tying a tall tomato plant to a low support, and vice versa.
- The stems and branches are tied with tape/insulating tape.This material secures branches only if wrapped tightly. However, this prevents the stems and shoots from growing in thickness. This results in poor plant nutrition and reduced yields.
Despite its simplicity, staking can significantly impact tomato yields. When choosing a staking method for tomatoes, consider the variety, growing method, budget, and other factors.
Thanks for the tying methods and the timing. I tried them this year and am happy with the results. The tomatoes aren't rotting, they're clean, and it's easy to loosen the soil, fertilize, and do other things.