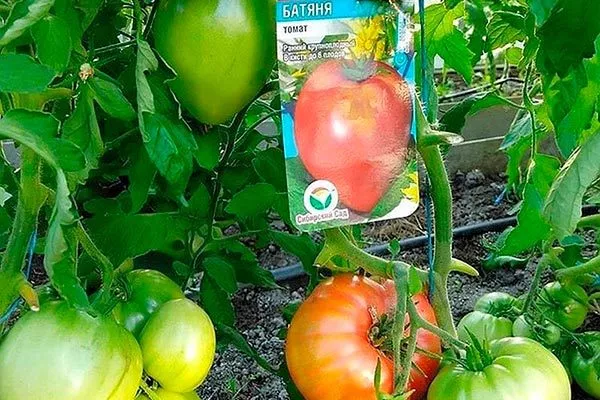
The Batyanya tomato is a popular early-ripening variety that deservedly earns the attention of gardeners thanks to its good productivity, disease resistance, and excellent flavor. It's ideal for both novice and experienced gardeners looking to grow tasty, plump tomatoes. Proper care is essential to ensure bountiful harvests.
History of selection
The development was carried out by renowned Novosibirsk specialists G. V. Botyaeva, V. N. Dederko, and O. V. Postnikova. Work on the variety was completed in 2007, and in 2008, after successfully passing variety trials, it was included in the State Register of Breeding Achievements.
Features of the variety
Every gardener has a few tried-and-true tomato varieties that provide a reliable harvest year after year. For many, the early variety with the unique name "Batyanya" has become a favorite.
Description of the bush
Characterized by an indeterminate growth pattern, the plant's height ranges from 1.2 to 1.5 meters, and in a greenhouse it can reach 2 meters. The bush is vigorous, with a well-developed branching structure and rapid growth, so it requires pinching and tying to supports.
The shoots are covered with large, dark green leaves and simple, yellow-hued inflorescences that bear up to six fruits in abundance. The plant can be trained into a single or double stem.
Main qualities of fruits
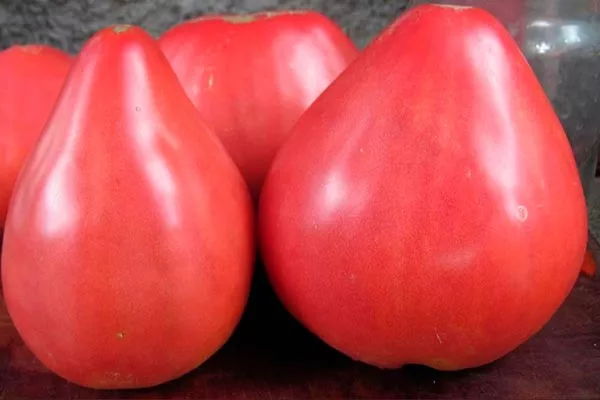
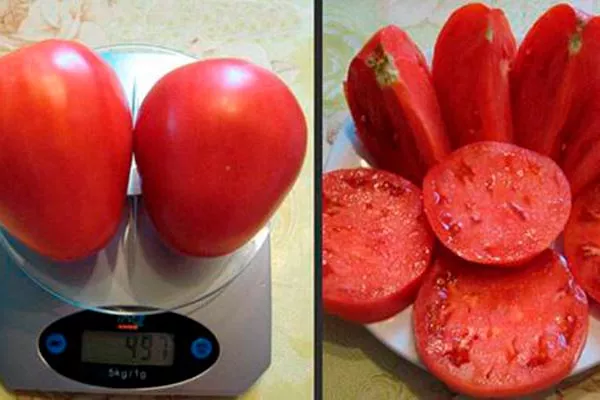
In the open ground, tomatoes reach a weight of around 200 g, while in a greenhouse they grow to 300-330 g, which is rare for early-ripening varieties. The tomatoes have a unique heart-shaped form with a small "nose" and a rich raspberry-pink hue.

When unripe, tomatoes are greenish with a dark spot at the base, which gradually disappears as they ripen. The skin is dense, smooth, and slightly shiny.
Taste characteristics
These tomatoes are distinguished by their sweetness without any noticeable sourness. The soft pink flesh is juicy, aromatic, and sugary, with a small number of seeds, which may disappoint gardeners planning to harvest them for planting next season.

Use of the harvest
Tomatoes have meaty flesh and excellent flavor, which is why they are most often eaten fresh. They are excellent for making juice, ketchup, and tomato paste.
Ripening and fruiting
This is an early-ripening variety: from the first shoots to ripening, the tomatoes take only 90-95 days. The timeframe depends on growing conditions.
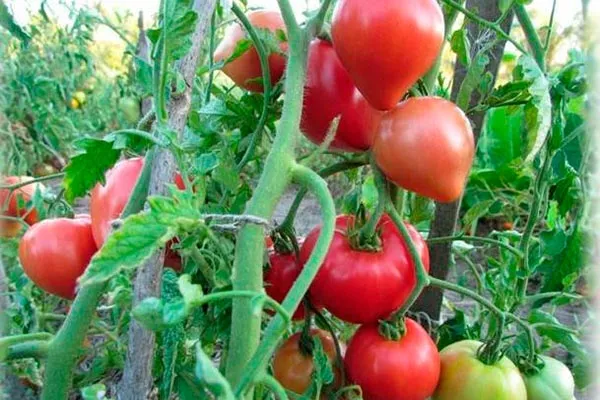
The crop is characterized by a long fruiting period and gradual ripening, allowing for a long harvest of fresh tomatoes. The active fruiting phase begins in July and continues until the onset of persistent cold weather.
Productivity
The crop has good productivity. In open ground, approximately 2 kg of tomatoes can be harvested per square meter, while in greenhouse conditions, the yield reaches 6-10 kg. Compliance with agricultural recommendations significantly affects the yield and quality of the harvest.
Transportability and shelf life
The dense skin of Batyanya tomatoes prevents cracking, regardless of growing conditions. This allows the fruits to store well and withstand transportation well, a trait rarely found among pink or raspberry-colored varieties.
Timing of planting seedlings and transplanting into the ground
Seeds of this variety are sown as seedlings 60-65 days before planned planting in open ground or a greenhouse. This is the optimal time for the seedlings to develop well and adapt before being transplanted to their permanent location.
Sow seeds in late February or early March (depending on your region's climate) so that the plants are ready for transplanting into the ground in late May or early June. If you plan to grow in a greenhouse, start sowing a little earlier.
Transplant the seedlings outdoors once the danger of frost has passed and the soil has warmed to 15-18°C. Place the seedlings in the greenhouse a little earlier – in mid- to late May. Transplant them to their permanent location when the sprouts reach a height of 20-30 cm and have 6-7 true leaves.
Resistance to adverse weather conditions
This crop is characterized by high tolerance to temperature fluctuations. The plant quickly adapts to various climates and soil types, continuing to produce fruit in both hot and cool weather. The variety is drought-resistant. In regions prone to night frosts, it requires shelter.
Growing regions
Tomato bushes produce good yields in various climatic zones of Russia and Ukraine. In the southern regions and areas with a temperate climate, tomatoes are grown in open ground, while in the northern regions, they are primarily grown in greenhouses.
How to grow seedlings?
To obtain high-quality seedlings, it is necessary to follow agricultural recommendations. The subsequent development of the bushes depends on this.
Seed preparation
This procedure promotes accelerated germination and increased disease resistance in tomatoes, which in turn improves productivity. This process involves several stages.
Sorting
Select only large, heavy seeds, as they contain more nutrients needed for plant growth. Place them in a solution of 200 ml of water and 1 teaspoon of table salt, then stir thoroughly for 2-3 minutes and leave for 10 minutes to settle.
Only the seeds that sink to the bottom are suitable. Rinse them with clean water and dry them in a dark place, avoiding placing them near heating devices. Discard any seeds that float to the surface.
Heat treatment
Warming the seeds helps improve their germination rate. One simple method is to use an incandescent lamp and leave the seedlings under it for 3-5 hours.
Disinfection
This step helps protect the seeds from diseases. To do this, soak the seeds for 20 minutes in a 1% potassium permanganate solution, after soaking them in water for 24 hours. After soaking in potassium permanganate, rinse.
Carry out dry treatment using a fungicide, such as Fundazol. Mix 5 g of the product with 1 kg of seeds. Perform wet disinfection five days before planting, and dry disinfection two days before.
Nutrient treatment
A day before planting, soak the seeds in a nutrient solution. To do this, use:
- Epin (1-2 drops per 100 ml of water);
- Virtan-Micro (10 g per 1 l);
- Immunocytophyte (1 tablet per 150 ml);
- Sodium humate (1 g per 2 l);
- Potassium humate (50 ml per 10 l).
Soak
This procedure is optional, but it helps speed up germination by 2-3 days and increases the seeds' tolerance to cold soil. Place them in a cheesecloth bag and soak in water (25-30°C) for 12 hours, changing the water every 4-5 hours. Then, let the seedlings dry.
Germination
To speed up germination and get an early harvest, sprout the seeds. To do this, place a cotton cloth in a plate, fill it with warm water, and spread the seeds on top. Cover them with damp cheesecloth or cloth and place them in a room with a temperature of 20-25°C.
Hardening
Hardened seeds are highly resistant to adverse weather conditions. Place them between two layers of cloth or cheesecloth, cover with warm water, and place them on a radiator.
After 3 days, they should swell. Then place them in the refrigerator for 20 hours, then return them to a warm place (20°C) for 6 hours. Repeat this process for a week.
Bubbling
For this procedure, you'll need an aquarium air compressor and a jar. Fill the container with water at 20°C (68°F) and attach a hose to the bottom to supply air. Place the seeds in the jar and leave them for 12 hours. This helps oxygenate them. Allow the seeds to dry until they disperse freely.
Container and soil
For tomato seedlings, prepare boxes, pots, or plastic cups with a minimum height of 10 cm. You can purchase soil from the store, but it is recommended to mix it with garden soil in a 1:1 ratio and add 40 g of chalk or dolomite flour per 10 liters of the mixture to reduce acidity.
To prepare the substrate yourself, use the following mixtures:
- Mix equal parts turf, peat, and humus. Add 5 g of urea, 20 g of potassium sulfate, 60 g of superphosphate, and 30 g of ash per bucket of the mixture.
- Mix 0.5 parts mullein, 1 part sawdust, and 3 parts peat, or 1 part sod soil, 4 parts peat, and 0.25 parts mullein. Add 1 g of potassium chloride, 2 g of superphosphate, 10 g of ammonium nitrate, and 3 kg of river sand to the mixture.
- Combine 1 part of soil and compost, 2 parts of peat, add 10 g of potassium and urea, 30 g of superphosphate and 200 g of ash to a bucket of the mixture.
- ✓ The pH level should be between 6.0-6.8 for optimal nutrient absorption.
- ✓ The soil must contain at least 3% organic matter to provide seedlings with the necessary microelements.
Don't use soil for the substrate from areas previously used for tomatoes, peppers, potatoes, or eggplants. Disinfect the soil first by pouring boiling water over it, then spread it on a baking sheet to a 5 cm layer and bake in an oven preheated to 90°C for 30 minutes.
You can place the soil in the freezer for 5 days, then leave it in a warm place for a week, and then expose it to cold again.
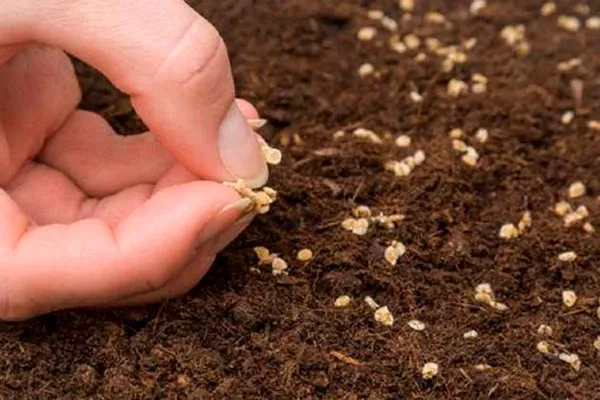
Sowing
First, add a 1.5 cm thick drainage layer to the container using expanded clay, sand, or fine gravel. Then fill with soil and make furrows 1 cm deep, spaced 3-4 cm apart. Space the seeds 1-2 cm apart, then sprinkle with soil or cover with a 1 cm layer of soil.
To maintain the required humidity (80-90%), cover the container with glass or plastic film, removing it after 2 weeks. Place the container in a room with a temperature of 20-30°C. At 20-25°C, seedlings will appear in 5-6 days; at 25-30°C, in 3-4 days. At 10°C, seedlings will emerge in 2 weeks.
Caring for seedlings
When the seeds sprout, move the container to a room with a temperature of 10°C at night and 12-15°C during the day for 7 days to prevent the seedlings from stretching. Then move the plants back to a warmer room.
Perform care procedures:
- Water the seedlings with warm, settled water (22-25°C) using a spray bottle. Avoid using cold water to prevent root rot and blackleg. Water when the soil is slightly dry, but avoid overwatering.
- To ensure adequate light, place the container on a southwest- or south-facing windowsill. If this isn't possible, use supplemental lighting with lamps for 16 hours a day.
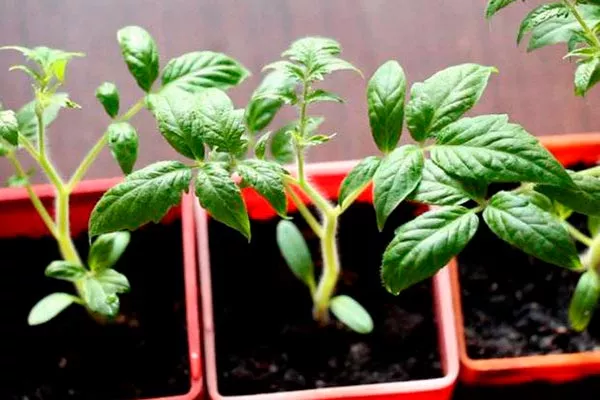
- After 10-18 days, when the plants have two true leaves, transplant them. Transplant the seedlings into 200 ml containers. Water the soil generously beforehand, and carefully remove the plants from the soil with the root ball.
- After transplanting, fertilize the seedlings with a solution containing potassium salt, superphosphate, and ammonium nitrate. After 8-10 days, apply a second fertilizer, and after 15-20 days, apply a supplemental fertilizer containing other fertilizers, such as potassium chloride, ammonium nitrate, and superphosphate.
You can use chicken manure, diluting it in a ratio of 1:10.
Four to five days before planting the seedlings outdoors, begin hardening them off. They need to acclimate to the changing conditions, so gradually move them outdoors, starting with 2-3 hours and increasing the time to 6-8 hours.
How to grow tomatoes?
Growing tomatoes is a process that requires attention at every stage. From choosing the right variety to carefully preparing the soil and caring for the plants, everything affects the final result. To ensure a good harvest, it's essential to follow basic guidelines.
Transfer
Carry out this procedure when the plants are 50-60 days old and have 5-7 true leaves. Do this in the morning to avoid direct sunlight, which can damage the tender shoots.
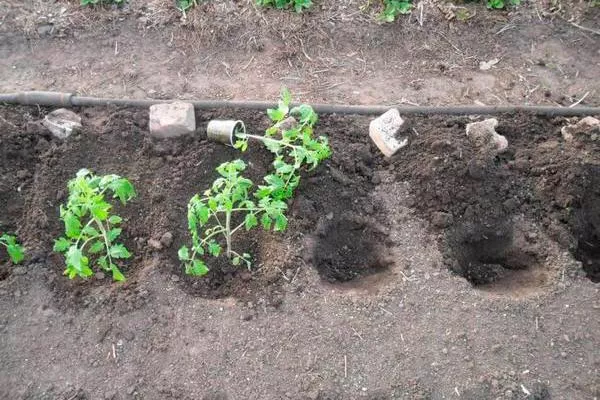
Prepare the soil in advance: it should be soft and loose, with good drainage. Dig holes 40-50 cm apart. Plant the seedlings deep enough to reach the first true leaves to encourage root development.
Site preparation
Choose sunny sites with good daytime exposure. The bushes grow best in loose, fertile soil with a neutral or slightly alkaline pH. A few weeks before planting, deeply loosen the soil and add organic fertilizer such as humus, compost, or well-rotted manure.
Don't grow tomatoes in the same spot more than once every 3-4 years, as they greatly deplete the soil. Before planting, disinfect the soil to eliminate pathogens such as late blight. To do this, water the soil with a hot solution of potassium permanganate.
The nuances of growing seedlings in open and closed ground
Growing tomatoes in a greenhouse can significantly increase yields. Plant 5 plants per square meter in open ground and 3 plants per square meter in a greenhouse. For optimal growth, choose a location with minimal exposure to wind, and ensure good ventilation in greenhouses with high temperatures.
Shaping and pinching out side shoots
Grow the bushes with 1-2 stems, though the two-stem option is more popular as it ensures a higher yield per plant. Form the second stem from a shoot located after the first flower cluster.
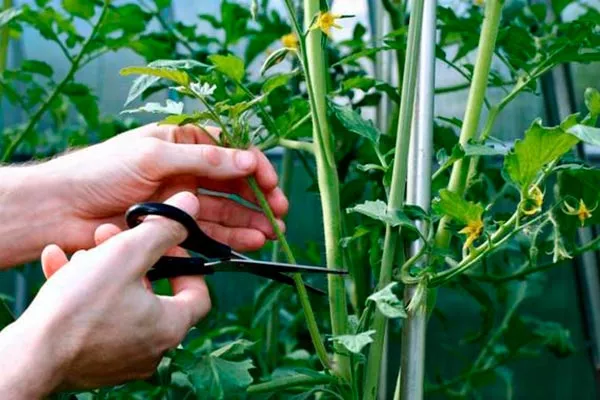
Remove all other shoots that appear on the plant to ensure proper development and increase yield.
Garter
The Batyanya variety requires staking, as its fragile stems may not be able to support the weight of large ripening fruits and break. Begin staking within the first week after transplanting the seedlings into the ground.
Watering
Provide moderate moisture. Make sure the soil around the bushes doesn't dry out and remains evenly moist, but avoid overwatering, as excess moisture can cause the fruit to crack. During hot, dry summer days, watering may be necessary more frequently, up to 4-5 times a week.
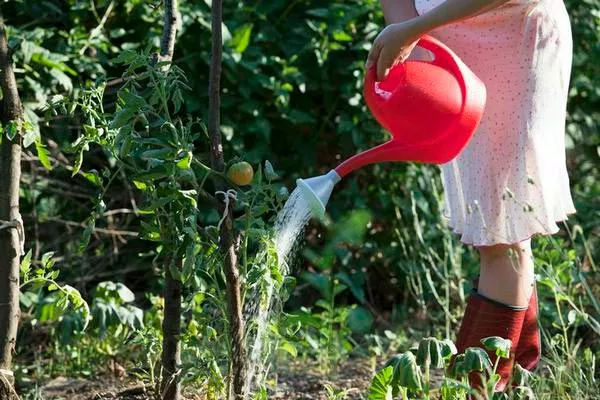
The main thing is to use warm water, preheated in the sun, to avoid temperature changes that can damage the root system.
Top dressing
Fertilize the bushes 14 days after planting. Apply 20-35 g of potassium salt, superphosphate, 10 g of nitrophoska, 15 g of urea, and 10 g of saltpeter per square meter of soil. Repeat the second fertilizing 20-25 days later, using the same fertilizer regimen.
Features of cultivation and possible difficulties
Sow seedlings two months before transplanting them to the ground or greenhouse. Early sowing can result in the loss of the first clusters, which produce the largest fruits. The bushes need support, as without support they can break under the weight of the fruit.
Diseases and pests
Batyanya is an early-ripening variety, which helps it avoid late blight, which typically develops in late summer during hot and humid weather. However, the crop can be susceptible to other diseases, such as fusarium, verticillium, and alternaria. The bushes are susceptible to various pests:
- May beetle larvae;
- wireworm;
- aphid;
- mole cricket;
- scoop;
- whitefly.
To protect against insects and fungal infections, use a special spray during the ripening stage. To prepare it, mince 500 g of garlic, add 5 liters of warm water, and let it steep for 15 minutes. After straining, dilute the infusion with water at a ratio of 3:100 and water the tomatoes with a watering can.
Harvesting and use of the crop
Tomatoes ripen three months after germination. Harvest the fruit in warm, dry weather, preferably in the morning after the dew has cleared, as this is when they are at their firmest. Tomatoes are ideal for salads, ketchup, lecho, pasta, and juices.
Pros and cons
Before growing seedlings in a garden or greenhouse, be sure to research all potential challenges. The Batyanya variety has many advantages:
Some vegetable growers note that this variety has several drawbacks: it needs to be tied up and the skin tends to crack in high humidity. Furthermore, large tomatoes don't fit whole in a jar, so they can only be preserved cut up.
Reviews
The Batyanya tomato is an excellent choice for those looking for an early harvest of large, tasty tomatoes. This variety combines high disease resistance, excellent fruit flavor, and good yield. Although it requires a little more attention during cultivation, the results are well worth it. Standard farming practices are essential for achieving this.