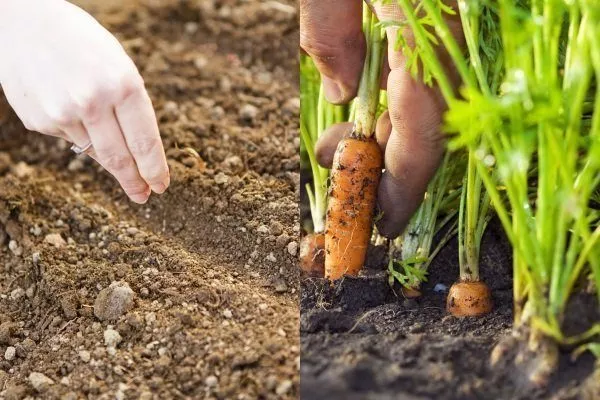
Unlike many vegetable crops, carrots are never grown from seedlings. They are sown exclusively in open ground. Growing carrots has several nuances and challenges that are useful to understand before planting.
Which carrot variety should I choose?
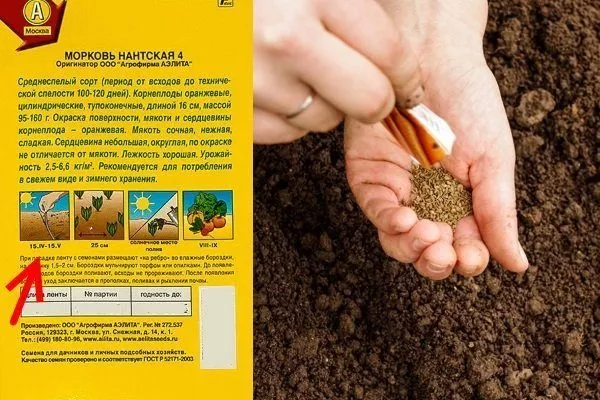
Inexperienced gardeners choose carrots based on price, attractive packaging, name, neighbor's advice, reviews from vegetable growers, and other dubious criteria. In reality, carrot varieties should be selected based on their agronomic characteristics.
- ✓ Resistance to diseases typical for your region.
- ✓ Adaptation to the soil type on your site.
- ✓ Daylight hours requirements.
All carrot varieties are divided into categories. When choosing the right variety, consider the following criteria:
- Selection. There are domestic and foreign varieties. The former are cheaper and are zoned for specific Russian regions. Foreign varieties can offer significant commercial and agronomic advantages, but their adaptation to the local climate must be taken into account.
- Ripening periods. There are three categories of carrots:
- Early. For a quick harvest. Ripens as early as June-July. Not for winter storage.
- Mid-season. Ripens in autumn. This is the sweetest and juiciest carrot. Stores well.
- Late. Designed for long-term winter storage. They feature large roots and are as sweet as mid-season varieties.
- Productivity. Carrots yield between 20 and 50 tons per hectare. An average of 5-6 kg of carrots are harvested per square meter.
- Product characteristics. Carrot varieties may differ in color and root shape.
- Carotene content. The more carotene, the healthier and more vibrant the carrot. Russian varieties typically outperform their foreign counterparts in this regard.
- Sweetness. They are recommended for baby food and for people who regularly work on a computer. They are rich in carotene and sugars.
The sweetest varieties of carrots are Orange Friend, Children's Joy, Karotan, Emperor, Nastena, Red Maiden, and Favorite.
Among carrots there are also varieties of unusual colors and shapes:
- Carrots with whites, yellow, red and purple root vegetables - Belgian White, Yellow Stone, Queen of Autumn and Dragon, respectively.
- With small and round root vegetables - Parisian carrot and Round baby.
- Without core – Longe Rote and Karotinka.
Conditions for growing carrots in open ground
Carrots aren't exactly a demanding or demanding crop. However, there are a number of conditions that must be met to ensure a successful harvest. Carrots will grow under virtually any circumstances, but whether they'll be large, tasty, shelf-stable, and vitamin-rich depends on the growing conditions.
Site requirements
Carrots are grown in flat, level areas. Site requirements:
- Illumination. Choose a well-lit area. Without enough sun, carrots grow poorly—the tops are stunted and the roots are thin. The area should receive full sun throughout the day. Shade, even temporary, reduces yield and degrades the flavor of the roots.
- Soil. Loose, neutral or slightly acidic soils (pH 6-7) are preferred. Acidic and alkaline soils are strictly contraindicated. The crop grows best in loamy soils with a high sand content, or in sandy loam soils. In dense loams, carrots grow small and rot during storage. When growing varieties with long roots, deep plowing is necessary. The soil must be well-aerated and moisture-retentive. High humidity and a lack of oxygen lead to tasteless carrots, and the risk of fungal diseases increases.
- Predecessors. Carrots grow well after tomatoes, cucumbers, cabbage, onions, garlic, potatoes, and grains. Avoid planting carrots immediately after dill, parsnips, caraway, fennel, parsley, carrots, and all umbelliferous plants.
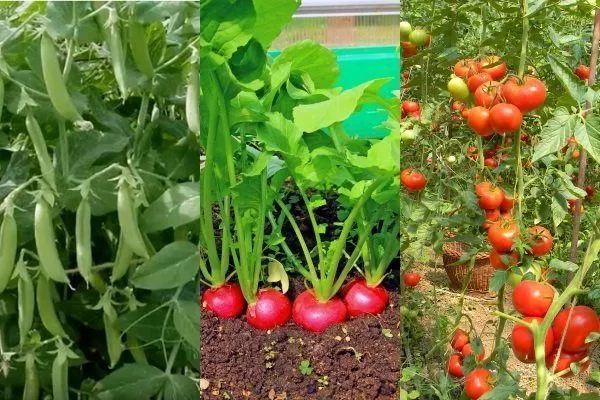
- Neighbours. Carrot yield increases if peas, radishes, and tomatoes are grown nearby.
Carrots should be replanted in the same area no sooner than 3-4 years later. If replanting the crop in the same spot:
- The crop yield is falling.
- The product quality is deteriorating.
- Disease rates are rising. Root crops and above-ground parts are being damaged by pests and diseases, including Alternaria blight, carrot fly, aphids, nematodes, and others.
The following areas are absolutely not suitable for carrots:
- with a strong slope;
- overgrown with weeds;
- on which unfavorable predecessors grew - especially tobacco and sunflower.
Preparing the soil for planting carrots
Plot preparation begins in the fall. Over the winter, all fertilizers and additives will be absorbed and produce maximum results. The ideal soil for carrots is well-drained, loose, and fertile, free of rhizomes and stones.
Features of soil preparation for carrots:
- The soil is dug up in the fall, removing all unnecessary things from it - stones, rhizomes, hard debris.
- The digging depth is 1.5 spade depths. Deeper digging depths allow root crops to grow deeper. Deep digging also simplifies carrot harvesting, as they are easier to pull out.
- If the soil is heavy loamy, peat or sand is added for autumn digging - 1 kg per 1 sq. m. m.
- For excessively sandy soils, add manure or humus.
- In low-fertility soils, humus is added in the fall – 6-8 kg per 1 square meter. However, organic matter can also be added in the spring – before sowing.
- In the fall, chalk or lime is added to acidified soil – 1 glass per 1 sq. m.
- In spring, you don’t need to dig up the soil; just loosen and level it.
In loose soils, carrots grow straight and beautiful, while in dense soils they grow crooked and deformed.
The amount of fertilizer applied to the soil depends on its type. For example, in clay soils, in addition to peat and sawdust to loosen the structure, the following is added per square meter per season:
- coarse sand - 0.5 buckets;
- humus or compost – 5 kg;
- wood ash – 300 g;
- lime – 500 g (for acidic soils);
- mineral fertilizers – 2 tbsp.
Each soil type requires its own fertilizer formula. Before applying fertilizer, it's necessary to determine the soil's density and acidity. Gardeners have a variety of methods for determining these parameters, ranging from folk wisdom to litmus paper.
Timing of planting carrots in open ground with seeds
Sowing times depend on the variety, climate, and purpose of the carrots. The packaging usually includes information about the ripening period, which can be used as a guide when calculating sowing times.
When to sow carrots in winter?
To get an early carrot harvest—a few weeks before the earliest carrots ripen—they are sown before winter. Only early varieties are used for this purpose. The best time for sowing is mid- to late autumn. Pre-winter sowing is practiced primarily in regions with mild winters. If winters are harsh, even a thick layer of covering material won't help—the seeds will freeze.
Autumn sowing is carried out taking into account the local climate. It's important to time the sowing so that there's no chance of a warm spell afterward. If the seeds manage to germinate and sprout before winter, they'll be destroyed by frost, and there won't be any seedlings in the spring. It's recommended to delay sowing until late autumn.
Only winter-hardy and zoned varieties are suitable for autumn sowing, for example, the “Moscow Winter” carrot.
In autumn, seeds are sown when the soil temperature is below +5°C. The sowing depth is 2 cm. mulch humus - a layer of 3-4 cm. If the snow cover is insufficient, cover the plantings with spruce branches - a layer of up to 0.5 m.
Planting carrots in open ground in spring: timing
In central Russia, carrots are sown no earlier than the end of April – by this time the risk of night frosts becomes minimal.
The sowing time depends on the ripening time:
- early varieties are sown on April 20-25;
- mid-season varieties are sown before May 5;
- late – from April 15 to June 1.
In southern Russia, the dates are quite different. Here, early carrots can be sown starting in mid-March, and in mid-June, carrots for the second harvest can be sown. In July, only early varieties and hybrids are sown. Sowing should take place no later than July 20th. In spring, seeds are sown as early as possible – as soon as the soil warms to 8°C (46°F), a period when the soil has a good moisture reserve.
Dates according to the lunar calendar
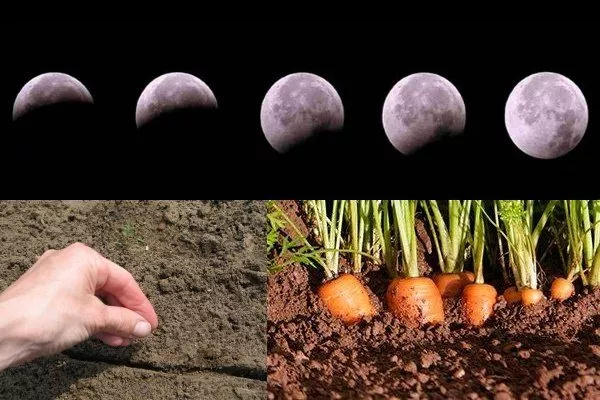
Lunar phases are linked to the movement of sap in plants. During the waxing moon, sap moves upward; during the waning moon, it moves downward, toward the roots. Therefore, root vegetables, including carrots, are recommended to be planted during the waning moon.
Carrots planted closer to the full moon grow tall, while those planted closer to the new moon grow firm, thick, but shorter. Table 1 shows favorable and unfavorable days for planting carrots according to the 2019 Lunar Calendar.
Table 1
| Month | March | April | May | June | July | August | September | October | november |
| favorable days | 10-12, 15-17, 23-25, 27-30 | 2-9, 11-15, 24-27, 29-30 | 1-4, 12-14, 21-23 | 9-11, 18-20 | 25-31 | — | 17-19, 26, 27, 30 | 4-7, 15-17, 19-21, 23-25, 27 | 1-3 |
| unfavorable days | 5, 6, 21 | 5, 19 | 5, 19 | 3, 4, 17 | 2, 3, 17 | 1, 5, 16, 30, 31 | 14, 15, 28, 29 | 14, 28 | 12, 13, 26, 27 |
Regionalism
Carrot planting times are adjusted for each region. Climate factors must be taken into account, including when the soil warms up and when recurrent frosts end. Table 2 shows carrot planting characteristics and timing in different regions.
Table 2
| Region | Climate features | When to sow carrots? | What varieties are suitable? |
| Central Russia | An unstable spring. Snow melts in March or April. Frosts are possible after the snow melts. | The best time to sow is the last ten days of April. This is best done during the flowering period of aspen and birch trees. Second-crop sowing begins in June, and fall sowing begins in late October or early November. | Early, middle and late. |
| Ural | Snow melts in mid- to late April. Frosts are possible in the spring. Cool weather and rain may persist into summer. | Plant in early May, June in summer, and October in autumn. | Early, middle and late. |
| Siberia | Short summer. | Sowing after significant warming – usually in May. | Mid-season varieties are most suitable. |
| Southern regions | Short winters. No consistent snow cover. Snow melts as early as February. | In spring, sow as early as possible, in March, while the soil is still moist. Summer planting occurs in May. Winter carrots are sown in late November. | Early, middle and late. |
Preparing carrot seeds for planting
Carrot seeds can sit in the soil for up to three weeks before sprouting. They contain essential oils that prevent swelling and delay germination. To speed up germination, it is recommended to treat the seeds before planting.
Carrot seeds maintain high germination rates – 50-70% for 3-4 years.
Processing carrot seeds before planting
If you're using store-bought seeds—pelleted or coated—they don't need to be processed. They've already undergone pre-sowing treatment, are coated with a special nutrient layer, and soaking them is not recommended, as this will dissolve the coating. These seeds are sown dry.
- Soak the seeds in water at +50°C for 20 minutes to disinfect.
- Cool the seeds in cold water for 2-3 minutes to harden them.
- Soak seeds in a growth stimulator for 24 hours to improve germination.
If the seeds are purchased from someone or collected at home, they will need to be prepared:
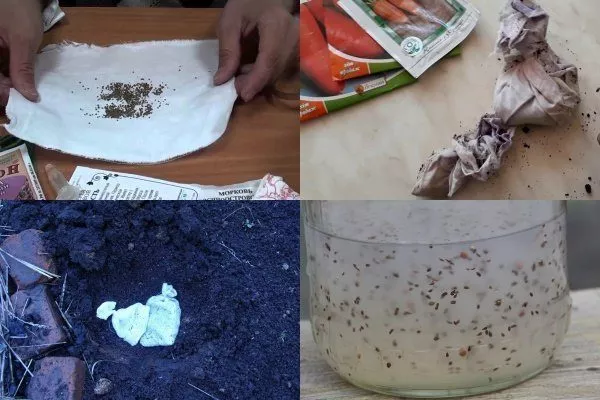
- Sorting. The seeds are placed in a saline solution for 5 minutes. Any seeds that float to the surface are discarded as they are not viable.
- Heat treatment. The seeds are soaked in hot water (50-60°C). After 20 minutes, they are transferred to cold water for 2-3 minutes.
- Treatment in a stimulator. Seeds that have passed the test are kept in a cloth soaked in a growth stimulant such as Zircon or Epin for 24 hours.
- Drying. After soaking, the seeds are dried until they become free-flowing and immediately sown.
We invite you to watch a video in which an experienced gardener shares the secrets of preparing carrot seeds for sowing:
Do you need to germinate carrot seeds?
To speed up germination, some gardeners do the following:
- Spread the seeds on a damp cloth and keep at a temperature of 20 to 24°C.
- The seeds will swell in 5-6 days. This is sufficient time for the seeds to germinate. If sprouts appear, they will be damaged during planting, and there will be no seedlings.
- Before planting, the seeds are dried until they become free-flowing and then sown immediately.
The old-fashioned way:
- The seeds are poured into a linen bag.
- They are buried in early spring to a depth of 20-25 cm. The soil during this period should be moist and not warmed up.
- The seeds are kept in the soil for two weeks. During this time, they swell and develop increased immunity.
- Before sowing, the bag of seeds is removed from the soil. The seeds are laid out on paper or fabric to dry. Once dry, sowing can begin.
Sowing carrots in the ground
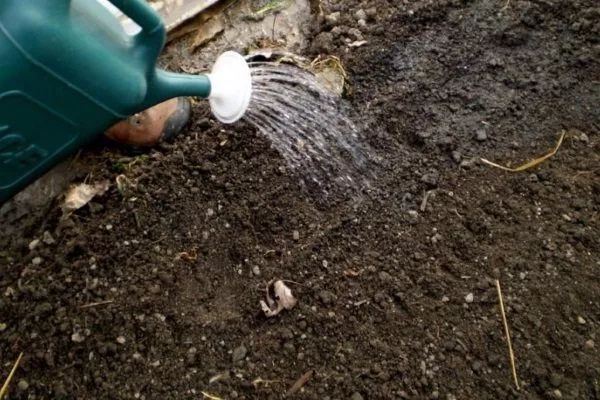
Before sowing, the beds are watered with hot water. It's advisable to dissolve Fitosporin in it. Then, the soil is covered with plastic wrap to retain moisture and warm it up.
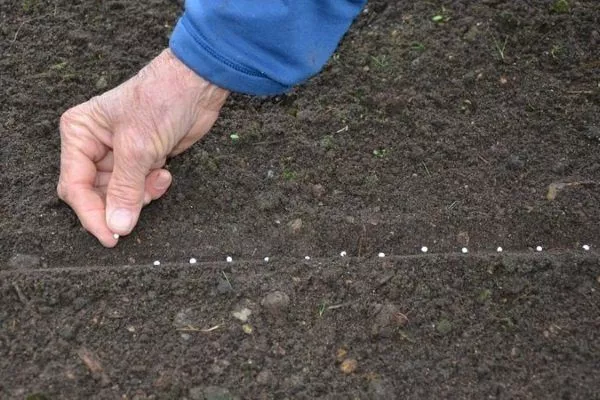
Distance between seeds
Carrot seeds are planted 2-3 cm deep, after making shallow furrows of 2-3 cm. Planting deeper is not recommended, as germination is already slow and will be delayed even further. Planting less deeply may result in loss of seedlings. The recommended spacing between adjacent seeds is 1 to 3 cm, with 2 cm being the optimal distance.
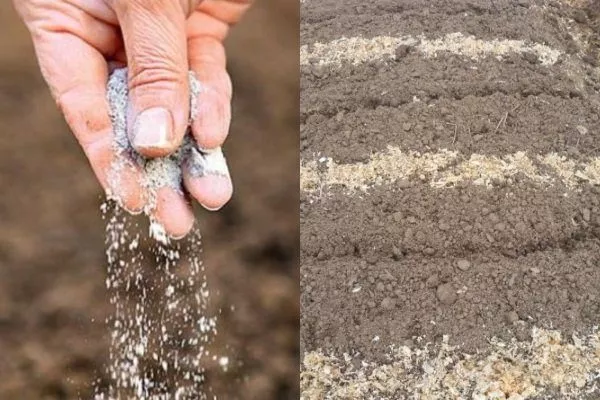
The furrows in which the seeds are sown are watered and then sprinkled with:
- wood ash is a potassium fertilizer;
- tobacco dust - it protects against pests.
Carrot seeds are very small, so sowing them is a painstaking and slow process. If you sow too quickly and generously, you'll have to thin the carrots later, wasting the seed. Furthermore, thinning overly dense plantings can damage the delicate seedlings.
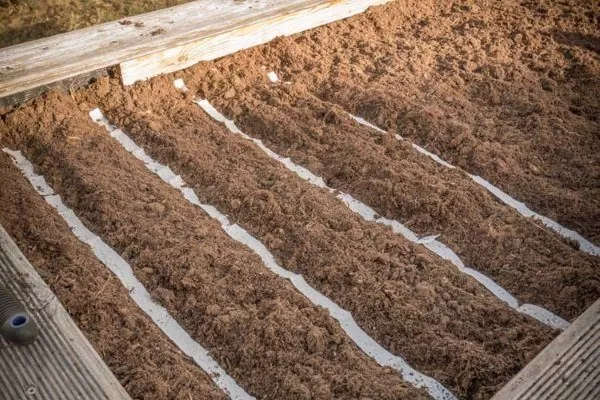
Carrot planting pattern in open ground
The scheme depends on the scale of the plantings:
- When grown commercially, carrots are planted in double rows, with 15-20 cm between them. The distance between adjacent rows is 40-50 cm.
- For small-scale gardens, the bed width is 1.3-1.5 m. Rows are made perpendicular to the long side of the bed. The narrow width of the bed makes it easy to weed, water, and thin the rows from either side. The distance between rows is 15-20 cm. Borders are built along the edges of the beds to prevent water runoff during irrigation.
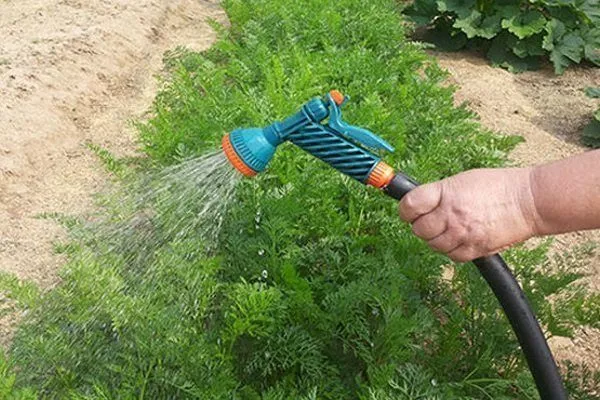
Do carrots need to be watered after planting?
The sown seeds are covered with fertile soil and compacted by hand to ensure good soil contact. Watering the crops depends on the weather:
- Carrots are planted early, while the soil is still moist, and if it is damp and cool outside, then there is no need to water the plantings.
- In warm, sunny weather, lightly watering the crops is recommended. However, this should be done carefully and sparingly to avoid crust formation. It's also advisable to mulch the crops after watering to prevent crust formation and allow the seedlings to emerge more easily.
To retain moisture and speed up germination, cover the seedlings with plastic film or spunbond. The latter is preferable, as it can become too hot under the film and burn the seedlings. As soon as the seedlings emerge, the covering material is removed.
Light watering—sprinkling—is repeated daily until seedlings emerge. Once the carrots emerge, the spaces between the rows are loosened, and watering is reduced by half. Until the spaces between the rows are covered with tops, they are loosened regularly to prevent weeds from growing.
How long does it take for carrot seeds to germinate?
Under favorable conditions—if the weather is warm and the seeds were soaked when planted—germination will occur in about a week. At temperatures below 12°C, germination time doubles, with the first shoots appearing no sooner than two weeks later.
Other types of planting
Thinning is one of the most difficult agricultural practices when growing carrots. To avoid wasting seeds and reduce the labor involved, gardeners have developed various sowing methods.
The most convenient option is to sow carrots using a mini-seeder. These machines simplify sowing, create even rows, and maintain proper spacing between seeds. The downside of this method is the high cost of the seeder. Gardeners have many inexpensive ways to sow carrots; let's explore them in more detail.
Sowing with granules
The most convenient way to plant carrots. If you buy pelleted seeds, you don't need any tools. The pellets are coated with a nutrient-rich shell and are much larger than carrot seeds, making them easier to distribute into the furrows.
Space adjacent granules 5-7 cm apart. The seedlings will emerge evenly, and each carrot will be in its proper place—no thinning required. The most important thing is that all the seeds germinate, so choose only reputable producers.
Sowing with sand
The simplest and most popular way to sow any small seeds is mixed with sand:
- Prepared seeds are mixed with fine-grained sand. The amount of sand to use is up to each gardener, based on their preference. The key is to ensure the seeds fall into the furrows at the required frequency. It's recommended to mix a dessert spoon of seeds with a liter of clean, dry sand. Mix the ingredients thoroughly.
- The resulting mixture is sown dry or slightly moistened, depending on your preference. The mixture should be spread over an area equal to the volume of seed mixed with sand. When sowing, carrot seeds are not visible—gardeners simply scatter the sand mixture.
Using paste
The order of sowing with paste:
- Prepare a paste from starch—potato or corn starch—or flour. It should be liquid. Add 1 tablespoon of bulk product (flour or starch) to 1 liter of cold water. Bring the mixture to a boil, stirring. Once it reaches a boil, turn off the heat and cool to 30°C.
- Pour the seeds into the warm mixture in a thin stream. Use one packet of seeds per 1 liter of paste. After mixing, pour the mixture into a watering can and pour it through the spout into the prepared furrows. The amount of mixture required depends on the area to be covered.
Watch the video to see how to sow carrots using paste (jelly):
Tape method
This is one of the most popular methods for planting carrots and other small-seeded crops. You can use duct tape, but a cheaper material—toilet paper—is more often used. The tape is prepared in advance, even in winter. The seeds are glued to the toilet paper. This requires patience, but planting is done in minutes.
The order of sowing in strips:
- To adhere the seeds, make a paste. Add boric acid – 1 pinch per 1 liter of water.
- Place a drop of paste on a sheet of paper laid out on the table and glue the seeds onto it. Space the seeds 2-2.5 cm apart. The length of the paper should be equal to the length of the bed.
- When the paste dries, the paper is rolled into rolls and stored until spring.
- The tape is laid in furrows 3 cm deep. It is watered and covered with soil.
You can use napkins instead of paper. For this method to be effective, seeds must have 100% germination, otherwise the plantings will be spotty.
In a bag
This is a combined method that involves swelling the seeds and mixing them with some other material. Sowing order:
- The seeds, placed in a bag, are buried in the soil in the spring for a couple of weeks – 15 cm deep.
- The swollen seeds are poured into a bowl and sand or paste is added. The sand can be replaced with starch, either dry or liquid, so the seeds are poured into the furrows rather than scattered.
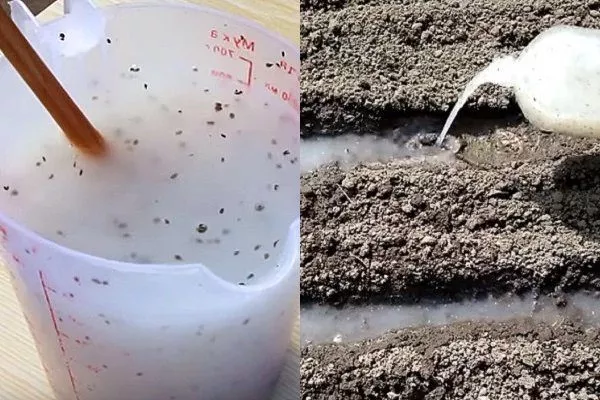
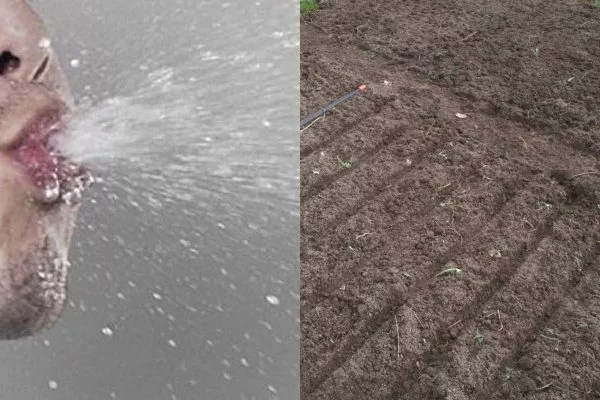
With the help of the mouth
This is a specific method – “for an amateur”:
- the seeds are poured into a glass;
- fill them with water;
- stir with a wooden stick;
- They take water with seeds into their mouths and spit it out into the furrows.
This was the method used to sow carrots in the old days, but it's rarely used today. The water used to sow the seeds should not be above 30°C.
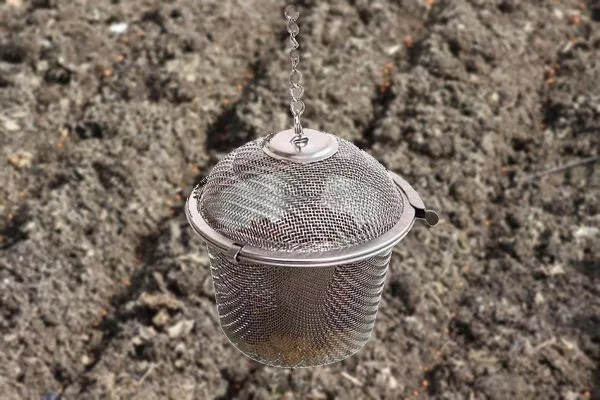
Sowing with a strainer
Another old method of sowing:
- seeds are poured into a tea strainer;
- They walk along the beds, shaking a sieve over the furrows.
A strainer can be replaced with a colander, salt shaker, or plastic bottle with holes poked in it. It's important that the holes match the size of the seeds, otherwise sowing will fail.
Sowing carrots with granules
Sowing carrots with sand
Sowing carrots using paste
Strip sowing of carrots
The "in a bag" method of planting carrots
Sowing carrots "from the mouth"
Sowing carrots with a strainer
Caring for carrots in open ground
To grow large and beautiful carrots, rich in vitamins and other nutrients, you need to care for them throughout the growing season - water them, loosen the soil, feed them, and thin them out if necessary.
Thinning
To ensure large root crops, you need to provide them with space to grow. If you don't thin out the plantings in time, the carrots will grow thin, and some plants won't develop roots at all.
Thinning times:
- The first thinning of the plantings occurs as soon as the sprouts develop two true leaves. All excess carrots are ruthlessly pulled out. There should be 2-3 cm between adjacent plants.
- The second and final time the carrots are thinned out is after a month – by this time the tops should have grown to about 10 cm in height.
By the second thinning, the plants are quite large and easier to pull out by hand, without any tools. Now, the distance between adjacent plants should be 5-7 cm. If the variety has cylindrical roots, the spacing should be smaller; if conical, the spacing should be larger.
How to thin carrots:
- Manually. Remove unwanted seedlings carefully, moving perpendicular to the surface. It's important not to damage the remaining plants.
- With scissors. Using a tool, pull out weak, short, and thin plants. Instead of scissors, you can use garden tweezers—they're suitable for both the first and second thinning. To make it easier to remove the plants from the soil, moisten the soil before thinning. This method requires patience—grasp each plant with tweezers and gently pull it out.
In addition to thinning, weeding is necessary. Seeds take a long time to germinate, but weeds grow quickly, and when the young plants emerge, they are mixed with other weeds. The seedlings are so small that weeding can only be done by hand—a hoe is not an option.
Don't leave any uprooted carrots in the garden beds—their scent immediately attracts carrot flies. All uprooted plants should be collected and composted. They cannot be replanted—uprooted carrots don't take root well, and even if they do replant, they produce branching roots. After uprooting, compact the soil to prevent insects from laying eggs in the disturbed soil.
Carrots are thinned out during the day; in the evening, the carrot fly is actively attracted by the smell of the pulled carrots.
Watering carrots
From glaze Not only the size of the roots, but also their flavor, juiciness, and sweetness depend on the soil. Carrots are watered throughout the growing season. The soil should be moistened to a depth corresponding to the expected length of the roots—approximately 30 cm. If there is insufficient moisture, the roots will be limp and have a bitter taste.
Watering features:
- Moisture is especially important during the initial growing season, when the plant's root system is still weak. As the plant grows, watering frequency decreases. After watering, loosen the space between the rows and weed out any weeds.
- Watering frequency: every 3-4 days.
- The watering rate is 30-40 liters per 1 sq. m. For medium-sized root crops, 10-20 liters per 1 sq. m. is sufficient.
- At the end of the growing season, 10 liters per 1 square meter is sufficient. Watering frequency is once every 1.5-2 weeks.
- Watering is stopped 2 weeks before harvesting.
If humidity fluctuates—from dry soil to overwatering—root vegetables crack and their shelf life deteriorates. Improper watering—failure to maintain the correct levels and frequency—leads to carrot deformation, causing them to grow crooked, with numerous small, thin roots along the entire length of the carrot.
Top dressing
During cultivation, carrots should be feed Two to three times. The development and immunity of plants, as well as the commercial quality and shelf life of root crops, depend on the timeliness of fertilizer application and the correct composition. The timing and composition of fertilizer applications are presented in Table 3.
Table 3
| Feeding period | Compound |
| The stage of formation of 2-3 true leaves. First thinning. | Fertilizers are best applied in liquid form. Use 30 g of superphosphate, the same amount of potassium salt, and 25 g of nitrate per bucket of water. This amount is sufficient for 10 square meters of garden beds. Another option is diluted bird droppings (1:15). |
| 3 weeks after the first feeding | Similar to the first feeding. The goal is to increase root growth. |
| 3 weeks after the second feeding | Nitrogen is excluded from the composition. For 10 liters – 40 g of superphosphate, 25 g of potassium salt. |
If carrots are lagging in growth, it's recommended to water them with complex fertilizers, such as Kristallone. Dissolve 1 tablespoon of the fertilizer in a bucket of water. You can also feed them with Kemira, Nitrophoska, or Rastvorin. Next time, increase the fertilizer dose by 1.5-2 times.
To get large and good carrots, do not feed them with nitrogen fertilizers after July 15.
Feeding rules:
- Before applying fertilizer, the beds are watered.
- The final fertilizing is done a month before harvest. This reduces nitrate levels in the root vegetables, adds sweetness and juiciness, and improves shelf life.
Carrot diseases and pests
Carrots are relatively disease-resistant crops. The most common diseases are phoma and early blight. To prevent, or at least significantly reduce the risk of disease, simply treat carrot beds with 1% Bordeaux mixture. Basics Pests and most common diseases of carrots are described in Tables 4 and 5.
Table 4
| Pests | Signs of defeat | How to fight? |
| Carrot psyllid | Small jumping insects lay eggs on leaves. The larvae attach themselves to the base of the leaves, weakening the plant. The roots grow small and bitter. Plant death is possible. When feeding, the insects inject toxic saliva into the plant, causing biochemical changes. | Spraying with insecticides – Borea, Vantex, Alatar, and others. Isolation from coniferous plantings. |
| Carrot fly | The larvae are worm-like, up to 7 mm long. After burrowing into the root, they eat their way through, often causing rot. | Observe crop rotation, select resistant varieties, practice autumn plowing, remove wild umbellifers, and plant marigolds. Use non-woven covering material to prevent flies from laying eggs. |
| Root nematode | Small white worms (up to 1.5 mm) damage plant roots. They thrive in damp and warm conditions. Affected roots are unfit for consumption. | Watering the soil with Decaris solution |
| Mole cricket | A large insect (5 cm long) bites off roots and stems. | Vinegar diluted in water is poured into the burrows, and rags soaked in camphor oil are placed there. Insecticides are used. |
| Wireworm | The beetle larvae (3 cm long) gnaw at the root crops. | Apply ammonia-containing fertilizers. Spray with Bazudin and Aktara. |
| Naked slug | It eats holes in root crops. It thrives in high humidity. | Adding superphosphate, spraying with 10% salt solution. |
Carrot psyllid
Carrot fly
Root nematode
Mole cricket
Wireworm
Naked slug


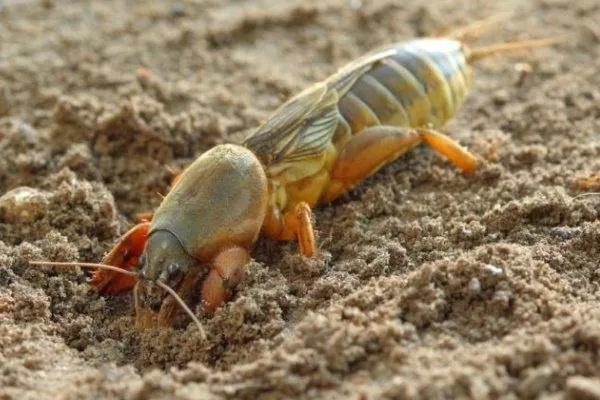
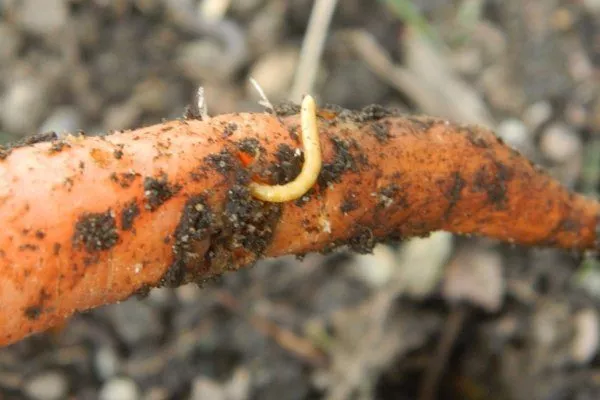
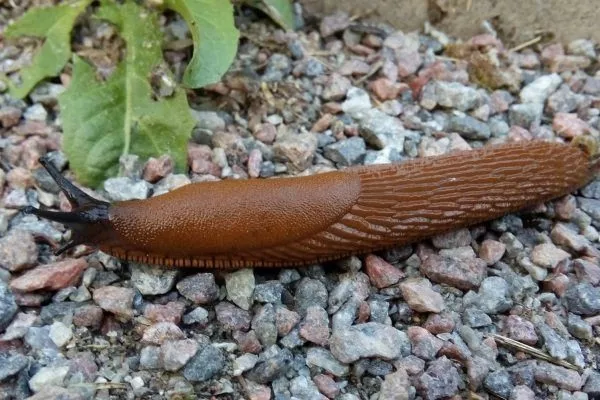
Table 5
| Diseases | Symptoms | How to fight? |
| Phoma (dry rot) | Gray-brown spots appear on the leaves and petioles. The fungus then attacks the roots. | Removal of plant residues. Application of phosphate-potassium fertilizers. |
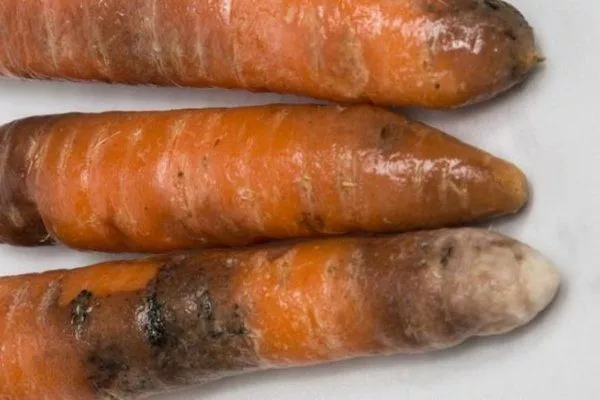
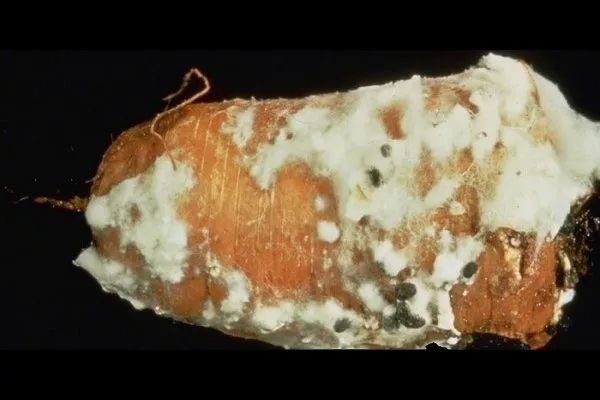
| White rot | A fungal disease affects root crops during storage. | Adding an increased dose of potassium (1.5 tablespoons of potassium sulfate per 10 liters of water). Treatment with copper-containing preparations. Disinfection of the basement with a sulfur checker. |
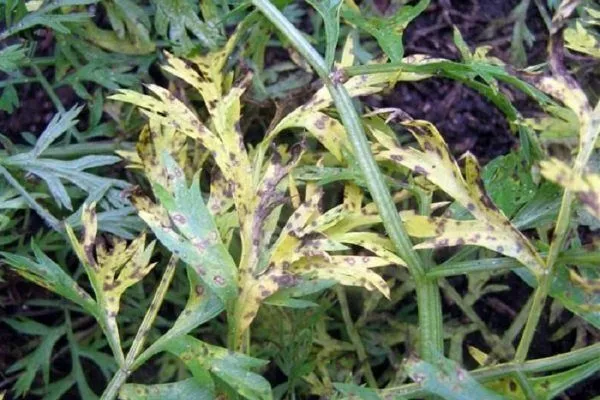
| Bacteriosis | Bacteria attack the leaves, causing them to turn yellow, and then the disease attacks the roots. | Seed treatment in hot water. Spray with Hom 3 weeks after germination (40 g per 10 liters) |
| Gray mold | A fungus that attacks root crops during storage. | Apply nitrogen fertilizers and spray with 1% Bordeaux mixture. Store carrots at +2°C. |
| Brown spot | The appearance of brown spots on the lower part of the stem. | Treatment with nettle or horsetail infusion. |
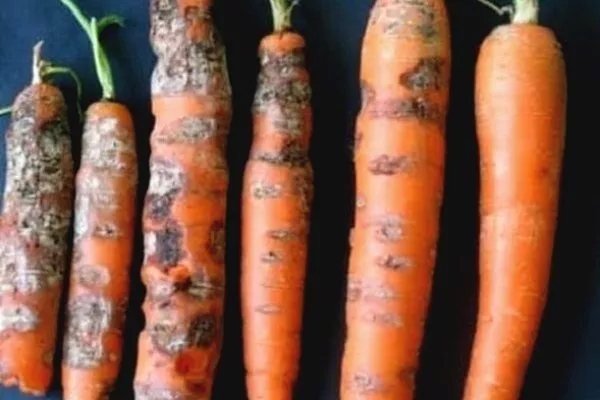
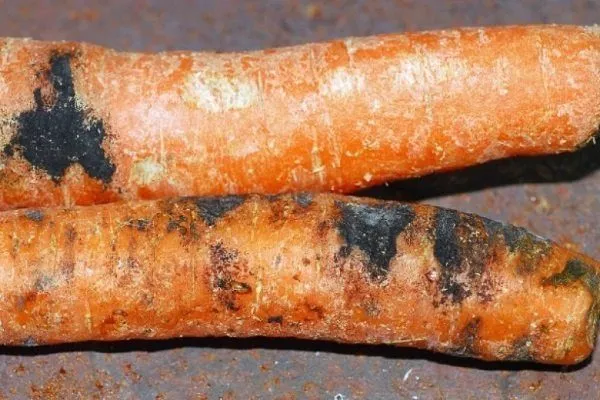
| Alternaria (black rot) | Affects carrots at any stage of the growing season. Symptoms include blackening of the stems. The disease can destroy the entire crop. | Spraying with Rovral. |
Carrot blight
White rot on carrots
Bacteriosis of carrots
Gray mold on carrots
Brown spot on carrot leaves
Alternaria wilt of carrots

Harvesting carrots
In central Russia, carrots are usually harvested after October 10th. When the carrot leaves turn yellow, it's time to harvest. Harvesting is recommended during the waning moon.
Cleaning procedure and storage:
- The extracted roots are cleaned of soil. Do not wash or wipe them with cloths, as this could damage the thin skin.
- The carrots are dried in the sun. If the weather is rainy, they are moved to a well-ventilated area. The tops of the dried carrots are trimmed off.
- The greenish tops are cut off, as they contain solanine, which causes carrots to become bitter during storage. The cuts are disinfected with a potassium permanganate solution. After waiting a few days for the cut area to develop a crust, the carrots are stored in the basement. Another storage option is to cut off the tops of the carrots. Removing the top bud prevents the carrots from sprouting, keeping them fresh.
- Carrots are stored at a temperature of +1°C and at a humidity of 90–95%.
- Carrots should not be stored in airtight containers. If carrots are stored in plastic bags, make sure to poke holes in them.
- Before storing, root vegetables are dipped in a clay mash, dried and stored.
- Another storage option is to place carrots in boxes, layering them with moss. Cover the boxes with tarpaulin.
If you approach sowing correctly, growing carrots is not difficult. Thanks to some ingenious gardening ideas, you can skip the thinning stage and significantly simplify the cultivation of this root vegetable.