Growing green onions at home is a common practice for many city dwellers. However, to ensure a sizable harvest, certain care and planting guidelines must be followed, using various growing methods.
Which varieties are suitable for growing for feathers at home?
| Name | Type | Productivity | Disease resistance |
|---|---|---|---|
| Batun | Annual/Perennial | High | Average |
| Schnitt | Perennial | Average | High |
| Multi-tiered | Perennial | High | High |
| Leek | Two-year-old | Average | High |
| Shallots | Perennial | High | High |
| Slime | Perennial | Average | High |
| Parade | Annual | High | Average |
| Onion | Annual | Average | Average |
| Rostov | Annual | High | High |
| The Black Prince | Annual | High | High |
| Amber | Annual | Average | High |
| Bessonovsky | Annual | Average | Average |
Choosing the right onion variety is important, as onions have different flavors depending on the type, and not every variety is grown for its greens. Preferred varieties include:
- BatunAlso known as Tatar or winter thyme, it's considered a high-yielding variety and can be either annual or perennial. Its distinctive feature is that it has no bulbs, so it's primarily planted in the ground.
- Schnitt It has a narrow and delicate feathery part, up to 50 cm long. The pleasant aroma is preserved during long-term storage.
- Multi-tiered This variety tolerates cool temperatures, making it ideal for growing on windowsills during winter. It requires virtually no maintenance.
- Leek – a common variety with garlic feathers (in shape). It has no bulbs.
- Shallots – a juicy and undemanding onion with a high yield. Relatively low-maintenance.
- Slime – similar to garlic, with a spicy, pungent aroma. It grows quickly and is grown in a cool room.
- Parade – has excellent taste and good green mass.
- Onion Onions are most often used by housewives to force out their greenery. Rotten bulbs can be used.
- Rostov It is distinguished by its increased resistance to fungal diseases and produces an excellent harvest.
- The Black Prince - multi-germ, due to which one bulb produces many feathers.
- Amber It is not afraid of diseases and has dense greenery.
- Bessonovsky – shortened feathers of dense structure, average yield.
Preparatory activities
Planting onions for green onions requires site preparation, soil preparation, planting material preparation, and container preparation. This determines the germination time, yield, and taste of the onions.
How to choose a place?
In apartments, onions are often planted in containers and placed on a windowsill. This is necessary to provide the plant with light. If you've purchased a cold-hardy variety, you can place it on a balcony or a north-facing window. However, the optimal location for most bulbous plants is a south-facing window, regardless of the growing method.
Selection and preparation of seed material
To force the flowers to feathers at home, bulbs and seeds are used. The latter are planted in the ground.
Selection Features:
- The seed material must be 2-4 years old.
- It's best to select firm, elastic bulbs (at least 2 cm in diameter). Their size doesn't really matter.
- The root part of the onion should not be damaged.
- If the heads have started to sprout, the germination time is accelerated.
- You can use sets – small heads formed after planting seeds in the first year.
- ✓ The optimal bulb diameter for feather forcing is from 2 to 4 cm.
- ✓ The bulbs should be firm, without signs of rot or damage.
- ✓ It is preferable to use bulbs that have already begun the germination process.
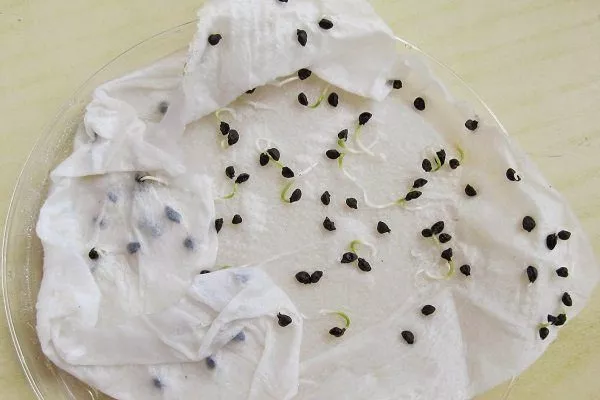
It's important to determine the germination rate of the planting material. The seeds are soaked in a damp cloth (the more germination occurs, the better). A trial forcing of the bulbs is performed by planting one bulb in water (if it sprouts, the onion is ready for planting).
Rules for seed preparation:
- select undamaged grains;
- Place them in clean warm water for 24 hours, changing the liquid periodically;
- pay attention to the elements that pop up - these are empty flowers;
- disinfect the seeds – make a weak solution of potassium permanganate and leave them there for 60 minutes;
- wrap the planting material in a moistened cloth for germination (this is not necessary, but desirable).
How to prepare the bulbs:
- disinfect the onion by soaking it in a solution of potassium permanganate for an hour;
- take out and rinse;
- place in a container with warm water, leave in the room for a day or two (depending on the size of the heads);
- After water treatment, remove the top layer of the husk, cut off the top by 1-1.5 cm;
- Soak the bulbs in a solution containing Epin, according to the instructions.
Preparing soil and containers
The choice of container depends on the growing method—it could be a glass, a bottle, a box, or other container. Remember that onions don't like excessive soil moisture, as they're susceptible to rot. To prevent this, ensure proper drainage by drilling holes in the bottom and lining the containers with a layer of stones.
The soil requires special preparation – it must be fertile and loose. Rules:
- if the soil is dense, add river sand and peat to it;
- disinfect the soil mixture using hot potassium permanganate;
- add compost or humus;
- Before planting, dry the soil after treating it with antiseptics.
Planting technologies
At home, onions are typically planted as close together as possible. Using seeds requires a longer period of time for the bulbs to develop (2-4 months), and the bulbs germinate within a few days.
Seeds
Planting seeds on a windowsill is extremely rare, as the plumes take a while to appear and require special care. Planting method:
- Place a drainage system at the bottom of the container;
- add a layer of soil on top;
- make grooves to a depth of 1.5 cm;
- plant seeds in holes (distance between them 2-5 cm);
- moisten the soil;
- cover with film until sprouts appear;
- Place in a warm, bright place.
As the seedlings grow, open the non-woven fabric daily for ventilation and water the seeds whenever the soil dries out. The best soil is one with added vermicompost and coconut fiber.
Planting bulbs
Bulbs can be planted in different ways – in water, soil, sawdust – using a variety of containers:
- Landing in water.
The classic method involves filling a container (disposable cups, jars, etc.) with water, adding onions, and waiting for the greens to emerge. This method is outdated and has drawbacks, including rotting of the onions, the formation of unpleasant odors, and the appearance of gnats. Today, many use an improved method that accelerates the growth process and minimizes problems.
Step-by-step instructions:
- Cut off the top of the onion and pierce the bottom (where the roots are) with a skewer.
- Pour settled water at room temperature into a container, dissolve 2 tablets of activated carbon, lower the head so that only the root part is in the water.
- In a day, roots will begin to grow. Now, drain the liquid slightly, making sure it doesn't touch the bulb but only the growing roots.
- After 12-16 days you can harvest the greens.
For information on growing green onions in water, watch the following video:
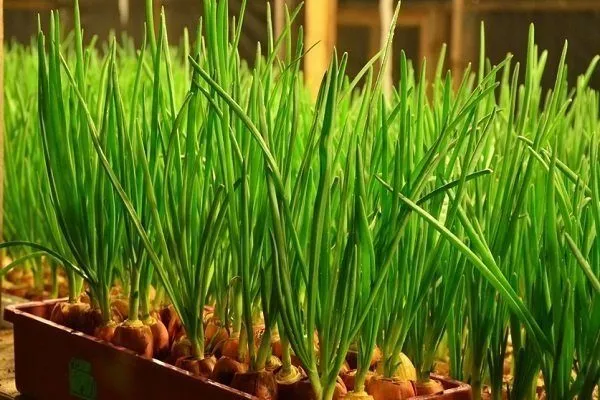
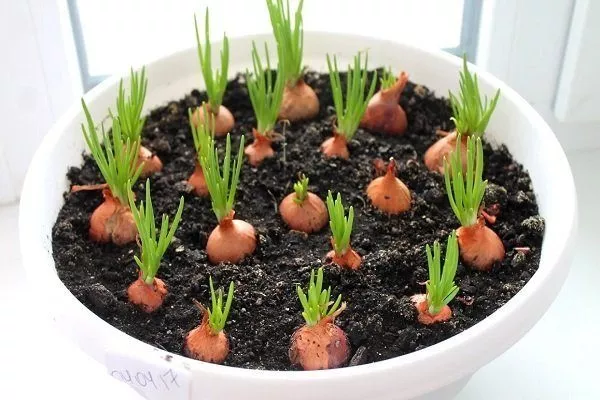
- Planting in the ground.
This is the best option, preventing unpleasant odors and rotting. Prepare the soil, healthy bulbs, and a container—a container, pot, or box. If you're using leeks, be sure to sprout them in water first, soaking them for a week. Then, proceed as follows:
- soak onion roots in water for 2-3 hours;
- fill the container with soil to a depth of 6-7 cm;
- make holes according to the size of the heads, leaving 2-3 cm between them;
- plant the vegetable to a depth of 2 cm (only the root will be in the ground);
- water generously with settled or rain water;
- Place the container in a dark place for 2-4 days, then move it to a lighted windowsill.

- Hydroponics.
This method is used when planting large quantities of bulbous plants. It uses slabs or mats, which can be purchased at a specialty store. Hydroponics works by enriching the plant with oxygen and nutrients, allowing for rapid growth.
A special feature is that during the first few days the culture should be kept in cool and shaded conditions; after a week the system is transferred to a windowsill.
For more information on growing onions using hydroponics, watch the following video:
- Growing in sawdust.
Instead of soil, the bulbs are placed in moistened sawdust. This prevents rot, unpleasant odors, and dirt. The only drawback is that the sawdust needs to be replaced after harvesting the greens.
Planting process:
- disinfect sawdust with boiling water;
- put them in a container;
- deepen the bulbs by 3 cm;
- pour water;
- Place the container on the sunny side of the apartment.
The feathers are harvested after 10-15 days. To prevent rotting, add hydrogen peroxide to the water during irrigation (10 ml per 1 liter).
To learn how to plant onions in sawdust at home, watch the following video:
- Growing in a bag.
Take a thick plastic bag, toilet paper, and prepared heads. Instructions:
- Place some moistened paper on the bottom of the bag;
- place the bulbs close to each other;
- inflate the bag with air;
- tie tightly with a string or rubber band;
- place in a dark place for root growth;
- after 3 days expose to light;
- It is forbidden to open the package until the harvest (approximately 10 days).
To learn how to grow onions in a bag, watch the following video:
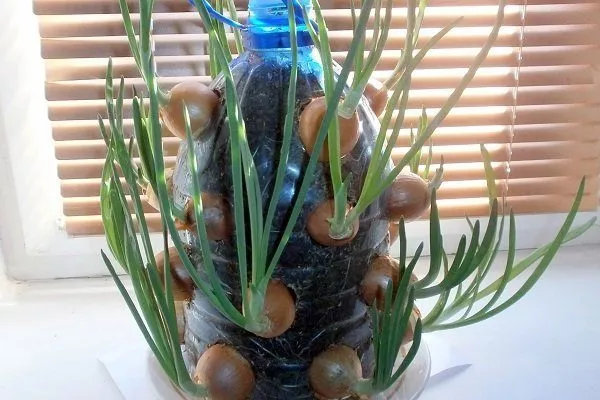
- Bottle method.
This is a versatile vertical method for forcing feathers that saves space on your windowsill. What you'll need:- 5 liter bottle (after food drinks only);
- scissors/knife;
- onion;
- priming;
- expanded clay stones.
Preparing the container:
- cut off the neck;
- cut holes along the bottom perimeter (the size depends on the diameter of the vegetable, the number depends on the number of root vegetables);
- make the remaining holes in a checkerboard pattern;
- process the edges of the holes with sandpaper or a soldering iron;
- Pierce the bottom with an awl to create a drainage system.
Planting process:
- Place the stones in one layer at the bottom of the bottle;
- sprinkle some substrate from soil, peat and humus on top;
- compact the soil;
- Place the prepared heads into the holes (horizontally), adding soil;
- place the top bulbs vertically;
- water it.
Caring for onions at home
To ensure your onions produce plenty of greens, you need to provide them with favorable conditions. Regardless of your planting method, follow these care guidelines:
- lighting should be present for 10-12 hours, but there are no special requirements;
- temperature conditions: air temperature – from +18 to +22°C, soil or water temperature – from +12 to +25°C;
- It is essential to ventilate the room, which reduces the risk of bulb rotting;
- Watering the soil and adding water is done with warm, settled water or rainwater (it is prohibited to use tap water collected before the procedure).
When grown in soil
When growing green onions in soil, they require more sunlight, so the container should be on a sunny, south-facing side. How to care for the crop:
- Take them outside daily or open the windows. This should be done starting when the feathers reach 3-4 cm in length.
- Fertilizing is usually not necessary, but experienced gardeners recommend applying potassium chloride, superphosphate, and ammonium nitrate in accordance with the instructions at the initial stages of green growth (4-5 cm). After that, when the greens are ready to be cut, no fertilizer is used.
- Bulbs should be watered 1-2 times a week. If there are heating appliances nearby that dry out the air, increase the frequency of watering.
- If the bulbs are not planted too close to each other, loosen the soil periodically.
- Water the greens 1-2 times a week, especially when the room temperature is high.
To harvest continuously, plant the bulbs in 2-3 containers with a difference in planting time of 2-3 weeks.
When grown in water
If the bulbs are grown in water, you'll need to maintain a constant water level in the containers. The water should be changed whenever an unpleasant odor develops—about once a week. Use room-temperature water, which should be left to settle.
When grown in a bottle
Bulbs grown in bottles are planted in the ground, so care is the same as when planted in boxes or containers. The only difference is watering, as the soil in bottles dries out more quickly, so it needs to be watered more frequently.
Harvesting
The plumes are harvested once they reach a length of 25-35 cm. Only the greens are cut, 1-3 cm from the bulb. The plumes can be harvested in bunches or individually, depending on your needs.
Helpful tips
Growing green onions has many tips and tricks that will help you get plenty of greens and avoid potential problems. Important recommendations:
- Egg trays can be used as a replacement for expensive hydroponics systems. To do this, take one plastic tray and split it in half. The lid will serve as the tray, and the cells will serve as the top tier. Cut off the bottom of each cell and insert the bulbs into the holes. Fill the tray with water and place the top tier, placing wooden sticks between the two elements. This ensures that only the roots, not the bulbs, are submerged in water.
- Whatever you use to grow your bulbous plants, be sure to place trays under the containers to catch any water after watering.
- Onions love light—without it, the leaves become pale, yellow, and wilted. Therefore, during winter, it's necessary to provide the "beds" with additional light—using a grow light, a fluorescent light, or similar.
- If your apartment is too hot, onions will stop growing. In these cases, wrap the container in regular foil to protect the bulbs from overheating.
- Soil taken from outside may contain insects and pest larvae, which actively reproduce under favorable conditions. To prevent this, don't skip the boiling water disinfection procedure. You can also bake the soil in the oven for 10-15 minutes.
- When forcing greens, try to select mother bulbs that produce 2-3 times more feathers.
By growing bulbs for their tops, no matter the method, you can delight your family with fresh greens year-round. The key is to choose the planting method, strictly follow the growing instructions, and remember to harvest.