To grow onions, gardeners most often purchase young bulbs at the market and store them in proper conditions for sowing outdoors in the spring. To ensure a good harvest, it's important to know how to properly plant onion sets and care for them in the garden.
What are onion sets?
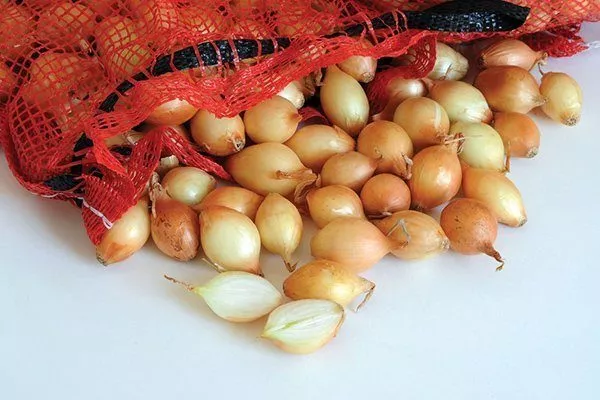
At the market, you can see small, one-year-old onions grown from seed. These are called sets.
There are several varieties of onions, based on their size:
- oats - the smallest bulbs (up to 1 cm);
- first grade (up to 1.5 cm);
- second grade (up to 3 cm);
- samples - the largest bulbs (from 3 cm).
The best varieties of onion sets
Breeders have developed many varieties of onions. It's advisable to choose sets from regionalized varieties—they thrive in specific climates. Below are the most popular onion varieties for growing from sets.
| Name | Ripening period | Weight of the bulb | Disease resistance |
|---|---|---|---|
| Orion | Early ripening | 180 g | High |
| Sturon | Early ripening | 100-160 g | High |
| Shallots | Mid-season | 50-100 g | Average |
| Stardust | Mid-season | 100-150 g | Average |
| Stuttgarter Riesen | Early ripening | 50-300 g | Low |
| Centurion | Early ripening | 100-150 g | Average |
| Red Baron | Mid-season | 80-120 g | Low |
| Exhibition | Late-ripening | up to 800 g | Average |
| Kaba | Late-ripening | 100-200 g | Low |
Orion
An early-ripening hybrid developed by English breeders. The bulbs are round and weigh approximately 180 g. This variety has the advantage of being able to be stored for a long time without losing quality.
Sturon
An early-ripening variety characterized by good germination, high yield, resistance to various infectious diseases, and long-term storage. The bulb of this variety Sturon weighs 100-160 g. The taste is pleasant, moderately spicy.
Shallots
An elite variety. The onion flesh is juicy, mild in flavor, doesn't cause tears when cut, is suitable for a variety of culinary purposes, and is rich in vitamins, minerals, and bioactive substances.
Stardust
A mid-season onion with white skin. It is characterized by uniform emergence and good harvest preservation.
Stuttgarter Riesen
An early-ripening onion. The yield is consistently high. It has a long shelf life without losing quality. The bulbs vary in weight: the smallest weigh 50 g, the largest 300 g. The only drawback is the plant's susceptibility to downy mildew and rot.
Centurion
A variety of the Stuttgarter Riesen cultivar, characterized by slightly elongated bulbs, bred to produce bulbous, rather than green, fruit. Under optimal conditions, germination is 100%. Flower stalks are almost never formed. Disease susceptibility is low. Storage life is long (up to 9 months). The flavor is quite sharp and spicy.
Red Baron
The onion is a rich red color with high nutritional value. It has a pleasant, medium-spicy flavor and a distinct aroma. It's a fussy plant: it quickly withers without weeding and regular watering.
Exhibition
A variety with large, sweet bulbs weighing up to 800 g. The bulbs reach their maximum size at 4 months. The shelf life is average (up to 4 months).
Kaba
A late-ripening onion. The bulb is teardrop-shaped with greenish-white flesh and yellow or beige skin. The plant is susceptible to fungal infections and onion fly infestation.
Benefits of growing onions from sets
Gardeners prefer to use sets for growing onions because:
- the growing season lasts six months;
- when grown using the two-stage method, it is possible to obtain a good harvest in any climatic region;
- The resulting plants have a strong root system that is resistant to the presence of weeds.
Timing of planting in open ground
The optimal time to plant onion sets is the first week of May. At this time, the soil is already sufficiently warmed by the spring sun, but still saturated with moisture left over from the melting snow, so the bulbous roots take root well.
In different regions of the country, planting dates may be shifted forward or backward, taking into account climatic conditions.
Planting onion sets
Onions are a undemanding crop, with yields reaching nearly 100%. However, this doesn't mean that proper agricultural practices are not necessary. If the planting material isn't treated and the soil isn't properly prepared, the young plants will become diseased, and the yield and quality will be significantly reduced.
The landing procedure is carried out in stages and includes:
- purchase of planting material;
- treating bulbs to improve growth and protect against diseases;
- preparation of planting soil;
- the landing process itself.
Selection of bulbs
The quality of your planting material is crucial for a bountiful harvest. When purchasing onion sets, carefully inspect each bulb. Its surface should not be wrinkled, dented, or have any scratches, cracks, or signs of rot or infection. The bulb should not be sprouted.
It's best to select onions of similar diameter. Experienced gardeners try to buy oats or first-grade onions, as the largest harvest comes from the smallest onions. Small onions are also less likely to produce shoots.
If the planting material being sold is sealed in packaging, it must indicate the expiration date, batch number, and variety name.
Some bulbs may be darker than others. They may be damp. If the problem isn't severe, simply place them on paper and leave them near a heating system to dry. If the flesh is very damp, you'll have to throw the bulbs away.
Optimal soil for planting
Alkaline loam or sandy loam is preferred for onions. The soil in the area chosen for planting should be pre-cultivated.
- ✓ Soil pH should be between 6.0-7.0 for optimal onion growth.
- ✓ The soil must have good drainage to avoid water stagnation.
Soil preparation begins in the fall. Before frost, the soil is dug to a depth of 20 cm. Fertilizer is added. Cow manure or compost with peat are best. Fertilizer should be applied beforehand; it should not be applied immediately before planting the onion sets, as the nutrients need to be recycled in the soil.
Onions do not thrive in acidic conditions, so it's essential to test the soil for acidity. To reduce acidity, add chalk, lime, and ash to the soil. These substances should not be used simultaneously with fertilizers, as they will reduce soil fertility: the peat-humus mixture used for fertilizing will destroy the nitrogen needed for proper vegetable growth.
Onions grown in well-prepared soil produce large bulbs.
Choosing a landing site
Choose a sunny area for bulb beds. It's important to have deep groundwater. This prevents waterlogging, rotting, and plant death.
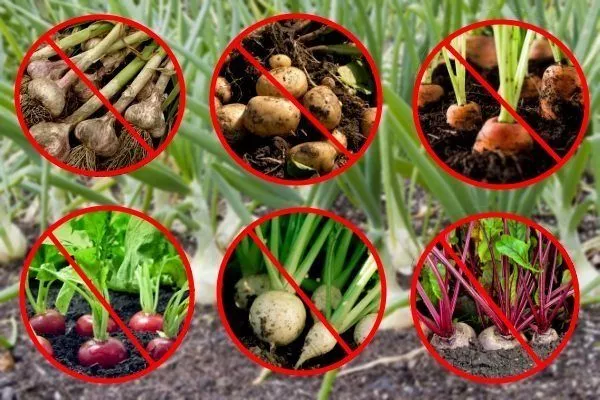
When planting onions, it's important to consider crop rotation. It's best to plant beds where tomatoes, potatoes, pumpkins, and grains grew last season.
Don't plant onion sets after garlic and root vegetables. These crops intensively draw nutrients from the soil, and the onions will suffer from nutrient deficiencies. It's also unacceptable to plant onions in the same area two seasons in a row.
Processing bulbs before planting
When buying onion sets at the market, they must be warmed up. Two or three days before planting, the bulbs are placed in a mesh bag and hung over a heating element. The air temperature near the mesh bag should be 30-40 degrees Celsius.
Before planting, soak the bulbs in a container of warm water. Instead of water, you can use a mineral solution to accelerate growth. The best solution is "Nitrophoska," a tablespoon of which should be dissolved in a 10-liter bucket.
It's also a good idea to treat the planting material against infectious diseases and insect pests. A universal protective solution is a teaspoon of copper sulfate per 10-liter bucket. Soak the bulbs in it for 10 minutes. The solution can also be prepared using any other fungicide.
The most common onion pest is the onion fly. To prevent attacks, use birch tar, the smell of which is unbearable to them. Make a solution: one tablespoon of the substance per 1 liter of water. Soak the onions in this solution for 15 minutes. It is also used to spray growing plants in the garden beds.
After the first roots appear, you can plant them in the ground.
Some gardeners experience their onion sets producing excessive flower stalks. This is caused by storing the planting material under improper temperature conditions. The sets are stored in a cool place, but freezing temperatures in the storage area trigger the flower stalks to emerge. This is the plant's response to unfavorable conditions: it initiates accelerated reproduction to maintain the population. Therefore, it is unacceptable to expose onion sets prepared for planting to cold stress.
Planting technology
Two weeks before planting, loosen the soil and enrich it with humic organic matter. You can use "Kuznetsov's Humicity." A week before planting the onions, disinfect the soil by watering it with a solution made from a tablespoon of copper sulfate and 10 liters of water. Fitosporin can also be used for disinfection, both in powder form (a teaspoon per 10-liter bucket) and in paste form (a tablespoon per 10 liters of water).
Next, you can plant. Onion sets can be grown both in spring and before winter. The procedure for the latter is virtually identical to the first. The only difference is that the plants are covered with mulch before the onset of cold weather.
The sowing area can be any size. The main thing is that it is easy to care for the crop.
Planting is carried out in stages as follows:
- Ovsyuzhka bulbs are planted 5 cm apart. The distance between first- and second-grade bulbs is 8 cm, and between the selected bulbs, 10 cm.
- The distance between rows should be 20-25 cm. Rows should not be closer together, otherwise there won't be enough soil space for the onion root system to develop. If the farmer uses a walk-behind tractor, the row spacing should be 60-70 cm.
- The depth of the furrows should be 5 cm.
- The bulblets are inserted into the furrows "up to their shoulders": not only the roots but also part of the bulb should be below the soil surface. This is important for maintaining the stability of the seedling, which does not yet have well-developed roots.
- The furrow is sprinkled with ash, which acts as a fertilizer and disinfectant.
- The furrows are covered with earth.
If planting is done in the fall, use straw or sawdust as mulch. The protective layer should be 3-4 cm thick. If planting is done in the spring, the harvest is in August.
If you're growing onions for greens rather than bulbs, you can save space by using the bridge planting method. In this case, the bulbs are planted very close to each other, not too deeply. This method is used not only in open ground but also in containers.
If you want both greens and bulbs, but space is limited, try a mixed planting. Make standard furrows, but stagger the seedlings within them, placing them fairly close together. Some seedlings will remain until bulbs form, while others will be pulled out earlier for fresh green shoots.
This video shows how to plant onion sets:
Caring for onion sets in open ground
Onions aren't particularly fussy crops, but they're not exactly easy to grow either. They require ample sunlight, regular watering, and fertilizing.
Thinning
After the seedlings emerge, the beds need to be thinned. Otherwise, some of the bulbs will be empty. Thinning is done after the first true leaf appears. Small and stunted seedlings are pulled out.
Top dressing
To increase yields, high-quality fertilizer is essential. Onions require both organic and mineral nutrients. Organic matter is essential for improving soil quality and nutritional value. Roots absorb mineral nutrients more readily in organic-rich soil.
- Conduct a soil test before applying fertilizer to identify any nutrient deficiencies.
- Apply organic fertilizers in the fall and mineral fertilizers in the spring, before planting.
- Use a complete fertilizer with an NPK ratio suitable for onions, such as 10-10-10.
Fertilizers should preferably be applied in the evening. Both dry and liquid mineral fertilizers are used. When applying liquid fertilizer, be careful not to spill the solution on the plants. Water the beds with plain water 24 hours after fertilizing.
The table shows the timing and rates of fertilizer application.
| Fertilizer | First application (4 weeks after the first shoots), g/sq.m | Second application (during the period of bulb formation), g/sq.m |
| ammonium nitrate | 12 | 6 |
| superphosphate | 10 | 10 |
| potassium salt | 5 | 5 |
| organic matter (mullein, chicken manure, ash) | — | 1.5 liters (the mixture is diluted with water in a ratio of 1 to 6) |
Watering
Onions should not experience a moisture deficit. During dry summer periods, watering should continue until mid-July. At least 20 liters of water are used per square meter of planting area. Water should be applied in portions, allowing the previous portion to soak in thoroughly before applying the next. The soil layer should be moistened to a depth of 30 cm.
Overwatering is just as dangerous for onions as underwatering. Overwatered plants experience stunted growth and yellowing of the green foliage.
If rainy weather sets in in July after watering has stopped and the underground part of the plants has formed, then an arched film covering is placed over the beds to protect them from over-watering.
Loosening
Onions grow well in loose, airy, well-drained soil. Till the soil every two weeks. If the above-ground parts of the bulbs are covered with soil, they need to be cleared of soil.
Harvesting and storage
The harvest begins when the leaf stalks begin to yellow and collapse. The bulbs are dug up, cleaned of soil, and placed in the sun to dry for two hours. They are then moved to the shade and left until the leaf pulp dries. The bioactive compounds are released into the bulb pulp. The harvested crop is sorted.
Most wild oatmeal doesn't survive until spring, drying out. Therefore, it's usually planted before winter. The first variety is selected for spring or fall planting for bulbs and greens. The second variety and selections are planted in spring for greens.
Store the onion sets in a cool place, but not at subzero temperatures. The optimal temperature is slightly above 0°C (32°F) and a relative humidity of 75%; this will ensure the bulbs remain dormant throughout the winter. A well-ventilated cellar is a good choice. City dwellers store small quantities of onion sets in the refrigerator's vegetable and fruit drawer.
This video explains how to harvest and store onion sets:
Growing onions from sets is not difficult. The crop is not fussy, so many gardeners don't even bother following planting guidelines or spending much time caring for the seedlings. However, following proper agricultural practices can significantly increase onion yields, while ignoring them can result in the loss of a significant portion of the harvest.