Before braiding onions, familiarize yourself with the basic braiding techniques, as the quality of the braid, its longevity, and the shelf life of the onion depend on them. This ensures the onion retains its nutritional value, prevents rot, and retains its flavor and aroma. Ease of removal of each onion is also important.
Why do people braid hair from onions?
You can store the tubers in a box, but it's difficult to preserve the onions that way. So why braid them? The reasons for braiding are as follows:
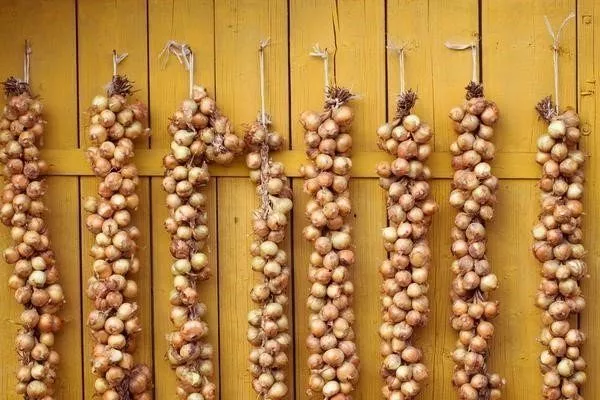
- Free air circulation is ensured, which increases shelf life. Without proper ventilation, bulbs are susceptible to mold and rot due to exposure to humidity.
- Saves space in the storage room (braids are hung).
- Signs of disease are detected early because each root crop is accessible. This helps prevent the spread of infection to other units.
- It is impossible for rodents and insects living in the floor area to eat the vegetable.
- Possibility of moving the scythe to another location.
- Preservation of aroma, taste and nutrients.
- There is no need to carry out antiseptic treatment of the room, since onions release phytoncides that suppress pathogenic microorganisms.
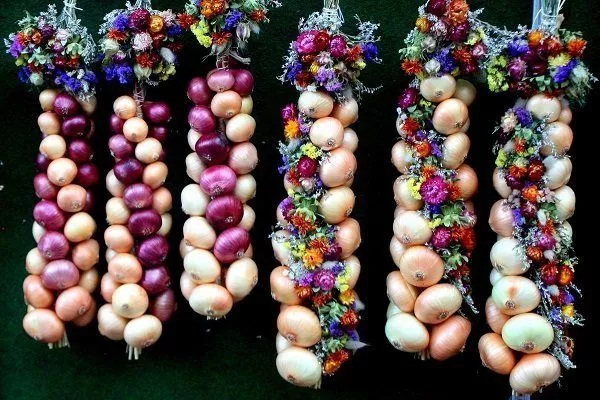
- You can create a unique interior design in a rustic style.
- Quick access to the product.
- Saving money – the harvest is completely preserved, there is no need to purchase additional containers.
Optimal timing for weaving
Onion bulbs are harvested in July and August, so braiding can be done during this period, but only after the roots have dried thoroughly. This takes about two weeks. However, the onions also dry in the braids, so depending on the method chosen, braiding can begin as early as three days after harvesting.
The optimal time can be accurately determined based on the maturity of the tubers, as evidenced by the following indicators:
- leaves turn yellow and dry;
- the bulbous necks become thinner and softer;
- the husk turns yellow;
- the scales are easily removed from the bulb;
- the fruits gain juiciness, crunchiness, aroma and taste.
Sometimes it's impossible to determine the harvest time, and therefore the time to braid, because the bulbs yellow unevenly. But there's a key sign: the stems lodging, even if they're still green.
Preparing the bulbs
To ensure the bulbs in braids last as long as possible, they must not only be braided properly, but also collected and prepared. These steps include:
- It is better to harvest in the morning, after the sun appears.
- Don't pull out the tubers, as they will be damaged from the inside. To remove them from the ground: dig into the soil with a shovel and gently pull the onion out.
- Shake off any remaining soil from the roots, but avoid smashing the bulbs together. Otherwise, the bulbs will rot.
- Place the tubers in the garden or indoors to dry. The first option is preferable, as onions need to dry in direct sunlight. Place a breathable fabric underneath the vegetables—they'll stay clean and "breathe" from all sides. Why in the sun? The answer is simple: the heat emitted by the sun's rays promotes disinfection and rapid natural drying.
- Don't cut the feathers off right away, as the tails will be needed for braiding. They should be at least 15-20 cm long.
- Don't leave root vegetables outside overnight—it's better to bring them indoors or cover them with plastic. This is to prevent the morning dew from saturating them with moisture.
- Before braiding, the bulbs are freed from the husk, which is easily removed, but do not allow the scales to be completely removed.
- Be sure to wipe each vegetable with a soft, dry cloth.
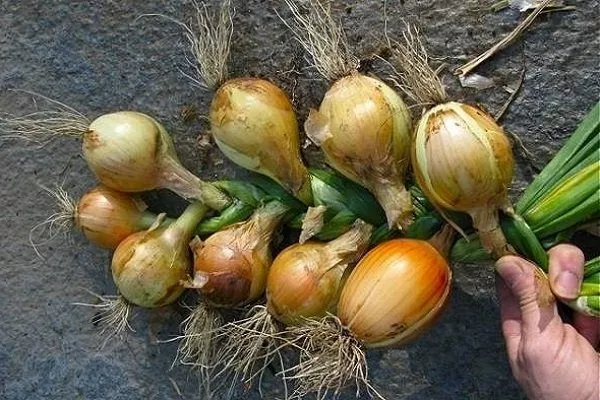
- Calibrate the bulbs (select whole, undamaged, fully ripened fruits).
- For braids, select turnips of the same size.
- Do not allow the tops to dry out – they should be elastic.
Weaving methods
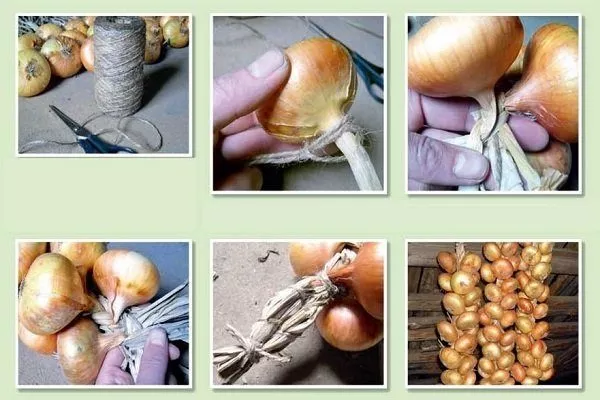
There are many methods for braiding bulbous plants, so gardeners can choose the most convenient and optimal one. The standard, generally accepted braiding method is shown in the photo:
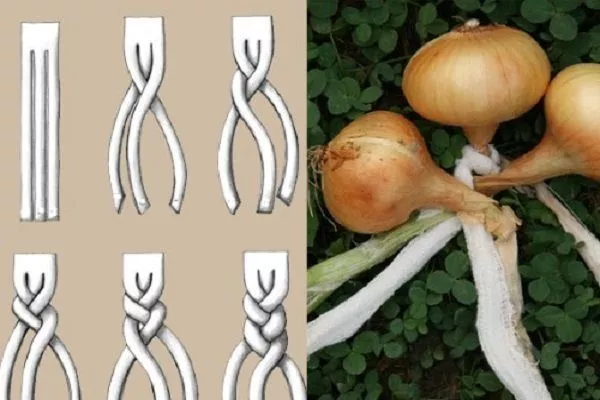
Method #1:
- take bulbs with long tops;
- select the largest vegetable, which will become the base;
- attach another root vegetable to it on the left side, crossing the shoots (the tail of the base lies straight, the top of the bulb on the left has the opposite direction);
- do the same on the right side;
- continue weaving to the required length (no more than 2 m), adding new bulbs each time;
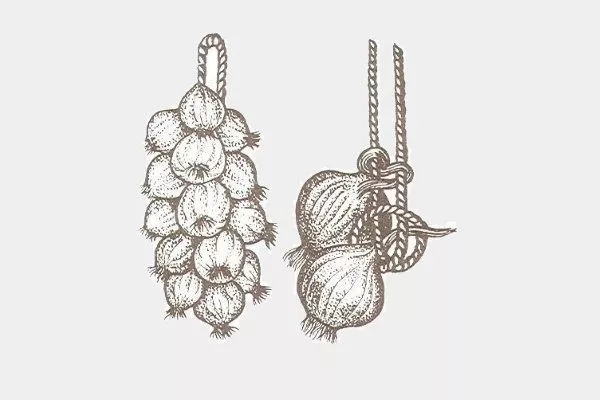
- At the bottom, secure the tops with a rope, making any knot.
If the onions aren't long enough, use a string that's placed on the greens and woven in with the tops. Remember to keep the ends of the strings even and uniform, and weave as tightly as possible. Tie a loop at the end to hang the onions. This can be done as follows:
- You will need three pieces of twine of the same length. Tie them together at the top.
- Place an onion on one of the ropes at the top and make a strong knot.
- Attach the tubers to the other two ends as well, but don't tie them to the rope. Instead, begin a three-strand weave, as in the previous method. This will create a tightly packed bundle.
Method #2:
- Fold a long rope in half. Make a loop at the fold, and tie the ends in a knot at the bottom.
- Insert a shoot from a large onion into the loop and tighten it tightly.
- Next, attach the bulb ends to one rope, then to the other, forming a horizontal figure-eight. Hold the tip of the top with your fingers and pass it through the rope ring.

- Continue weaving the remaining bulbs in this manner. The ends of the tops will remain in the overall braid and can be trimmed with regular scissors.
Method #3:
- Fold a long piece of twine in half, creating a loop and threading the tops of one onion through it. You should have three strands – one made of the tops (placed in the middle) and two made of the rope.
- With each step of weaving, add one root vegetable at a time, weaving them into the side strands (rope and onion).
- When you reach the end (the length of the string is 10 cm), make a knot.
Method #4:
- Fasten 2-3 bulbs together in any way, but the integrity of the tops should not be compromised.
- Fold the rope in half, make a loop and thread the feathers of the first pair of vegetables through it.
- Place the remaining pairs on opposite sides of the twine so that when weaving, the bulbs turn in diametrically opposite directions.
- After weaving each pair onto the rope, make a knot to secure the braid.
- Fix the structure at the bottom.
The end result is a very tight braid. Remove any remaining tops with scissors.
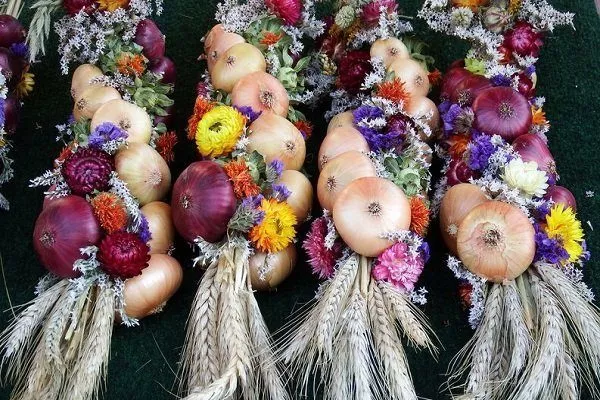
If you plan to use onion braids as a decorative element, weave in dried flowers, spikelets, and other "accessories" that match your interior design.
One of the ways to braid a bow is clearly demonstrated in the video below:
Important nuances
Regardless of the chosen method of braiding onion hair, it is necessary to adhere to general rules so that the bundle does not fall apart and the onions are securely fixed.
8 useful tips:
- Follow the rules for preparing the bulbs before weaving - the shelf life depends on this.
- Try to leave the feathers as long as possible, as they are easier to work with and the weaving becomes stronger.
- For braids, you can use not only the feather part but also arrows, although they are considered less flexible.
- For ease of braiding, hang the braid on a nail or hook. However, to make the "structure" more stable, it's better to lay the bulbs out on a table.
- If you're braiding without rope, avoid making the bundles too long, as the bulbs are heavy. Consequently, the braid will break under its own weight.
- When choosing rope, choose reinforcing fibers—those that are non-slip and therefore hold the bundles securely. Examples include twine, bandages, and cord.
- If you have braided a plait but it is not very strong, re-braid it immediately before the tops dry out.
- Don't be afraid to weave in some green feathers - they will dry in the braid, but the bundle will be more secure.
How to store onion braids?
To ensure bulbs stay in the braid for at least six months, create optimal storage conditions. Here's what experts and experienced gardeners recommend:
- The room must be dry, with a humidity level of up to 70%. Failure to adhere to this requirement will cause the root vegetables to rot.
- Air temperature plays a crucial role. Ideally, it should be between 18 and 22 degrees Celsius, or room temperature, so use a kitchen, hallway, or storage room. Avoid placing bulbs in cellars or basements.
- Braids require frequent airing. If you store your braids in a closet, take them out periodically and keep them in a ventilated room overnight.
- Avoid hanging onions over heating devices as this will cause them to dry out excessively.
- Inspect your bulbs every 2-3 weeks for signs of rot. If mold or rot is present, trim off any affected bulbs to prevent the rot from spreading to other vegetables.
- When humidity is high, the bulbs germinate, so inspect the heads carefully.
- Before storing, it is advisable to trim the root system a little - this will make the bundle look aesthetically pleasing.
- There is an opinion that in autumn and spring, onion bundles require warmer storage conditions, and in winter the temperature drops by 5-7 degrees.
- ✓ Maintain room humidity at 60-70% to prevent the bulbs from drying out.
- ✓ Ensure good air circulation around the braid to avoid condensation and mold.
By mastering the art of onion braiding, you'll not only preserve vegetables for a long time but also create a special coziness in your home. Braiding bundles isn't difficult—all you need to know is the basic principles of braiding regular onion braids. Follow the instructions, adhere to the preparation and storage guidelines, and come up with new braiding ideas on your own.