The Exhibition onion variety is often called "giant" for its impressively large fruit. It's quite a demanding crop, but when provided with the proper conditions, it produces a bountiful harvest. Exhibition onions can be planted in a variety of ways.
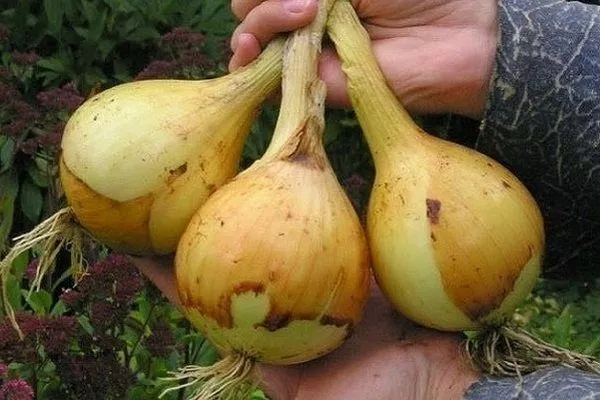
Onion Exhibition
One Exhibition bulb can weigh 1 kg.
Exhibition onion has a sweet taste without bitterness.

Characteristics of the variety, its advantages and disadvantages
Exhibition was developed in Holland. The variety has the following characteristics:
- large bulbs - one specimen can weigh 0.5 kg, sometimes the weight reaches 1 kg;
- oval shape of bulbs;
- the husk is thin, yellowish in color;
- tender and juicy, but dense pulp;
- sweet taste, no bitterness.
This variety is considered a salad onion. Due to its flavor, it is primarily eaten raw. It is also used in first and second courses.
The Exhibition variety has the following advantages:
- growing in different ways: seeds, seedlings, onion sets;
- possibility of winter sowing;
- versatility – grown both for greens and for fruit;
- good yield indicators – up to 3 kg of onions can be harvested from 1 sq. m;
- ease of harvesting;
- excellent taste characteristics;
- tear-free treatment due to the lower content of essential oils;
- There is no characteristic smell after consumption in raw form.
The variety has minimal drawbacks. These include its sensitivity to growing conditions and short shelf life.
Planting methods
Exhibition can be planted in a variety of ways. This advantage allows you to choose the best option for your specific region and personal preferences. Each case has its own unique characteristics.
Seeds
When planting this way, the bulbs don't reach their full size. They typically weigh an average of 250-300 g.
Exhibition seeds are planted in April. The exact timing depends on the region's climate. In Siberia and central Russia, it's best to wait until mid-May, as there's a high risk of frost.
Another option for planting Exhibition onions from seeds is winter sowing. This option offers quick germination in the spring and an early harvest. Winter sowing hardens the seeds well, significantly increasing the plant's immunity. Planting is done immediately before or at the very beginning of frost.
When choosing a method for planting this variety using seeds, you need to follow the following algorithm:
- Germination testThis step is recommended to be carried out in advance, preferably a month before sowing. Select several seeds, wrap them in cloth, and soak them in warm water. Then, leave them in the cloth for 5 days, keeping them constantly moist. Now evaluate the germination rate.
- DisinfectionFor this, a solution of potassium permanganate is used. The seeds should be soaked in it for fifteen minutes.
- Preparing for landingAlthough this step is optional, it significantly simplifies subsequent work. If this preparation is completed, there will be no need to thin the beds later.
Prepare strips of toilet paper by cutting it lengthwise into thirds. Attach the seeds to these strips with a liquid paste made from potato starch. Add 2 teaspoons of the paste to a glass of water and simmer over low heat until thickened, stirring constantly.
AVA complex fertilizer is effective; add it to the cooled mixture. Apply the glue with a syringe, spacing it 5 cm apart. Insert seeds into each glue spot using tweezers. Wait for the paste to dry, then roll up each strip and place it in a plastic bag. - Application of wood ashYou need 50 g of fertilizer per square meter.
- Loosening and leveling the soilThe procedure allows to saturate the soil with oxygen.
- Fungicide treatment to prevent fungal diseasesFitosporin is usually used. Dissolve 1 tablespoon of the product in a 10-liter bucket of water.
- Preparing the groovesThe depth should be a maximum of 2 cm.
- LandingCarefully place a paper strip into each prepared furrow. The seeds should be on top. Carefully cover the furrows with soil.
- Watering. Do this immediately after filling the furrows, do not spare water.
- ShelterYou can use film or other suitable material. This will protect the crop from frost.
Basic soil preparation should be done in the fall. Dig over the selected area, removing weeds, roots, and insect larvae. If the soil is light, loosening it in the spring will be sufficient.
Exhibition can be grown either outdoors or in a greenhouse or hotbed. The latter method is attractive because it maintains warmth and sufficient humidity, ensuring a good harvest.
When sowing Exhibition onions in winter, the work algorithm is as follows:
- Select a suitable siteThe location should be sunny and elevated.
- Prepare the bedsThey should be tall. Be sure to add humus and sand, and get rid of weeds.
- Make grooves or holes. Deepen by 2 cm. Leave 20 cm between rows.
- Sow the seedsThe sowing must be dense, since not all the seeds will germinate.
- Cover the plantings with soil and water.Use a watering can with small holes, the water should be warm.
- MulchUse peat, straw, and sawdust. Apply a 2 cm layer. Mulch helps retain moisture and protects plants from weeds and frost.
- Re-mulchThis stage is recommended for cold regions prone to spring frosts. The beds are mulched again after the snow melts.
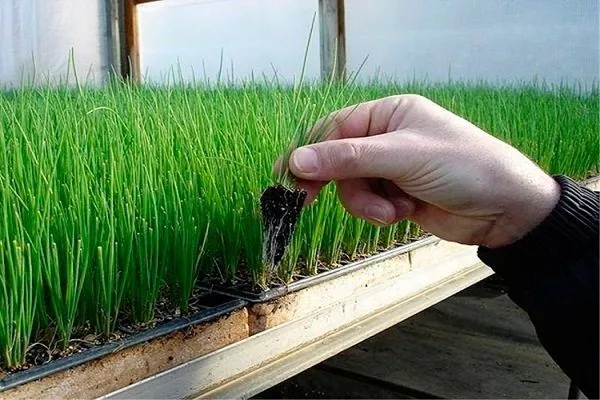
Seedlings
This planting method is considered the best, but also the most difficult, for the Exhibition variety. Seedlings allow for an earlier harvest, and the bulbs reach their maximum size and weight.
Seeds should be planted for seedlings in March. Follow the following procedure:
- Soaking and drying seedsThe seeds should be wrapped in a thin strip of cloth and soaked in warm water. Then, dry the material in a shaded area for 3-4 days.
- Disinfection of planting materialFor this purpose, it's best to use a weak solution of potassium permanganate—just dissolve 1 g of the solution in 1 liter of water. The optimal water temperature for disinfection is 40 degrees Celsius.
- Soil preparationYou can buy ready-made soil suitable for this crop, or make your own mixture using turf soil, humus, and rotted cow manure in a ratio of 9:9:1.
- Sowing seedsYou can use special boxes or plastic containers for this. There's no need to dig holes; the seeds are sown on the surface and then covered with soil. A 1-cm layer is sufficient.
- WateringUse a spray bottle and water generously.
- Waiting for seedlingsThe container with the seedlings should be placed in a shaded area and kept there for 1-1.5 weeks, covering the crops with film.
Once the seedlings emerge, remove the plastic covering and place the seedlings in a sunny location. A south-facing location is ideal.
To successfully grow seedlings, certain conditions must be met:
- temperature regime – 20-22 degrees, after the appearance of young leaves, it is recommended to reduce the daytime temperature to 17-20 degrees, and the nighttime temperature to 10-15 degrees;
- Regular ventilation of the room with seedlings, ideally every 3 days;
- daily watering, it is recommended to add mineral fertilizers to the water.
The seedling cultivation process takes two months. Two weeks before planting outdoors, hardening off the seedlings is necessary. To do this, take them outdoors; indoors, limit them to a balcony or open window. Increase the hardening time gradually, starting with 15 minutes.
Seedlings should be planted in early May. The site should be well-lit, and the soil should meet the requirements of the variety. Manure should only be applied in the fall; using it in the spring will cause the bulbs to become loose.
Planting of seedlings is carried out according to the following algorithm:
- Loosen the soil and level the surface.
- If necessary, get rid of weeds.
- Water the soil and seedlings.
- Make holes.
- Trim the roots of the seedlings by a third of their length.
- Plant the seedlings 2.5-3 cm deep in the soil. Leave a distance of 20 cm between them and 10 cm more between rows.
- Carefully sprinkle the planted seedlings with soil.
- After 20 days, apply the first feeding.
Only healthy and strong seedlings should be planted. Diseased and weak specimens should be discarded immediately.
- ✓ The presence of 3-4 true leaves before planting in open ground.
- ✓ No signs of disease or pests on leaves and stems.
Onion sets
This method of planting Exhibition onions is less common. This variety's sets are not available commercially, although they can be found in some private gardens, so people usually grow them from seed.
Planting onion sets can be done in spring or winter. In either case, disinfection and antifungal treatment of the planting material are necessary. A solution of potassium permanganate can be used to disinfect it, and fungicides can help prevent fungal growth.
Planting onion sets is attractive due to its simplicity and the potential for a good harvest. To obtain onion sets, the seeds must be planted densely. The planting guidelines are general.
Soil requirements
The Exhibition variety thrives best in sandy and sandy loam soil. Loose, light, and nutritious soil is essential.
- ✓ Soil pH should be between 6.0-7.0 for optimal growth.
- ✓ The soil must be well-drained to avoid water stagnation and rotting of the bulbs.
It's effective to add compost to the soil—two buckets of fertilizer per square meter. Additionally, use mineral fertilizers and finely crushed charcoal. River sand should be added if possible.
Caring for a plant in open ground
When grown outdoors, the crop requires comprehensive care. This includes watering, weeding and loosening the soil, mulching, fertilizing, disease prevention, and timely treatment.
Watering
Watering frequency should be adjusted to the soil condition. Allow the soil to dry out, but don't allow it to dry out completely. Watering should be moderate, using warm water.
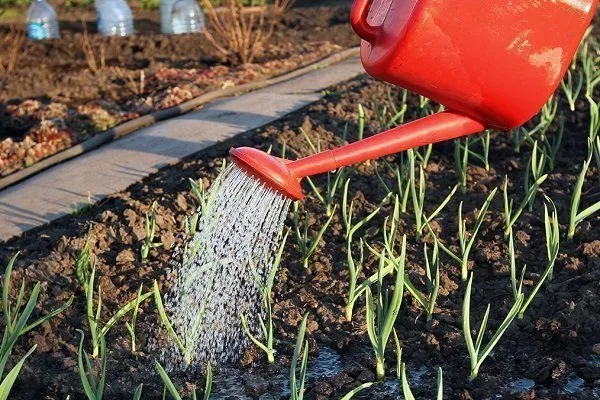
It's important to take weather conditions into account. During hot and dry periods, switch to daily watering, which should be done in the evening.
Watering should be stopped a month before harvesting, usually at the end of July. If watering is not stopped, the bulbs will become waterlogged, significantly reducing their shelf life.
Top dressing
The first feeding is done two weeks after planting. You can use a mullein infusion or a complex fertilizer containing potassium, nitrogen, and phosphorus.
Fertilizer is applied three times per season. Leave at least three weeks between applications.
Fertilizer application should be stopped one month before harvest.
Weeding and loosening
Loosening the soil is a necessary step in plant care. It is performed after each watering. This is necessary for soil aeration. If you water daily during a drought, loosening the soil every day is not necessary. Doing it once or twice a week is sufficient. When loosening, proceed carefully to avoid damaging the root system.
Another essential requirement for proper crop care is timely weeding. Ignoring this routine leads to weed overgrowth, which negatively impacts crop development.
Mulching
Mulch is essential for retaining moisture in the soil, which is loosened regularly. The following can be used for mulching:
- straw;
- sawdust;
- paper;
- wood rot.
Pest and disease control
This stage begins with the treatment of seeds or sets before planting. Disinfection and antimicrobial agents help reduce the risk of many diseases.
When growing the Exhibition variety, you may encounter the following problems:
- SmutThe disease manifests itself as dark, ash-colored, translucent streaks on the leaves. If these are removed promptly, the crop can be saved. Otherwise, the area will be unsuitable for planting for several years, as the spores persist for a long time.
- RotThis is a fungal disease. The bulbs are affected internally, as evidenced by their softness and sliminess. To prevent the disease, water sparingly and apply fungicidal treatments. If the disease has already manifested, there is no cure for the plants; all affected specimens must be removed and burned.
- Onion flyIt's not the adult insects that attack the crop, but the larvae that hatch from eggs laid in the soil and onion scales. The pest's presence is indicated by yellowing and drying of the seedlings, and softening and rotting of the bulbs. Onion flies typically appear in May-June. Treatment involves applying tobacco dust mixed with ash and black pepper. The crop can be dusted with a dry solution or prepared as an infusion for spraying. Insecticides are also used.
- Stem nematodeThe bulbs serve as food for this tiny worm. When it appears, the feathers become discolored and curl. Immediate removal and burning of diseased plants is necessary. Preventative measures include treating the soil with lime powder and carefully selecting planting material.
Plantings should be inspected regularly. This monitoring allows for early detection of diseases or pests and the appropriate action. Otherwise, there is a risk of losing the entire harvest.
Harvesting and storage
Signs that it's time to harvest Exhibition onions are similar to those of other varieties. These include lodged and dried greens. Harvesting is typically done in the second half of August, but timing can vary depending on the time and method of planting, as well as the climate of the specific region.
Harvesting Exhibition onions is appealingly simple. The bulbs lie flat, making them easy to remove. A pitchfork is convenient, but care must be taken to avoid damaging the onions.
Harvesting should be done in dry weather, preferably on a sunny day. Avoid harvesting immediately after rainfall, as the onions should have time to dry out.
There's no need to cut the plumes. After harvesting, they need to be dried. If possible, this should be done in the attic, as these spaces are dark and well-ventilated. The harvest should first be dried in the sun.
Once the necks have thinned and dried, remove the excess skin and store the onions. Nets or wooden crates are good options for this. The storage area should be dry and cool; the optimal temperature is 5 degrees Celsius.
Exhibition has a short shelf life—no more than 4 months. If stored for an extended period, the onion begins to spoil, losing its flavor.
You can learn about the technology for growing the giant Exhibition onion in the following video:
By following the planting and care recommendations for the Exhibition onion variety described in this article, every gardener can achieve a good harvest of this vegetable.