Cauliflower can be grown outdoors using seedlings, yielding a good harvest of small heads of cabbage. In terms of cultivation, this crop is similar to early white cabbage, but is more demanding in terms of growing conditions and requires proper care.
Growing conditions requirements
If you decide to grow cauliflower, you need to consider the basic rules of agricultural technology:
- It's best to grow this vegetable using seedlings. Seeds can be sown several times at 10-14 day intervals. For an early harvest, sow seeds for seedlings in mid-May and plant them in the ground in early May. For summer use, seeds can be sown in the ground from mid-May, and for late harvest, from late June to early July. Seedlings should be transplanted to their permanent location when they are 30-35 days old.
In the southern regions of Ukraine and Russia, seeds can be sown directly into the soil, as they can germinate at temperatures between 2 and 5°C. In cooler regions, seedlings are a better choice.
- ✓ The soil pH level should be strictly within 6.0-6.5, deviations can lead to poor absorption of nutrients.
- ✓ The soil must contain a high percentage of organic matter (at least 4-5%) to ensure the necessary moisture capacity and air permeability.
- Choose humus-rich, loose soil with a neutral or slightly acidic pH for cauliflower. If necessary, lime the area in the fall and apply organic fertilizers containing boron, molybdenum, and copper in the spring, as the plant is particularly sensitive to these deficiencies.
- Grow the vegetable at temperatures between 15 and 18°C. Prolonged exposure to low temperatures will result in the formation of small, tasteless heads. Higher temperatures will also negatively impact their development: at 25°C and above, especially in low humidity, they will stop growing rapidly and become loose.
- Place the crop in sunny areas protected from cold winds and drafts. Avoid dense or shaded plantings, as these conditions will cause the sun-loving plant to stretch and become more susceptible to various diseases. Furthermore, shaded areas will produce small heads, and in full shade, they will not set any fruit at all.
With long daylight hours, heads will form earlier, but will also break up into flowering shoots more quickly. With short daylight hours, they will be denser and larger, but will form much later.
When to plant?
To ensure a harvest throughout the summer and fall, seeds should be sown three times for seedlings. The exact planting dates should be calculated based on the crop variety:
| Varieties | Timing of planting seedlings | Deadlines for planting at a permanent location |
| Early, hybrid | from March 5 to March 30 | in 25-60 days, that is, from April 25 to May 15 |
| Mid-late | from April 10 to May 10 | in 35-40 days, that is, from May 20 to June 15 |
| Late | from May 25 to June 10 | in 30-35 days, that is, from July 1 to 10 |
Therefore, seeds of early varieties should be sown for seedlings at the end of February, on average 40-50 days before transplanting to a permanent location, mid-season varieties - after 2 weeks, and late varieties - after a month.
How to grow seedlings?
To achieve a good harvest, it's crucial to grow strong seedlings. This process can be divided into several stages, each requiring special attention.
Substrate preparation
You can buy it at the store or prepare it yourself, but do so in advance—in the fall. The soil for the seedlings should be nutritious, moisture-retentive, loose, and neutral (pH around 6-6.5), as cabbage does not tolerate acidic soils. With this in mind, you can prepare the following mixtures:
- lowland peat, sand and humus – 1:1:10;
- lowland peat, rotted sawdust, mullein – 3-5:1-1.5:1.
All types of peat can be used in the substrate, as they absorb moisture well, are breathable, and do not compact. When using low-lying peat, add sawdust (up to 1/3 of the mixture).
The prepared substrate should be steamed for 2 hours, then nitrogen fertilizer should be added. Here are some popular options:
- urea or ammonium nitrate – 20-25 g;
- complex fertilizers – 50 g per 1 l.
Additionally, 300-450 g of dolomite flour can be added to 10 liters of high-moor peat. If the fertilizer lacks micronutrients, it's worth adding an additional cup of wood ash, as it's an organic source of potassium, which also reduces soil acidity and increases the concentration of phosphorus, boron, and manganese.
Store the prepared substrate until spring in a place protected from rodents.
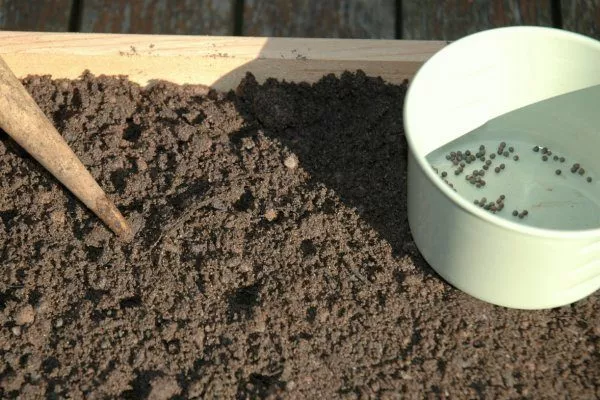
Seed treatment
For sowing, it's best to select only large and heavy seeds. They need to be treated as follows:
- To disinfect, soak dry seeds for 15-20 minutes in hot water (45 to 50°C). This will help kill viruses on their surface, which could continue to survive in the soil and cause various diseases in the growing crop. Soaking can be done in a thermos.
- After soaking, immediately cool the seeds in cold water and dry.
- Soak the seeds in a mineral fertilizer solution for 24 hours; otherwise, they won't be able to produce flower stalks after scalding. For example, to encourage germination and germination, soak the seeds in a solution of Nitrophoska (1 teaspoon per 1 liter of water). Untreated seeds can simply be soaked in a solution of Fitosporin for a double effect—preventing diseases and providing the necessary mineral nutrition.
- Once the seeds have sprouted, harden them off. To do this, place them in a cool place for 24 hours, where the temperature remains between 2°C and 5°C. For example, you can place them on the bottom shelf of the refrigerator. Then, remove the seeds, keep them warm for 24 hours, and then return them to the refrigerator for another 24 hours.
Properly treated seeds will produce strong seedlings that will be more resilient to adverse conditions.
Sowing seeds
At the optimal time, they can be sown for seedlings, following this order:
- Prepare containers for growing seedlings. Peat pots or plastic cups with a diameter of at least 6 cm are best, as they eliminate the need for transplanting. In a pinch, a deep container can be used.
Cauliflower does not like picking, as this is a great stress for it, which can lead to a delay in development of 1-1.5 weeks.
- Prick the substrate in the oven for 5 minutes. The ideal temperature is 60-80°C. This will clear the soil of pathogenic microflora, increasing the disease resistance of future seedlings.
- Place drainage at the bottom of the prepared container, and then fill it with substrate.
- Make small 0.5 cm deep holes in the soil surface, drop 2-3 seeds into each hole, firm the soil, and mulch with a thin layer of sand. If planting in a common container, avoid spacing the seeds too close together, as this could damage the roots when transplanting the seedlings to their permanent location. Therefore, sow in rows, making furrows 3 cm apart and spacing the seeds 1 cm apart.
- To retain soil moisture, cover the crops with transparent film.
Learn how to plant seeds in trays to avoid transplanting later in the video below:
Caring for seedlings
It consists of carrying out the following agrotechnical measures:
- Organization of optimal temperature conditions. Until the first shoots emerge, maintain the temperature between 18 and 20°C. Once the shoots emerge (usually 7-10 days after sowing), remove the protective covering and move the seedlings closer to the light source. Lower the temperature to 6 to 8°C. Otherwise, the seedlings will stretch excessively and the root system will be underdeveloped. After 5-7 days, adjust the temperature again: maintain it between 15 and 18°C during the day and between 8 and 10°C at night.
- Topping. If all the seeds in the hole sprout, leave only the strongest sprout and pinch the rest at ground level. Don't pull out any excess sprouts, as this can damage the plant's root system.
- Watering. Seedlings don't tolerate either excess moisture or excessive dryness, so they should be watered moderately with settled, room-temperature water once a week. To maintain soil moisture, mulching with river sand or vermiculite is a good idea. There's no need to loosen the soil, as the plant's roots are close to the surface and can be easily damaged. After watering, ventilate the room. The ideal humidity level is 70-80%.
- Top dressing. Cauliflower is particularly demanding of boron and molybdenum, so when 2-3 true leaves appear, the seedlings should be sprayed with a 0.2% boric acid solution (2 g per 1 L of water), and when 3-4 true leaves appear, with a 0.5% ammonium molybdate solution (5 g per 10 L of water). A week before transplanting, avoid applying nitrogen fertilizers completely, but 2-3 days before, the plant can be fed with phosphorus and potassium (2-3 g of superphosphate and 3 g of potassium chloride per 1 L of water) to increase its cold hardiness.
- Dive. Cauliflower seedlings do not tolerate transplanting well because they have a very weak and shallow root system. Therefore, seeds should be sown in individual pots from the very beginning. However, if they were planted in a single container, the seedlings will need to be transplanted once two true leaves appear. To do this, prepare individual, deeper containers to avoid damaging the roots when transplanting them into open ground. After transplanting, keep the seedlings at a temperature of 21°C (70°F). Once established, maintain the temperature at 17°C (63°F) during the day and 9°C (47°F) at night.
- Hardening. Ten days after planting in a permanent location, or at the age of 40 days, seedlings with 5 true leaves should be taken out onto the balcony or into the greenhouse for several hours so that they gradually get used to the open air.
- ✓ After the seedlings emerge, the temperature must be reduced to +6…+8°C during the day and +8…+10°C at night for 5-7 days to prevent the seedlings from stretching.
- ✓ Air humidity should be maintained at 70-80%, too dry air can cause the leaves to dry out.
Hardened seedlings can withstand frosts down to -5°C.
Preparing the garden bed
While the seedlings are growing, it's time to prepare the plot. Fertile soil with a slightly acidic or neutral pH (6.7-7.4) is best for cauliflower. If the soil is acidic, it should be limed in the fall by adding lime or dolomite flour during tillage. This should be done a few days after fertilizing the soil.
Lime will work faster, but dolomite flour will enrich the soil not only with calcium, but also with magnesium.
The best predecessors of culture are:
- roots;
- legumes;
- cereals;
- onion;
- garlic;
- green manure;
- early varieties of cucumber.
Bad predecessors include:
- tomato;
- beets;
- radish;
- radish;
- all types of cabbage.
In a plot where poor predecessors previously grew, cauliflower can be grown after at least 4 years.
Soil preparation involves the following activities:
- In autumn, add organic and mineral complexes, including 150 g of phosphate and 100 g of potassium sulfate or chloride per 1 sq. m.
- The weather in May is unstable, and cauliflower doesn't tolerate frost well, so it's best to insulate the soil in advance. To do this, build tunnel shelters by covering the beds with polyethylene film, lutrasil, or black spunbond to suppress weeds. Non-woven fabric is best, as it allows moisture and air to pass through well without forming condensation.
A tunnel shelter will not only insulate the soil, but also protect it from cruciferous flea beetles, which are dangerous for cabbage.
- In early spring, apply 1 tablespoon of nitrogen fertilizer and up to 1 kg of humus to each plant. Some gardeners recommend adding rotted manure or a mixture of humus, peat, and compost to the soil at a rate of 10 kg per square meter. Before planting, you can also add (per square meter):
- a bucket of humus or compost;
- 2 glasses of wood ash;
- 2 tbsp. l. superphosphate;
- 1 teaspoon of urea.
The added fertilizers should be thoroughly mixed with fertile soil. It's best not to dig the beds, but rather to loosen them superficially, breaking up any clumps. Large, dense cauliflower heads can only grow in dense soil.
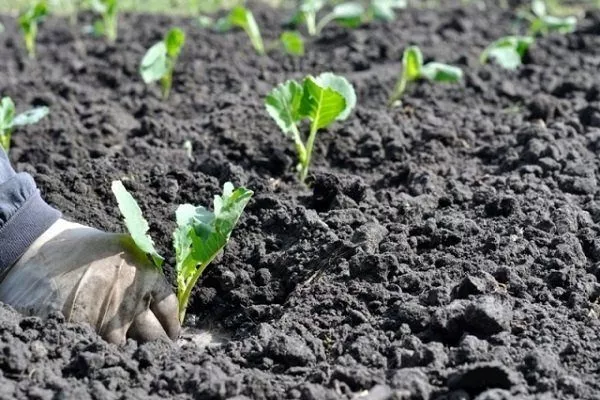
How to plant cauliflower in a permanent location?
Cauliflower can be grown from seedlings or from seeds. When using seedlings, transplant them to their permanent location when they are 45-50 days old. Overgrown seedlings will significantly reduce the quality of the produce, as after transplanting, these sprouts lose 2-3 leaves, resulting in a small head of cabbage that will quickly crumble. Therefore, it's best to transplant seedlings with 4 true leaves. If planting from seeds, the seedlings should be treated initially in the same way as for transplanting seedlings.
Regardless of the cultivation method, planting should be carried out on a cloudy but warm day, adhering to the following scheme:
- Plant seedlings or sow seeds in 2 rows, the distance between which is 50 cm. The interval between holes is 20-40 cm depending on cabbage varietiesIf the variety has a large rosette of leaves, the plant can be spaced even more widely. Generally, the optimal planting pattern is 50 x 25 cm.
- Plant the seedlings deep down to the first true leaf, firm the soil surface to ensure a firm plant position, and water. If no soil preparation was done, add a pinch of ash to each hole, mix it with the soil, and moisten with 1 liter of water per hole.
- If work is carried out in April-May, cover the bed with non-woven fabric for several days to protect young shoots from possible night frosts and flea beetles.
A homemade greenhouse made from a plastic bottle with a capacity of at least 1.5 liters can be used for each seedling's individual greenhouse. Cut off the bottom and screw on the lid to create a completely airtight shelter. For ventilation, simply unscrew it temporarily.
This type of greenhouse has a layered structure, so it retains heated air for a long time and also protects the plant from winds.
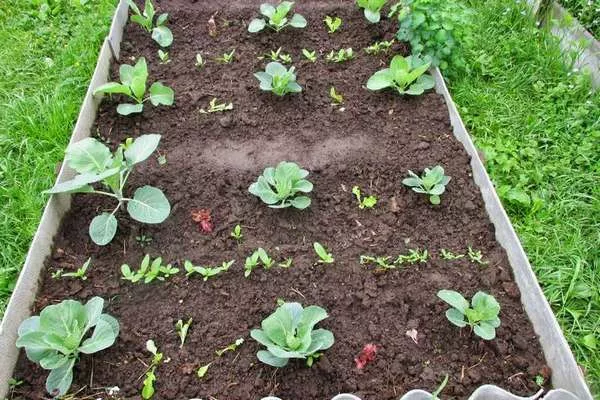
Caring for cauliflower
Cauliflower requires more care than white cabbage, but the cultivation techniques remain the same. Each technique requires individual attention.
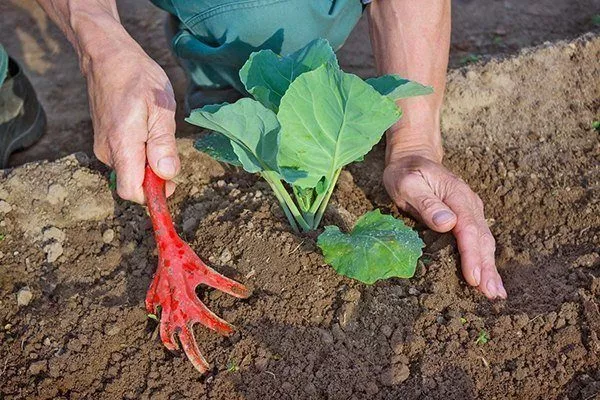
Watering, loosening, mulching
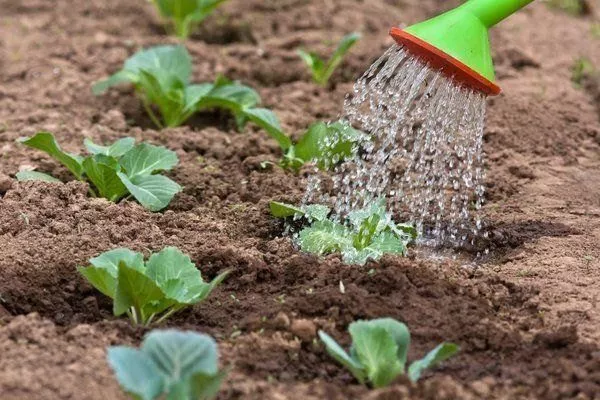
Initially after planting, the plant should be watered twice a week at a rate of 6-8 liters per square meter. Subsequently, the frequency should be reduced to once a week. Weather conditions should also be taken into account. On rainy days, the soil does not need to be moistened at all, and in dry periods, water every few days to prevent crusting. In any case, it is best to water in the evening using sun-warmed water.
Excessive soil moisture should not be allowed, as this will disrupt the functioning of the root system and delay the formation of the head.
Cauliflower's root system is close to the soil surface, so loosening the soil is unnecessary. At a minimum, after watering or rain, the bed can be loosened to a depth of 8 cm, removing weeds along the way.
To promote root growth, cabbage should be regularly hilled. It's also worth mulch the garden bed To maintain optimal soil moisture, the soil around the plants should be covered with peat mixture, humus, or other mulching material.
Shading
This is a must for growing snow-white heads. As soon as the first inflorescences appear, shade them with 2-3 adjacent leaves using one of the following methods:
- break the leaves and make a curtain out of them;
- Gather the leaves into a bunch and tie with a rubber band or clothespin.
If you ignore this technique, the heads will grow in direct sunlight, and will therefore become covered with dark spots and turn yellow.
Top dressing
Cauliflower requires fertilizing, without which it's unlikely you'll get a good harvest of cauliflower flowers. Fertilizing should be done at least three times during the growing season. The fertilization schedule is as follows:
- The first feeding should be done no later than 3 weeks after planting, or on the 10th day. The best fertilizer at this stage is a mullein solution. To prepare it, dissolve 0.5 liters of liquid mullein and 1 tablespoon of a complex fertilizer containing boron and molybdenum in 10 liters of water. Apply the mixture to the roots of the plants at a rate of 5 liters per 1 square meter or 0.5 liters per head.
- Two weeks after the first feeding, apply a second one. Add 1 tablespoon of Kristina to the same solution. Apply at a rate of 1 liter per plant.
- After another two weeks, feed the cabbage with a different solution, prepared by diluting mullein with water at a ratio of 1:8. For 10 liters of this solution, use 40 g of superphosphate, 30 g of ammonium nitrate, 20 g each of boric acid and potassium chloride. Mineral fertilizers can also be used as a third dressing, for example, by dissolving 2 tablespoons of nitrophoska in 10 liters of water. Apply at a rate of 6-8 liters per 1 square meter.
Once the cabbage heads have formed, no more nitrogen fertilizers are needed to prevent the accumulation of harmful nitrates. Meanwhile, the plant can be sprayed with a special solution prepared by mixing 1 g of boric acid, 1 teaspoon of potassium magnesium sulfate, and 1 tablespoon of superphosphate extract in a small amount of hot water. Add water to the mixture to make 10 liters of solution and spray the plant.
The following video explains in detail how to care for the plant outdoors:
Protection from diseases and pests
Among the diseases that pose a danger to cauliflower are:
- AlternariaA fungal disease that causes black or dark brown spots on cabbage leaves, resulting in their death. It develops in humid conditions at temperatures between 33 and 35°C. As a preventative measure, seeds should be disinfected with Planriz before planting. The plant can also be treated with copper-containing products. These include:
- Bordeaux mixture;
- colloidal sulfur;
- copper sulfate.
- KilaThis disease causes growths and swellings to appear on the roots, leading to root rot. The plant no longer receives nutrients from the soil, turning yellow and drying out. It develops primarily in moist and acidic soils. To prevent clubroot, add a small amount of slaked lime when planting seedlings. If the disease does affect the cabbage, regularly apply dolomite flour (1 cup per 10 liters of water) to the roots. It is also advisable to add wood ash to the soil throughout the growing season.
In an area where clubroot has been discovered, cauliflower should not be grown for 5-7 years.
- Ring spotThis fungal disease is activated in a humid environment and manifests itself as black spots on the leaves and stems of the plant. As the cabbage grows, these lesions expand in diameter to 2.5 cm, and concentric circles form around them. Eventually, the surface of the leaf blade turns yellow, and its edges become jagged. As a preventative measure, the soil and seeds should be disinfected before sowing. To combat the disease, the cabbage should be treated with fungicides, and all plant debris should be removed from the area after harvesting.
- Slimy bacteriosis (wet rot)It develops when the water balance is disrupted, causing small, dark, water-soaked spots to appear on the cabbage heads. Black, elongated growths can also be seen on the stems. These spots gradually begin to rot, turning black and emitting an unpleasant odor. Wet rot progresses in damp weather and mechanical damage to the plant. To prevent this, cabbage should be treated in the spring with a 0.4% colloidal sulfur suspension. If spots do appear, the affected areas should be cut out, leaving a healthy section. After harvesting, carefully remove all plant debris from the bed.
- Vascular bacteriosisThis fungal disease develops under prolonged rainfall. Chlorotic spots appear on the above-ground parts of cauliflower, leading to necrosis. The leaves wilt, and the heads become infected with black rot. If the bacterial blight attacks the plant at an early stage of development, the heads fail to form at all. To prevent these consequences, seeds and soil should be disinfected. As the disease progresses, the plant should be treated with products such as Trichodermin and Planriz.
- Fusarium (jaundice)It's caused by a fungus that penetrates the plant's vascular system, causing the leaves to turn yellow-green, then become covered with dark spots and fall off. Veins darken, and the heads become deformed. To prevent yellowing, add Fitosporin-M to the water used for watering the plant. If yellowing occurs, treat the cauliflower with Fundazol (Benomyl).
- BlacklegThe disease affects plants even at the seedling stage, manifesting itself as blackening of the root collar in conditions of excessive moisture. Eventually, the root collar becomes soft, and the seedling dies. To prevent blackleg, seeds should be treated with a solution of potassium permanganate or Pseudo-bacterin-2 before sowing, and disinfect the soil (for example, with a formalin solution or steam). If the disease appears, the affected seedlings must be immediately removed and destroyed.
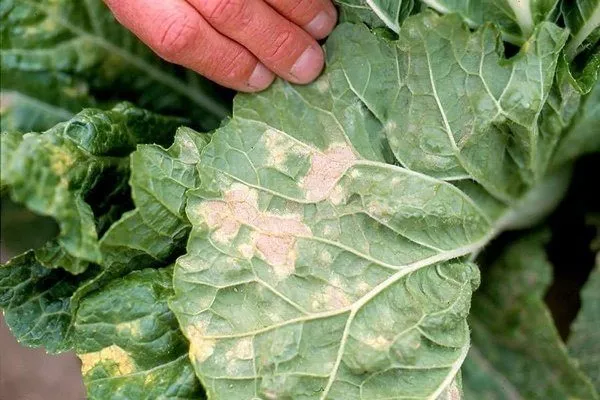
- Downy mildew (peronosporosis)It attacks the above-ground parts of the plant in high-humidity conditions. Slightly sunken spots form on the leaves. The undersides of these spots become covered with a whitish coating that gradually turns gray. Eventually, the leaves dry out and fall off. To prevent this, seeds and soil should be disinfected. If signs of the disease appear, the cabbage should be treated with a fungicide, such as a 0.5% suspension of Ridomil Gold.

- MosaicA typical viral disease for plants grown outdoors. Its first signs are observed a month after transplanting seedlings into the garden. Leaf veins lighten, and a dark border appears around them. As a result, they stop growing, and the leaves become wrinkled, covered with necrotic spots, and die. The heads are small and deformed. The disease is often caused by sucking insects, so cabbage should be protected from aphids, cruciferous weeds should be removed promptly, and all agricultural practices should be followed. The disease is incurable, so affected plants must be destroyed.
Cauliflower is also at risk from numerous pests, including:
- Cruciferous flea beetlesThese are small bugs from the leaf beetle family that feed on cauliflower seedlings and leaves. To repel them, treat the seedlings twice with a trichlormetaphos solution, 10 days apart. These pests dislike the smell of garlic and tomatoes, so they should be used to compact the cabbage beds. After watering, sprinkle the plants with sifted ash.
- FlyIt lays eggs in the lower portions of plant stems, clods of soil, and cracks in the soil. The larvae emerge after 8-12 days and attack the root system, which is destroyed, leading to the death of young plants and the destruction of mature plants. To repel the fly, cauliflower plantings should be thickened with celery, as the pests dislike its smell. Additionally, the soil around the seedlings should be watered 2-3 times with a 0.2% solution of Malathion (Karbofos) at a rate of 1-1.5 cups per plant. The interval between waterings should be 7 days.
- AphidA dangerous pest that not only sucks the plant's juices but also spreads viral diseases. To prevent an aphid infestation, the area should be completely cleared of plant debris and cruciferous weeds after harvest. Additionally, cauliflower plantings should be thickened with tomato plants, the smell of which repels the pest. Infusions and decoctions containing grated laundry soap based on the following ingredients can also be used to combat aphids:
- Luke;
- garlic;
- hot pepper;
- herbs (wormwood, yarrow);
- tobacco dust;
- mustard;
- potato tops.
In the case of a large aphid infestation, you will have to use insecticides, which include Aktara, Tanrek, and Biotlin.
- CaterpillarsCabbage whites, cutworms, and moths are insects whose caterpillars consume cauliflower leaves, often leaving only the veins. These pests also burrow into the heads, damaging their appearance and flavor. To combat them, treat the cabbage with a 0.5% solution of Entobacterin-3. Furthermore, the eggs should be destroyed and the caterpillars removed manually.
To repel slugs from cauliflower, sprinkle the spaces between the planting rows with lime, mustard, or unsifted ash. This will ensure the cabbage heads have a beautiful, marketable appearance.
When and how to harvest?
The seed packaging indicates the harvesting dates. Gardeners should use these dates as a guide. Additionally, the following signs will indicate the technical maturity of cauliflower:
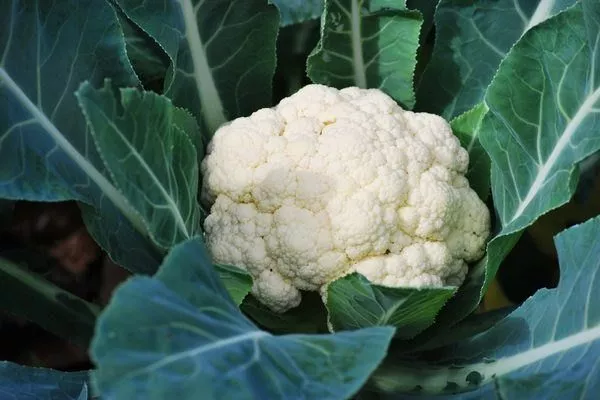
- the head diameter is 8-12 cm;
- head weight – from 300 to 1200 g.
In this case, it is necessary to take into account the maturity period of cauliflower depending on what variety it belongs to:
- early varieties ripen in 60-100 days;
- mid-season varieties can be harvested in 100-135 days;
- Late varieties reach maturity in 4.5 months, so cauliflower will be on the table until the New Year.
Don't delay harvesting, as overgrown heads will loosen, darken, fall apart, and bloom. As they ripen, they should be cut off along with 3-4 rosette leaves, 2 cm below the last leaf. It's best to do this in the morning, but if frost has set in, you can wait until afternoon.
If the cabbage has developed lateral shoots, it is worth leaving a few of the strongest ones so that they will produce new inflorescences.
If you're storing cabbage, you can dig it up by the roots, leaving the outer leaves behind. Then, lay it in damp sand and store it in a cool place. Alternatively, you can hang the dug-up cabbage heads upside down in a dark, frost-free place.
Sometimes, late cauliflower, which should be harvested before the first frost, doesn't produce a full head by then. In this case, it needs to be nurtured further. This is done as follows:
- Bring several boxes of garden soil into the cellar.
- Water the plantings in the garden bed, and after 2 days dig up the heads with a large lump of earth and transfer them to the cellar.
- Transplant the cabbage into boxes, immersing them in soil up to the leaves.
- Water the plants regularly, as cabbage requires at least 90-95% humidity to reach full maturity. The room temperature should be between 0 and 4ºC and there should be good ventilation.
Nutrients will flow from the leaves to the inflorescences, so in 2 months the underdeveloped heads will turn into decent heads that you can enjoy all winter.
The video below explains how to grow vegetables to get a good harvest:
Rules for storing cauliflower
To preserve cauliflower, it is worth considering the following rules:
- Do not leave cut heads in the sun, as they will turn yellow and become unfit for consumption;
- store the harvest for up to 2-3 months in a cellar, plastic or plywood box covered with polyethylene film (the optimal room temperature is from 0 to 0.5ºC, and the humidity is 90-95%);
- If there is no suitable storage space, freeze the cauliflower and keep it in the freezer for up to 1 year, but first the heads need to be separated into florets, washed under running water, dried and placed in cling film;
- Like white cabbage, cauliflower can be stored hanging for up to 1 month. To do this, dig up the heads from the garden bed, trim off the roots and remove the outer leaves, then tie them by the stalk with twine or rope and hang them so that they do not touch each other.
Cauliflower is a rather capricious and demanding crop, so when growing it, it's essential to follow all the rules of agricultural technology—from sowing seeds and transplanting seedlings into open ground to harvesting. With proper care, you can enjoy cauliflower dishes not only all winter but all year round.