Cabbage transplants are performed when it's necessary to thin out the plantings so that each seedling receives sufficient nutrients, air, and water. Cauliflower, broccoli, white cabbage, and Savoy cabbage varieties often require transplanting.
Why do you need to pick cabbage?
Pricking out plants involves transplanting seedlings into different containers. This allows each seedling to continue developing in its own unique location until it reaches the open ground.
Placing plants in different containers has a number of advantages and disadvantages, let's look at them in order.
Benefits of transplanting cabbage seedlings:
- plants receive more components necessary for life;
- the old soil mixture is replaced with new soil;
- Planting space is saved. Only strong and healthy seedlings grow on the plot;
- Picking helps to get rid of diseased specimens.
Is it possible to grow cabbage seedlings without picking?
Some gardeners claim that any plant can be grown without this procedure. It's just necessary to plant the plants farther apart from the start so they don't interfere with each other while growing and receive adequate nutrition.
Disadvantages of picking:
- Damage to the root system. Even the most minimal and harmless manipulation of roots can cause damage. The seedlings then take a very long time to recover, and sometimes simply die. Consequently, pricking out the roots delays the growth of the seedlings.
- Lateral roots are developing. Improper transplanting can damage the root, causing unwanted lateral shoots to emerge. The main stem stops developing, requiring frequent repotting.
- Expensive and time-consuming. Purchasing individual pots and special soil for transplanted cabbage is expensive and time-consuming. This is especially true for cabbage grown in warm climates. In these areas, plants don't need to be replanted, and seedlings can be grown without the need for transplanting. The seedlings are sown directly into the soil.
When to transplant cabbage seedlings?
Any variety of this vegetable crop is transplanted when its true leaves have formed. For example, cauliflower is transplanted 7-10 days after sowing the seeds; by this time, it will have two leaves. The same applies to cabbage varieties. Kohlrabi and broccoli are potted when they have three leaves.
Only correct and timely picking brings real benefit, as seedlings are often damaged and die during this process.
Follow the lunar calendar; it's recommended to transplant vegetables in the first or second quarter. Avoid this procedure during the sign of Aquarius.
Soil preparation
Plants can only be repotted after pre-treating the planting material. For this purpose, use a weak solution of potassium permanganate.
- ✓ The soil should be light and permeable to allow the roots to breathe freely.
- ✓ Soil pH should be between 6.0-7.5 for optimal nutrient absorption.
- ✓ It is essential to have a drainage layer at the bottom of the container to prevent water stagnation.
The soil is prepared two weeks before transplanting seedlings. This mixture of black soil and wood shavings produces excellent results. Its properties are enhanced by the following elements:
- ammonium nitrate (5 g per 5 l of water);
- superphosphate (6 g per 5 l of water);
- lime (12 g per 5 l of water);
- potassium nitrate (3 g per 5 l of water).
These products are dissolved in water and used to water the beds: 150-200 ml per plant.
If you can't treat the cabbage this way, simply water it before transplanting. The moisture will "connect" the roots slightly, enveloping them in soil and preventing damage during transplantation.
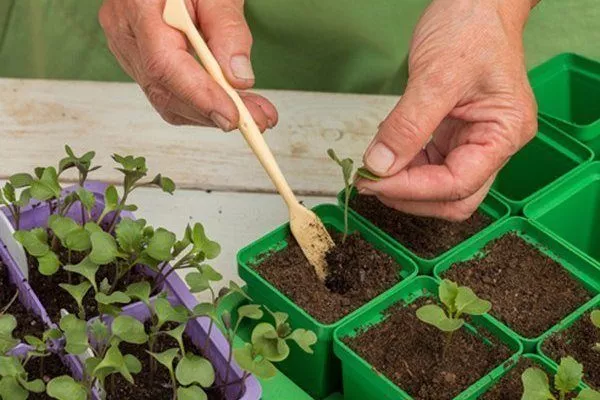
Methods of picking and step-by-step recommendations for them
After watering the plants, it's time to prepare all the necessary tools. A simple spoon or a small spatula will do. Pricking out plants has been a familiar practice for many years, so there are many methods for doing it. Let's look at the main ones.
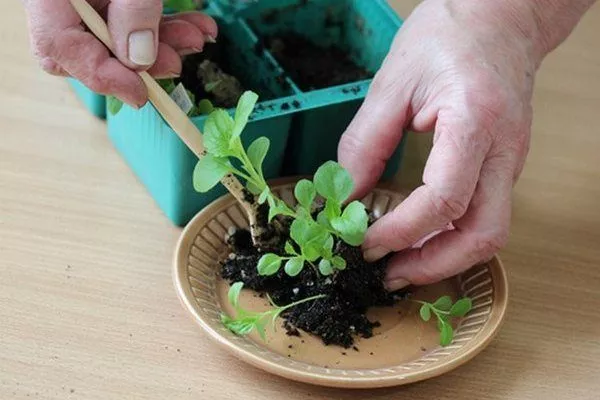
In one container
You can transplant the crop into a single container. Use a wooden box or a small basin. Fill the container with soil to a depth of about 2 cm. Prepare the mixture yourself, using garden soil, ash, and river sand. If this isn't possible, buy ready-made soil for cabbage seedlings at the store.
The soil may contain pathogen spores. To prevent them from harming your plants, treat it with a weak solution of potassium permanganate. This will completely disinfect the soil.
Carefully remove the seedlings from the original container and carefully transfer them to the small depressions in the new container. Firm the soil around the transplanted plants. The main requirement for the new container is to leave at least 8 cm between the edges of the container and other seedlings. This will ensure the cabbage thrives and begins to receive the nutrients it needs.
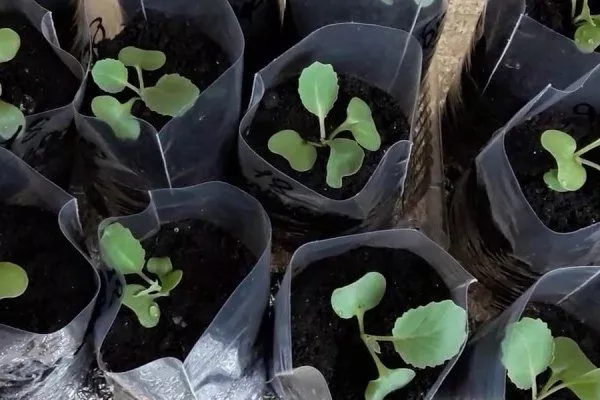
In plastic cups
To ensure the seedling feels comfortable, choose a container at least 5 cm in diameter, otherwise the roots will develop incorrectly. For this purpose, gardeners use ordinary plastic cups or very thick bags. Poke holes in the bottom of the container to allow excess moisture to escape. The composition of the soil mixture is the same as the previous method.
The only significant drawback of this method is that it's very easy to damage the roots when transplanting plants into open soil or a greenhouse. Therefore, if possible, choose larger containers. If this isn't possible, cut the cups open during transplantation and remove the undamaged seedlings.
You can clearly see how cabbage seedlings are transplanted into plastic cups in the following video:
In peat cups
This is considered one of the most common methods for transplanting cabbage. Unlike plastic, a peat container disintegrates very quickly, so you can plant the seedlings in the same cup. This not only protects the sprouts but also nourishes the soil.
Choose peat containers of the same size (about 7 cm). Fill them with potting mix, leaving a little space. Water the soil where you'll be planting the seedlings, and dig holes to ensure the soil reaches the bottom leaves of the plants.
Peat cups are the best container for transplanting vegetable crops.
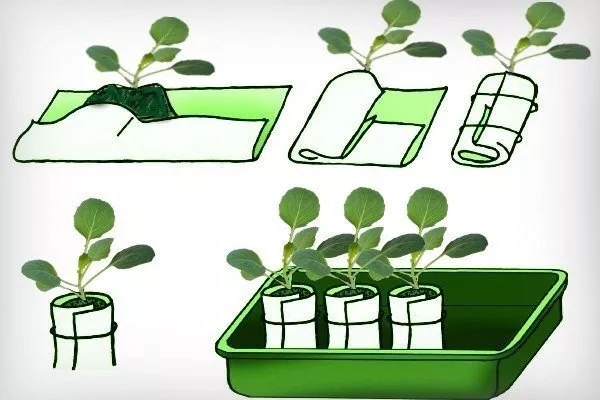
In polyethylene
This method is applicable not only to cabbage seedlings but to other plants as well. Take some thick plastic and cut it into pieces measuring 0.1 x 0.15 m. This method is popular with gardeners because it's easy to implement and saves a lot of space, which is otherwise taken up by cabbage sprouts.
Algorithm for transplanting seedlings into polyethylene:
- Lay out the plastic.
- Place some fertilized soil in the top corner.
- Place a cabbage sprout on top of the ground so that the lower leaves are above the plastic.
- Cover the root system of the seedlings with soil.
- Make an envelope out of polyethylene: place the bottom corner on the sprout with soil and fold it over.
- Secure the envelope with tape.
Place all the envelopes in one large box or crate and place them in a sunny, warm spot; a windowsill is a good option. If natural light is limited, install additional fluorescent lamps.
Into the "diaper"
There's a method for growing seedlings that doesn't require further transplanting. First, you need to grow the seedlings using a specific method. The algorithm for growing cabbage seedlings using film and paper is as follows:
- Cut the film into strips about 0.1 m wide.
- Place newspaper on top.
- Spray it with a little water.
- Place the seeds on the paper, 4 cm apart.
- Cover the seed with another layer of paper, then with film.
- Roll the structure into a roll and place it in a plastic glass with water at the very bottom.
- Cover with a cloth and place in a warm place.
This method helps quickly grow sprouts from seed, leaving enough space between plants. Once two sprouts emerge, the plants can be transplanted into open soil, but only if you're growing cabbage in the southern region.
This method can also be used by residents of northern climates, however, after 2-3 true leaves appear on the seedlings, they still need to be transplanted into separate containers.
The "diaper" method has a number of advantages:
- saves space;
- you won’t have to prepare special soil for germinating seeds;
- during secondary picking the roots are not damaged;
- seedlings are 100% protected from bacteria;
- At the initial stage, you can get rid of weak seeds that would not produce a harvest in the future.
Disadvantages of picking in film:
- very slow growth of seedlings;
- re-pricking is often necessary.
The video below explains how to sow cabbage seeds in "diapers" so you can easily transplant the seedlings later:
Caring for cabbage seedlings after picking
Growing plants after transplanting has a number of nuances and peculiarities. First and foremost, this concerns caring for the seedlings. Cabbage can become diseased and die.
The most important thing the seedlings need right now is fertilization. The first feeding should be done after the first leaves appear. To do this, dilute 15 g of urea in 5 liters of water.
- 7 days after picking, add a urea solution (15 g per 5 l of water).
- Two weeks before planting in open ground, fertilize with a solution of chicken manure (1:2) or potassium chloride (5 g per 5 l of water).
- If growth is slow, repeat the urea feeding.
The second application of fertilizer should be done approximately two weeks before planting the seedlings in open soil. Use chicken manure and water (1:2). You can substitute this solution with a potassium chloride solution (5 g per 5 liters of water). After transplanting, the plants should grow and develop rapidly. If the seedlings wilt, fertilize them again with a weak urea solution.
Peculiarities of picking different types of cabbage
Picking cabbage is done for the same purpose; it is carried out almost the same way for all types of crops, but there are some special features to note.
White cabbage varieties
The timing of transplanting directly depends on the timing of seed sowing. Delaying transplanting is crucial, as it will hinder the seedlings' survival in open soil. Before sowing, be sure to treat the seedlings with a weak solution of potassium permanganate to prevent the development of pathogens.
Until the first shoots appear, maintain the temperature at 20–22 degrees Celsius and water the seedlings regularly. Pricking out should begin after the plants have developed two true leaves. Do not transplant weak plants; keep only strong and healthy ones.
Cauliflower
Almost always is grown cauliflowerUsing seedlings. Maintain a temperature of 20 degrees Celsius (68 degrees Fahrenheit) until the sprouts emerge. Once they emerge, gradually reduce the temperature to 9 degrees Celsius (47 degrees Fahrenheit) to allow the seedlings to establish. After a week, increase the temperature again to 12 degrees Celsius (55 degrees Fahrenheit) and maintain this temperature for 1.5 weeks.
Pick the seeds a week after sowing. Use peat pots as containers, as cauliflower's root system is fragile and can be damaged by a few missteps during transplantation.
During this process, place the seedlings in the soil up to the cotyledon leaves, then add wood ash as a mulch. In open soil, plant in rows, maintaining a distance of at least 0.7 m for early-ripening varieties and 0.9 m for late-ripening varieties. Leave about 0.3 m between plants.
Broccoli
Gardeners recommend avoiding transplanting this type of cabbage, as the roots are very fragile. It's best to grow the plants in a large container so that the seedlings can be transplanted directly into the ground (two months after sowing).
Transplant the seedlings in the evening on a rainy day. Make the holes in rows, leaving at least 0.5 m between them.
Kohlrabi
Sow seeds for seedlings no later than March 15th. Place the seedlings in a prepared substrate of soil, sand, and peat. Keep the temperature at 20 degrees Celsius until the first shoots appear, then reduce it to 10 degrees Celsius. After 1.5 weeks, set the temperature at 16 to 18 degrees Celsius. Once the first leaf appears, you can transplant.
Pricking out cabbage isn't mandatory, but it's a good idea. After transplanting the plants into individual pots, they'll thrive, receive adequate nutrients, and reward you with a bountiful and delicious harvest.