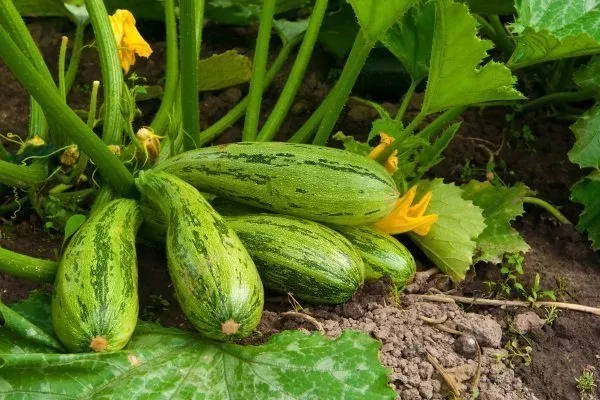
Every gardener can grow zucchini in their own backyard. This is an easy-to-grow vegetable crop, but to get a good harvest, it's important to know the rules, methods, and procedures for growing it outdoors. Proper care and timely harvesting are equally important. Read on for details on all the stages of zucchini cultivation.
Selecting a variety
If you decide to grow vegetables outdoors, preference should be given to varieties characterized by well-developed shoots and independent bush formation. They are more resistant to diseases, adverse weather conditions, and other external factors. Among these varieties are:
- GribovskyThis mid-season variety bears fruit 55 days after sowing. It has well-developed bushes with long shoots. The light-colored fruits are distinguished by slight ribbing on the surface and excellent flavor. As they age, their skin becomes dense and rough. This variety is resistant to cold and disease, making it suitable for cultivation in both the Moscow region and the Urals. It is also low-maintenance, requiring only regular watering and loosening of the bed for good fruiting.
- ChaklunThis variety is distinguished by its high yield and long fruiting period. The first fruits can be harvested in as little as 45 days. They are white and smooth. The squash flesh is tender and slightly sweet. The crop is rarely susceptible to infection and tolerates transportation well to long-term plants.
- GoldfinchThis variety has a female flowering type, so it produces fruit abundantly and for a long time. As the zucchini ripens, it turns bright yellow, hence its name. Fruits weighing up to 400 g are edible. Larger specimens lose their flavor.
- White-fruitedThis early hybrid produces its first harvest 35 days after sowing. The white fruits have a smooth surface and are compact in size. They are resistant to pests and diseases and are easy to transport.
- Odessa bushLike the previous variety, this one is early maturing, bearing fruit 40 days after sowing. The white fruits are slightly ribbed and have tender, sweet flesh. The plant is resistant to disease and cold.
- PharaohThis easy-to-grow zucchini variety doesn't require frequent watering, easily tolerates both cold and heat, and produces a bountiful harvest. The dark green fruits are long and can weigh up to 1 kg. This variety can be grown in a wide variety of regions, from the central Russian region to the Urals.
- PantheonThe fruits of this variety surpass their counterparts in marketable appearance, so they are often grown commercially. It is easy to care for, but requires planting in fertile soil and maintaining stable moisture levels.
- ✓ Resistance to diseases and pests not mentioned in the variety description.
- ✓ Adaptation to specific climatic conditions of the growing region.
Planting methods and timing
Zucchini can be cultivated in two ways, which will determine the optimal timing for sowing:
- SeedlingThis method involves growing seedlings, which should be transplanted into open ground once they germinate. With this method, you don't have to worry about successful seed germination. Sow seedlings on April 15-25 or May 1-10. At 25-30 days old, in the first ten days of May, the seedlings can be transplanted into the garden beds. They should be covered with plastic or other insulating material until the end of spring frosts, that is, until early June.
- Direct sowing of seeds into the groundThis is a less labor-intensive method; however, there is a risk of crop loss in the event of subsequent frosts. Seeds should be sown in well-warmed soil (at least 12-13°C at a depth of 8-10 cm). This is typically done in late May or early June. To reduce the risk of frost damage, seeds should be sown in 2-3 stages, 3-4 days apart. The minimum temperature for normal germination is 12-15°C.
When choosing a seedling method, keep this in mind: zucchini grown this way is not intended for long-term storage—they should be eaten immediately or used for winter preserves. If you want to grow zucchini suitable for long-term storage, the sprouted seeds should be sown directly into the ground, around the beginning of June.
To ensure a successful harvest and maximize the harvesting period for young zucchini, experienced gardeners combine seedling technology with direct sowing of seeds into the ground.
Zucchini is the most cold-hardy crop of all members of the Cucurbitaceae family, so it can grow at temperatures of 8-9°C and even withstand short-term drops to 6°C. However, regardless of the planting method, the strongest young seedlings will be obtained at temperatures of 20 to 25°C.
- ✓ Soil temperature not lower than +15°C for optimal seed germination.
- ✓ Lighting at least 6 hours a day for healthy plant growth.
Selecting a location and preparing a garden bed
Zucchini is a light- and heat-loving plant, so it should be grown on the sunny side of a 60-70 cm wide bed. This can be a small plot for growing several plants. It's important that other members of the Cucurbitaceae family have not been grown in this area previously, otherwise the zucchini will become diseased, producing many barren flowers. For crop rotation, it's best to grow them after the following crops:
- tomatoes;
- potatoes;
- cabbage;
- Luke;
- root vegetables;
- greens;
- legumes.
Zucchini themselves are good precursors for all vegetables, with the exception of cucurbits. Their roots are excellent soil looseners, and their large leaves prevent the development of most weeds.
It's equally important to choose a site with optimal soil for zucchini. Loamy or sandy loam soils with a neutral pH (6.5-7.5) are considered the best. Zucchini grows poorly in peaty soils—the fruits are small, and the leaves don't develop well. Heavy clay soils are unsuitable for this crop.
To ensure the soil is fertile and loose, 12-15 days before planting, dig the area to the depth of a shovel, adding the following to 1 square meter:
- 0.5-1 bucket of humus or rotted compost;
- 1-1.5 buckets of rotted sawdust;
- 1 tbsp each of urea and potassium sulfate;
- 2 tbsp. l. superphosphate;
- 2 cups of wood ash.
To reduce fertilizer use, apply it directly to the planting holes, 80 cm apart, and then mix thoroughly with the soil. Next, be sure to water the bed with hot water and cover it with plastic wrap before planting the zucchini.
The order of fertilization can be adjusted depending on the soil composition:
- PeatFor every square meter, add 2 kg of compost or humus, 1 bucket of loamy or clay soil, 1 teaspoon each of superphosphate and potassium sulfate, and 2 tablespoons of ash. Next, dig a 65-70 cm wide bed to a depth of 20-25 cm and level it with a rake. Water it with a warm (40°C) solution of Agricole-5 or Rossa liquid fertilizer (1 tablespoon per bucket of water) at a rate of 3 liters per square meter. Finally, cover the bed with plastic wrap to retain moisture and heat.
- Clayey, loamyFor every square meter, 2-3 kg of peat, sawdust, and humus is sufficient. For mineral fertilizers, add 1 tablespoon of superphosphate and 2-3 tablespoons of wood ash.
- SandyEach square meter should be fertilized with one bucket of turf soil (clay or loam) and the same amount of peat. Next, add 3-4 kg of sawdust and humus, as well as 1 tablespoon of superphosphate and 2-3 tablespoons of wood ash.
- Black earthFor each square meter of fertile soil, it is advisable to add 2 kg of wood sawdust, 2 tablespoons of ash and 1 tablespoon of superphosphate.
- Dense, heavy and poorIn such soils, it's worth adding manure or compost (4-6 kg per square meter) in the fall, as well as complex mineral fertilizers for vegetables (50-80 g per square meter). It's advisable to water the bed with a weak solution of potassium permanganate and loosen it slightly just before sowing the zucchini.
If you are cultivating zucchini on a plot of land for the first time, you should carefully remove all roots from the soil when digging it, and also catch and destroy any cockchafers and wireworms.
Fresh manure should not be added to the soil immediately before planting, as this can lead to the development of various diseases in young seedlings, active growth of green mass, and weak fruiting.
Planting zucchini from seedlings
This involves growing strong seedlings approximately a month before planting them outdoors. We'll look at each step of this procedure separately.
Seed preparation
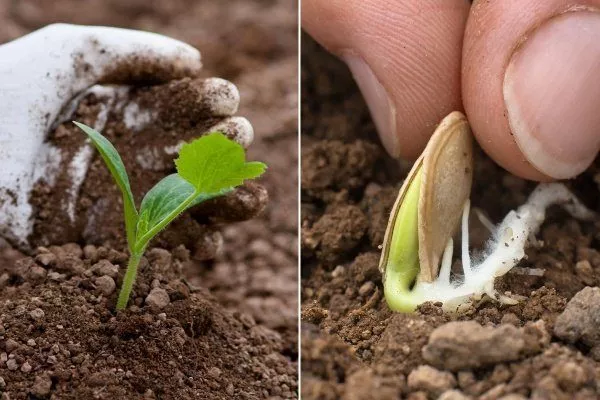
Pre-sowing seed treatment involves soaking the seeds for 10-12 hours in water with nitrophoska added. Any seeds that float to the surface are hollow and should be discarded. Once the remaining seeds have swollen, they can be sown in the soil, but it's best to soak them for another 24 hours in a solution of the growth stimulant Epin (one drop per 50 ml of water). After soaking, rinse the seeds with clean water and dry them before planting them in the soil.
Proper treatment will increase seed germination and promote faster development of young seedlings.
Planting seeds in pots
To grow seedlings, you can purchase a ready-made soil mix called "EKZO" at a gardening store. You can also prepare it yourself by mixing equal parts peat or compost with sand and garden soil. For containers, choose individual 10x10 cm disposable cups, as plants are sensitive to transplanting.
At home, 3-5 plants are sufficient. Plant the seeds in pots filled with soil at a depth of 2-3 cm. Water them with a spray bottle and cover them with glass or plastic. Remove the protective covering regularly to allow the soil to air out. Keep the pots on a sunny windowsill.
Caring for seedlings
It involves the following agrotechnical measures:
- WateringThere's no need to water the seedlings frequently; the key is to maintain soil moisture. To do this, simply mist the soil with warm (25°C) water about once a week at a rate of 200-250 ml per pot. Under these conditions, properly prepared seeds will germinate in as little as 3-4 days.
- Temperature conditionsTo speed up germination, the ambient temperature should be around 18 to 20°C. Once the seedlings emerge, the temperature should be lowered to 15 to 18°C during the day and 12 to 14°C at night, otherwise the plants will stretch too much.
- LightingThe sprouts need to be provided with good daylight, otherwise they will be weak. If necessary, you can additionally use special lamps for illuminating seedlings.
- Top dressingDuring the entire growing period, seedlings need to be fed twice:
- 8-10 days after emergence. Seedlings can be fed with a solution of Bud (2 g per 1 liter of water) at a rate of 1 cup per 1-2 pots. A solution of 1 teaspoon of superphosphate and the same amount of urea can also be used as an initial feeding. The recommended dosage per plant is 200 ml.
- 7-10 days after the first feeding. The plant can be fed with a solution of Effekton organic fertilizer and nitrophoska (1 teaspoon per 1 liter of water). Apply 1 cup of the mixture per pot. Instead of this fertilizer, you can use a solution of 1 teaspoon of nitrophoska and the same amount of wood ash. Water the zucchini at a rate of 200-250 ml per seedling.
- HardeningA week before transplanting outdoors, regularly take the pots with seedlings outside or onto the balcony to harden them off. Keep them in the fresh air for 1-2 hours.
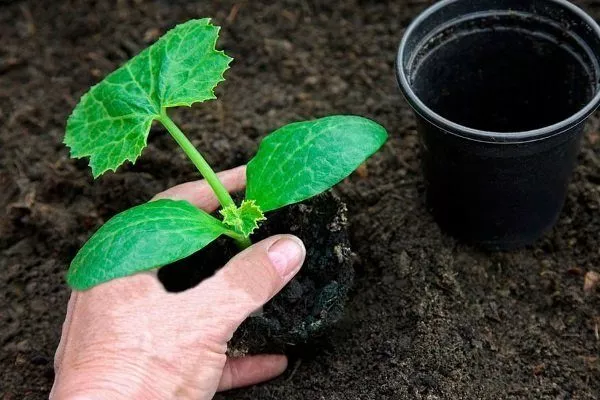
At 20-25 days old, the seedlings can be transplanted into open ground. By this time, they should have 2-3 true dark green leaves and short, squat stems. The root system of the young seedlings should tightly cover the entire cube and consist of intact, white roots.
Transplanting seedlings into open ground
Seedlings should be transplanted into well-warmed, loose, and organically rich soil. This work should be done only on a warm, cloudy day or early in the morning. Seedling holes should be spaced 90-100 cm apart. Ideally, there should be one plant per square meter of bed. The holes themselves can be prepared in the following ways:
- Form a mound of annual weeds and cover with a 15 cm layer of fertile soil. Add 1 tablespoon each of urea and superphosphate (preferably dissolved), then water thoroughly with a dark solution of slurry or fermented grass. Finally, cover the entire mound with plastic wrap and wait 10-12 days for the mound to settle.
Next, make a hole at the top for planting the seedlings. To retain heat, cover the mound with plastic wrap, and cut a hole of the desired diameter in it for the zucchini. As it grows, it will quickly cover the mound with its tops and become a true highlight of the garden. - Dig the bed to the depth of a spade, then add 1 tablespoon of Effekton organic fertilizer to each hole. Mix it with the soil and water with a warm solution of Agricole-5 (1 tablespoon per 10 liters of water) at a rate of 1 liter per hole.
When planting, proceed carefully to avoid damaging the plants' delicate root system. To do this, transplant the seedlings with a lump of soil, first watering them with warm water and cutting the pot open. If the seedlings are too elongated, they can be planted deep down to the cotyledons, slightly tilting the stems. Use humus, soil, or peat as a substrate. Raking the soil from the surface can expose and damage the roots.
After planting, the seedlings should be watered with warm water to prevent them from drying out. Next, cover the bed with polyethylene on arches. If dry winds are expected on sunny days, the planting area should be shaded. If the weather is cool, the soil containing the seedlings can be covered with another layer of plastic.

Direct sowing into the ground
If you don't intend to grow an early harvest, you can sow the seeds directly into the ground. Prepare the seeds and soil for planting in the same way as for seedlings. Sowing follows these instructions:
- Water the bed generously with hot water.
- Make holes 4-5 cm deep and 50-70 cm apart.
- If necessary, add a small amount of compost or humus to each furrow, then plant 2-3 seeds vertically, pointed end up. It's important that the top of the seed is 1-1.5 cm below ground level.
- Water the holes and fill them with soil. If all the seeds sprout, leave one strong plant and either cut the rest off above ground level or replant them when the cotyledons emerge. Pulling them out is not recommended, as this could damage the entire root system.
- Cover the finished bed with plastic or other covering material to protect the seeds from cold weather. The covering can be removed once the first sprouts appear. This typically occurs between June 12th and 15th.
Caring for zucchini
Zucchini plants grow rapidly, especially in favorable weather conditions. During this period, they require proper care to ensure the plant grows and produces numerous female fruits.
Watering and mulching
Zucchini is a moisture-loving and drought-tolerant crop, so it requires ample watering. It's important to use water that has been settled and warmed in the sun (22-23°C), otherwise it can cause widespread rot of the young buds on the plants. Water should be applied at the base of the plant, avoiding contact with the leaves and buds, as this can lead to rot.
It's best to water zucchini sparingly but generously. Here's the optimal schedule:
- Before flowering, water the seedlings once a week at a rate of 8-10 liters per 1 sq. m.
- During the fruiting period, increase watering frequency to 2-3 times per week at a rate of 8-10 liters per 1 square meter. The plant can be watered once a week, but then you will need to increase water consumption to 15-20 liters.
It's best to water zucchini with a watering can, as the pressure of a hose can expose the roots. If this has already happened, cover the roots with a 3-5 cm layer of peat moss and compost.
Zucchini require regular watering, but they don't tolerate excess soil moisture, as this leads to end rot. In this case, you'll need to cut off the affected area down to the clean tissue and burn the cut area with a candle flame to encourage the vegetable to continue growing.
While the shoots have not yet become entangled, after watering the bed is worth mulch humus or peat. This will prevent plant shoots from covering the soil, making it easier to loosen the soil.
Loosening, weeding and hilling
To get a good zucchini harvest, it's important to maintain loose, water- and air-permeable soil. To achieve this, loosen the soil 2-3 hours after watering. This should be done gently and shallowly, as the plant has very fine, weak roots located close to the soil surface.
The frequency of loosening depends on the soil composition. This procedure is especially common in loamy soils, as they easily develop a hard crust, particularly after precipitation.
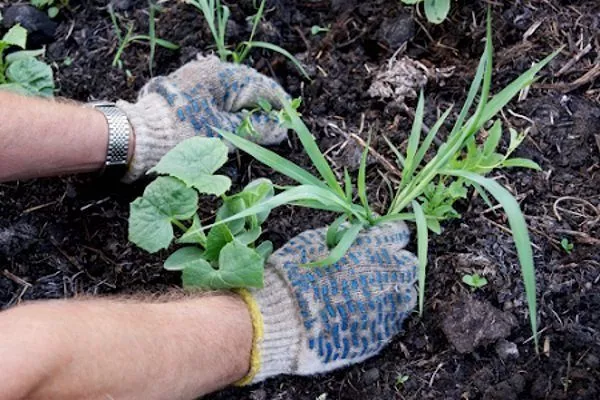
Another important step is regular weeding, which prevents weeds from growing and robbing the zucchini of nutrients. This procedure is especially important during the early stages of vegetable growth, as young plants will not thrive if they are poorly nourished by too many weeds.
To encourage zucchini to develop additional adventitious roots, they should be earthed up when they develop 2-4 true leaves. To do this, add about 5 cm of soil to the roots.
Pollination
A week after planting, the plant begins to bloom. Ideally, male and female flowers appear simultaneously, but if the ovary hasn't increased in size within 3-4 days, pollination hasn't occurred. This work will have to be done manually, especially in inclement weather. You can use the following techniques:
- pick a male flower, tear off its petals and apply pollen to the pistil, which is located in the center of the female flower;
- Attract pollinators and other insects for pollination by spraying flowering zucchini with a honey solution in the morning (1 teaspoon of honey per glass of water).
Top dressing
Achieving a good fruit harvest without regular fertilization is impossible. Root and foliar feeding should be applied several times throughout the growing season.
The scheme for applying root fertilizers is as follows:
- Before floweringWater the seedlings with a mullein infusion. To prepare it, dilute 0.5 liters of mullein and 1 tablespoon of nitrophoska in 10 liters of water. This can be replaced with fermented weed infusion or a Ross fertilizer solution (2 tablespoons per 10 liters of water) at a rate of 1 liter per plant.
- During floweringWater the plant with a solution consisting of 2 tablespoons of wood ash and the same amount of Effekton fertilizer per 10 liters of water. Apply 5 liters of the solution per 1 square meter of bed.
- During the period of fruit ripening (fruiting)Dissolve 1 tablespoon each of superphosphate, urea, and potassium sulfate in 10 liters of water. Water the bushes with this mixture at a rate of 3 liters per 1 square meter of bed. For the final feeding, you can also use another mixture: 2 tablespoons of wood ash or 2-3 tablespoons of Effekton-O organic fertilizer per 10 liters of water. The consumption rate is 2 liters per bush.
If the plant is not developing and bearing fruit well, it can be additionally fertilized with foliar feeding several times during the fruiting phase, at intervals of 10-12 days. Here are some fertilizing options:
- Dissolve 1 tbsp of urea in 10 liters of water and spray the plant;
- Dissolve 10 g of the Bud preparation or 1 tbsp of liquid Rossa fertilizer in 10 liters of water and spray the bushes at a rate of 2 liters of the composition per 10 sq. m.
Bush formation
Zucchini plants often don't require pruning, but during flowering, the vegetative mass can become excessively large, to the detriment of the fruit. In this case, it's necessary to prune 2-3 central leaves to improve pollination conditions for insects and allow better sunlight access to the core of the plant.
This will encourage new ovaries to form more vigorously, increasing the vegetable's yield. It's also important to regularly remove aging leaves and rotted fruit.
When buds begin to appear, zucchini can be pinched to remove the tips of young shoots. Once the growing tip is removed, the stems will produce side shoots. This will encourage the growth of flower stalks and ovaries, resulting in higher yields.
When the ovaries appear, it is worth placing plywood or bricks under them so that they do not come into contact with the ground and are reliably protected from rotting.
Protection from diseases and pests
As a preventative measure against diseases in the fall, after harvesting, the area should be carefully cleared of existing vegetation, dug over, and properly prepared for the new crop, following crop rotation guidelines. For the same purpose, seven days after planting, zucchini should be treated with a 1% solution of Bordeaux mixture or copper oxychloride. Malathion (Karbofos) will also help against pests.
Despite the measures taken, zucchini can be affected by certain diseases, among which the most dangerous and widespread are the following:
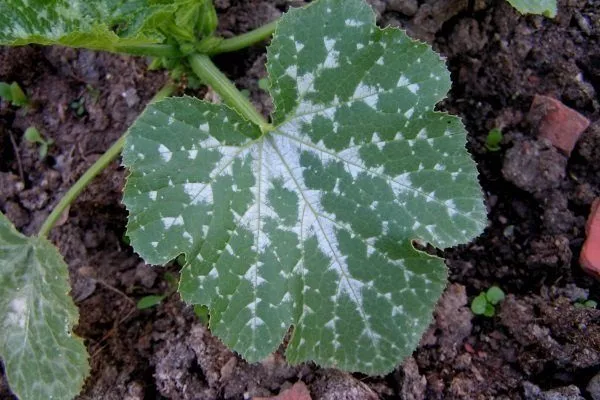
- Powdery mildewIt occurs under conditions of sudden changes in humidity and air temperature. A grayish-white, loose coating appears on the above-ground parts of the plant, which gradually turns brown and causes the leaves to dry out. The fruits themselves become deformed and stop developing. If these signs appear, the area should be treated with a 10% fungicide solution (Topsin, Bayleton). This treatment should be repeated twice, 14 days apart.
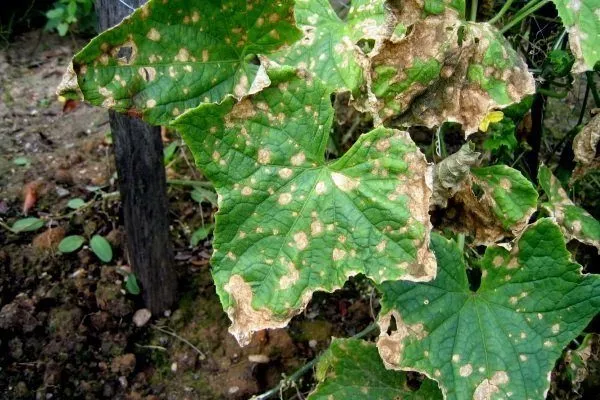
- Black moldIt manifests itself as angular or rounded rusty spots on the foliage, which gradually become coated with fungal spores, dry out, and crumble, leaving holes in the leaf surface. The fruit will be wrinkled and poorly developed. Affected plants should be immediately removed from the plot and burned.
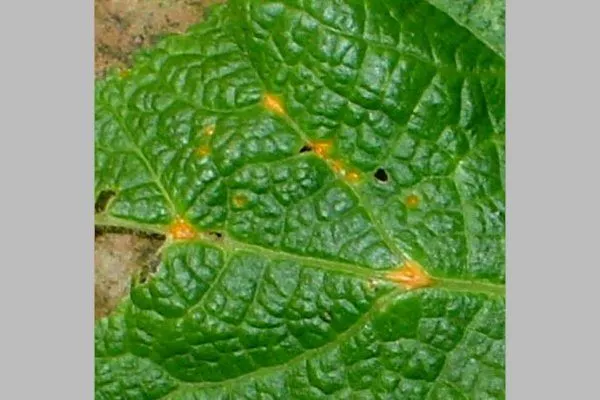
- BacteriosisThe infectious disease manifests itself as oily spots on the leaves, which darken over time and damage the leaf blade. Water-soaked spots and ulcers appear on zucchini. In case of bacterial blight, the plant should be treated with a 1% Bordeaux mixture.
- White rot (sclerotinia)Myceliums—a thick white coating—appear on the plant. The areas underneath become soft and slippery, then harden and become covered with black bumps. Eventually, the plant wilts. This rot often develops in cold and damp weather due to overly dense plantings. Diseased plants should be removed, as fungicide treatments will be ineffective.
- Root rotIt causes yellowing of zucchini, death of their lower leaves, browning of the stems, and the transformation of the lower part of the plant into a sponge. The disease develops due to planting in poorly warmed soil, watering with cold water, or overfertilizing. To combat the rot, it is necessary to correct the poor care and treat the plant with copper-containing products.
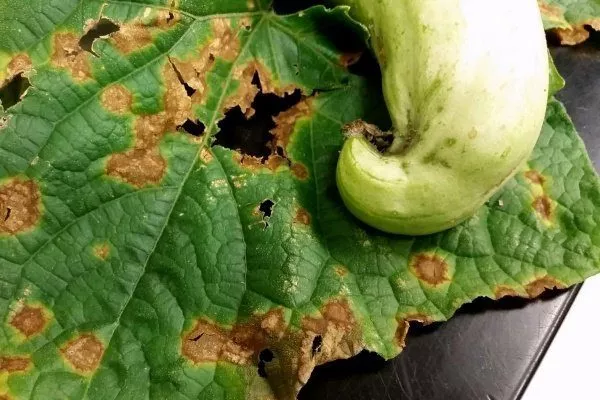
- AnthracnoseRound, yellow-brown spots appear on the leaves, leaving holes when they dry. The foliage curls, and the fruit dries out. Treating the plant with a 1% Bordeaux mixture solution or dusting with ground sulfur at a rate of 15-30 g per 10 square meters will help prevent anthracnose.
Powdery mildew on zucchini
Black mold
The initial stage of bacterial blight on zucchini
White rot (sclerotinia)
Root rot
Anthracnose of zucchini


In addition to the pathologies mentioned, the following pests can pose a danger to zucchini:
- Melon aphidThey attack crops in humid and warm weather. Aphids suck nutrients from the above-ground parts of the plant, causing damage to stems, leaves, flowers, and ovaries. To combat them, you can treat the plant with a soap solution (300 g of soap per 10 liters) three times at weekly intervals. In severe aphid infestations, insecticides (such as Karbofos, Fosfamide, Decis, or Metaphos) will be necessary.
- WhitefliesThey appear on the underside of leaves, primarily in the second half of summer. They leave behind sticky, sugary secretions that provide a favorable environment for fungal growth, leaving black spots on the plant and causing it to wilt. The pests can be washed off the leaves with water, followed by loosening the soil to a depth of 2 cm. If this is ineffective, the zucchini should be treated with a Komandor solution (1 g per 10 liters of water for 100 square meters). It is advisable to spray the plant after harvest.
- SlugsThey must be collected by hand. If they are found in large numbers, bait can be used to control them. For example, you can fill bowls with dark beer and place them around the perimeter of the area. When the slugs are drawn to the scent, they must be quickly collected.
Harvesting and storage
As the fruit ripens, it should be harvested every 1-2 weeks to prevent overripe fruits from appearing. These will delay the formation of new ovaries, using up too many nutrients. This will ultimately impact the variety's yield.
The fruits can be harvested at any stage of development. For consumption, it's best to pick immature 10-12-day-old ovaries, 15-20 cm long. The seeds inside are soft and tender, and the pulp itself has the best flavor. Furthermore, picking immature fruits stimulates the formation and rapid growth of new fruits.
However, young zucchini don't store well. Therefore, if you plan to store the fruit for the winter, you should harvest ripe ones with a firm, thick rind and coarser flesh. They typically reach this condition in 6-7 weeks. Each zucchini can weigh up to 500 g.
The fruits should be cut with pruning shears or a knife along the stem. Young specimens should be cut at the base, while mature fruits should have a long stem left on. The cut itself should be smooth, as shaggy ends quickly spoil and rot the entire fruit.
Young zucchini harvested at the milky stage can be stored for 2 weeks at 0 to 2ºC. After this point, they will begin to wilt or harden, and sometimes even rot. Ripe zucchini can be stored for up to 5 months in a cool, dry, well-ventilated place. They should not be stored in a cellar with high humidity, as this will encourage rotting. When storing zucchini, place them in a box with straw or pine sawdust between them to prevent them from touching. For longer storage, the stems can be dipped in melted paraffin wax beforehand.
Zucchini can be stored in the refrigerator if placed in a perforated plastic bag and kept in the vegetable compartment.
Growing zucchini outdoors is a task even an inexperienced gardener can handle. However, to ensure a good harvest, it's important to strictly follow the correct cultivation techniques for this cucurbit—from timing planting to harvesting.