The Random currant variety is widely grown in gardens. It is distinguished by its excellent productivity and disease resistance. Adherence to planting and care guidelines guarantees gardeners an abundance of large, flavorful berries. This variety adapts to a wide range of weather conditions and performs well in all climate zones.
History of creation
The Rondom variety was developed by Dutch breeders, who based its development on the Versailles Red currant variety. In 1985, these specialists submitted their variety for state testing. Since 1995, the Rondom currant has been included in the official register for the Central and Volga-Vyatka regions.
Distinctive features of the plant and fruits
When describing red currants, attention should be paid to their size, the appearance of the bush, the arrangement of buds and leaves on the branches, the characteristics of fruit ripening, as well as the taste and color of the berries.
The main characteristics of this plant:
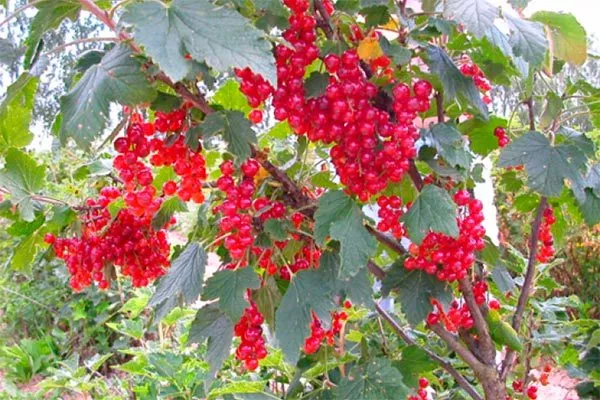
- The bush is medium-sized, with branches that are not hairy, and a compact, slightly spreading appearance. The height of the bush can range from 120 to 150 cm.
- Young shoots are colored greenish-red, while more mature ones acquire a gray-brown hue.
- The buds are elongated, fit tightly to the trunk and are located singly.
- Mature currant leaves have a wrinkled texture, have 3 to 5 branches, and range in color from light to dark green. The leaf's vein network is visible to the naked eye and is located perpendicular to the base.
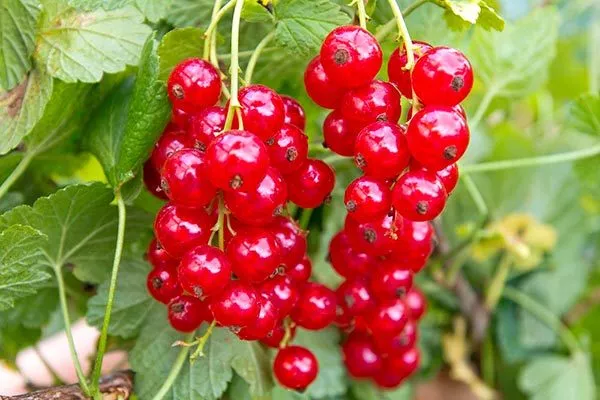
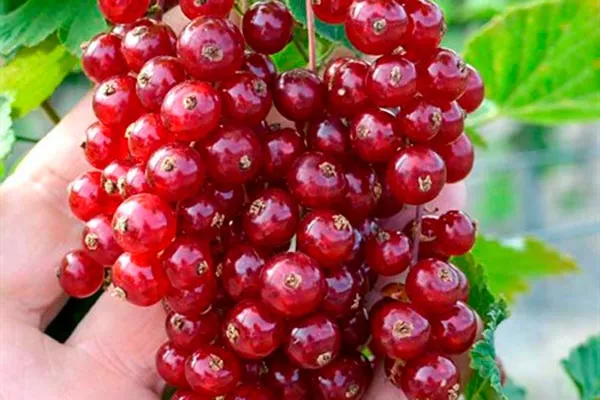
- The currant's fruiting clusters are quite long, reaching 10-12 cm in length. When ripe, they are strikingly beautiful, with long, dense inflorescences filled with berries—each cluster can contain up to 16-17.
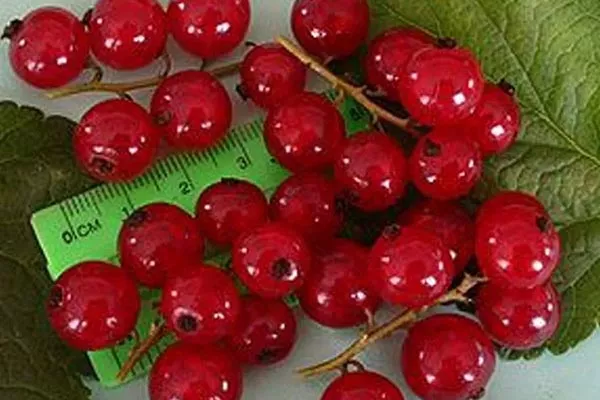
- The berries are uniform in size and dark red, with a shiny surface. The flesh is juicy and richly aromatic.
- Currant flowers are light brown in color and are arranged in a cup-shaped arrangement.
- Ripe berries are small in size – their average weight ranges from 0.6 to 0.11 g.
The taste and uses of currants
Rondom stands out for the sweet and sour flavor inherent to its berries. They also have a rich aroma. In tastings, this variety received a high score of 4.6 points, confirming its quality.
Rondom currant can be used for a variety of purposes:
- freeze;
- make canned goods;
- offer on the market;
- cook exquisite compotes and jams;
- consume fresh.
Characteristics
The red currant variety Rondom is a complex intervarietal hybrid. It exhibits a tendency for bark to partially peel off on its branches. This is not a sign of disease and does not require treatment.
Drought resistance, winter hardiness
Red currants have moderate drought tolerance thanks to their robust root system. However, this doesn't apply to young or diseased plants, which require adequate nutrition and moisture to survive.
The yield of currant bushes decreases if they are planted at elevated elevations, where moisture shortages are common. This leads to both slower growth and reduced winter hardiness.
Waterlogged soils or planting seedlings in low-lying areas increases the risk of frost damage to young shoots. However, with proper care, the variety demonstrates high winter hardiness. Ukrainian regions, including Transcarpathia, are ideal climate zones for red currants.
Pollination, flowering period and ripening time
This variety is considered mid-late, with gardeners typically starting harvesting in July. Flowering begins in late April. Weather conditions can affect when the Rondom variety's buds appear—it can occur as late as mid-May.
Rondom is self-pollinating, allowing it to produce fruit to its full potential without the need for neighboring bushes for pollination.
Productivity and fruiting, shelf life of berries
A currant bush can yield up to 25 kg of juicy berries. If not properly cared for, this figure drops significantly, to 12-15 kg per plant. Harvesting should be done only in dry weather, but if there's constant rain, the harvesting time can be extended—the berries won't fall off.
When transporting currants over long distances, it's preferable to choose bunches that are not yet fully ripe. This will help preserve the freshness of the harvest for two to three weeks without any additional processing.
Landing rules
September is the ideal time for planting seedlings of this variety, but if spring work is required, it is preferable to choose the second half of April.
- ✓ The seedling planting depth should be such that the root collar is 5-7 cm below the soil level.
- ✓ The distance between bushes should be at least 1.5 meters to ensure sufficient space for growth and ventilation.
Choosing a landing site
When choosing a planting site, it's important to keep in mind that although this variety has good winter hardiness, it requires plenty of sunlight. Therefore, brightly lit areas should be preferred.
There are other parameters:
- This plant has a robust root system, making it drought-resistant and requiring only moderate water. However, it's important to note that insufficient moisture can negatively impact growth, yield, and ability to withstand winter frosts. Therefore, the site should be chosen with an eye toward the absence of elevated groundwater levels.
- Currants grow best in moist but well-drained soil.
- Rondom thrives best in neutral chernozem, as well as loamy, sandy, or slightly acidic soils. The plant responds well to organic and mineral fertilizers.
Preparing for planting a berry bush
Before realizing your gardening dreams, you need to carefully consider every step to create the ideal conditions for your currant bush to grow and thrive. It's best to start by preparing the soil, which will serve as the foundation for your plant, providing it with nutrients and moisture:
- Once you've decided on a location and prepared the soil, mark out the area to precisely locate each bush. Proper spacing between plants promotes their health and growth, and also makes garden maintenance easier.
- When planting several plants next to each other, the distance between holes should be at least 150-180 cm.
- If the bushes are located next to a fence, a similar distance should also be left from the fence.
- Clear the area of unwanted plants and rocks, till the soil to a depth of approximately 30-40 cm, and enrich it with manure or compost. This will create optimal conditions for the plant's root system to develop.
- If the soil is sandy, it's recommended to add clay components, and if it's sandy, mineral components. This will improve the soil structure. If the soil is highly acidic, add a small amount of chalk or limestone.
- Before planting, make sure the area has an irrigation system or guaranteed access to water for regular watering. The plant needs sufficient moisture for healthy growth and development.
Planting technology
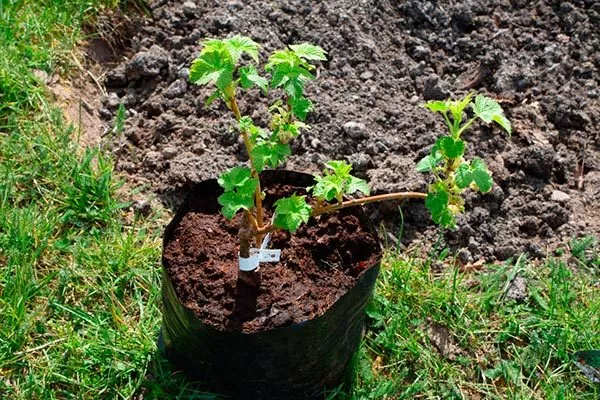
Today, seedlings are available in containers with enriched soil mixture or bare-root. To ensure successful establishment of bare-root plants, it is recommended to plant them in early spring or late fall, when the leaves are still in place or have already been removed.

Algorithm of actions:
- Dig a hole the size of the root system.
- Make a small mound of soil and place the pre-soaked roots on it. If the seedling is in a container, it should be moved into the hole whole, root ball included, to avoid damaging the root system and speed up the rooting process.
- Next, fill the hole with fertile soil mixture, compact it thoroughly, and water generously—3 to 6 liters of water per bush. During the first weeks after planting, the seedling requires regular watering—two to three times a week.
If planting in the fall, it is recommended to apply a layer of mulch around the root collar to protect the plant from winter frost. This layer should be removed in the spring.
Care Features
Although the Rondom plant tolerates drought well, it's important to pay special attention during fruit formation and ripening, which occurs in late June or early July. During this critical period, the bushes should be regularly watered, using 15-20 liters of water per plant.
Water the plant every 6-8 days. Cover the soil around the plant with a layer of straw or cardboard to maintain moisture. Other things to do:
- After planting red currant Rondom, start feeding the bushes:
- It is recommended to apply nitrogen during the first two weeks of May.
- Fertilize a second time in mid-June. However, if excessive leaf growth is observed, reduce the amount of nitrogen next year.
- For the third and fourth time, apply potassium and phosphorus-based formulations.
- Loosen the soil regularly during watering and as needed, for example, once every 2-3 weeks.
- Remove weeds in a timely manner.
Pruning and shaping bushes
Shrub pruning is a key part of care that affects its appearance and productivity. This process not only enhances the plant's appeal but also promotes its health by improving air circulation and light penetration within the shrub.
When planting a seedling in open ground, primary pruning is carried out - on the Rondom red currant, no more than 4-5 strong basal shoots should be left.
The optimal time for pruning shrubs is during their dormant period, which typically occurs in early spring or late fall. There are some guidelines to follow:
- In the first year of the bush’s life, remove up to half of the new shoots to ensure its harmonious development.
- In subsequent years, to ensure uniform light distribution to all branches, prune up to 20 shoots.
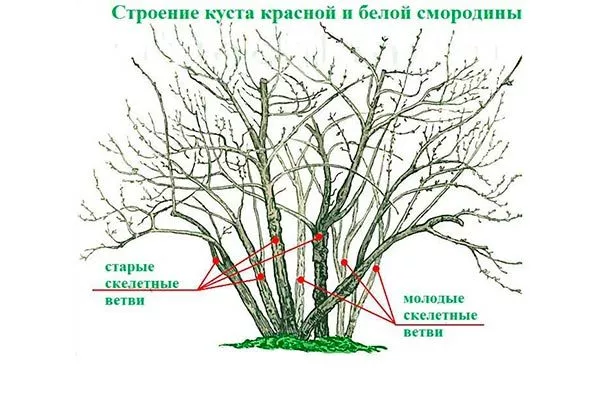
- After five years, the bush is subject to rejuvenation, which also involves pruning.
The most important pruning is sanitary pruning. It leads to the following results:
- increase in crop yield;
- providing better illumination of the bush;
- protection from diseases and pests;
- plant health improvement, with the removal of diseased, dead and frost-damaged branches.
The best time for pruning is autumn, when the shrub is bare of foliage, allowing for a more accurate assessment of the pruning requirements. During this period, the plant is less susceptible to injury and stress, as most of the growing season has already been completed.
The autumn shrub pruning procedure follows a clearly defined pattern:
- Sanitary pruning includes removal of:
- underdeveloped, weak and broken branches;
- stems that touch the ground;
- one of two intertwined branches;
- shoots affected by diseases.
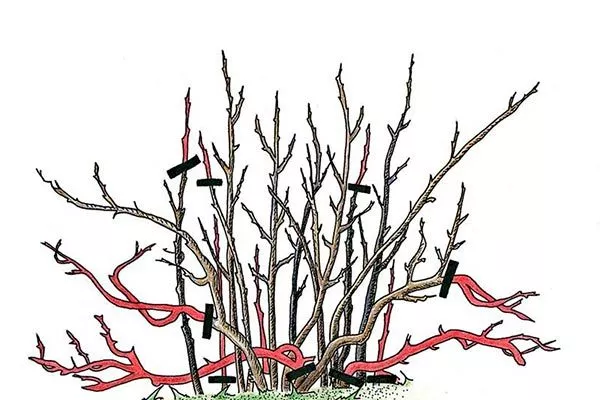
- Rejuvenating pruning provides for:
- removal of branches older than five years;
- preserving only 4-5 of the strongest young shoots;
- cutting back old branches by a quarter;
- shortening the shoots that appeared in the first year by a third.

- Formative pruning aimed at removing all unnecessary shoots that appeared in the summer.
- If the yield has dropped, After harvesting the berries, you can do some light pruning. In this case, after harvesting, you should cut out 2-3 main branches at the base of the bush to remove stumps. This will allow better light penetration to the fruiting branches next year.
To prevent disease and pest attacks, all pruned branches and leaves should be destroyed or burned. After pruning, the bushes require no special care; simply prepare them for winter.
- In early spring, before the buds open, treat the bushes with a 3% solution of Bordeaux mixture.
- After flowering, treat with a 1% solution of Bordeaux mixture or another fungicide.
- In the fall, after harvesting, repeat the treatment to destroy the overwintering stages of pests and diseases.
Pest and disease control
This currant variety offers some resistance to disease, but it's impossible to completely eliminate them. It's important to learn about potential diseases and pests in advance, identify them promptly, and apply effective control methods.
What is dangerous:
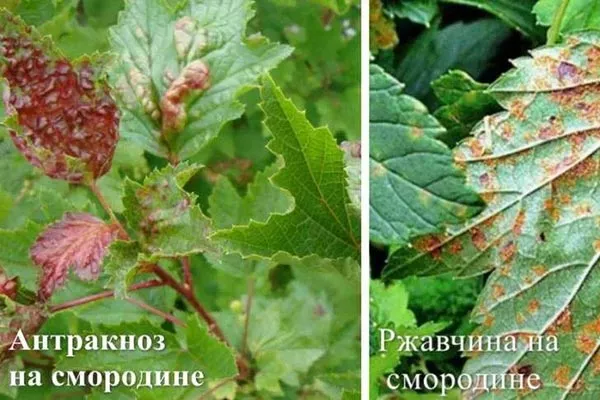
- Anthracnose – It manifests as dark spots on the leaves, which are then topped by growths. This leads to leaf deformation and leaf drop. To treat the disease, spray the bush and the surrounding soil with a copper sulfate solution before budding begins.
As a preventative measure, the bush is sprayed every two weeks after flowering with a 1% solution of Bordeaux mixture. - Goblet rust – Characterized by the appearance of reddish spots on leaves and berries caused by fungal spores. If lesions are detected, the infected parts should be destroyed and the bush treated with appropriate fungicides.
- Septoria - It appears as brown spots with black spores in the center. If detected, remove infected leaves and treat the bush with copper-containing products. To prevent the disease, spray the bushes with copper sulfate several times before flowering.
- Powdery mildew (spheroteka) – This is a light-colored film on leaves and stems that darkens over time. Infected plants stop growing, and their fruits and leaves fall off. Fungicides are used for treatment. To prevent the spread of the disease, it is necessary to destroy the affected parts of the bush with fire.
- Narrow-bodied jewel beetles – They emerge in July and lay eggs in the stems. The insect larvae cause damage by gnawing and tunneling through the stems. Affected branches die, and the berries become stunted and reduced in size.
To prevent the bush from dying, remove weak branches and burn them in the spring. Pests should be destroyed manually. After flowering, the bushes can be treated with an Actellic solution after 20 days. - Bud moth caterpillars – Pests that live at the base of the bush. They must be identified promptly, otherwise the bushes begin to wilt, leading to reduced productivity. To combat this pest, it is recommended to treat the plant with insecticides such as Karbofos or Nitrofen during the period of active bud development.
- Aphids - It's a serious enemy of the shrub, as it feeds on its sap. The leaves lose their green color, become bumpy and brown, curl, and fall off. Actellic or Engio are used to control aphids.
Reproduction
Gardeners can take the easier route and purchase pre-prepared seedlings at specialized fairs, but many prefer to propagate the variety themselves, as the process requires little effort. Furthermore, there are several methods.
Layering
One of the key features of this method is that the cuttings remain connected to the mother plant, ensuring a continuous supply of water and nutrients. However, there is a drawback: the resulting yield is less planting material.
Growing instructions:
- Thoroughly dig the soil around the bush, adding a little compost or rotted manure. This will help retain sufficient moisture, preventing a dry crust from forming on the surface.
- Create holes around the bush approximately 10-15 cm deep.
- Carefully place the shoots in them and press them into the soil.
- Cover with soil. Don't forget to pay attention to the plant's care, watering and hilling it regularly.
- In the fall, cut off the shoots and place the cuttings in individual pots or planting areas, dividing them into sections to produce finished seedlings.
Cuttings
Preparing cuttings should begin in early August, when the rate of sap flow slows, allowing them to retain moisture and speed up the rooting process. Taking cuttings later may slow down rooting.
The reproduction process is as follows:
- Identify a healthy bush and cut off annuals about 6-8 mm in diameter.
- Cut them into segments up to 20 cm long, each with 5-6 buds. Make the cuts so that the top end is straight to promote proper growth, and the bottom end is angled to improve water absorption by the roots.
- Place the cuttings in a glass of water until roots appear.
- Prepare the planting site, which includes digging the soil, fertilizing with compost and adding ash, and providing plenty of water.
- Create a trench about 15 cm deep and plant the cuttings at a slight angle, with a spacing of 20 cm between them. A few buds should remain above the surface.
- Tamp the soil around the cuttings, water, and mulch with humus (5 cm layer). It is recommended to protect each cutting with a plastic bottle.
The method of propagation by cuttings has a number of advantages:
- due to the absence of a transplant procedure, the root system is not damaged, which facilitates the rooting process;
- it is possible to obtain a significant amount of material for planting;
- The probability of successful survival exceeds 90-95%.
By dividing the roots
To obtain new plants, you can divide the bush into several parts. This should be done after the end of the growing season, which usually occurs in October, or in early spring, so that the young plants have time to acclimate to the new conditions.
Process:
- Dig holes 50 to 70 cm deep, enrich them with organic matter and ash, and water them.
- Dig up the plant so as not to damage the root system. Leave the one-year-old shoots, shortening them to 30 cm.
- Cut the bush into sections, ensuring each section contains roots and shoots. Use a sharp knife for this. After dividing, treat all cuts with charcoal.
- Plant the cuttings in the standard way, then moisten the soil and hill it up.
Pros and cons
In Europe, Rondom is considered a model variety due to its numerous advantages:
Reviews
The Rondom red currant variety is renowned for its large clusters of brightly colored fruit and high productivity. This plant is frost-resistant and sun-loving, producing abundant fruit with proper care. The bush has a strong immune system but still requires protection from pests and diseases.