Any healthy currant bush growing in your garden is excellent propagation material. Why spend money on seedlings when you can get them for free in your own garden? This is especially convenient if you want to replant the original variety—vegetative propagation allows you to fully preserve the varietal qualities of the berry bushes.
Propagation by cuttings
This method of replenishing your fruit and berry "arsenal" is considered the simplest and most reliable. The main thing is to strictly follow the technology and adhere to the rules, time-tested by gardeners and experts.
- ✓ Shoots must be healthy, without signs of diseases and pests.
- ✓ The optimal shoot diameter for cuttings is 6-8 mm.
- ✓ Give preference to shoots growing on the sunny side of the bush.
Mandatory requirements for cuttings:
- For propagation, use the most productive and healthy bushes. Free from disease or pests. This condition means that currant propagation requires proper care and preventative measures.
- Do not use the apical parts of the shoots for cuttings. They simply won't have time to ripen by the end of summer. Plus, they're often home to pests and fungi.
- Always remove leaves from prepared cuttings. This will prevent unnecessary moisture loss.
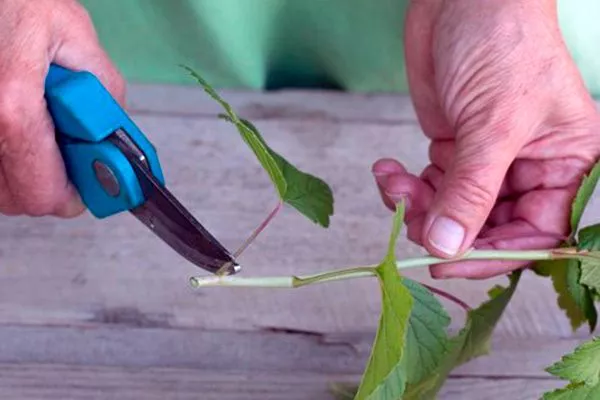
- Make the cut using a sharp and disinfected tool. With a knife or pruning shears.
Lignified cuttings
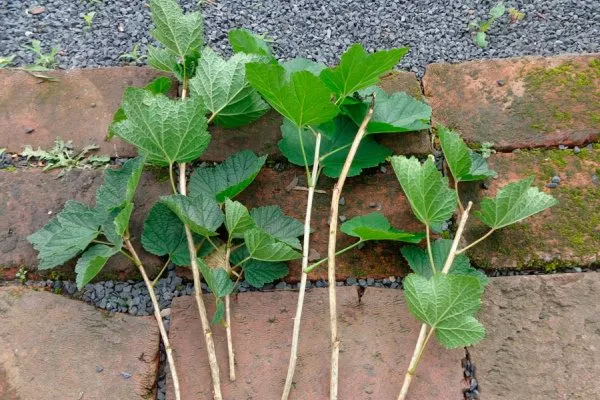
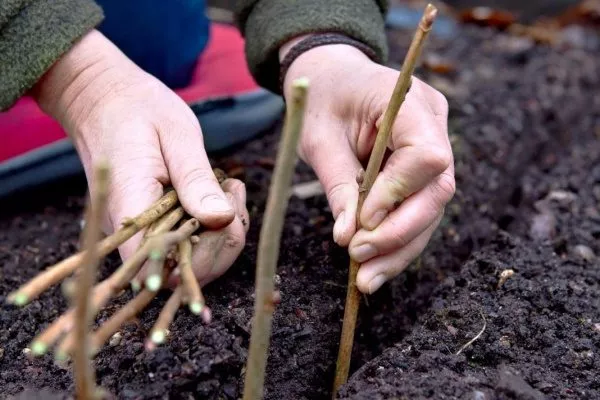
Currant branches aged 2-4 years are best suited for this purpose. Cuttings for planting are made in the fall, approximately from the second ten days of September to the second ten days of October. Delaying cuttings reduces the survival rate.
The optimal length for cuttings is 12 to 15 cm, with each section containing 5 to 6 buds. Make a slanted cut at the bottom, positioning it directly under the bud. Make a straight cut at the top, 1.5 cm from the last bud.
The order of planting cuttings:
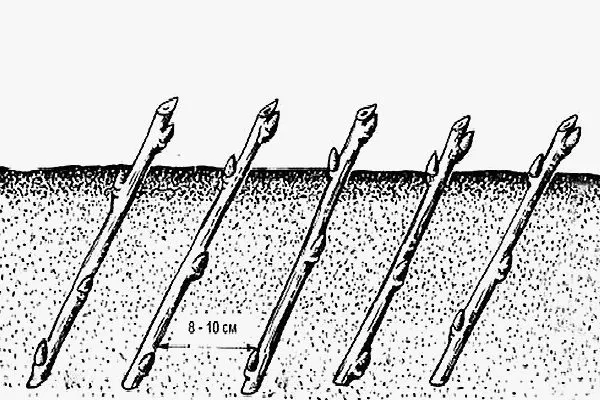
- Prepare the planting beds in advance by digging up the soil and fertilizing it with organic matter, such as humus—6-8 kg per square meter. Water the dug area.
- Be sure to keep pre-cut cuttings in water or in the shade until planting - do not allow them to dry out.
- Plant currant cuttings in the bed at intervals of 10 cm. If there are many cuttings, keep a distance of 50 cm between adjacent rows. Plant the cuttings deep enough so that only two of the 5-6 buds remain above ground. One of these buds should be located just below the surface.
- After covering the cuttings with soil and compacting it to prevent air pockets, water the beds. Once the water has been absorbed, sprinkle the soil with humus or compost and mulch the beds thoroughly.
- Cover the plantings with black plastic stretched over arches—this will speed up rooting of the cuttings. Ventilate the micro-greenhouse periodically by removing the covering for half an hour.
- ✓ The soil temperature should not be below +10°C to stimulate root formation.
- ✓ Soil moisture must be maintained at 70-80% of the total moisture capacity.
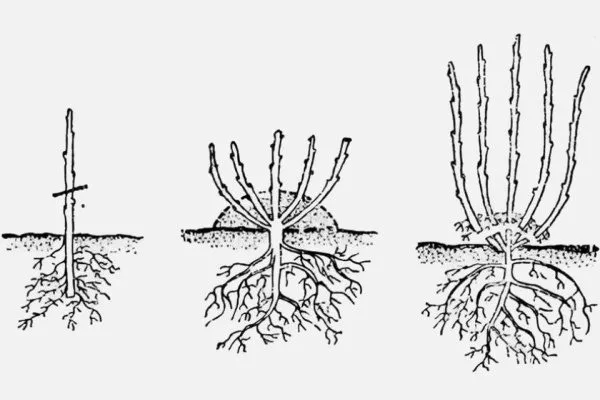
Planted in October, the cuttings take root securely before winter sets in. In the spring, as soon as the ground thaws, the seedlings begin to grow, and by autumn, they've transformed into full-grown currant bushes—now ready to be planted in their permanent locations.
Currant cuttings cut in the fall can be left in the ground until spring, rather than planted in the winter. In this case, they can be dug into greenhouses or snow-covered—the planting material is placed vertically in boxes and covered with snow.
In the water
This propagation method is suitable for those who didn't have time to plant cuttings in the fall. Using water, spring cuttings can be used to produce full-fledged planting material with well-developed roots.
Work plan:
- In late winter or early spring, place the cuttings taken in the fall in containers filled with water. Use glass jars to monitor the root system's development. If the planting material is healthy and high-quality, roots will appear within 10 days.
- When at least one of the roots reaches 12 cm, begin transplanting the cuttings into containers filled with a general-purpose potting soil. The containers should have at least a couple of drainage holes in the bottom to allow excess water to drain.
- Provide the rooted cuttings with water. Water them until the soil becomes runny, like sour cream. After 10 days, reduce the soil moisture to a standard level.
- Until May, the seedlings should be kept in a heated room. By this time, the seedlings should be approximately 50 cm tall.
- Carefully cut the plastic/film containers. Be careful not to damage the roots—they should remain attached to the soil. Then, plant the seedlings in the soil as usual.
Also watch a video about rooting currant cuttings in water:
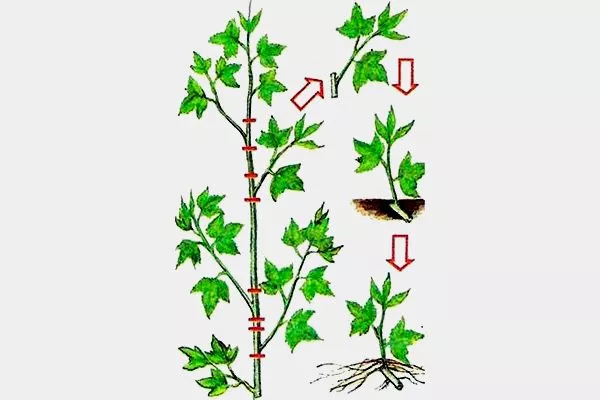
Green cuttings
This method is used from the end of May to mid-June, when the length of young shoots reaches 10-20 cm - at this stage they can already be used for cuttings.
Reproduction order:
- On each bush, select 3-4 two-year-old branches and prune them at the base. Only one-year-old growth should be used for cuttings. Be sure to leave a piece of wood from the parent branch at the bottom—up to 5 cm. Do not remove the foliage.
- Thoroughly water the soil in the beds, and then plant the seedlings, keeping intervals of 10-15 cm. The gaps between adjacent rows are 20 cm.
Place the cuttings strictly vertically, without tilting them. Lightly press the woody parts into the bottom of the grooves and cover them with soil—3-4 cm thick. Mulch the plantings with humus, sawdust, etc. - Water the cuttings at least twice a day for 14-20 days. Once the cuttings have rooted, reduce watering to once every 2-3 days. After that, water the cuttings as needed.
Propagation by green cuttings takes root very well—in 5-9 cases out of 10. In the fall, the cuttings acquire well-developed roots and grow up to 40 cm in height—they can be transplanted to a permanent location.
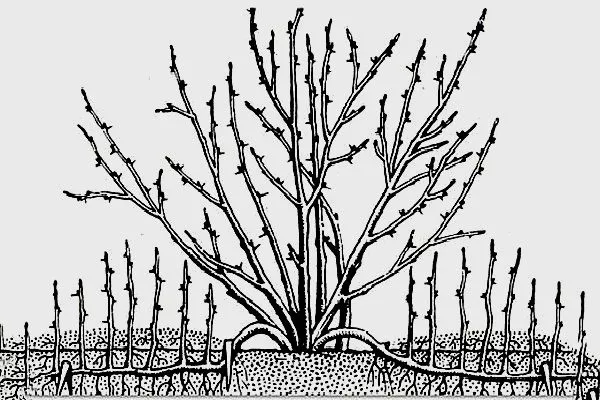
Propagation by layering
Many experienced gardeners consider layering to be the most reliable method of propagation. This is because the mother plant provides long-term support for the future seedlings.
There are three types of layering: arched, vertical, and horizontal. The latter is considered the most productive, while the vertical version allows for the maximum amount of planting material, and arched layers produce the strongest, well-rooted plants.
Horizontal
Begin rooting currant cuttings early in the spring, before the buds open. Select strong, one-year-old shoots for planting material.
Work order:
- Bend the shoot to the ground and pin it down to prevent it from returning to its original position. Cover the secured branch with a thin layer of loose soil. Leave the shoot tips exposed, trimming them back to 2-3 buds.
- Once new shoots 10-12 cm tall grow from the buried shoots, hill them up. Rake the soil up to a depth of 4-6 cm.
- After a couple of weeks, rake in some more soil so that the shoots grow and strengthen faster.
- Water your plants regularly—this is essential for developing a strong root system. Loosen the soil carefully to avoid damaging the young roots.
- In October, use pruning shears to cut off the rooted seedlings and transplant them to pre-prepared locations using the standard method.
From one 3-year-old currant bush, only one branch can be taken for propagation; from a 5-6-year-old bush, 2-3 shoots.
A single mother bush can eventually produce up to 30 seedlings. Most of these require further nurturing, so don't rush separating them from the mature bushes. Select only the strongest and most well-developed seedlings for planting.
Vertical
This method is equally effective on bushes of all ages. Work begins in the spring, before bud break.
Work order:
- For the bush selected for vertical layering, trim the branches to stumps 4-5 cm high. These will produce shoots, which will later become seedlings.
- Once the young shoots reach a height of 20 cm, loosen the soil around the bush. Hill up the new growth by 10 cm. Repeat this throughout the season—only the growing points should remain above ground. If soil crumbles from the mounds after rain, rake it back in as soon as possible.
- Water the bush regularly - the soil around the growing shoots should always be slightly moist.
- In the fall, separate the finished seedlings from the adult bush and plant them in pre-prepared locations.
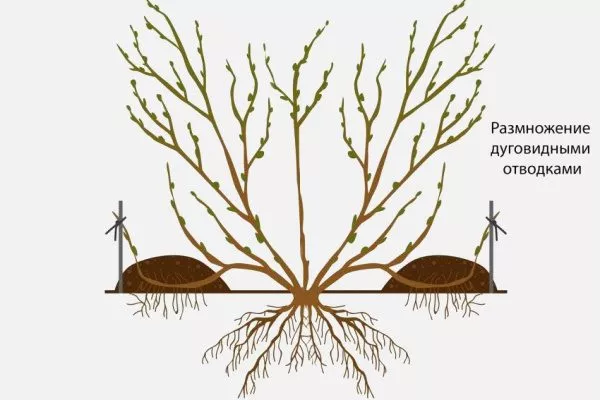
Arched
This method produces strong seedlings that don't require further nurturing—they're completely ready for planting. The process is carried out from June to mid-July.
Work order:
- Step back 30-40 cm from the adult bush and dig a shallow hole there.
- Bend the shoot that will be used as a layer into an arc. Place a pin in the center of the curved section, placing it in the dug hole. Fill the area with soil. This is where root formation will occur.
- Tie the top of the branch to a vertical support.
- Water the rooting area regularly so that the soil there is constantly moist.
- In the fall or even the following spring, before the buds open, separate the seedling from the mature bush. Carefully remove the seedling along with a lump of soil and plant it in a pre-prepared hole.
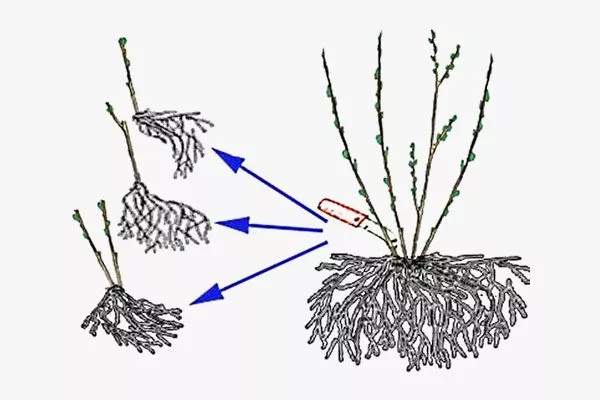
Propagation by dividing the bush
The division method is convenient if a gardener wants to move a currant plantation to a new location. This procedure allows the number of bushes to be increased by 2-4 times or more, depending on how many parts can be divided.
Work order:
- Dig up the currant bush.
- Use pruning shears or a saw to divide the plant into sections, ensuring that each section has large young shoots and strong roots.
The division procedure is carried out in the fall—from October to November, or in March. It's important that the plant is dormant during the division process.
Cuttings in greenhouses
This method became widespread back in Soviet times and is recommended for regions with cold and unstable climates. It's labor-intensive, but effective—almost all seedlings grow strong and sturdy. After overwintering, they can be safely transplanted to their permanent location.
Work order:
- Take 15-18 cm long cuttings from the tops of the plants. Use shoots from this year. The cuttings must have at least one bud—this is essential. Tear the leaves in half—reducing their surface area will reduce moisture evaporation. Make diagonal cuts at the bottom.
- Gather the cuttings into a bunch and tie them together so as not to damage them or interfere with sap flow. Immerse the cuttings in a growth stimulant solution. 12 hours is usually sufficient, but be sure to check the instructions for the correct time. There should be no more than 25 cuttings in a bunch.
- Prepare a cold frame in an elevated location away from trees and buildings. The length of the frame will depend on the number of cuttings, and the width should be 1 m.
- Dig out soil to a depth of 30 cm across the entire greenhouse. Sift the resulting soil and mix it with equal parts compost or peat moss. Pour the mixture back into the hole, leaving 4-5 cm from the edge. Add sand on top, filling the hole to the edge.
- Place 6mm diameter arches and cover them with plastic wrap. If it's too hot, replace it with gauze.
- Move the cuttings to the greenhouse and plant them in holes, keeping intervals of 5-10 cm. 30-50% of the length should remain exposed. 400 cuttings should be placed per square meter.

- Water the plantings generously, and then water them at least 5 times a day using a watering can or spray bottle.
- During the first few days after planting, shade each cutting with gauze, later replacing it with plastic wrap. Maintain the greenhouse temperature at 27°C. If it gets hotter, open the ends of the greenhouse.
- Starting in the fourth week, reduce watering frequency to twice a day. After another month, reduce watering frequency to once a day. Subsequent care consists of weed removal.
The cuttings remain in the greenhouse overwinter. In regions with harsh climates, the greenhouse is covered with spruce branches and snow. In the spring, the cover is removed, and the strongest seedlings are selected for planting.
Currant propagation options by season
A key advantage of currants is their excellent survival rate and adaptability, so they can be propagated at any time except winter. The key is to choose the most suitable option for the specific season.
In the fall
In the fall, cuttings and division are preferred. These methods allow you to achieve your goals. Cuttings and seedlings planted in the fall root well and begin to grow quickly once the weather warms up.
In addition to planting in open ground, as discussed above, cuttings can also be planted in special containers—500 ml plastic cups or 1.5-liter bottles with the tops cut off. Here, the cuttings will remain safely until spring.
How to plant cuttings in containers in the fall:
- Make holes in the planting container to allow water to drain.
- Fill plastic molds with a general-purpose potting mix.
- Plant the cuttings in containers. Water them and lightly compact the soil.
- Place the planted cuttings in the light in a heated room.

To prevent plants from losing strength during the establishment stage, immediately pick off flowers if they appear.
In summer
Currants can be propagated just as productively in summer as in spring or fall. The only requirement for success is a greenhouse or hotbed. In summer, the best option is cuttings. This procedure differs slightly from fall propagation.
How to propagate currants in summer:
- To obtain planting material, select one-year-old shoots that are just beginning to develop woodiness. They are fairly flexible but can already break. These shoots mature in mid- to late summer.
- Take cuttings from the tops of the shoots—they're more viable than other parts of the plant. Follow the standard cutting pattern.
- Wrap the prepared cuttings in a cloth soaked in water. Or place them in a diluted growth stimulant, Heteroauxin, for 24 hours (10 mg per 1 liter of water).
- Prepare a greenhouse or hotbed for planting in advance: level the soil and sprinkle it with peat mixed with sand in a 1:1 ratio. Water the prepared soil thoroughly.
- Place the prepared cuttings 2 cm deep into the soil. The intervals between adjacent plants are 5 cm, and between rows – 8 cm.
- Water the soil again, being careful not to expose the planted cuttings.
In the spring
In spring, currants are propagated using cuttings taken in the fall, layering, or etiolation. The first two methods have already been discussed above; now we need to learn what etiolation is. This method is rare and is used primarily on very old bushes with little growth and ineffective pruning.
The order of etiolation:
- In the second ten days of May, select a strong shoot 2-3 years old. Cover its first two buds, the lower internode, with dark film. Secure it on both sides with tape or rubber bands. There's no need to separate or cut the shoot. Don't forget to remove the leaves at the internode.
- Leaves on the part of the shoot free of film are not torn off and continue to grow normally. After 5 to 7 buds emerge from the top edge, step back 3 to 4 buds from the top and apply a second layer of film. Then, as the shoot grows, apply a layer every 5 to 6 buds.
- Under the dark film, the beginnings of a root system are forming. When they appear on the entire etiolated stem, cut it off.
- Cut cuttings from the shoot so that the lower cut is located below the edge of the film, and the cutting itself has 4 to 5 buds.
- Remove the plastic wrap from the cuttings and plant them at an angle, 6-8 cm deep. Only 1-2 buds should remain above the ground; create a plastic cover over them. Care for the new cuttings as you would for hardwood cuttings.
See also a video about propagation by cuttings in spring:
Propagation of currants by seeds
Propagating currants by seed is not common in amateur gardening, but it is possible in principle. It's important to note that this berry plant was brought into cultivation from the wild, so its seeds retain the characteristics of their wild ancestors. Seed propagation results in the loss of varietal characteristics.
If you want, you can try growing currants from seeds:
- Remove the seeds from fully ripe berries.
- Dry the seeds for 1-2 days, and then sow them immediately into prepared soil - directly into the beds or in containers/boxes.
- Make furrows in the soil first and water them. Spread the seeds evenly across the holes, cover with soil, and compact lightly.
- Cover the seedlings with plastic wrap. Seedlings will appear in 3-7 weeks, depending on the variety.
- Once the seedlings appear, remove the film immediately.
- When the seedlings reach 10-15 cm in height, transplant them to the raised beds for further growth. They will remain here over the winter. If sown directly into the beds, the seedlings do not need to be pricked out.
- Mulch the plantings with a suitable material - peat, sawdust, humus or just soil.
- After the first berries are harvested, the seedlings are assessed for quality. The best ones, those with large, tasty berries, are transplanted to their permanent location, while the rest are discarded.
To learn how to propagate currants from seeds, watch this video:
Rules and secrets of cuttings
Cuttings remain the most popular propagation method among gardeners, but for it to be successful, many subtleties of the procedure must be taken into account. Most importantly, there are secrets that, if learned, will help you obtain high-quality planting material.
Tips from experienced gardeners:
- Bend the top of the shoot toward the ground - if it straightens quickly, the branch is ready for cuttings.
- Carry out work early in the morning, preferably between 4 and 6 am.
- Place the cut material immediately in water to prevent it from drying out.
- Suitable bushes are healthy, with large berries, and at least 4 years old.
- Use sharp pruning shears with tightly fitting blades - the quality of the cuts depends on these conditions.
- To avoid mixing up varieties, tie the cuttings into bundles and attach appropriate tags to them. Suitable materials include thick cardboard or soft tin.
- The soil for planting should not be clayey, otherwise the cuttings will rot.
- Spray the leaves with water several times a day.
- Use a milky, opaque film for covering.
- Don't rush to transplant the cuttings to a permanent location - they need at least 2-2.5 months to fully develop.
Currants propagate easily using any vegetative method, and this can be done at any time convenient for the gardener. The choice of method depends on personal preference, the time of year, and the characteristics of the bushes being propagated.