Gooseberry care in spring is simple, but it requires time and attention. The berry bush's main characteristic is that it begins to awaken earlier than other crops. Since all maintenance (pruning, maintenance, etc.) must be completed before buds appear, care can be completed quickly.
Peculiarities of caring for gooseberries in spring
What makes this berry bush so special is that care for it begins not with the arrival of sunny spring days, but immediately with the arrival of spring—on the first of the month. The first leaves appear on the gooseberry bush in the first week of April, and every gardener must prepare the bush for this period.
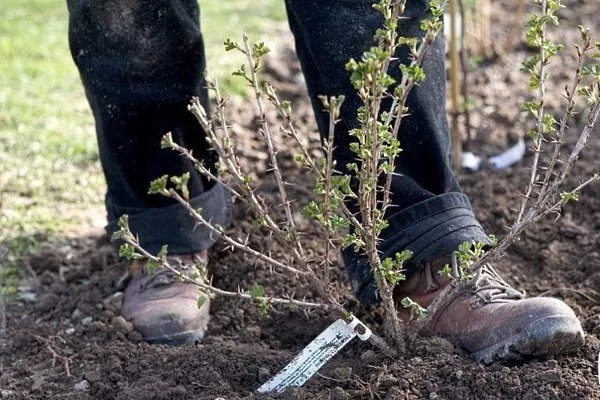
Removing the cover after winter
The time to remove the covering material from gooseberries depends directly on the location where they grow. In moderate and warm climates, a layer of mulch is collected around the gooseberries in early March. During the winter, this layer not only serves as insulation but also as a prime breeding ground for pests. To prevent the mulch from damaging the plant, it is removed from the garden area and burned, thus destroying all fungal larvae and spores.
In cold climates, the cover is removed a little later, more precisely in the second or third week of March. First, the agrotextile and branches are removed from the plant, then the twine is untied and the mulch layer is removed.
Watering
Gooseberries are drought-tolerant, but they appreciate infrequent, generous watering. This will also ensure a bountiful harvest in the future.
- ✓ The water temperature for irrigation should not be lower than 18°C to avoid stressing the plant.
- ✓ Watering should be done early in the morning or late in the evening to minimize water evaporation.
It's important to water the bush during flowering. It's best to apply water to the root system; for this purpose, you can create special grooves or install a drip irrigation system. Gooseberry roots are deep underground, so the water should be sufficient to soak the top 0.3-0.4 m of soil.
An adult plant needs 50 liters of water.
Avoid sprinkling with cold water. This method weakens the plant's resistance to disease, leading to increased risk of fungal infections.
Loosening and weed removal
The soil is loosened to a depth of 70 mm with a hoe; a hoe can also be used. The depth between rows is increased to 150 mm. Weeds are pulled out by the roots. If this is not done, the grass will rob the berry bushes of nutrients. Often, loosening is combined with fertilizing.
Mulching
Mulching Mulch is an important step in spring gooseberry care. A layer of mulch prevents weeds from developing, prevents a dry soil crust from forming, and retains water. Peat, sawdust, straw, dried grass clippings, compost, and other materials can be used as mulch.
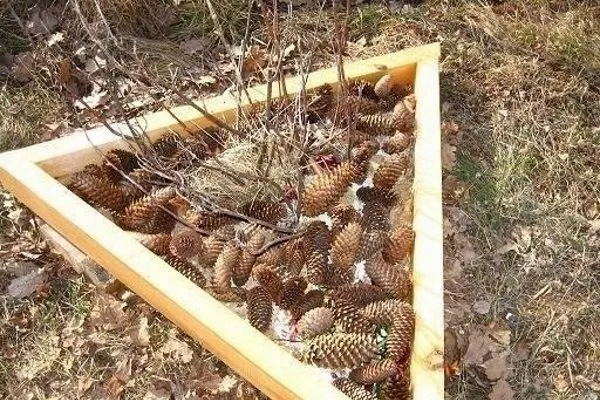
Cones used as a mulch layer are not only useful, but also beautiful.
Pay attention to the grass clippings from the lawn. They dry quickly and serve as excellent fertilizer for all berry bushes. The only drawback is that the grass absorbs a lot of water and doesn't release it, so the bush's root system is always overwatered. It's best to remove the grass when watering and then return it to its original position.
Top dressing and fertilization
If the seedlings were planted last year and the soil was well fertilized beforehand, there's no need to add fertilizer. The shrub requires nutrients starting in its second year of growth. It's best to use mineral and organic matter. They will quickly and efficiently replenish the soil with beneficial micronutrients.
Fertilizer application algorithm:
- The first feeding should be applied immediately after the buds begin to appear.
- The second feeding should be done during the flowering period of the plant.
- The third feeding is at the time of berry setting.
As a fertilizer, use the following mixtures:
- Minerals: nitrogen, phosphorus, and potassium. Urea is an excellent option (55 g per plant).
- When loosening the soil, add 0.4 kg of wood ash.
- If your berry bush is growing in poor soil, add organic matter. After the bush blooms, add one bucket of slurry (1 part slurry to 7 parts water), chicken manure (1:12), or mullein (1:5).
- Once every 2 years, add rotted manure (12 kg per plant) under each bush.
Do not use chlorine-containing fertilizers as they are contraindicated for berry bushes.
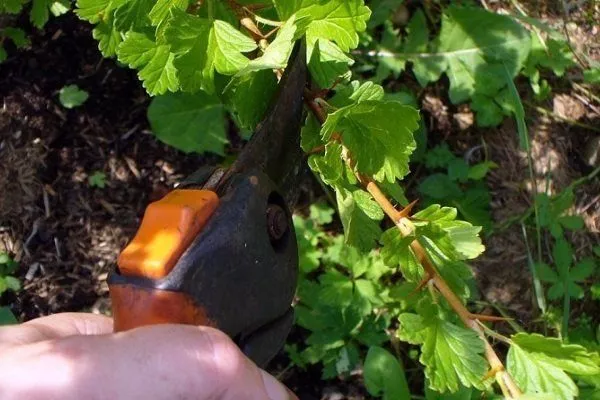
Trimming
The main role of gooseberry pruning is to shape the crown, which determines the plant's yield. Gooseberries grow very quickly, with young branches growing vigorously, forming impenetrable thickets between themselves.
On neglected, unkempt plants, the berries are small and their quantity is minimal.
If gooseberries are not pruned, fungal diseases may appear. diseases and pestsFruit ovaries fail to appear because pollination is difficult. Over time, the plants stop bearing fruit. Spring pruning is considered preventative, as the main crown formation occurs in the fall.
In the first half of March, cut:
- dried, frozen or partially frozen branches;
- areas affected by pests or diseases;
- weak and thin branches;
- shoots that thicken the bush;
- branches that grow too low to the ground.
The gooseberry crown must be formed before the sap begins to flow.
Regular shaping pruning algorithm:
- When planting the cutting, leave no more than four large shoots spaced widely apart. Each shoot should have four buds. Remove any remaining branches.
- In the second year, leave 5 strong branches. Remove weak, diseased, and crooked ones.
- In the third year, do the same as in the second year. Just shorten the strong second-order branches by a third.
- In the fourth year, form a permanent crown. It should contain about 20 branches of varying ages. The rest are pruned.
- From the 5th year onwards, simple rejuvenating pruning is carried out.
The first 4 years after planting the bush, the crown is formed, and in the following years it is maintained in proper condition.
Transfer
If you decide to replant the bush in the spring, you must do this before the sap begins to flow:
- On the gooseberry bush, keep only the shortened branches.
- Carefully dig around the soil to the diameter of the crown.
- Dig a hole approximately 0.5 m deep.
- Use a pitchfork to lift the root system and carefully pull it out along with the soil lump.
- Inspect the roots for larvae and spores; if some areas are damaged, sprinkle them with ash.
- Place the prepared berry bush on burlap and transfer it to the new planting hole.
- To help the plant take root, pour about 2 buckets of water into the hole and cover it with soil and humus.
- Place the plant in the hole, cover with fertile soil, and water it well again.
- ✓ The root system must be well developed, without signs of rot or damage.
- ✓ The seedling must have live buds ready to grow.
Propagation of gooseberries in spring
Gooseberries can be propagated using several methods, and in this article we will look at some of them: root suckers and various layering methods.
Read the article about How to properly plant and grow gooseberries.
Root shoots
Young shoots often form around the bush. These are controlled and destroyed, but they can be used as shoots for propagating gooseberries in the spring. To do this:
- In the spring, dig up the shoots from the ground and cut off the root that connects them to the mother plant.
- Young plants are transplanted to the site in the same way as ordinary seedlings.
Layering
This method of bush propagation is effective because root shoots emerge along the entire length of the shoot, growing quickly and establishing themselves in open ground. The mother gooseberry must be grown in open ground for 3-5 years; only then will it produce good offshoots.
The soil around the plant is prepared in advance: it is dug to a depth of 0.1 m, humus is added, mixed with the top layer of soil and leveled.
Horizontal layering
This method of propagating the bush produces a huge number of offshoots. During this period, the gooseberry continues to bear fruit. To create offshoots, use one- or two-year-old branches. The tops of the branches must be pinched off.
In the video below, a gardener demonstrates how to propagate gooseberries using layering:
Rejuvenating pruning will stimulate new shoot growth. Propagation algorithm:
- Make 30mm deep grooves perpendicular to the base of the plant.
- Place the selected branch on the bottom, pressing it slightly into the soil.
- Secure in some places with large staples or slingshots.
- Do not allow the soil to dry out.
- As soon as the buds wake up and the shoots grow to 0.1-0.2 m, hill them up to a height of 50 mm.
- Repeat hilling as soon as the growth increases by another 0.1-0.2 m. The total height of the soil mound should not be higher than 0.1 m above ground level.
- It is better to mulch the soil to prevent moisture from evaporating.
- In the fall (after one year), carefully dig up the shoots and separate the offshoots. Leave a portion of the mother branch on each one.
- Don't allow underdeveloped seedlings to be planted. Those with undeveloped roots should be replanted for further growth. Those with a strong root system should be planted in their permanent location.
Arc-shaped layers
This propagation method is used when you need to obtain several well-developed plants. The main difference from horizontal layering is that each shoot will produce only one fully developed seedling. This method produces a small number of plants, but they are high-quality and will begin to produce fruit within 1-2 years.
Algorithm for propagation by arc layering:
- Dig a hole 0.1 m deep.
- Bend the branch and place it in the hole so that the bud is located in the middle of the hole (roots will appear around it).
- Secure with a slingshot.
- Fill with fertile soil, it should rise 0.1 m above the ground.
- Leave the end of the branch 0.35 m long above the ground.
- Place the support in a vertical position.
- Be sure to pinch off the top.
At the beginning of autumn, the shoot is separated from the mother plant, but it needs to be replanted in October.
Dig up the seedling with a lump of soil, this way it will take root faster and better.
Vertical layering
This method is used to propagate a bush at the age of four years. After this process, the plant will not produce berries for the next two years.
Algorithm for propagation by vertical layering:
- Underdeveloped, diseased shoots are removed immediately.
- The remaining branches are shortened by 0.2 m.
- When the branches reach 0.25 m, the base becomes slightly woody.
- Hill up the shoots to a depth of 50 mm.
- After 18 days, carry out hilling again, increasing the height of the mound by another 50 mm.
- Before hilling, be sure to water thoroughly.
- When planting, be careful to keep the shoots at a distance and to ensure that their roots do not become twisted during growth.
In the autumn, the soil is carefully raked away, the seedlings are taken out and transplanted to a permanent location.
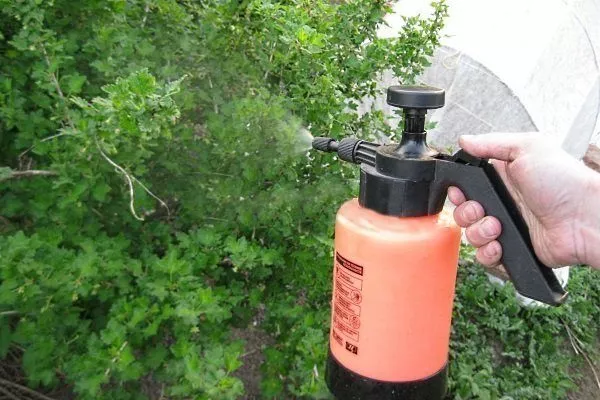
Protection from diseases and pests
From the first days of spring, it's important to take preventative measures against diseases and pests. If these measures aren't taken promptly, there's a high risk of gooseberry infestation.
| Prevention | Period of implementation | Implementation methodology | Result |
| Pouring boiling water over the bush | beginning of March | The water is boiled, poured into a metal watering can and carefully poured over the bush. | The bush wakes up, pests and bacteria are destroyed. |
| Preventive pruning | last week of February - first days of March | Pruning dry and old branches. | Pathogens that can live on dry branches are destroyed. |
| Treatment with chemicals | last week of February - first days of March | Spraying the plant and soil with Bordeaux mixture (1%) or copper sulfate (3%). | Prevention of diseases and pests. |
| Treatment with systemic chemicals | after flowering | Use "Hom", "Strobi", "Horus" and others. Spray 2-3 times with an interval of 2 weeks. | Destruction of fungal diseases |
| Treatment with systemic chemicals | after flowering | Use "Denis", "Iskra" and others. Spray 2-3 times with an interval of 2 weeks. | Pest control |
Subtleties of care in different regions
Gooseberries are common throughout Russia and beyond. There are some specific care considerations depending on the region where they grow.
In the Central Belt (Moscow Region)
The spring care instructions for berry plants are completely consistent with those for central Russia. The first steps are taken in early March. There are no specific care nuances for this region.
In the Volga region
An exceptional feature: care begins after March 15th, as winter in this region is long, and it's not recommended to begin any earlier. In areas with a high proportion of clay and sandy soil, plants are fertilized more frequently. After flowering, gooseberries are watered generously, as the soil dries out very quickly.
In the Urals and Siberia
Cold climates are known for unexpected frosts, which can destroy gooseberries. To prevent plants from dying, gardeners recommend monitoring climate changes and, if necessary, covering the gooseberries with agrotextile at night. If it's impossible to monitor weather changes, several gooseberry varieties with different flowering periods can be planted in the same area.
The soil in Siberia and the Urals is heavy, so regular loosening is essential. Proper care will help grow a healthy and strong bush, and the yield will increase significantly. Gardeners choose hardy and cold-resistant varieties, including "Yarky," "Shalun," "Oksamit," "Zeleny Dozhd'," and "Grossular." Caring for berry bushes begins in late March or early April.
Common mistakes
Even an experienced gardener sometimes makes unforgivable mistakes when caring for this shrub.
The most common mistakes in care:
- Watering is done with tap water (without letting it settle) and sprinkler irrigation. This results in the appearance of harmful insects and fungal diseases on the plant.
- They don't prune weak branches, which results in the bush becoming sick and producing virtually no crop.
- They don't pay enough attention to rejuvenation pruning. They do it just once, which is wrong. Rushing this process is unnecessary, as the gooseberry could die.
- The shrub is repotted when the buds open. This also applies to pruning.
Caring for gooseberries in spring will ensure a bountiful harvest. The key is to follow all recommendations and avoid common but fatal mistakes.