To understand how to grow a melon in a greenhouse and whether it's worth the time and money, you need to understand many aspects. To ensure a delicious, bountiful harvest, you need to approach every step of the process responsibly. Let's find out together whether it's worth a try.
Advantages and disadvantages of growing melons in a greenhouse
Melon is a heat-loving crop, so it grows better in a greenhouse than in open ground. The advantages of growing it under cover include:
- The favorable microclimate of the greenhouse provides a high chance of melon ripening.
- Care of the crop is made easier by the well-thought-out organization of the greenhouse.
- Climate and weather conditions have virtually no impact on melons and pose no problems for gardeners. For example, in open ground, wind can overturn and tangle the plant's vines.
- The crop is less susceptible to diseases and pest attacks.
- It is possible to grow melons in almost any region, regardless of natural conditions and climate.
- Fruits grown under cover are sweeter and juicier.
Despite the advantages, this method also has its disadvantages:
- High cost of the greenhouse and installation work.
- Additional measures such as lighting and temperature control require considerable expenses.
- The pollination process, due to the lack of pollinating insects, becomes the responsibility of the gardener.
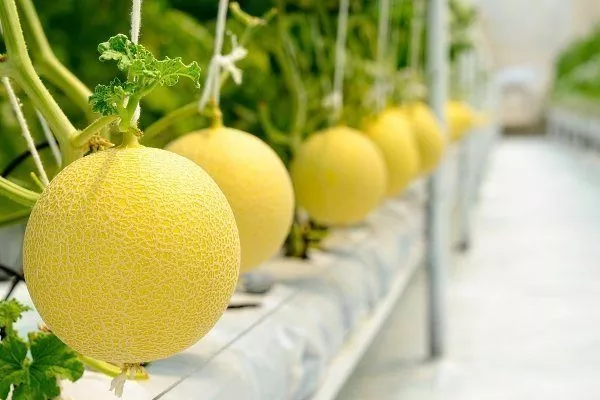
Preparing a greenhouse for sowing seeds
Melons grow well in large greenhouses made of film or polycarbonate. Before preparing the soil, check the condition of the shelter itself:
- Seal all existing cracks. This is especially important, as heat-loving seedlings don't tolerate drafts.
- Prepare trellises - at least 2 for each square meter of area, nets and fastenings for garter material.
- Equip the greenhouse with additional sources of heat and light.
- If necessary, treat the shelter with a fungicide.
- ✓ Optimum soil temperature for planting seeds: 15-20°C.
- ✓ Required air humidity in the greenhouse: no more than 60%.
- ✓ Recommended daylight hours: up to 14 hours.
Preparing your greenhouse is the first step toward a bountiful harvest. Without this work, the rest may prove futile.
How to grow melon seedlings from seeds?
You can purchase ready-made seedlings. However, to be sure of the varieties and the specific growing conditions, it's best to handle the entire process, from seed selection to harvesting, yourself.
Suitable varieties for growing in a greenhouse
| Name | Ripening period | Fruit weight | Disease resistance |
|---|---|---|---|
| Lada | 80-85 days | 1.1-1.5 kg | Fungal diseases |
| Mallet | 60-65 days | up to 3 kg | Fungal infections |
| Waller | 62-65 days | up to 3 kg | Powdery mildew, anthracnose, fusarium |
The results of melon cultivation largely depend on the correct variety selection. Therefore, pay special attention to studying the variety diversity of this crop and determining cultivation priorities.
It is recommended to grow the following melon varieties in a greenhouse or hotbed:
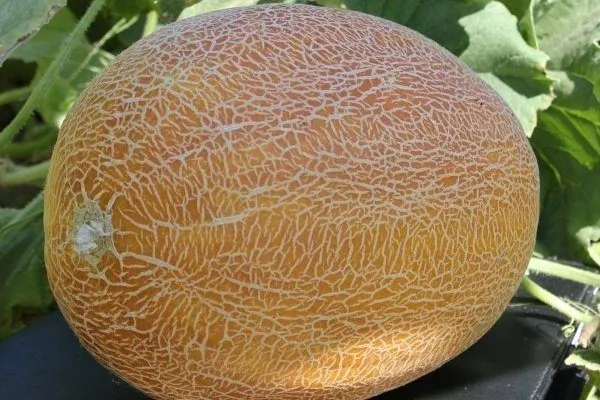
- LadaA mid-season variety. Ripening occurs 80-85 days after the emergence of stable seedlings. The fruit is oval, yellow-orange, with a mesh pattern over the entire surface. These very sweet melons weigh between 1.1 kg and 1.5 kg. The variety is resistant to fungal diseases.
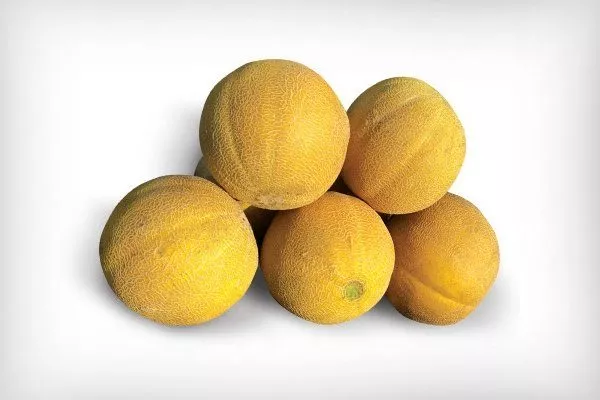
- Mallet. The growing season lasts 60-65 days from mass germination. The fruit is oval, bright yellow, and can weigh up to 3 kg. The flesh is juicy and sweet, and the rind is thin. This variety is productive and resistant to fungal infections.
- Waller.The early-ripening, yellow-brown fruits have tender, sweet flesh, a thin rind, and a small seed chamber. They weigh up to 3 kg and ripen 62-65 days after germination. The fruits transport well and store well. The variety is resistant to powdery mildew, anthracnose, and fusarium.
melon variety "Lada"
melon variety “Kyanka”
melon variety "Woller"

For northern regions, seeds from Barnaulka, Yantarnaya, Altai and others are suitable.
Selection of high-quality seeds
To select high-quality seeds, pay attention to the following nuances:
- Select seeds of varieties and hybrids that produce crops in your climate zone.
- Pay attention to the melon's growing season. Early and mid-season varieties are preferable for greenhouse cultivation.
- The plant prefers to grow vigorously and bear fruit in black soil. If your soil type is different, select seeds specifically for that soil type.
- If you plan to grow melons for years to come, choose your varieties carefully. You can harvest seeds from melons, but hybrids don't.
- Check the packaging. It always indicates the sowing and planting dates for the seeds. The expiration date of the planting material is also important; if it's nearing its expiration date, discard the purchase.
- Certified seeds are purchased from specialized stores, not ordered online or from other dubious sources.
Most often, neighbors and friends provide melon seeds for planting. Over time, the melons grown from these plants become increasingly frail and degenerate. There's only one solution: replace the seeds every 3-4 years, or cross-breed different varieties to create hybrids.
Sowing seeds
Melon seeds harvested 3-4 years ago are suitable for planting. Last year's seeds, even if the foliage is growing well, will not yield a good harvest. The planting material must be hardened and treated before sowing. To do this, follow these steps:
- Sort out the seeds, leaving only healthy ones with a dense, large body.
- Soak the seeds in a light pink solution of potassium permanganate for half an hour.
- Remove any floating seeds; they are not suitable for planting.
- After the soaking time has elapsed, rinse with clean water.
- Hardening. To do this, place the seeds in water at a temperature of 55 to 65 degrees Celsius for a couple of hours, then dry them at room temperature for 24 hours. Then, place the seeds in the refrigerator for 15 to 17 hours, and after removing them, return them to the room temperature to warm up to their normal temperature.
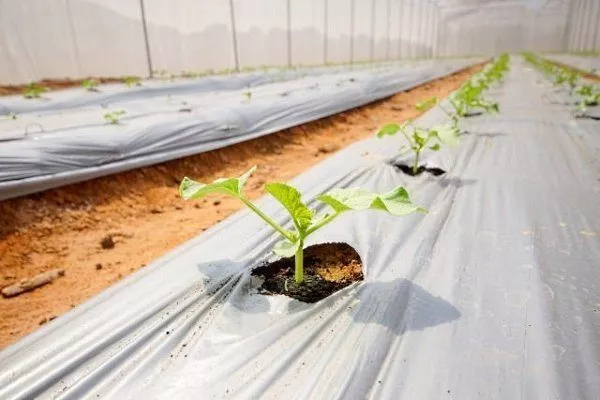
After completing all the preparations, it's recommended to sow the melon directly into its permanent location. However, if the greenhouse isn't ready yet, plant the seeds in 10-cm diameter peat pots and place them on the windowsill. You can use any other peat pots instead, or use empty plastic cups you have around the house, with a few holes poked in the bottom.
Prepare a planting soil mixture of 90% peat and 10% sand. Add 1 cup of wood ash for every 10 liters of planting mixture.
The second method for preparing planting soil involves mixing 2/3 soil with 1/3 compost. Fill cups with the mixture and plant 2-3 seeds in each at a depth of about 2 cm.
Cover the seedlings with plastic wrap. Daytime temperatures for germination should range from 23-26°C, and nighttime temperatures should be between 17-19°C. Once the sprouts emerge, select the main one—the strongest and healthiest one. Cut off the remaining sprouts at the base.
Don't pull weak seedlings out of the ground. This will damage the still-weak root system of the main shoot.
Caring for seedlings
Caring for young greenery involves the following tasks:
- Regularly moisten the soil. Water the seedlings carefully, avoiding water from getting on the green parts of the plant.
- Sprinkle sand on top of the soil to prevent black leg from developing.
- When two leaves appear, apply a fertilizer complex. Repeat the procedure again in 10-14 days.
- Harden off seedlings before planting them in the greenhouse. Reduce daytime temperatures to 17°C and nighttime temperatures to 12°C.
- As the greens grow, move the containers away from each other so that the leaves of the plants do not touch.
- Check the soil temperature daily, maintaining it at 15-20°C.
- Provide the seedlings with sufficient lighting, using phytolamps if necessary.
- Water the seedlings with warm water, avoiding water getting on the leaves.
The seedlings are planted under cover when they become stronger and 5-6 leaves form on the stem.
Landing features
When transplanting seedlings into the greenhouse soil, it's important to properly prepare the soil and adhere to the appropriate timing for all cultivation practices. Each plant in the greenhouse occupies approximately 40 square centimeters of space, so no more than two seedling roots can be placed per square meter of greenhouse space. If the greenhouse size allows, stagger the plants.
Watch the video below on how to grow melon in a greenhouse, from planting seedlings to harvesting:
Soil preparation and disinfection
Melons grow well in loose, sandy soils and chernozems. It's important to prevent soil salinity and acidification. To achieve this, add ash, chalk, and limestone when tilling the greenhouse. Ash also increases the sugar content of the fruit.
At the beginning of the second ten-day period of spring, the soil for planting melons is fertilized. Organic matter is preferred: humus, bird droppings, rotted manure, peat, and the contents of compost bins. This is because organic matter decomposes over time, meaning the crop will receive nutrients gradually and over time rather than all at once.
Moreover, the decomposition of organic matter produces heat, which is essential for fragile young plants. Bacteria involved in the decomposition process have a beneficial effect on the soil, increasing air penetration to the roots.
Organic matter is distributed at a depth of approximately 30 cm, at a rate of 2 kg per square meter of greenhouse space. After placement, the organic matter is watered with hot water and covered with soil.
If necessary, disinfect the greenhouse and soil using one of the following methods:
- AgrotechnicalThis method emphasizes crop rotation. Every 1-2 years, the crops grown in the greenhouse are rotated. Therefore, if possible, build several small greenhouses rather than one large one.
- BiologicalThis method involves adding special solutions to the soil that enhance the growth of beneficial bacteria to suppress unfavorable microflora. Such solutions include "Baikal," "Baktofit," and others. Other biological methods include steaming and freezing the soil. These processes are more labor-intensive than using biological products. A completely new soil layer in the greenhouse is an effective method.
- Chemical. This is a last resort when preparing the soil, as chemicals are not selective—they destroy beneficial microflora along with pathogens and pests. After chemical treatment, beneficial microflora can be restored using organic matter. Such products include manganese, formalin, TMTD fungicide, sulfur-based products, and others.
When working with chemicals, use personal protective equipment (clothing, respirator, gloves, glasses).
Preparation of planting material
If the seedlings have already been grown and hardened, you can begin planting them in the greenhouse as soon as the preparatory work on the soil and covering has been completed.
If you plan to grow melons initially in a greenhouse, the following measures are necessary:
- Warming seeds near a heating source. You can hang cloth bags containing seeds near a heat source or place them on a radiator, provided the radiator temperature doesn't exceed 50 degrees Celsius.
- Disinfection of seeds by treating them with special preparations or soaking them in a manganese solution for 15 minutes.
- Germinate the seeds using any of the following methods: on peat tablets, in a roll of toilet paper, or on moistened gauze.
Planting dates
Melon planting times depend on the regional climate and greenhouse equipment. This period is most often in late April or early May. The soil must warm to 15°C (59°F). Daytime temperatures should not fall below 20°C (68°F), and nighttime temperatures should not fall below 15°C (59°F). If temperatures drop below 10°C (50°F), young plants are more likely to die.
If the greenhouse is equipped with lighting and heating systems and has raised beds, it is not dependent on external weather conditions, meaning planting times can be varied.
Planting seedlings in a greenhouse: step-by-step instructions
Planting seedlings in a greenhouse is a responsible activity that must be carried out according to the instructions:
- Prepare planting holes at least 50 cm apart. If space allows, leave 70 to 100 cm between rows.
- Water the seedlings in the containers generously.
- Carefully remove the young plant from the container so as not to damage the root system.
- Position the seedling in the hole so that the root collar is slightly above the soil surface. This prevents the plant from rotting.
- Cover the root with soil, making a small elevation and compacting it slightly.
- Sprinkle the soil around the root system with a layer of river sand.
- Cover the seedlings with damp paper to help them take root and adapt to the new location.
Caring for melons in a greenhouse
Careful care of melons in a greenhouse requires attention and a lot of effort. But without it, the harvest may not ripen.
Correct temperature conditions
After transplanting young seedlings, maintain a temperature of 25-30°C in the greenhouse. If weather permits, ventilate the room daily. Once the plants have established roots, reduce the temperature by 5°C. Nighttime temperatures in the greenhouse should not fall below 15°C.
Humidity and watering
Melon should be watered using drip irrigation or a watering can to avoid wetting the green above-ground parts. The water should be warm. While the plant can tolerate drought, it does not tolerate waterlogged soil. Humidity should not exceed 60%.

Lighting
Melons require up to 14 hours of sunlight per day. Insufficient light causes the plant to wither and stunt growth. Therefore, be prepared to use lighting fixtures. Specialized phytolamps are available that emit ultraviolet light, which is essential for the plant's biological processes. LED and fluorescent lamps can be used instead.
Top dressing
A deficiency or excess of minerals in the soil is very dangerous for melons, as the fruit will quickly rot. Complex fertilizers (nitroammophoska, ammophoska, etc.) are applied every 10-14 days under the roots until flowering, at a rate of 10 g per 10 liters of water. The recommended application rate is 5-7 liters per root.
During flowering and fruit set, melons are fed with superphosphate. Dilute 40 g of the fertilizer in 10 liters of water. The application rate is 2.5 g of superphosphate per square meter.
When the fruit ripens, ash is applied as a top dressing. It is either scattered over the surface or an ash infusion is prepared.
Greenhouse pollination
When the greenhouse is opened for full daylight, bees will perform pollination. Otherwise, this procedure will have to be performed by a gardener. When the flowers are fully open, pick a male flower (it's larger, with a bulge at the base) and brush it across the female flower cups, scattering pollen onto them.
For every male flower, there are four female flowers. Repeat this procedure as needed. To avoid plucking the male flower, you can use a cotton swab.
Thinning
When the melons reach the size of a chicken egg, thin them out. Leave 5-7 melons on the vine and remove the rest, otherwise they won't be nourished enough and the harvest won't be ripe. After thinning, water the bed thoroughly and apply a complete fertilizer.
Bush formation: pruning, pinching, removing side shoots
Melons produce fruit not on the main stem, but on lateral shoots. Therefore, the first pinching should be done at the seedling stage—pinching the shoot above the third leaf. The main stem will grow from the bud above it, and lateral shoots will grow from the lower shoots. The second pinching is done when the shoots have grown to at least 2 meters in length. At this point, both the lateral shoots and the main stem need to be pinched.
If some melon vines have not produced fruit, they are cut off completely. The cut areas are sprinkled with crushed charcoal.
The number of ovaries per shoot also needs to be controlled. When growing vertically in a greenhouse, leave 3-4 ovaries closest to the base of the stem. Subsequently, monitor the bush's development, simply removing any excess shoots.
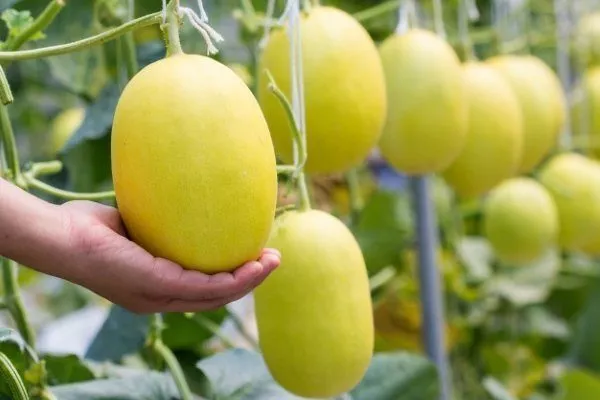
Harvesting and storage
Harvesting begins after making sure the fruit is fully ripe: the mesh on its surface is clearly visible, the color is uniform, and the melon itself is easily separated from the vine.
Early-ripening varieties typically store for up to 8 weeks, while late-ripening varieties last up to 6 months. Pick the melons with stems about 3 cm long in the morning or evening. Leave the melons in the garden for four days, turning them every 6 hours.
After the time has passed, store the fruit in a cool, dark place that has been disinfected and whitewashed with lime. Place the harvest on shelves sprinkled with sawdust or hang it. The storage temperature should be 3-4°C, and the humidity should be 80%. Check the fruit periodically; if any begin to spoil, consume them.
Diseases and pests of melons in the greenhouse and their control
Most melon diseases in greenhouses are fungal in origin. Fungal sources include seeds, weeds, soil, and pests.
The most common diseases are:
- Powdery mildew.It is identified by a whitish coating on the leaf surface. Over time, it covers the entire leaf blade, causing it to dry out and fall off.
- Peronosporium. Shows signs of powdery mildew, but the disease affects the leaf blade from below.
- Fusarium.Characterized by whitening of melon leaves and vines. In severe infestations, the plant dies completely within two weeks.
- Anthracnose. It is identified by the appearance of brown spots on the melon leaves. Rotten spots, similar to rust, develop on the fruit.
- Root rot.The root becomes thinner, it collapses, ceases to perform its functions and the plant dies.
Disease control involves removing affected areas and treating with fungicidal solutions.
Disease prevention includes moderate watering, loosening the soil, removing weeds, and treating the soil and seeds before planting.
Pests include:
- Melon aphid.Tiny white-yellow insects feed on the plant's sap, congregating under the leaves. Due to a lack of nutrients, the melon withers. Spraying with a solution of laundry soap (100 g per 10 liters of water) or Actellic or Karbofos will help.
- Wireworm.The insect larvae, which feed on the sap and pulp of plants and fruits, are dangerous. They are orange-brown, worm-like insects in a shell. When planting melons, add crushed eggshells to each hole, practice crop rotation, and remove weeds.
- Spider mite. Dark, tiny insects gather under the leaf blades. They feed on plant sap. Their presence is confirmed by webbing.
To control pests, chemicals based on acaricides are used.
Growing melons in a greenhouse requires a whole range of measures. It's a complex and demanding process. But it has an undeniable advantage: the melons grow to be extremely sweet, juicy, and large. And the safety of their ingredients is beyond doubt.