Beans amaze gardeners with their diverse varieties, species, and varieties. Growing them in your garden is easy, but choosing the right location, caring for them, and harvesting them can be challenging. This and much more will be discussed in this article.
Origin of beans and distribution area
The culture first appeared before the Common Era. Native to South and Central America, historians and breeders claim that precise records date back to 5000 BC.
The plant was brought to Russia in the 16th century and was used as a decorative element in gardens and homes. Since the 18th century, it has firmly established itself as a leading culinary staple, delighting chefs and homeowners with a multitude of exquisite dishes.
The best varieties and types of beans for growing
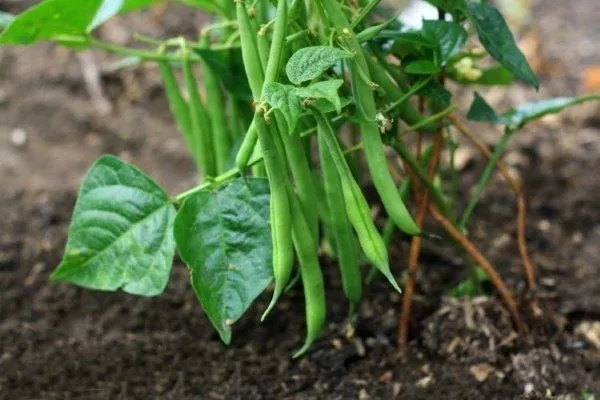
There are a huge number of varieties of this plant, but in Russia, the common bean is the most popular. It can also be found in climbing, semi-climbing, and bush varieties. Bush beans are popular in Russia; they produce a quick harvest and require little care.
Beans can also come in a variety of colors, with the most common being white, red, purple, and black. Depending on the pods, the plant is classified as:
- Sugar. The common name for this bean is "asparagus bean." This name comes from its tender, unripe pods, like asparagus spears. The pods containing the undeveloped beans are edible. It's impossible to open the pods of this bean variety to get the fruit.
- Semi-sugar. They take a long time to harden. Initially, they can be used as sugar, and then the finished beans can be collected.
- Shelling. Planted to harvest beans.
If you plan to grow beans on your balcony, excellent varieties include:
- Caramel. Produces sweet-tasting pods in 60 days. This variety has strong resistance to many diseases.
- The Butter King. The beans are ready to harvest 40-50 days after planting. The pods are tube-shaped, 0.25 m long. They are tender and tasty, suitable for both canning and fresh consumption.
- Saxa 615. Length is approximately 0.4 m. The pods are tubes, 0.12 m long. They contain useful elements that benefit the human body.
Caramel beans
Beans of the "Oil King" variety
beans variety "Saksa 615"

Planting beans
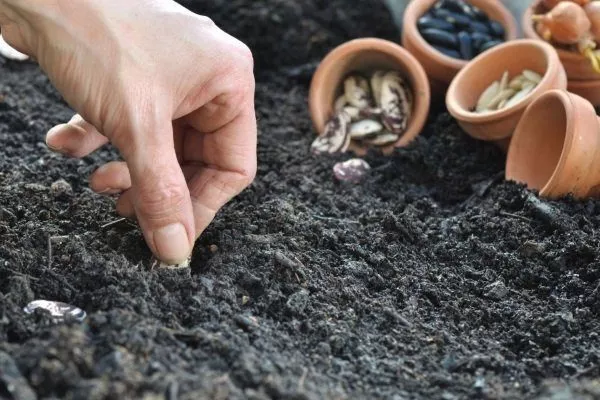
The planting algorithm for any bean variety is the same. Two methods are used:
- Directly into the ground.
- Using seedlings.
The first option is the best, almost all summer residents use it.
Planting dates
One good rule of thumb to use when deciding when to plant outdoors is to ensure the soil temperature reaches 15 degrees Celsius by the time of planting. If you can't measure this temperature, use the bloom time as a guide.
If you want to have green beans throughout the summer, plant the plant in several stages at 14-day intervals.
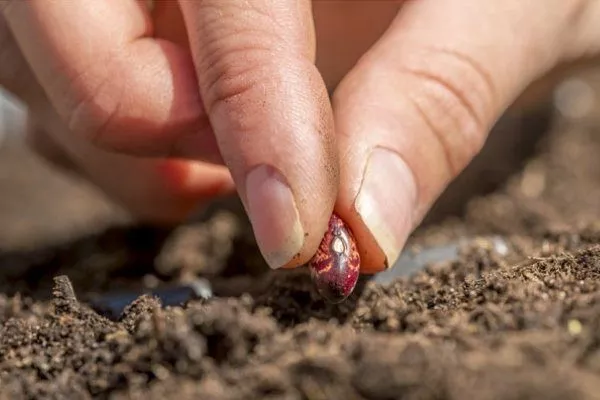
Seed preparation
Almost all legumes have hard skins, so the seeds take a long time to germinate. Soaking them before sowing is not recommended, as cold water will cause the seeds to rot.
| Processing method | Water temperature (°C) | Soaking time (min) |
|---|---|---|
| Potassium permanganate solution | 70 | 30 |
| A weak solution of potassium permanganate | 65 | 45 |
Experienced gardeners recommend this approach: place the seed in a small bowl and pour a weak solution of potassium permanganate over it. The temperature of the solution should be at least 70 degrees Celsius. After this, plant the seed immediately in open ground or onto seedlings, and pour the solution into the soil.
Another seed treatment option: dilute a weak solution of potassium permanganate in water at a temperature of about 65 degrees Celsius. Spray the soil with the solution, and then plant the treated seeds in it.
Choosing a location for beans
All varieties of the crop cannot grow and develop without ample sunlight. In the shade, the crop will die. During cultivation, partial shade for a couple of hours a day is acceptable – no more. Windy or drafty areas are unsuitable for growing any bean variety.
Lowlands where water lingers for a long time or where fog sets in in the mornings are also unsuitable. A good option is to grow the crop in open ground in a sunny area, protected by a fence or hedge. The soil should be loose and well-drained. Sandy loam and loam soils are best.
If the soil is heavy, it is improved by adding sand, peat chips and sawdust.
Regarding crop rotation, beans can be planted beforehand with a variety of crops, except legumes. Beans should only be planted in the same plot after four years.
Beans are self-pollinating, so there's no need to plant additional crops nearby. Alternatively, you can plant different varieties and species nearby without cross-pollination.
Growing this plant enriches the soil with nitrogen, as all legumes contain green manure. If you want to restore your soil, plant beans.
When it's time to harvest, there's no need to pull up the entire crop; just cut off the above-ground part, and the rhizome is preserved in the soil as a natural fertilizer.
Soil preparation
The soil should be breathable and permeable to allow water to drain quickly. Heavy soil is unsuitable; to change its composition, dilute it with plenty of organic matter. The pH should be neutral (6.0-7.0). If it's high, add lime.
- ✓ The pH level should be strictly within the range of 6.0-7.0. Deviations in any direction reduce yield.
- ✓ The soil must contain at least 3% organic matter to ensure the necessary looseness and nutritional value.
High-quality soil consists not only of soil but also of compost and manure. Any of these natural fertilizers will reduce the soil's density and also add a large amount of nutrients.
You can improve the soil by mixing these two fertilizers with a shovel or small rake a couple of weeks before planting. Don't forget to mix a powdered fertilizer into the soil—this is a natural, beneficial type of bacteria that facilitates nitrogen utilization by plants during the early stages of development.
Sowing beans
Wait until the last frost has passed. The crop needs warmth and sufficient moisture to begin growing quickly. Plant in the spring, as soon as you know there will be no more cold days.
Soil temperatures should not drop below 15 degrees Celsius; ideally, they range from 20 to 27 degrees Celsius. Air temperatures throughout the entire bean development and growth period should be between 18 and 27 degrees Celsius.
If a frosty day does decide to visit your region, cover the bean seedlings with a small amount of cloth or film to protect them from frost and wind. Plant the seeds at a depth of 3-4 cm.
Gardeners prefer to plant seedlings 4-5 cm apart. This is acceptable, but only at first. Once the seedlings reach 7-8 cm, thin them out. Remove weak seedlings, but leave the strong ones.
Some plant varieties need to be sown at a distance of 0.1 m from each other, such species mainly include: climbing varietiesCompact varieties grow well if spaced 0.2 m apart. In any case, the choice should be based on the type of bean and the amount of space you have available for growing the crop.
The seed will germinate in the soil in about 2 weeks, depending on care and climate.
Watch a video about planting beans in open ground:
Caring for crops
Without proper care, beans won't grow and reward you with a bountiful harvest. This includes regular watering, fertilizing, disease control, weeding, and tilling the soil.
Watering
Water only when the soil is dry. Overly wet soil is harmful to the plant, as it will immediately damage the plant's root system.
Before watering, gardeners should ensure the area is completely dry. Watering should be done 3-4 cm into the soil; this is easy to check: lightly press your finger into the soil and feel the moisture level.
Top dressing
Use nitrogen fertilizers sparingly. While nitrogen fertilizers will certainly promote foliage growth, they will do more harm than good. Beans will begin to actively develop foliage, while bean formation will remain neglected. These fertilizers are effective if the goal of growing the crop is to create an ornamental plant rather than to harvest it.
If the beans are growing poorly and the plant's appearance indicates that it needs help, use organic fertilizers with a minimum nitrogen content.
Loosening the soil
The bean root system is very small and fragile, easily damaged, especially when loosening the soil. When removing weeds, do so with extreme care. Weeds can be pulled out by hand; do not use a hoe or shovel.
You can use a layer of mulch around the crop; it will prevent weeds from appearing, and this method also maintains normal moisture levels. The plant's pods will be protected from rotting once they begin to touch the soil. Read more about mulching the soil. here.
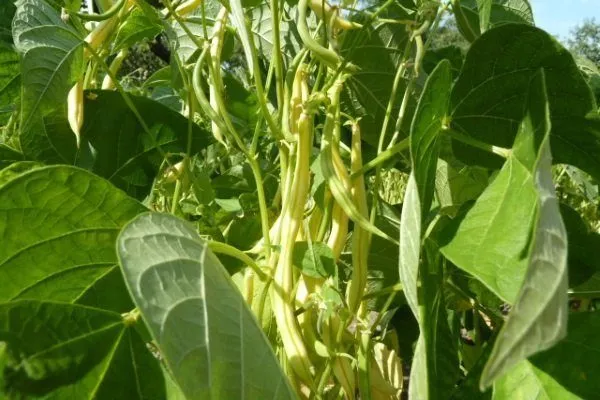
Garter beans
Please note that not all varieties require support. Many varieties are bushy, but if you choose a climbing variety, you won't be able to do without staking. This variety grows vertically, so supports will be needed to secure the beans.
You can also avoid using supports for climbing plants, however, doing so could completely deprive you of your harvest.
Protection from diseases and pests
Garden pests target the crop, which is also vulnerable to certain diseases. If a gardener encounters bean diseases, special sprayers and chemicals are essential.
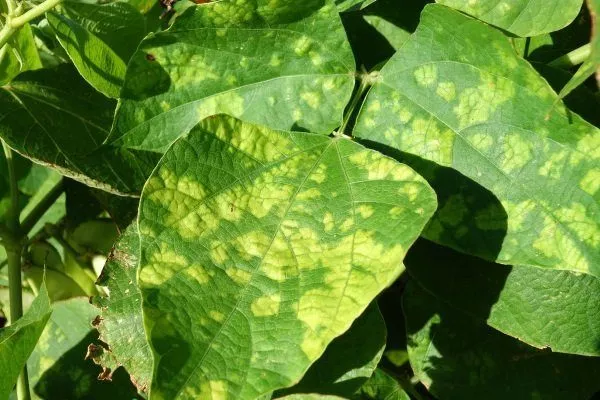
- MosaicIt is a viral infection. Young seedlings stunt development, take on an unusual shape for legumes, and become covered with yellow, fading spots. As the disease progresses, these spots become colorless. In mature plants, the leaves wrinkle and become curly. This can also happen: the virus only attacks the foliage, leaving the fruit unaffected.
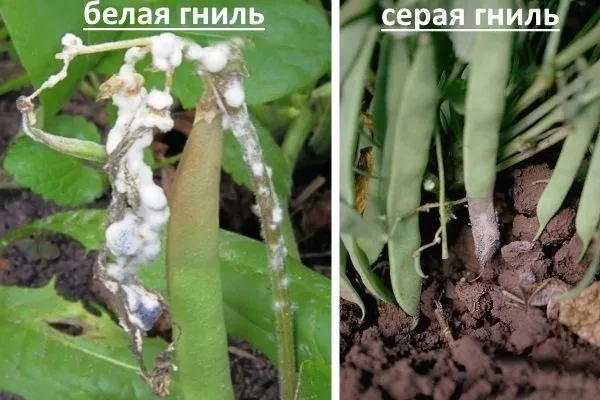
Get rid of aphids (they carry disease)! Select only vigorous seeds for planting. Remove all infested areas and treat the plant with Bordeaux mixture. - White and gray rot of beansThe disease is caused by fungal spores. Infected areas become white and resemble cotton wool. The vector is aphids.
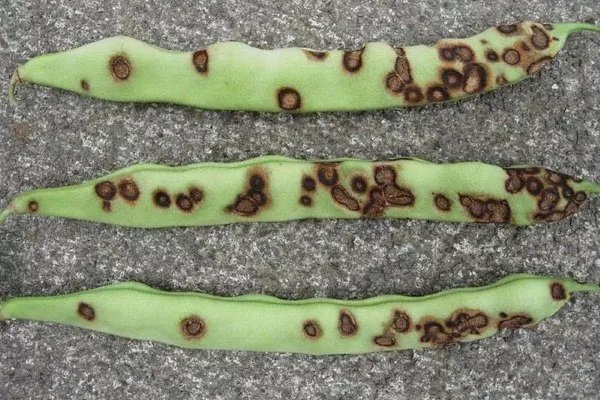
Spray the plants with Bordeaux mixture (1%). Build strong immunity in the beans with phosphorus and potassium fertilizers. - AnthracnoseThis disease attacks beans during the growing season, affecting all above-ground parts. It strikes hardest during seedling and fruit formation. Brown, slightly flattened spots with a dark border appear on the foliage and beans. These spots cover the entire bean, making it unfit for consumption. These beans do not produce seed. The disease is caused by sudden weather changes and dense plantings.
After seedlings emerge, treat the plants with "Energen" at a rate of 10 drops per 1 liter of water. One liter of this solution is used per 10 square meters. You can also use "Buton": 1 liter of water and 2 g of the product. - Root rotThis disease can have two causes: fungal and bacterial. It causes the greatest damage to young plants and seedlings; without proper treatment, the plant simply dies. The disease progresses more rapidly during rainy periods. A white or purple layer with thick pads appears on the root system. Plants stop receiving nutrients from the soil, and the affected tissues become darker.
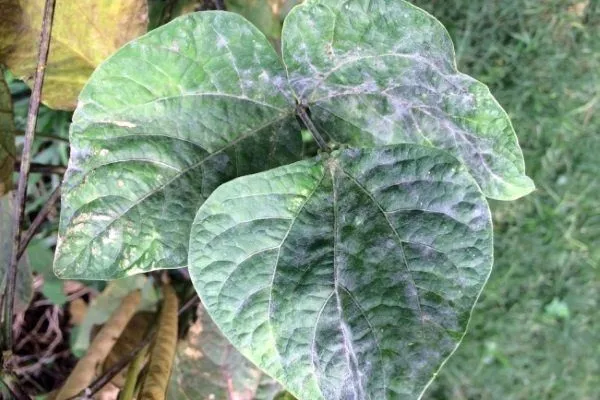
Control of root rot: spray with Bordeaux mixture (1%). - Powdery mildewThe disease persists until the end of the growing season, completely destroying the plant. The first symptoms can be seen on the stems: they appear as if they've been dusted with flour. The more this coating, the faster the disease destroys the plant.
Immediate spraying of beans with a 1% colloidal sulfur suspension is required. Infected plants are dusted with ground sulfur.
Bean mosaic
White and gray rot of beans
Anthracnose of beans
Root rot
Powdery mildew on beans

Harvesting and storage
The entire crop should be harvested at the end of the season. Bush varieties are harvested once per season at the end of the growing season; beans should not be left for harvesting "another day or time." Climbing varieties are harvested a couple of times per season; the largest harvest occurs at the end of the growing season.
Tips from experienced gardeners on harvesting and storing legumes:
- The ripening period of beans depends on the type of plant – it is from 3 to 5 months.
- Climbing varieties produce crops on a continuous basis for a couple of months; they cannot be called disposable.
- The mature pods of the plant are dry, the beans in the middle are hard.
- Before harvesting, check a few pods by gently biting into them. If the bean leaves a telltale mark, the fruit isn't ready for harvesting yet; you'll have to wait a little longer.
- If the weather conditions decide to play a cruel joke on you, then pick the unripe plants; you can let them dry out later, and the fruits will ripen.
- Drying the harvest is a must; if you can't do this in the sun, take the beans indoors and dry them there.
- Pick the beans, hang them root-side down, and store them this way for about 2-3 days. Sometimes this period lasts 2-3 weeks. Harvest them only when the pods are dry and the beans inside are firm.
- Almost all foliage should be dry before harvesting.
- While drying the crop, keep the beans in a warm, well-ventilated area.
Once you've picked the pods, you need to scoop out the beans; they should be firm and dry. If you have a small harvest, you can harvest them yourself, but if you have a large number of plants, you can use the bag method:
- Place the pods in a bag or something similar.
- Gently press the pods through this package.
- Once you do this, separating the pods and beans will not be so difficult.
Beans can only be stored for a long time in a dry room.
Place the dried harvest in a jar and store in a dry place. The beans can last up to 12 months in this form, depending on proper care. You can also store the beans in airtight bags.
This plant is highly nutritious and delicious. Planting beans is easy, but providing them with proper care is challenging. Sprouted pods can be used to prepare unusual, savory dishes.