When beans stop growing or fail to sprout at all, it's important to investigate the cause. This could range from simple improper preparation of the planting material to non-compliance with agricultural practices. By identifying the underlying cause, you can quickly correct the situation and reap the rewards of a long-awaited harvest.
Reasons why beans fail to germinate
If a legume doesn't germinate after planting, it's usually due to improper seed treatment and selection. Sometimes, it's due to improper planting depth. If the seeds are planted deeper than 5 cm, they'll have difficulty breaking through the thick soil layer.
- ✓ Check seeds for visible damage and uniform size.
- ✓ Make sure the seeds do not show signs of mold or fungal diseases.
What to look for when choosing planting material:
- age — you cannot use seeds older than 3–4 years, as their shell dries out and becomes “oakish”, and swelling will occur too slowly;
- quality — You cannot purchase planting material from unverified producers, and it is prohibited to sow damaged elements, those with signs of mold, etc.
In addition to standard preparatory measures, experienced gardeners use tricks to speed up and improve germination. There are many methods for this, but the following stand out among them:
- Microfertilizers. For every liter of water, add 0.2 g of boric acid and ammonium nitrate. These are available at specialty gardening stores. Place the beans in the mixture and let them soak for 5-6 minutes. Allow them to dry naturally (by laying them out on a cloth).
- Growth stimulants. They can be made from synthetic phytohormones or natural microelements. A wide range of products is available: Epin, Zircon, aspartic or succinic acid, Energen Aqua, Novosil, heteroauxin, gibberellin, etc.
- AKCH. This is an aerated compost tea. It's made at home by mixing 1 liter of rainwater, 5 ml of molasses, and 35 g of dry compost.
Place all ingredients in a glass container and insert the spray tubes from an aquarium air pump. Run the container for exactly 24 hours.
Next, place the seeds inside and let them sit until they swell and form a compost shell. The tea is ready by smelling it—it should have the aroma of fresh soil.
And also folk methods:
- Alcohol solution. To do this, take vodka or 40% alcohol. Soak the beans for 20 minutes. Let them dry.
- Honey. Place 1 teaspoon of bee product and the seeds in 200 ml of water. Leave for 24 hours, then rinse and dry.
- Aloe. Squeeze the juice from a freshly cut leaf. Mix it with equal parts water and soak the seeds for 24 hours.
- Mushroom tincture. Take dried mushrooms (any edible ones), pour boiling water over them until they're covered. Cover and let steep until completely cool. Leave the seeds in the infusion for 5-6 hours.
- Potato juice. To prepare, you'll need 2-3 potatoes. After washing, place them in the freezer for 4-5 hours. Once frozen, peel the potatoes and squeeze out the juice. Place the potatoes in the freezer for 7 hours.
- Ash solution. Add 2 tablespoons of wood ash to 1 liter of water, mix thoroughly, leave for 48 hours, and then add the seeds. Leave for about 5–6 hours.
- ✓ Presence of a persistent aroma of fresh soil.
- ✓ Absence of unpleasant odors indicating fermentation.
Whichever method you choose, strictly adhere to the specified proportions. Otherwise, the surface of the beans will burn.
Features of planting in open and closed ground
Beans are typically grown indoors in northern regions. In cold climates, the vegetable won't have time to fully develop or won't sprout at all if planted outdoors once the required temperature has reached the desired level.
In all cases, there are mandatory conditions: warming the soil to a temperature of +10°C, and the air to a minimum of ±18°C. To ensure the soil is warm, in greenhouses They equip high beds and make earthen embankments to a height of 20 cm.
The second important factor is soil type. Inappropriate soil for the crop's needs can result in seed failure. Pay attention to the following parameters:
- acidity level - from 6.5 to 7 pH;
- structure - loose, if necessary, heavy soil is diluted with peat, sand;
- type - limed, loamy, sandy loam, chernozem;
- groundwater must be located at a depth of at least 8 m;
- The soil fertility is high, but with a minimal amount of nitrogen, since the legume crop consumes the substance from the air, and its excess leads to the growth of green mass, not pods.
Beans do not tolerate high humidity, which cannot be avoided in greenhouses. It is recommended to water less frequently than in open bedsAnother mandatory condition is ventilation of the greenhouse.
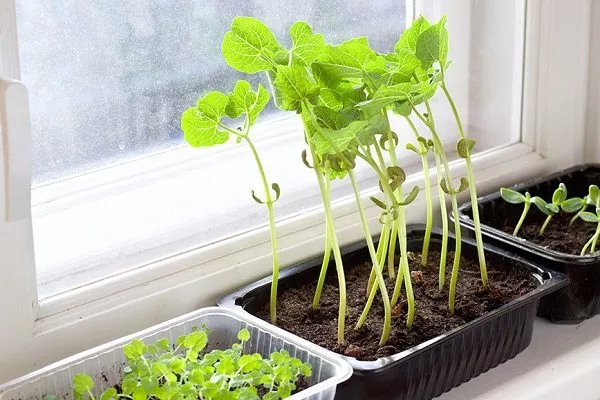
The nuances of seedling cultivation
Growing beans from seedlings isn't used in the southern regions, as the soil warms up early and recurrent frosts are rare. To ensure the crop emerges and grows quickly, be sure to prepare the planting material.
The activities include the following actions:
- Freezing. This procedure is optional, but recommended. It helps kill bean weevil larvae. To do this, place the beans in the freezer at -14–15°C for 48 hours, then leave them at room temperature.
- Sorting and calibration. These measures allow you to use only high-quality materials, which reduces the risk of germination failure. Follow these steps:
- manually sort through all the beans, remove those that show signs of disease, mold, damage, or holes;
- discard lightweight items (they are empty inside and may contain pests);
- Place the seeds in lightly salted water for 20–30 minutes – ungerminating beans will rise to the surface;
- Place the beans in piles based on size (large beans should not be planted next to small ones).
- Disinfection. A light pink solution of potassium permanganate is usually used to disinfect the material. Place the grains in the solution for 10–15 minutes and then let them dry.
- Warming up. To start the growth, place the beans in warm water (temperature no higher than +30°C) for 15 minutes.
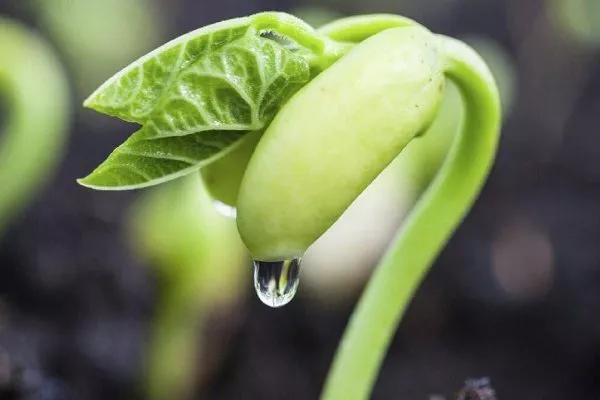
- Germination. This procedure will help the beans sprout 6-10 days earlier, which is especially helpful if you need to plant urgently. This can be done in two ways:
- first - place the grains in a wet cloth, transfer to a plate with warm water and leave at room temperature;
- The second is to make balls out of cotton wool, soak them in warm water, put beans inside, then place them in glass containers and cover them on top.
The seedling method is rarely used for beans, but when necessary, individual cups are used. They should hold at least 200 ml and be 8–10 cm in diameter. They can be sown in a common container, but transplanting will damage the root system.
Rules for sowing beans for seedlings:
- When the sprout reaches 2 cm in length, prepare the soil mixture. To do this, mix the following ingredients:
- 1 part each of peat and humus, 2 parts of garden and disinfected soil;
- 1 part of soil and compost and 1/10 part of river sand.
- Prepare the containers. Take regular cups and make holes in the bottom for drainage. Place expanded clay on the bottom and the growing medium on top.
- Lightly water the beans. Then, use a skewer to make a 5 cm deep hole in the center. If the beans are large (depending on the variety), you can increase the depth to 7 cm. If you're sowing the beans in a large container, space the seedlings 8–10 cm apart.
- Place the seeds so the sprouts are slightly on their sides. If the beans are large, one per hole is sufficient; if they are small or poorly sprouted, two per hole.
- Sprinkle with soil and moisten again with a spray bottle.
- Cover each glass with plastic wrap and leave in a warm place.
It's not enough to just plant beans. The seedlings need to be cared for. Here's how to do it right:
- Ventilate the plants twice a day (for 10–15 minutes) by opening the film or glass;
- water regularly (be sure to use a spray bottle), but make sure that water does not fall on the green mass (make sure that the water does not stagnate and that a dry crust does not form on the surface);
- every 10 days apply Diammophoska (3 g per 1 liter of water);
- Keep the seedlings on a sunny windowsill, but do not expose them to direct sunlight.
Reasons for seedling growth cessation
To accurately determine the cause of slow bean growth, it's essential to have a clear understanding of the proper agricultural practices for legumes—how to plant and care for them, when to sow, etc. If a discrepancy is detected, this is the cause of the slowdown.
Inappropriate landing site
Any bean variety prefers full sun. Planting the crop in the shade will not only slow growth but also completely stop it. Key site selection guidelines:
- absence of winds and drafts;
- plenty of light - beans need 12 hours of light;
- Elevation is the best option, since groundwater is usually close to the ground in lowlands.
Be sure to practice crop rotation; don't plant legumes in the same spot every year. Allow them to rest for 3-4 years. Pay attention to their predecessors:
- sow beans after tomatoes, potatoes, cabbage, sweet peppers, eggplants and cucumbers;
- Unacceptable predecessors are any legumes, as this increases the risk of infection by diseases specific to the plant species and pest infestations.
Bad soil
Beans won't grow in unfavorable soil conditions. The soil must be loose and nutritious. To achieve this, prepare it as follows:
- Dig the future beds in the fall to the depth of a spade. Fertilize the soil at the same time. The optimal fertilizer and dosage for beans is approximately 20 g of crushed wood ash, 5 kg of compost, and 30 g of superphosphate per square meter.
- If the soil is too acidic, add 3–5 kg of lime per 1 square meter.
- If the soil is heavy, add sand to the beds (the amount is determined individually, but you need to achieve a structure such that when you squeeze the soil in your hand, it does not form a lump).
- In spring, scatter wood ash over the entire surface of the beds and level the garden with a rake.
- When planting seedlings or seeds, apply 20 g of Superphosphate or 10 g of Monophosphate per 1 sq. m.
Failure to meet deadlines
Beans are considered a very heat-loving plant. Even the slightest frost can kill them or cause them to stop growing for a long time (until they recover). For this reason, it's important to strictly adhere to planting dates. These depend on weather and climate conditions.
The table shows the period for sowing in open ground and for seedlings, based on the region:
| Regions | Seeds in the garden | Seeds for seedlings/transfer to open ground |
| Moscow region, Central Russia | after May 10–15 | From April 20 to May 10 / from May 20 to June 10. |
| Leningrad region, Urals, Siberia | from May 25 to June 10 | From May 10 to 20 / from June 10 to 20. |
| South (Crimea, Krasnodar Krai) | after April 10 | The seedling method is not used. |
Incorrect watering
This is another common reason why bean plants stop growing. The crop doesn't tolerate high humidity, but drying out the soil is also undesirable. There are a number of nuances that are important to consider:
- the most important period for watering is when the pods are forming (if you ignore it, the flowers and ovaries will fall off, and the bush will stop growing);
- before flowering, watering is carried out once every 6-7 days;
- during flowering and fruiting - twice a week;
- the watering rate after transplanting seedlings and sowing seeds is about 10 liters per 1 sq. m;
- dosage for pod growth of 15–17 l;
- After each moistening, loosening is carried out;
- During rainy periods, the amount of watering is reduced, and during drought, it is increased;
- humidification time - early morning or evening;
- water quality - only settled and preferably rainwater (without chlorine or other impurities);
- water so that no drops fall on the leaves;
- temperature - warm (it is worth standing in the open rays of the sun).
Over- and under-fertilization
When there's a shortage or oversupply of fertilizer, significant changes occur in the plant—specific symptoms appear depending on the required or excess nutrients. But in general, metabolism is disrupted, and the plant's appearance and structure change.
How to determine the presence of essential substances for beans:
| Element | Shortage | Excess |
| Nitrogen | the leaves turn pale and yellow, the green mass decreases in volume | the foliage darkens, the greenery grows vigorously, and the pods lag behind in development |
| Phosphorus | the plant's color becomes darker, the leaf blade becomes denser, and spots form on the surface | interveinal chlorosis forms on the leaves |
| Potassium | the leaf blades turn yellow, then die off, become wrinkled and curl downwards | the leaves become dark and small, and many nutrients cease to be absorbed |
| Copper | leaves curl and wilt, white spots develop | Brown spots appear on the lower leaves and the plant stops growing completely |
| Sulfur | the greenery is lightening, the plant is not growing | the leaves first turn yellow, then brown, and curl up completely |
| Magnesium | The edges of the leaves turn yellow-red, and multicolored spots form on the veins. The edges curl up into a dome-like shape. | the roots die off, the bush dies |
| Calcium | young foliage turns pale and curls, a brown tint appears, the root system branches out greatly | Light spots form on the leaves, which leads to the death of the leaf blade |
| Bor | the base of the apical leaves becomes curved, after a long time they become lighter and bend | Brownish spots appear on the lower leaves, the greenery dies off |
| Iron | the upper leaves turn pale, whitish stripes form on the veins (young leaves are initially susceptible to damage) | the foliage darkens, the root dies |
To ensure beans continue to grow and receive sufficient nutrients, it is necessary to apply fertilizers correctly:
- It is enough to feed beans 2, maximum 3 times per season;
- the first time during planting - for this you can take 30 g of potassium and phosphorus per 1 sq. m;
- the second time during budding - 15 g of superphosphate and 5 g of potassium sulfate per 1 sq. m are used;
- periodically (about once a month) spray wood ash;
- Nitrogen fertilizers are not used, but if the soil is too depleted, it is permissible to add 3 kg of compost per 1 sq. m.
Violation of agricultural technology rules
The first thing to consider is the planting pattern. Regardless of the type of bean (climbing or bush), the average distance between rows is 40 to 60 cm, and the distance between holes within a row is 20 to 30 cm. Beans should be planted using one of the following techniques:
- In rows. The most common method, in which the minimum distance between rows is 45 cm, and within a row - 25 cm. This method requires a lot of space, but the plants feel comfortable.

- With ribbons. Beans are planted in 3 rows, with a distance of 20 cm between them, and 15 cm within rows. A minimum of 45 cm is maintained between each three rows.


Beans can stunt their growth due to improper agricultural practices. Please note the following:
- Thinning. If you're planting seedlings, this isn't necessary. When planting 2-3 beans per hole, remove the weaker ones.
- Supports. These are essential when growing climbing beans. If the plant isn't tied down, it will become diseased, which will cause growth to stop. There are several options:
- installation of individual wooden stakes at a height of about 2–3 m with a depth of 0.5 m;
- inverted V installation - stakes are fastened together at the top;
- trellises - trellises are installed along the garden bed, and strong rope or wire is stretched on them.
- Loosening. Perform this after watering. Otherwise, the oxygen needed for root growth will be deprived.
- Hilling. Do this when the bushes reach a height of 10–12 cm.
- Weeds. Remove them as they grow, as they draw nutrients from the soil and further shade the beans.
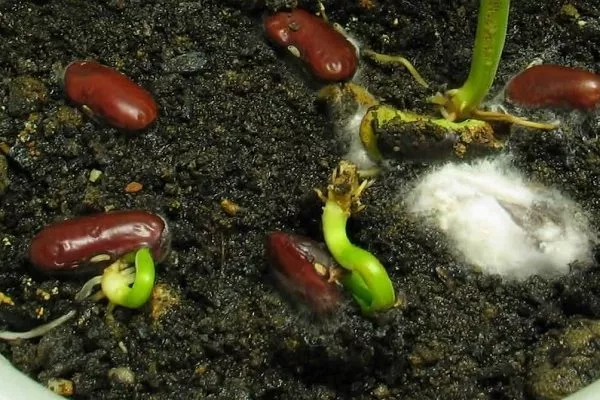
Diseases as a cause of bean growth retardation
Most often, beans stop growing due to disease. There are a number of ailments that affect their appearance:
| Name of the disease | Symptoms | Reasons | Treatment methods |
| Gray mold | flower drop, brown spots on leaves, yellowing of foliage, formation of plaque | high humidity levels | use of fungicides according to the instructions (wide range) |
| Anthracnose | the formation of brown-red spots, sunken type, then the appearance of holes and ulcers on the leaves and pods | high humidity | use of Bordeaux mixture (1%) |
| White rot | softening of the trunk, foliage, and roots, formation of a slimy coating and white flakes | lack of ventilation in the greenhouse, high humidity | drug Hom, Fitosporin |
| Olive mold (cladosporiosis) | the formation of a velvety coating over the entire plant with an olive tint | high humidity | Quadris product (per 1 hectare - 1 liter of the drug) |
| Cercospora leaf spot | the formation of gray spots on the leaves with a reddish or brown pattern | high humidity levels | drug Protect, Protazox |
- Isolate affected plants from healthy ones.
- Treat plants with recommended fungicides according to the instructions.
- Remove and destroy heavily infested plants.
Pests as a cause of bean growth retardation
Diseases aren't the only problem. A number of insects can slow down bean development:
- Sprout fly. Its larvae consume the shoots, which subsequently die. To prevent this, the seeds must be disinfected.
- Bean weevil. The larvae chew out the pods. The pests appear only after they have formed.
- Aphid. The insects cover leaves and trunks, which eventually die. Spraying with a solution of laundry soap is effective for control.
- Pea moth. Caterpillars eat the beans inside the pod. They will have to be collected by hand.
To ensure a bountiful harvest and rapid growth of beans, it's essential to follow proper agricultural practices, disinfect the planting material, choose the right site, and apply fertilizer. Only then can you achieve positive results without worrying about the beans failing to germinate or stopping growing.