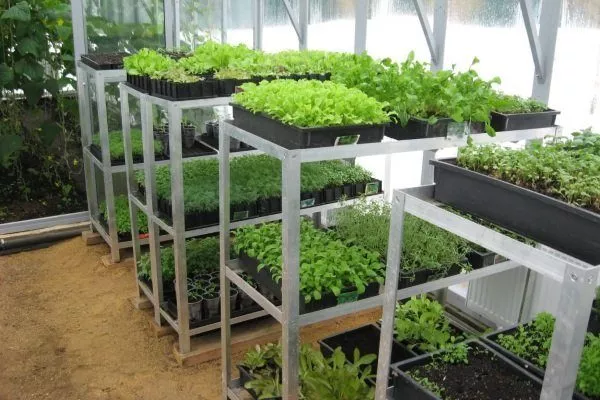
Seedling racks are convenient for growing plants from seeds until the weather becomes favorable for planting the established seedlings outdoors. They save space and simplify plant care. Furthermore, if you attach artificial lighting to the shelves, the seedlings can be grown regardless of the rack's location.
Basic requirements for the rack
A seedling rack can be made from various materials, but in any case it should be:
- durable;
- suitable for multiple use;
- convenient, i.e. provide comfortable conditions for caring for plants (it is important to have quick access to seedlings for watering, inspection and loosening);
- possessing an aesthetically attractive appearance.
- ✓ Consider the room humidity: for high levels, metal or plastic are preferable.
- ✓ Assess the load: wooden structures are less resistant to heavy pots compared to metal ones.
The dimensions of the structure can vary greatly, but racks with the following parameters are considered universal:
- number of shelves – from 3 to 6;
- the length of the shelves is sufficient to accommodate standard fluorescent lamps (i.e. from 50 cm);
- height between shelves – from 40 to 50 cm;
- distance from the floor to the bottom shelf – from 10 cm.
Often the bottom shelf is used to store various garden tools or household items.
If you don't plan to store seedlings on the top shelf, you can leave the top of the rack open by installing the front and rear horizontal supports in place of the top shelf. These will not only support the entire structure but also provide a great place to attach lighting elements.
Selection of material
The shelving unit must be strong, waterproof, and durable, which is something to consider when choosing the material. Let's take a closer look at the possible materials for shelving:
- TreeWood is one of the most popular materials because it breathes and looks natural and beautiful. However, it has a significant drawback: it absorbs moisture. Therefore, when choosing wood, it's best to choose hardwoods, as they absorb moisture worse than others. These include maple, ash, and oak. It's also worth using special wood impregnations that help prevent wood from getting wet.
- MetalStainless steel is a better choice, as it resists corrosion. Profiles or even metal pipes can be used as uprights, and shelves can be made from sheet metal or durable mesh. Iron structures are generally durable and fairly reliable, but they are more expensive and require considerable effort to construct, as working with metal requires specific skills and expensive equipment.
- PlasticThis material has many advantages – it's durable, easy to clean, and doesn't absorb moisture. Plastic sheets and pipes can also be used in shelving.
- PlexiglassThis material can be used to create a transparent, original structure that looks stylish and modern. Plexiglass comes in a variety of colors, so you can create a shelving unit with multicolored shelves.
- PlywoodIt's easy to work with, but it quickly becomes damp, making it not the best choice for making seedling racks. However, if you do use plywood, it's a good idea to have a few pieces of plastic or oilcloth ready to wrap around the shelves, otherwise they'll inevitably deteriorate quickly.
The choice of material depends on budget and engineering design decisions. However, if the choice is between plywood, plastic, and plexiglass, it's best to choose the latter. These materials have a long service life and don't require any coating to protect against moisture.
Once you've prepared the materials, you should also acquire the necessary tools for building the rack, namely: a saw (regular or miter), a drill, a screwdriver or a regular screwdriver, etc.
Types of structures
For seedlings, you can assemble a structure of the following types:
- StationaryA suitable option for a specially equipped plant growing room, as the structure is not disassembled but rather secured in several directions. Its advantages include reliability and durability.
- DisassemblableIf space is limited, this type of structure is best, as it's easy to move and can be removed completely after the seedlings are grown.
- WindowThis type of structure is installed on a windowsill in a window opening. It's suitable for germinating small numbers of seedlings. Window shelving is often used to grow fresh herbs for the table throughout the year.
Each design has its own advantages, so it’s best to make a choice based on your own preferences and financial capabilities.
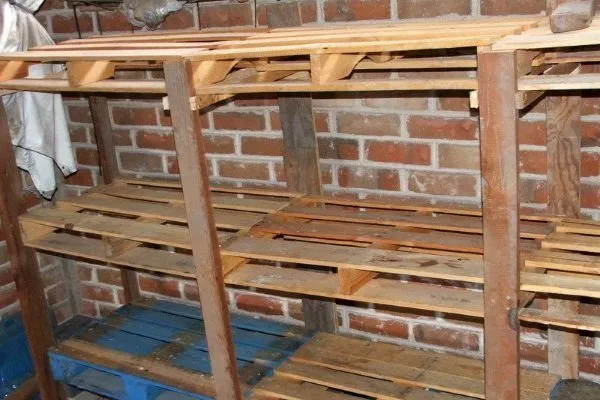
Wooden rack for seedlings
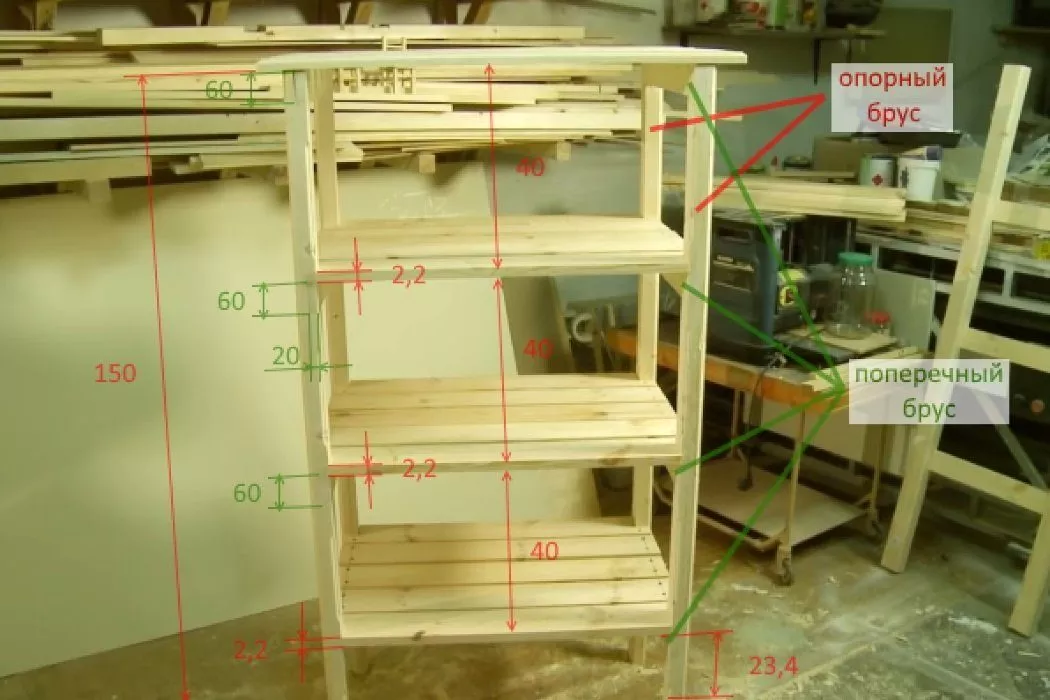
If you're planning to build a wooden shelving unit, you'll need to draw a sketch first to help you remember the dimensions. Here's an example of a suitable diagram:
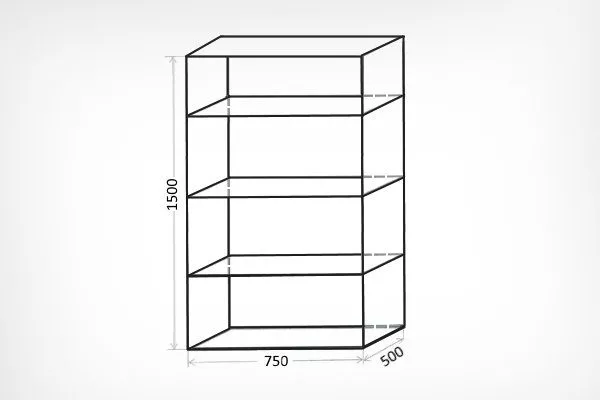
It's better to make shelves from timber in a longitudinal lattice pattern. They will be stronger than plywood shelves, although the structure will be bulkier and heavier.
After preparing the sketch, you need to collect the following materials and tools:
- wooden beam for racks with a cross-section of 45x60 mm (2 pcs. of 3 m each, you can immediately ask to cut them into 1.5 m pieces);
- wooden beam for crossbars with a cross-section of 20x60 mm (2 pcs. of 2 m each, you can immediately ask to cut them into 50 cm pieces);
- wooden board for shelves with a cross-section of 22x100 mm (one shelf requires 5 pieces of 75 cm length, then for all 4 shelves you need 4-5 boards of 3 m length);
You can save on shelf boards by laying them slightly apart rather than end-to-end. This will create a shelf that resembles a wooden lattice.
- saw;
- self-tapping screws, nails;
- chisel;
- hammer;
- wood glue;
- roulette;
- pencil.
Once you've prepared all the necessary materials and tools, you can begin constructing the shelving unit. This process essentially consists of two main stages: cutting the parts and assembling them. Let's look at each stage separately.
Cutting out parts
The timber purchased from a hardware store must be cut to the following parameters:
- the length of the bars for making the supporting parts of the rack (uprights) is 1.5 m;
- length of the crossbar beam – 50 cm;
- The length of the shelf boards is 75 cm.
On each beam, you'll need to measure the required length, draw a line, and cut along it using a miter saw or a regular saw. To save time, it's best to use a circular saw or jigsaw. Once cut, you should have the following elements of the future structure:
- 4 supports, 1.5 m long;
- 8 short crossbars;
- 15-20 boards for shelves.
To further strengthen the rack, you can prepare bars that will need to be screwed to the finished structure diagonally at the back wall.
Assembly
The prepared boards need to be assembled like a construction set to create the finished product. Follow these steps:
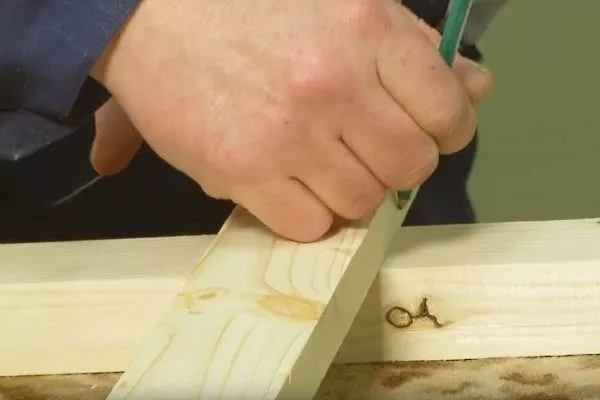
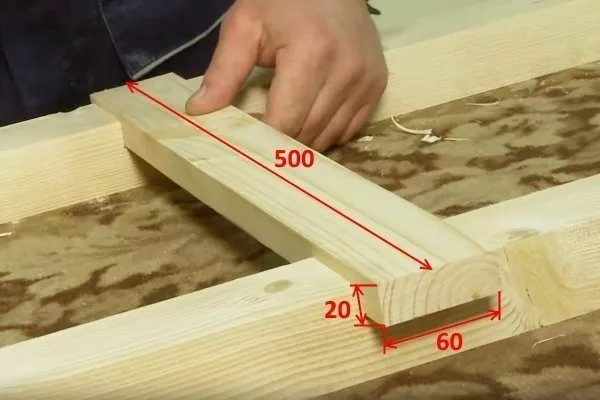
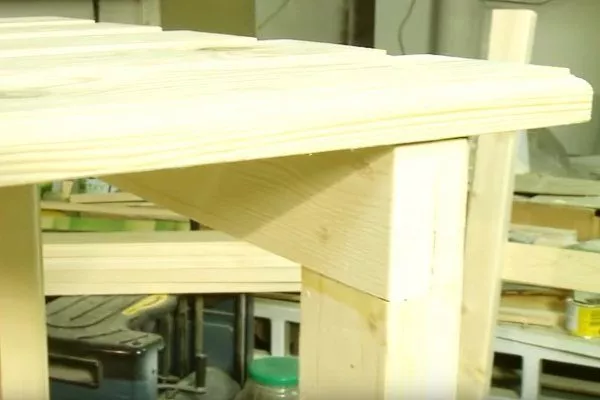
- Mark with a pencil where the groove for the crossbar will be located, placing it against the support block:
 The first crossbar should be positioned 23-24 cm from the edge of the support beam, and subsequent crossbars should be spaced 40 cm apart. Measurements should be taken from the end of the support beam that meets the floor. This will ensure that the shelves are positioned at the same height.
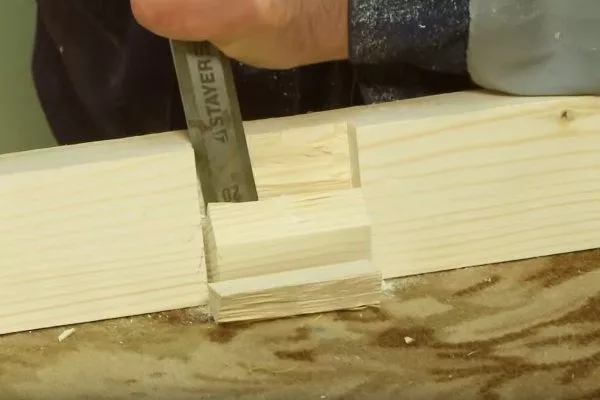
 - At the marking points, first make cuts taking into account the thickness of the crossbar, and then cut out the grooves using a hammer and chisel.
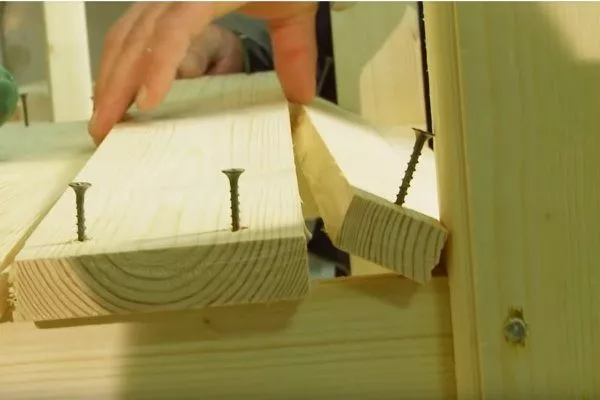
Please note that the crossbar must be recessed into the groove. - Fasten the first crossbar between the two support bars by hammering it into the groove (in the photo the dimensions are in mm).
It is recommended to pre-treat the attachment points with wood glue and additionally secure them with self-tapping screws.
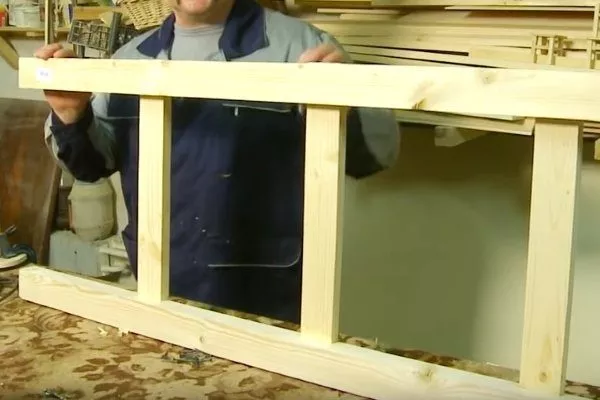
- After 40 cm, attach another crossbar, and then two more (the last crossbar will be at the very top edge). The result should look like a staircase.
- Prepare the second side of the structure in the manner described above.
- Place the boards that will form the shelves between the two support posts. Secure them to the crossbars with screws or nails.
- Cut corners in the outer boards to accommodate the support beams.
- Create the two top shelves in a similar manner.
- The top shelf can be made longer.
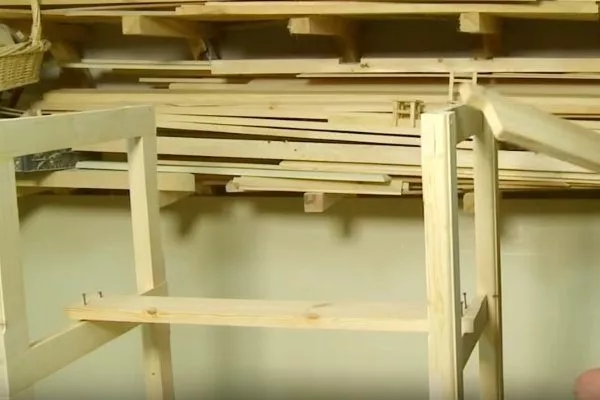
The finished structure will look like this:
If the joints weren't glued during assembly, this shelving unit can be easily disassembled by simply removing the screws. To save time on disassembly, after growing the seedlings, the shelving unit can be moved to another location and used for storing books, tools, jars of preserves, etc.
Metal construction
This shelving option is made from angle iron. Its lightweight nature is a distinct advantage.
Before you begin assembly, you will need to prepare the following materials and tools:
- metal corner measuring 40x40 mm;
- shelf boards;
- miter saw;
- self-tapping screws for assembly;
- metal drill;
- electric drill for preparing holes for fasteners;
- roulette;
- marker for marking.
The amount of material required should be calculated based on the height of the racks and the length of the shelves.
Once you have prepared everything you need, you can cut the metal and begin assembling the rack.
Metal cutting
Cut the elements of the future structure from the metal corner:
- 4 posts, 1.5 m high;
- 4 crossbars of 50 cm;
- 4 shelves, the length of which should correspond to the desired length of the rack.
The length of the rack must be determined taking into account the location where the structure is planned to be placed.
Assembly
The rack is assembled according to the following instructions:
- Drill holes in the places where the elements are supposed to be connected.
- Fasten the parts together with screws (or rivets).
- Using a saw, cut the boards into pieces of the required size to cover the space between the supports of each level and create shelves.
- Place the shelves between the guides to create a finished rack.
This video shows how to assemble a shelving unit using only metal profiles:
Shelf on the windowsill
A window rack, which can hold a large number of seedlings, can solve the problem of limited space.
To make such a rack you will need:
- wooden beam with a cross-section of 20x20 mm;
- a sheet of plywood (if you decide to make the shelves out of it);
- jigsaw;
- a screwdriver and screws or nails and a hammer;
- roulette;
- pencil.
Once you have prepared everything you need, you can begin making the rack:
- The beam mode in parts: for the support you will need 4 beams of 80 cm each, for the crossbars – 4 beams of 27 cm each.
- Apply markings to each support beam. Measure 5 cm from the top edge and 37.5 cm from the bottom.
- To assemble the side section of the structure, nail two crossbars to the two support beams at the marked locations. To ensure stability, you can attach a diagonal profile to each support beam.
- Assemble the second side part of the structure in the manner described earlier.
- Nail the shelves between the side panels. They can be made from the same lumber or cut from a sheet of plywood. The shelves can be made of glass or wood, but for security, they should be secured with adhesive spacers.
- If necessary, you can attach lighting lamps under each shelf.
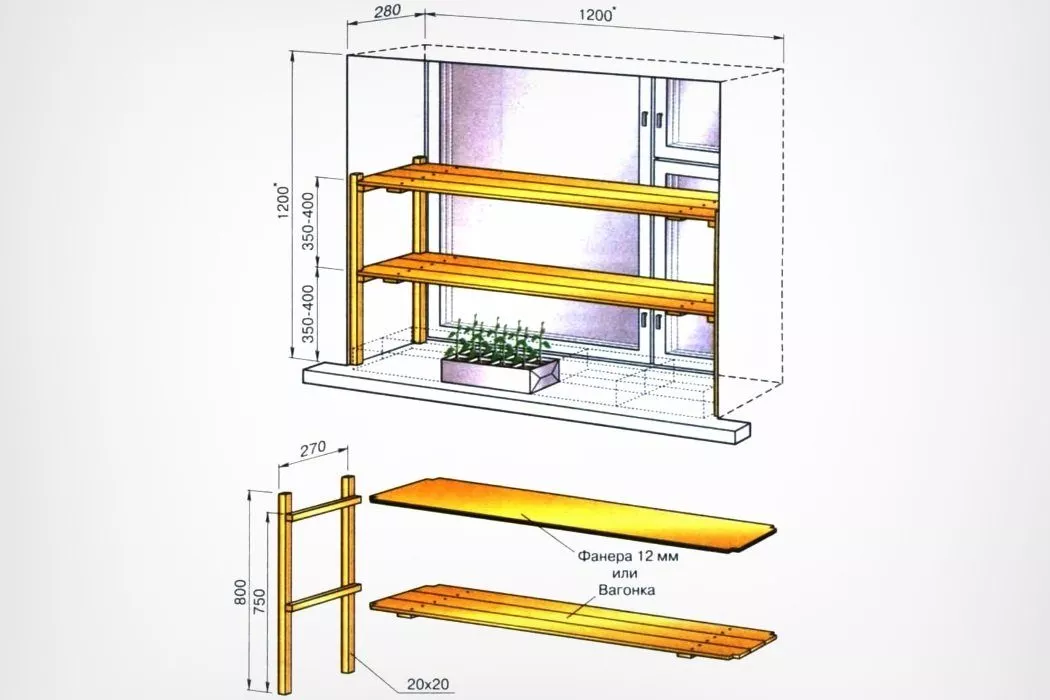
The diagram shows standard dimensions that can be adjusted to suit the width and depth of a specific window opening.
Shelving made of plastic pipes
This type of structure is assembled like a metal shelving unit. It has a low specific weight, making it easy to move around the room.
To make a rack, you will need:
- PVC pipes;
- hacksaw;
- tees (4 pcs.);
- corners (12 pcs.);
- corner crosspieces (4 pcs.);
- roulette;
- marker for marking.
- ✓ Use only high-quality tees and corners to ensure the strength of the structure.
- ✓ Consider the room temperature: plastic can deform at high temperatures.
You can assemble the rack according to these instructions:
- Cut 4 long pipes for supports (180 cm each), 6 crossbars (50 cm each), 4 crossbar pipes (150 cm each) and 4 “short” pipes 30-40 cm each.
- First, take one 50 cm long crossbar and attach two tees to it, equally spaced. Do the same with the second crossbar.
- Take four 180 cm pipes and cut each in half (i.e., 90 cm). Connect the two pieces together using a corner cross. Connect the remaining pieces in the same way. You should have four of these pieces. Place two of the pieces parallel to each other.
- First, insert one assembled crosspiece into the crosspiece, forming an "H" shape with the pipes. Do the same with the second pair of elements. This will create two separate "H"-shaped structures.
- Take two more crossbars, each 50 cm long. Using brackets, secure one to the top and the other to the bottom of the H-shaped structure. This will create a new figure eight, like the one on a digital clock. You'll need two of these pieces. These are the vertical support walls. Position them parallel to each other.
- Insert crossbars into the last available holes in the crosspieces. This way, the two side support walls will be connected and will stand firmly.
- The resulting frame is missing only a "shelf." Using brackets, secure one short pipe to each end of the crossbar pipe. This will create a bracket-shaped structure. You'll need two of these shelf pieces. Insert them into the remaining free holes in the tees, arranging the shelf pieces parallel to each other.
- Place pots with seedlings on the "shelf." A pendant light can be installed above, securely fastened to the side posts.
You can put a sheet of plywood on the bottom of the shelf if you are using pots, but it is better to simply choose tall cassettes or spacious boxes for seedlings.
DIY Pallet Shelving
If you're growing seedlings in a small apartment, the problem of arranging the plant containers can be solved by using a narrow vertical pallet structure attached to one of the walls. To make it, you'll need:
- pallet (cargo box);
- wooden beams (4 pcs., 3 m each);
- wooden slats;
- hammer;
- nails;
- pencil;
- roulette.
You can assemble the rack according to these instructions:
- Let's make a three-span shelving unit. Cut the timber into 1.5-meter lengths. This will make 8 pieces.
- Cut 18 slats to the same length as the width of the pallet.
- Take two pieces of timber and place them parallel to each other. Measure a distance from the top equal to the thickness of the pallet (about 10 cm). Nail the slats to the timber to create a ladder-like structure. The pallets will be mounted on these slats as shelves. The distance between the shelves should be about 40 cm.
- Place the pallets on the slats. For added security, you can secure them with nails or wood glue.
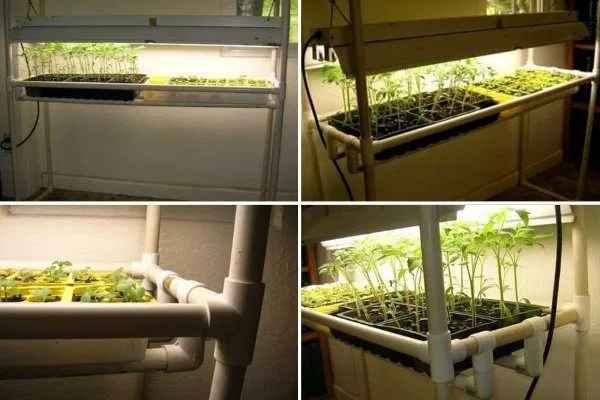
Selecting a lighting fixture and installing the backlight
If you plan to place the rack in a fairly well-lit area, then you don't need to install additional lighting. Otherwise, you'll still need to install it to ensure the seedlings receive the necessary daylight.
Lamps should provide bright light but emit minimal heat, otherwise the seedlings could be seriously burned. Therefore, any light fixtures other than incandescent bulbs can be used for illumination. Here are the best options:
- High pressure sodium lampsThese lamps emit an orange-yellow glow that promotes seedling growth. Furthermore, it's gentle on the eyes, making them suitable for use in residential settings. Their drawbacks include their high cost and the need for a dimmer during installation.
- PhytolampsAlthough the spectrum of these lamps is well suited for plants, it is harmful to human eyes. When installing them, they should be adjusted so that the light hits the seedlings from above and the sides. The distance from the lamp to the tops of the plants should be at least 10 cm.
- Fluorescent lampsThese lamps produce a cool light that lacks the red component of the spectrum. They should be installed 30-60 cm from the seedlings. Furthermore, to ensure uniform heating of the plants, the lamps should extend 5 cm from the edge of the shelves.
- LED lampsPlants illuminated by these lamps produce higher yields, making them more commonly used than other options. Furthermore, these lamps consume little electricity and combine the most beneficial spectrums for plants—blue and red.
Since LED lamps are the most popular, let's look at installing lighting using them as an example. At an electrical supply store, you need to purchase lamps whose length matches the dimensions of the shelving (or, more precisely, the length of the shelves).
It is extremely important to observe safety precautions: do not leave exposed electrical wires in free access, and turn off the electricity completely during preparatory work.
Necessary materials and tools:
- red and blue LEDs on the strip;
- Moment glue (transparent);
- plastic base or plinth with cable channel;
- screwdriver and screws;
- switch;
- plug and electric cord;
- insulating tape;
- reflectors.
The installation instructions for the backlight are as follows:
- Attach the LED chain to a plastic base.
- Connect the strip to the switch, and then extend the wire and plug from there to the outlet. If you plan to run the wiring through metal brackets, you'll need to drill holes in them. Of course, you can take a simpler approach by carefully distributing the wire along each metal element.
- Secure the base with tape to the bottom of the shelf. You can use Moment clear glue for this.
- Attach mirrors or sheets of foil to the sides of the rack to reflect light.
If the shelves are made of plexiglass, then light will fall freely through them onto the seedlings, which is an additional advantage of this design.
The following video clearly demonstrates how LED strip lighting is installed into a finished plant rack:
To grow healthy and strong seedlings, it's essential to provide them with sufficient warmth and light. A favorable microclimate can be created using seedling racks, which can also help alleviate space constraints. You can build such structures yourself using the ideas, diagrams, and instructions provided above.