Cherry grafting is the process of attaching a cherry cutting to a base tree, a method for growing high-quality planting material, strengthening varietal characteristics, and disease resistance.
Gardeners graft cherries for:
- updates cherry varieties without uprooting or cutting down the tree;
- growing cherries in harsher climates;
- obtaining a harvest of several varieties from one tree;
- acceleration of the first harvest - on a scion in 1-2 years, a seedling from a nursery will bear fruit in 4-5 years;
- propagation of varietal trees;
- increasing immunity and shelf life of berries.
What tree can a cherry tree be grafted onto?
The operation is permitted for stone fruit trees with wood structure similar to that of cherries. Rootstocks (the trees onto which the scion is grafted) are selected from strong, healthy plants under 10-12 years old, low-growing (easier to shape the crown).
It is permissible to graft cherry onto the following crops:
- Cherries. Grafting onto the same tree allows you to update a variety and improve its flavor. You can obtain berries of a new variety in 1-2 years without growing an additional tree in the garden.
- Cherry. It is a closely related crop. The structure of cherry wood is similar to that of sweet cherry. Grafting allows berries to be grown in harsher climates—the scion's survival rate is nearly 90%.
- Cherry plum. The graft takes root well, the cherry plum branches are stronger than cherry branches, and they break less often under the weight of the harvest.
- Plum. The grafting takes place more slowly, but if it is carried out successfully, the trees exchange minerals with each other, and the taste and shelf life of the berries improves.
If you graft bird cherry trees, if they take root, you can get fruits with an unusual taste.
Optimal conditions for cherry grafting
When performing the procedure, it's important to choose the right timing. Be sure to check the condition of the cuttings and rootstock, as well as the moisture level.
Vaccination timing
Cherry grafting can be done:
- In the spring. In March-April, when the sap begins to flow in the tree bark, this is the best time for grafting; the cuttings take root well and grow vigorously throughout the summer. Look for the time when buds begin to swell on the branches, but leaves and flowers have not yet emerged.
- In summer. In July, when the berry harvest has already been gathered, the weather should be cool, high humidity, and the sky overcast.
- In autumn. Cherry grafting is done in September if it's not possible to do so in spring or summer. Autumn grafting is suitable for southern regions, where the scion has time to gain strength during the warmer months.
You can learn about when to graft a cherry tree in the following video:
Active sap flow in the rootstock
In spring, the period when sap begins to flow in the base tree is chosen. Under the influence of increased daylight hours and rising average daily temperatures, the cambium (a thin layer of wood located directly beneath the bark) is activated. It produces growth cells.
- ✓ Check that the soil temperature at a depth of 10 cm has reached +8°C to activate root activity.
- ✓ Make sure that the tree has not been subjected to stress (drought, overwatering) in the last 2 weeks before grafting.
During the grafting process, layers of basal tissue intergrow, initiating the growth of layers in width. The activity of the cambium determines the success of the grafting process.
Positive temperatures and no frost
Cherries thrive in a mild, warm climate. Therefore, graft when nighttime temperatures reach at least +3°C and average daily temperatures reach approximately +10°C.
In summer and fall, choose cloudy weather. Cherry grafts will dry out in hot weather.
The procedure cannot be carried out at temperatures below 0 °C, as the scion will freeze.
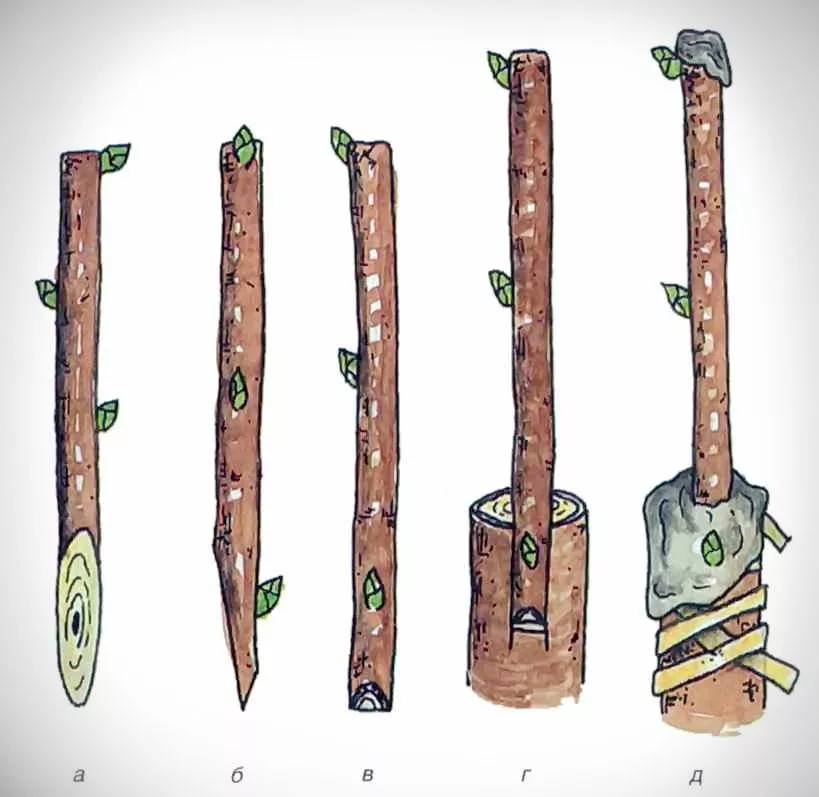
Preparing cuttings
If grafting is planned for spring, prepare branch cuttings in advance - in the fall, when the leaves have fallen.
When preparing cuttings, follow these tips:
- Select branches no more than one year old. Prune off any upper growth that has occurred during the current season.
- The grafting material should have at least five buds. Choose a cutting with at least one shoot bud about 7 cm long at the top.
- Store the resulting cuttings until spring in a cool, dry place at temperatures between 2°C and 5°C. They can be placed in the refrigerator in a bag wrapped in a damp cloth, or in a sand cellar.
- In summer and fall, prepare fresh cuttings for grafting. Cut the cuttings 10 minutes before grafting.
Methods of grafting cherries
There are several ways to graft cherry trees. Choose the method that suits your needs and the conditions of your garden.
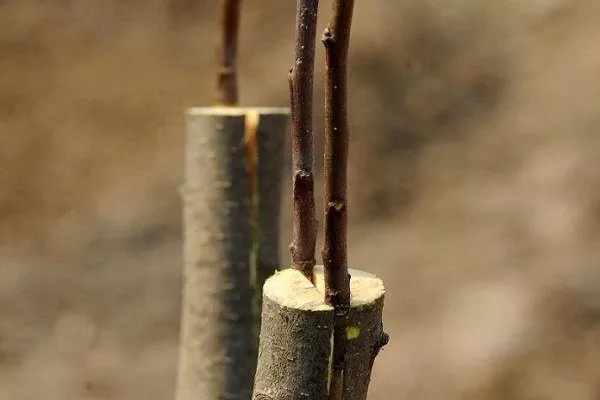
For the bark
Start in the spring, before the buds open. This method allows you to place several cuttings on a single rootstock cut.
The procedure for performing vaccination:
- Prepare the base tree:
- when grafting under the bark of the main tree trunk, make a cut at a distance of 70-80 cm from the ground;
- When performing an operation on the main skeletal branch, make a cut in a horizontal direction at a distance of 20-25 cm from the place where it is separated from the trunk.
- Make a vertical cut into the bark about 4 cm long. Carefully pull it back, keeping it whole and undamaged.
- Cut the lower part of the cutting with 3-4 buds at an angle of 45 degrees and a length of 4 cm.
- Place the trimmed scion under the bark, connecting the cut to the trunk. Leave 2-3 mm above the cut of the main tree.
- Secure the connection with electrical tape, duct tape, or twine. Place the material with the sticky side facing out.
- Cover all exposed cuts and sections with garden pitch.
If the grafting is successful, the scion takes root within two weeks. A scar of plant tissue (callus) grows at the graft site. Buds begin to sprout and begin to bloom.
Cherry grafting by copulation
The most common method. It's used in spring, around March, if there's no frost. This method results in a quickly healing cut, and fruiting begins earlier.
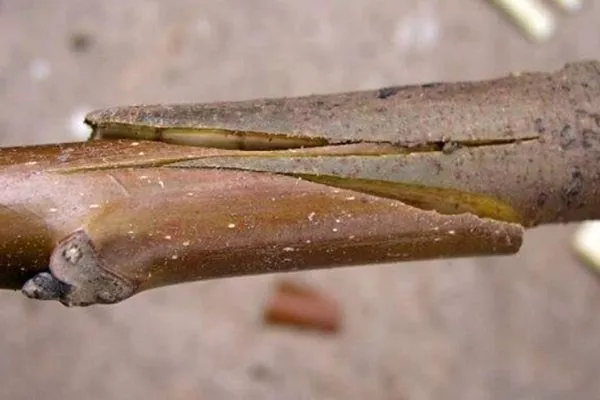
To carry out the procedure, take a rootstock and scion of the same thickness so that they are precisely connected to each other.
Follow these steps:
- Make cuts at a 30 degree angle on the rootstock branch and the cutting.
- Make additional teeth in the middle to better align the branches.
- Firmly join the rootstock and scion. If the scion is slightly thinner than the main tree branch, precisely align one side to maximize the surface area of the joint.
- Secure the branches using tines that match the cuts.
- Tie the grafting site with tape, twine or electrical tape (sticky side out).
- Cover the scion with a small plastic bag on top, secure it, and leave it for 14 days.
- After two weeks, remove the bag.
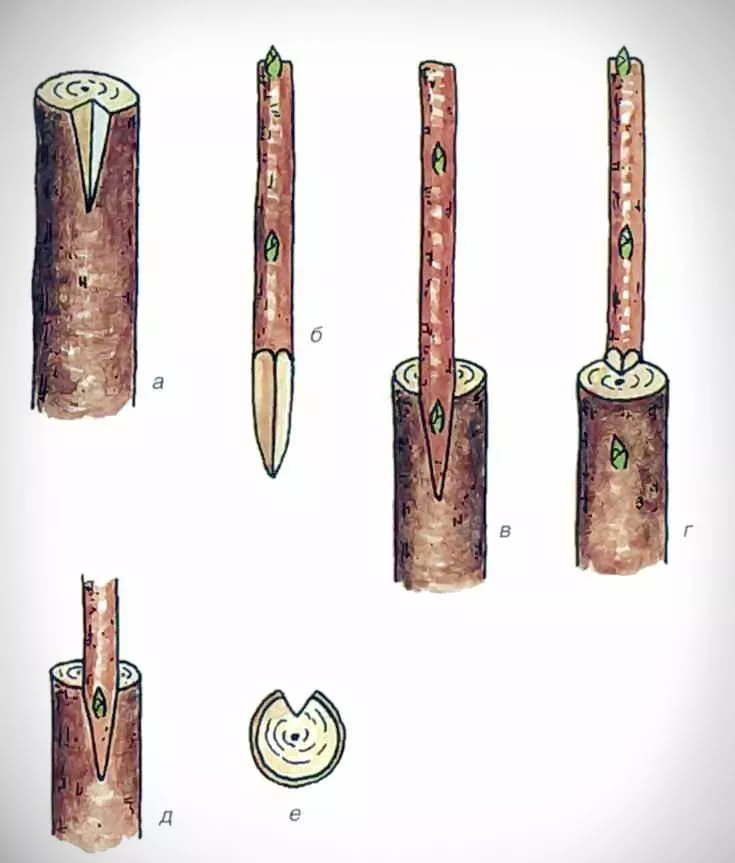
Into the cleft
The procedure is performed in the spring. It is used if the rootstock and its bark are damaged, or if the tree needs to be re-grafted or cultivated.
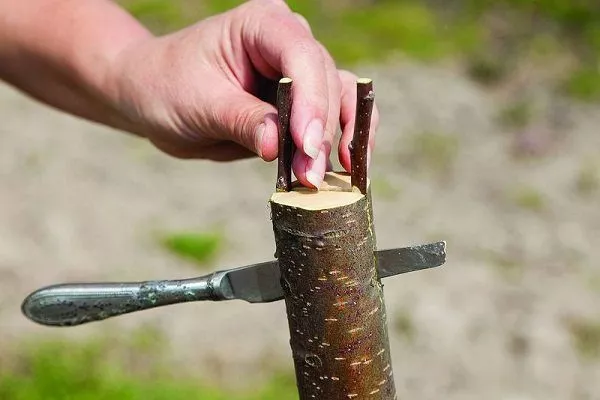
Up to four scions are placed on one cleft site.
Perform the vaccination in the following order:
- Cut off one of the main branches of the rootstock at a level of 30 cm from the main trunk.
- At the cut site, carefully make a 5 cm deep split.
- On the scion cuttings with five buds, make a wedge-shaped cut 5 cm long.
- Carefully insert the cuttings into the cleft, matching the cambium layers.
- Tightly connect the branches.
- Secure the grafting site with rope or other fixing material.
- Cover the outer visible parts of the cuts with garden pitch.
- Place a plastic bag on top of the cutting.
- After 3-4 weeks, check to see if the graft has taken root. If successful, the buds should swell and open.
Into the corner cutout
It is performed in the spring and allows for an increase in the surface area where the layers of the scion and the main tree are combined.
The procedure is carried out as follows:
- Make a straight horizontal cut on the skeletal rootstock branch.
- Make a wedge-shaped angled cut on the side of the cut. It should extend 6 mm into the cut at the top and 2 mm at the bottom, for a height of about 5 cm.
- In the same way, trim the selected branch so that it matches the cutout.
- Combine the rootstock and scion.
- Secure with electrical tape or jute twine.
- Cover tightly with a bag or film. You can leave a small slit for ventilation.
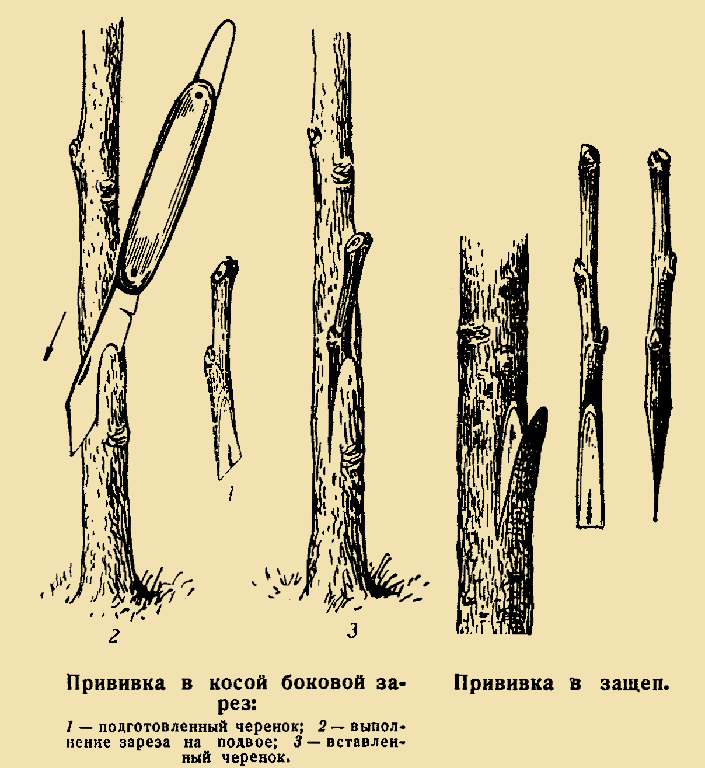
In the side cut
The procedure is similar to copulation. The graft will grow on the side of the plant. The procedure is as follows:
- Make a 15 degree angle cut on the side of the rootstock branch, cutting both the bark and the trunk.
- Make a side cut on the cutting at an angle of 30 degrees.
- Insert the cutting into the cleft, aligning the green layers of cambium.
- Fix the scion to the trunk.
- Coat all exposed areas with garden pitch.
- Isolate the grafting site from moisture and dust with a bag or cling film.
- Check the cutting's rooting in the 4th or 5th week. If the grafting was successful, the buds will swell.
By bridge
This grafting method is used when it becomes necessary to restore sap flow after a ring-shaped injury to the trunk (gnawed by hares, goats, etc.). Without it, the tree will not receive nourishment and will die.
Vaccination is carried out in spring according to the following scheme:
- Trim away damaged tree bark down to living tissue and clean off any dirt and debris.
- On the trunk, above and below the prepared area, make cuts in a circle, as when grafting under the bark.
- Prepare cuttings 4-5 cm longer than the distances between the upper and lower cuts.
- Remove all buds.
- Make cuts at the ends of the scions at an angle of 15 degrees in one plane.
- Place the lower parts of the rods into the cuts in the bark and secure them with electrical tape or twine.
- Insert the upper ends of the cuttings into the cuts above the damaged area, bending them in an arc.
- Secure with jute, electrical tape or scotch tape (sticky side out).
- Tie the grafted area with insulating material and coat with garden pitch. Cover with damp moss and wrap with burlap.
You can use a bridge to graft using your own shoots, suckers, or part of the bark.
Further care of cherries
The grafted tree has undergone a complex operation and needs care and rehabilitation.
During the recovery period, do the following:
- Water the tree once a week.
- Apply at the root top dressing before flowering and during fruit setting.
- If new shoots appear on the rootstock, remove them so that they do not take sap from the tree and do not inhibit the development of the scion.
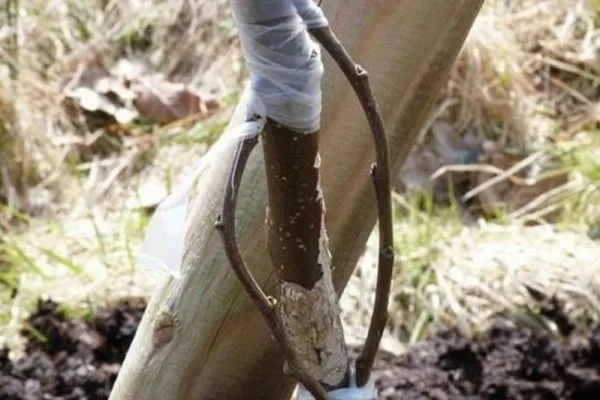
- Inspect the graft every 7-10 days. Until the cutting takes root, check the tightness of the grafting site's covering with plastic film and garden pitch.
- When the buds begin to open on the scion, remove the protective covering, twine, and electrical tape so that they do not interfere with the plant's development.
- Attach splints made of branches or wooden poles to the graft site to prevent birds or wind from breaking the fragile joint. Secure them to both the scion and rootstock to stabilize the shoot. Remove the splints after the leaves have fallen.
- At the end of August, pinch off the top of the new shoots that grew on the graft over the summer.
- In the spring of the following year, prune the shoots on the scion to form a beautiful crown.
- Shorten the horizontal shoots on the graft to a level of 50 cm from the base.
- In the third year, remove any fatty branches growing at an acute angle to the main body of the tree or along the trunk. Trim back one-year-old shoots to 50 cm.
You can learn about different cherry tree grafting methods in the following video:
Each of the cherry grafting methods described above allows for the propagation of trees, their health, and the expansion of the variety. Choosing the right grafting method and following all recommendations will ensure bountiful harvests.