Grafting a pear is a simple and enjoyable process, but it requires attention and adherence to certain rules. Before beginning, familiarize yourself with the timing and methods of grafting to choose the most suitable option. Research the appropriate rootstock, as this will directly impact the outcome.
Pear grafting in horticulture: rules and requirements
Grafting allows gardeners to solve many problems and difficulties. This procedure is suitable not only for experienced gardeners but also for beginners. To ensure a plant with good survival rates, prepare the grafting material correctly and follow these recommendations:
- Perform all work with sharp gardening tools.
- Before this, treat the equipment in a 1% solution of hydrogen peroxide, alcohol or copper sulfate.
- Make the cuts just before grafting.
- The time from preparing the scion to connecting it to the rootstock should be less than 1 minute.
- Be sure to use a garden sealant with natural ingredients to seal the graft. You can use pine resin, beeswax, or lanolin.
- During the first year, protect the graft from direct sunlight to ensure better survival.
Timing of pear grafting
Pear grafting is possible at any time of year, as long as you follow all the rules. The scion should be slightly behind the rootstock in development.
| Name | Vaccination timing | Temperature conditions | Features of survival |
|---|---|---|---|
| In the spring | May-August | +15 degrees during the day, not below 0 at night | Active sap flow |
| In summer | July-August | Consistently warm | The need for shelter from the sun |
| In the fall | September-October | Before the frost | Risk of death from early frosts |
| In winter | For spring planting | Controlled temperature and humidity | Preparation is required from autumn |
In the spring
You can carry out the procedure during a period of consistently warm weather—daytime temperatures reach 15 degrees Celsius and nighttime temperatures don't drop below 0 degrees Celsius. The cuttings will thrive in conditions of active sap flow.
Follow the advice of experienced gardeners: make a small cut in the bark of the trunk and carefully peel back the edge. If you notice a slight lagging, you can begin the grafting process. This method is used to determine the timing of grafting in the spring.
In summer
Grafts made in the spring may fail. If this happens, you have the option of re-grafting the pear tree during the summer sap flow. You can determine the timing of the procedure by examining the bark, as with spring grafting.
Prepare cuttings in July and August – cut young, healthy shoots on the day you plan to do the cutting. To ensure the cutting takes root, cover the plant to prevent direct sunlight from hitting it, which can cause it to die.
In the fall
If you plan to graft in the fall, make sure there won't be any frost in the next month. Finish grafting before frost sets in. If you miscalculate the timing, the cuttings won't have time to take root and will die.
The best way to carry out the procedure is:
- in the Moscow region from early to mid-September;
- in Siberia, the North-West regions and the Urals from the middle to the end of the first month of autumn;
- In the southern regions, the graft takes root better if the procedure is carried out from mid to late October.
In winter
Winter grafting of seedlings is done for spring planting. Begin the preparation process in the fall: prepare the rootstock and scion. Only use this method if you have a room where you can control the temperature and humidity.
- Prepare the rootstock and scion in the fall, before the onset of frost.
- Store prepared materials under controlled temperature and humidity conditions.
- Before grafting, check the viability of the rootstock and scion.
Rootstock for pear
The characteristics of the future fruit crop depend on the rootstock chosen. When choosing, consider compatibility with growing seasons and other characteristics.
- ✓ Compatibility with the scion in terms of vegetation cycles.
- ✓ Resistance to local climatic conditions.
- ✓ Absence of diseases and pests on the rootstock.
The most suitable options for pear grafting:
- Wilding. A simple and popular option. The wild pear produces relatively small fruits, but it adapts easily to local conditions. The tree will grow up to 6 m in height.
- Rowan. This method also has its drawbacks. Pear and rowan are different crops, so there's a risk of tart, dry, and less sweet fruit after this procedure. This method is ideal for regions with high humidity and marshy soils.
- Cherry plum. This variety is often chosen as a pear graft, as it produces a large, robust plant that requires little attention. A positive quality is its early fruiting.
- Quince. The most popular rootstock for pears, as it allows for space-saving gardening due to its low growth. Grafting a pear with a quince tree ensures delicious fruit.
- Apple. Gardeners often graft pears onto apples. Sometimes there's a risk of incomplete union due to pears being heat-loving. For this reason, choose easy-to-grow apple varieties, such as Antonovka. Melba.
- Hawthorn. Not the best solution, as this is a thorny plant, making harvesting very difficult. However, with successful grafting, you'll get exceptionally tasty fruit.
- Irga. Grafting a pear and a serviceberry will produce a compact plant and delicious fruit. However, serviceberry has flexible and thin shoots, so you'll need to constantly support it, which can weaken the plant.
Select the most suitable scion to begin the grafting process and obtain a tree with excellent characteristics in the future.
Methods of grafting pears
Numerous methods have been devised for grafting pear trees. You can choose one or use the simplest and most suitable one. Over time, you'll gain experience and won't have any difficulty achieving good results.
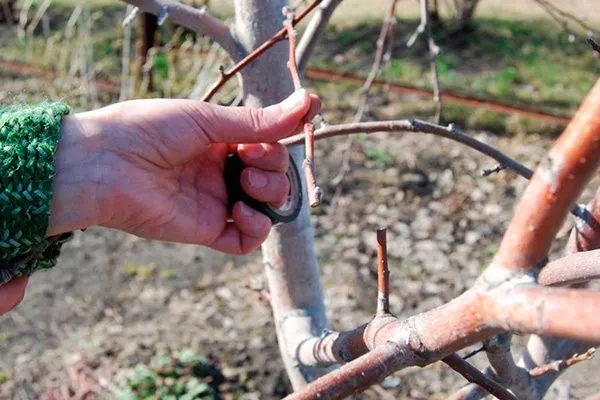
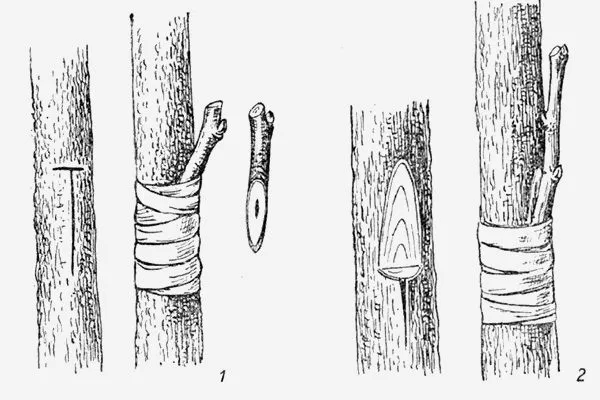
With a peephole
Graft when the sap begins to actively flow, around May or August. Follow the procedure in stages:
- Take a one-year-old, well-developed shoot with about 12 buds from a quality pear tree. If you're grafting in the summer, remove the bud from the branch just before grafting.
- Before the procedure, place the cut branches in a container with water.
- For grafting, select 8 buds on the cut shoot.
- Remove the crown and 5 lower buds.
- On the stem of the cutting, mark a part of about 12 cm so that it is larger than the root collar, and clear it of any dirt.
- At the chosen location, make a T-shaped section at the northern edge.
- Make a longitudinal cut of about 3 cm in size on the cutting.
- Pull back the bark, insert the cut tightly, and cut off the top part.
- Wrap it with electrical tape.
After just 12 days, you'll be able to determine whether the graft has taken. To do this, carefully pull back the tape and inspect the graft site. A swollen, greenish bud indicates a positive result. If the bud doesn't take, remove the tape and repeat the process from the other end.
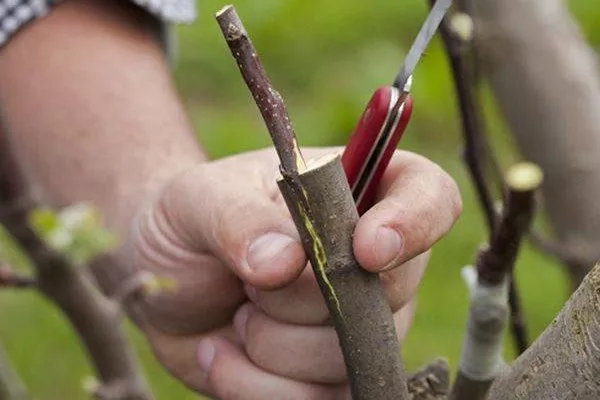
With a cutting
Perform this procedure from early spring to June. This method is considered the most convenient and popular.
Follow the instructions:
- For the rootstock, select the most developed branch and make a longitudinal cut at a 45-degree angle. Use only a sharp knife.
- From the scion, cut a one-year-old shoot, which should have 4 buds.
- Make an oblique cut (at a 45-degree angle) on the prepared petiole, approximately 1-1.5 cm long, starting from the lower bud. Make a straight cut (at a 90-degree angle) above the upper bud of the scion.
- Connect the scion and rootstock so that there is no shifting. Secure with electrical tape.
- Cover the upper straight cut on the scion garden pitch.
The described grafting principle is indicated by the letter "a" (see diagram below). There are also other variants of grafting using cuttings (points "b," "c," "d," "e," and "e").
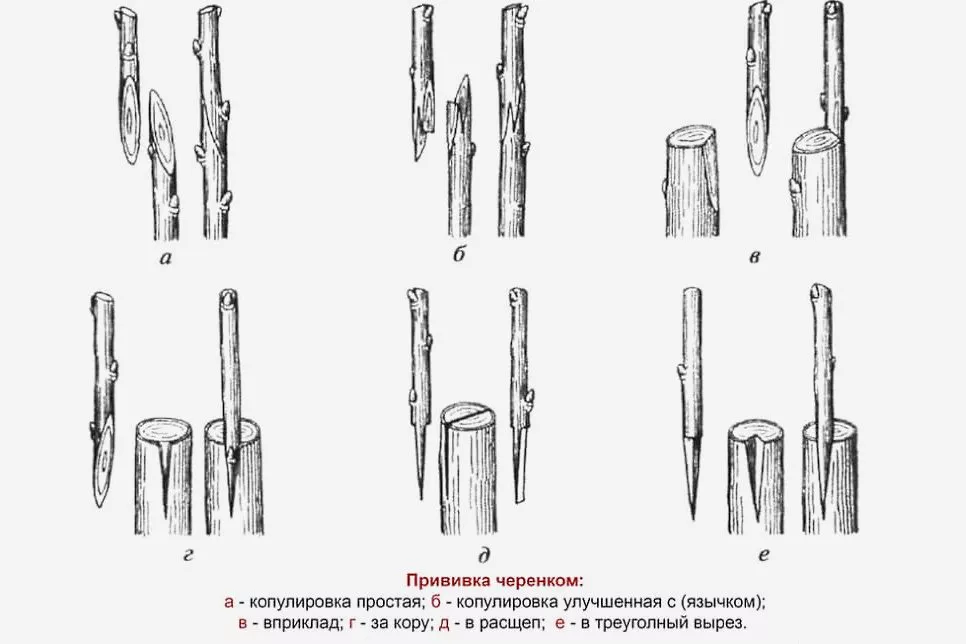
See also a video on grafting a pear tree with a cutting:
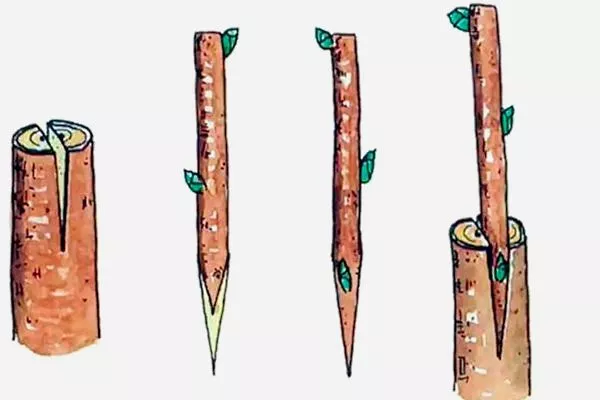
Into the cleft
Carry out the procedure in early spring, when sap flow is active and buds are swelling. Choose early or mid-April for grafting.
Step-by-step instructions:
- Trim the rootstock trunk to 15 cm. If you've chosen a large branch, shorten it to a length that won't cause you any discomfort during the process.
- The rootstock diameter should be approximately 15 cm. Divide the branches down the center using a sharp knife. The hole should be the size of four seedlings.
- Use scions with five strong buds as grafts. Sharpen the lower part to the depth of the cleft, allowing the stake to be placed.
- Use a knife to deepen the hole, then carefully insert the cutting into the rootstock.
- Coat the grafting site with garden pitch and carefully wrap it with electrical tape.
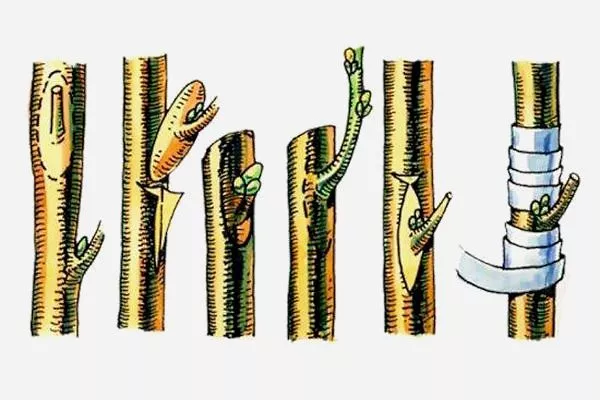
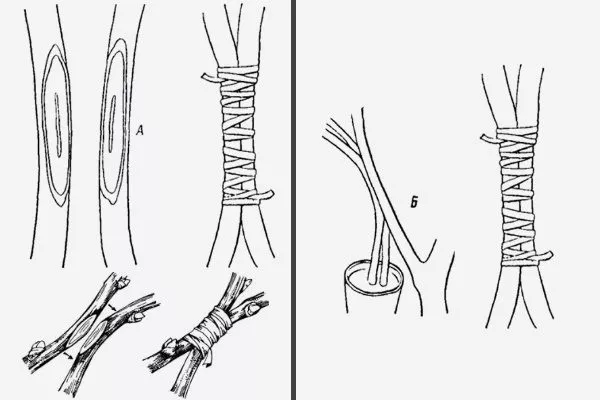
For wild game by the bark
This is the most popular method if you plan to graft a pear tree onto a wilding stock. The procedure doesn't require much effort, but be very careful to avoid mistakes.
Step-by-step grafting onto a wild stock:
- First, shorten the rootstock to 1 m, then remove all the lower branches and clean the bark in the upper part.
- In the cleared area, make several cuts in the direction from the cut to the bud. The cuts should be 5 cm long.
- Carefully form "pockets" from the scion by separating the bark from the wood. Use cuttings 10-15 cm long with strong buds.
- Make a sharp angle cut at the bottom of the cutting.
- Carefully push back the bark in the cuttings, insert the cuttings into them, then cover the grafting site with garden pitch and wrap it with electrical tape.
There is also another vaccination option (see diagram below).
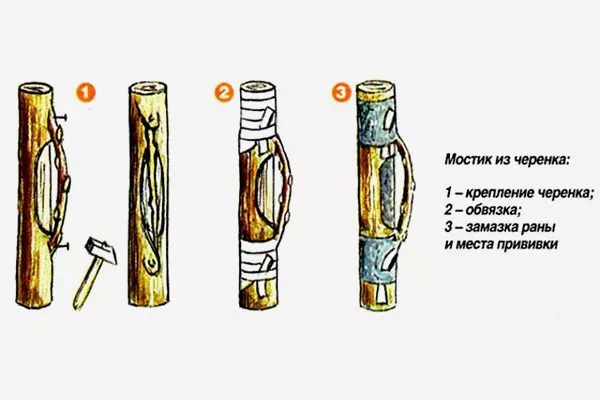
By bridge
This method is very good if you need to restore a pear orchard in which the trees have been damaged by cold, strong winds, or attacked by rodents.
The vaccination technique is very simple:
- Make longitudinal incisions about 3 cm long above or below the wound.
- Insert the prepared cuttings. They should be the same size as the wound.
- Secure with electrical tape.
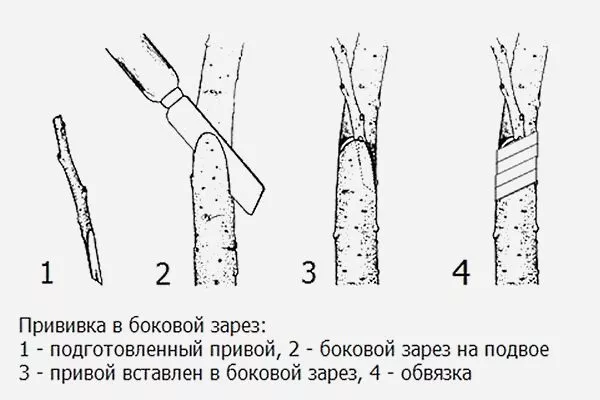
In the side slit
Side grafting is the fastest method used by many gardeners. Its main advantage is a high survival rate.
Follow these steps:
- Make a cut on the rootstock at an angle of 60-70 degrees.
- Sharpen the lower end of the cutting so that it attaches well to the section in the rootstock.
- Insert the scion cutting into the depression on the rootstock.
- Coat the graft with garden pitch, then wrap it with electrical tape.
Ablation of pear
If you plan to graft a pear tree onto a rootstock of a suitable variety, ablactation will be the most suitable method.
Step-by-step instructions:
- Make several indentations on strong, growing branches of the rootstock and scion. One cut should be at the bottom, the other at the top.
- Press the scion and rootstock together tightly so that the indentations touch each other.
- Make a wrap using electrical tape.
Caring for the vaccination
To ensure successful grafting and a well-formed, vigorous plant, proper care is essential. Follow these recommendations:
- Water the cutting as the soil dries out, in the morning or evening. The air temperature should be at least 20 degrees Celsius. Each plant requires approximately 10 liters of water.
- During the first year, before you remove the above-ground part above the grafting site, do not apply any fertilizer. Only in the spring after cutting should you apply top dressing (ammonium nitrate).
- During the warm season, loosen the soil around the plant and add peat and humus.
- Once the scion has taken hold, loosen the bandage to prevent oxygen from entering. Remove the bandage at the end of the year if the grafting was done in early spring. If you grafted in the summer, remove the tape the following spring.
With proper grafting, you can get a strong plant. Most importantly, follow the recommendations of experienced specialists who have been practicing plant propagation and garden restoration for many years. Determine the best method for you.
We've always used the "bud" method for grafting, but I've also found two ideas appealing: "in the bud" and "by cutting." I'm writing this comment after trying both methods. The result:
1. "in growth" - it's easy to graft this way, but it didn't take off right away - on the second try, I think it's my fault - I didn't treat it with garden pitch.
2. "by cutting" - it turned out to be a very simple method, the adaptation was successful, the survival rate was excellent.
In short, thank you so much for the advice. I used it and loved it. Kudos!