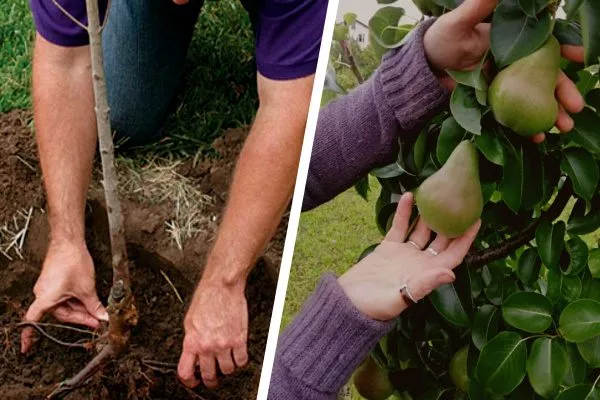
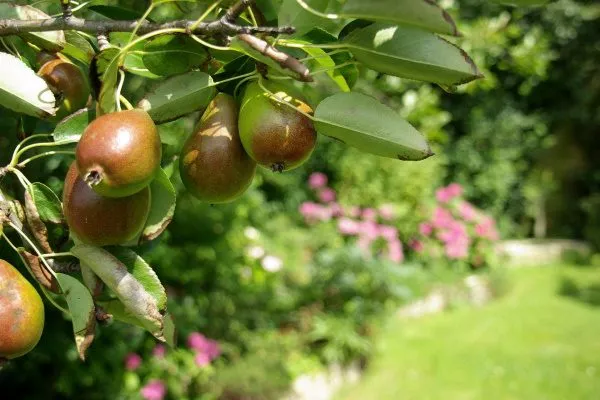
The pear tree is considered a highly productive and popular crop, grown both in large agricultural enterprises and in private gardens. To achieve good fruiting, proper agricultural practices are essential. Therefore, it's important to know how to plant a pear tree correctly to maximize the harvest of large, juicy fruits.
When is the best time to plant?
Determining the planting date for a fruit tree is a crucial step. Planting too early or too late can result in the loss of a large portion of the harvest, and in some cases, the entire tree itself. The timing varies depending on the time of year.
- ✓ Soil pH should be between 5.5-6.5 for optimal nutrient absorption.
- ✓ The seedling planting depth should be such that the root collar is 5-6 cm above ground level.
| Name | Ripening period | Disease resistance | Fruit size |
|---|---|---|---|
| Chizhovskaya | Summer | High | Average |
| Rognedo | Autumn | Average | Large |
| Allegro | Summer | High | Average |
| Fairytale | Autumn | High | Large |
| Muscovite | Summer | Average | Average |
In the spring
This is the optimal time for planting pear trees, especially in cool climates, as it's important for the tree to establish strong roots in favorable conditions. The only requirement for this is that the seedling must still be dormant. This is due to the tree's poor survival rate when it begins to grow.
Why gardeners choose spring planting:
- since the planting hole needs to be prepared in the autumn, by the time of spring work the soil mixture is considered fully formed and fertile;
- Due to the soil being filled with melt water, nutrients acquire a soluble form, which ideally saturates young plants with all the necessary elements;
- During the summer period, trees have time to gain strength and energy for winter.
Gardeners also note negative aspects:
- relatively small selection of cuttings;
- the tree will require more water and nutrients, as it needs to simultaneously take root and enter the growing cycle;
- The seedling may die in the event of recurrent frosts, which often happens in the main regions of Russia.
In spring, a gardener has much more work than in autumn – he needs to work not only on the garden, but also on the vegetable garden.
In the fall
Despite the advantages of spring pear planting, most gardeners still prefer autumn planting. The main reason is that the trees grow more winter-hardy. To ensure the seedling has time to take root, it's important to know the weather forecast so that work can be carried out at least three weeks before the first frost in the south and four to five weeks in the north.
Advantages of autumn planting:
- the cuttings will only spend energy on rooting;
- after awakening in spring, growth begins immediately;
- the soil is maximally warmed up in autumn, so rooting occurs faster;
- a large assortment of cuttings;
- the cost of planting material is lower than in spring;
- The gardener can only work with pears, since garden crops are planted in the spring.
The only drawback noted is the risk of the seedling freezing and subsequently dying. Therefore, the most important task is to accurately determine the date of the work.
In summer
Pear trees can be planted in summer, but only with a closed root system and not before mid-August. The main advantage is that you don't need to calculate the date or worry about frost. Gardeners report no drawbacks.
Criteria for selecting a seedling
Poor-quality planting material doesn't guarantee survival, so if you plant a damaged cutting, you risk losing it entirely. Choose your seedlings carefully, especially store-bought ones:
- the optimal age of a pear is 1-2 years, when the degree of adaptation and survival is at the highest level;
- bark - there should be no scratches, peeling, or abrasions on it;
- the root system is developed and flexible (the shoots bend easily without breaking);
- grafting - should be visible and have a slight bend;
- all elements of the bush are free from signs of mold and other diseases, traces of pests, breaks, or dryness;
- Parameters of a one-year-old seedling: height from 10 to 12 cm, number of shoots on the side from 1 to 2 pcs.;
- at two years old - length is about 20 cm, presence of branches from 2 to 3 pieces.
How to preserve a pear seedling until spring?
Sometimes a seedling is purchased in the fall, but for some reason it can't be planted right away. In this situation, there's only one solution: storing the cutting until favorable conditions arrive. There are three options: burying it, covering it with snow, and storing it in a basement.
Digging in planting material
The cutting should be planted in the area where the pear tree will grow permanently. Here's how to do it correctly:
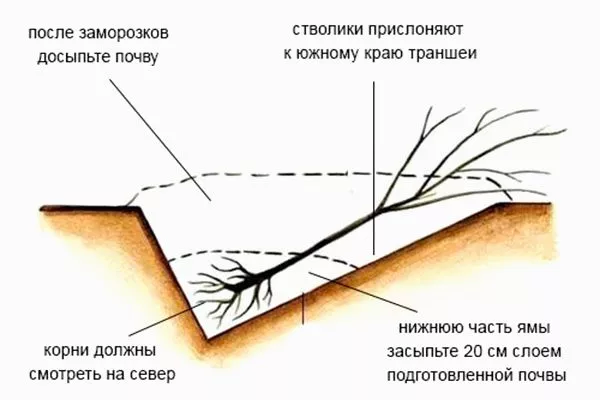
- Dig a hole the length and width of the roots. There are some nuances: the north wall should be vertical, and the south wall should be at a 35-45 degree angle.
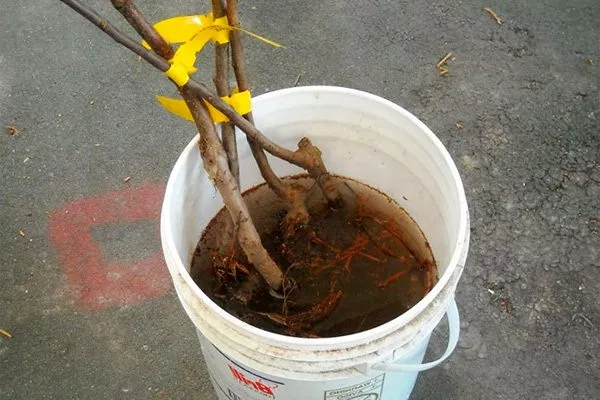
- Soak the planting material roots in water for 5 hours. Do not add any growth stimulants under any circumstances, as the seedling needs to be preserved, not rooted and grown.
- Remove the plant from the liquid and carefully inspect the root system. If any parts are unsuitable for planting, trim them off with pruning shears. Be sure to disinfect any gardening tools to prevent infection.
- Tear off the leaves from the shoots and remove dried branches.
- To prevent rotting, soak the plant in a Fundazol solution for 30 minutes. Add 10 g of the solution to 10 liters of water.
- Place the cutting on the south side of the hole so that the branches are above ground level and the roots are facing the north side.

- Cover with 20 cm of soil. Lightly compact the soil so that there are no empty spaces among the roots.
- Water (about 5-8 liters per bush).
- Wait until the liquid is completely absorbed, then add a 5 cm layer of soil on top. Remember, the soil must be perfectly dry.
- Leave it like this until the first frost. When this happens, fill the hole completely, creating a mound around the seedling. This will allow meltwater to drain away and prevent waterlogging.
- Insert branches from other crops between the shoots. For example, after pruning roses, raspberries, or gooseberries, insert thorny branches to prevent rodents from eating the pear saplings.
When snow falls, cover the hole with it. Do not use any other covering material.
Snowing seedlings
If you didn't have time to plant your seedlings due to unexpected heavy snowfall, try snow-covering them. Follow these guidelines:
- Take the required amount of moss, sawdust or river sand to create a moist substrate.
- Fill with hot water and let stand until the material swells. Drain off excess liquid.
- When the substrate has cooled, sprinkle it over the root system of the seedlings, right up to the neck.
- Wrap in plastic wrap.
- In the garden, lightly dig up the snow and place the seedlings on a 5-6 cm layer of snow.
- Cover the top with a generous layer of snow, about 20 cm thick.
- Cover with dry sawdust in a layer up to 10 cm.
Storing seedlings in the basement
If you missed the deadline for planting and there's no snow outside, don't despair, as pear seedlings can be stored in a basement. Here are the conditions:
- the optimal temperature range is from 0 to +3 degrees, but not higher;
- ventilation is essential to prevent the tree from becoming susceptible to fungal infections;
- humidity level – 70-80%.
- ✓ Storage temperature should be between 0 and +3 degrees.
- ✓ Air humidity should be 70-80% to prevent the roots from drying out.
How to store – step by step:
- Soak the roots of the pear cuttings in water at room temperature for about a day.
- Treat with Fundazol or another fungicide according to the instructions for use.
- Moisten the sawdust and sprinkle it over the root system.
- Place the seedling in a large plastic bag and tie it shut.
- Place it in the basement and place bait for small rodents (poison, traps, etc.) nearby, otherwise mice and rats will gnaw on the plant during the winter.
Check the seedlings every 2-3 weeks. If the roots are dry, spray them with water.
Preparing the seedling
Preparatory measures when planting a pear tree play a significant role. They determine the survival rate and the immune system's ability to resist diseases and the future development of the tree.
What you need to do:
- Root pruning. Their length should correspond to their age (for one-year-old plants, a maximum of 12 cm, for two-year-olds, 20 cm). If the roots are longer, shorten them.
- Formation of the aboveground partThis shouldn't be done in the fall, to prevent the bush from expending energy, and with it nutrients, on restoration (healing). In the spring, this procedure is essential, as pruning the upper part of the plant stimulates root growth.
- Soaking in water. This is used to speed up the adaptation process. Keep the roots in warm water for 22-24 hours.
- Exposure to growth stimulants. This isn't mandatory, but it's recommended. This not only accelerates root development but also promotes faster root establishment. You can use various products, such as Kornevin, but follow the instructions.
- Inspection. Before planting, carefully inspect the trees, remove damaged parts, and tear off the lower leaves.
Selecting a site
The site where a pear orchard will be planted must meet the requirements of the specific variety. However, there are general site selection standards for all pears that must be adhered to.
Illumination of the place and other parameters
Pear trees prefer plenty of light. Without enough light, the fruit will not develop juiciness, aroma, or sweetness. Therefore, avoid excessively shaded areas.
Other indicators:
- the groundwater level is more than 3 m, so give preference to elevated areas;
- placement near buildings is unacceptable, otherwise the root system will not have enough space for normal development;
- they cannot be planted next to crops that cannot develop without light, since the majority of pears are tall varieties;
- It is also forbidden to plant next to trees that are taller than the pear tree - they will shade it, as a result of which the fruits will form only at the top of the crown;
- the influence of the cold northern wind is excluded;
- It is acceptable to plant trees next to hedges - they do not interfere with root growth;
- The optimal site is located on the South-West or West side.
The pear tree loves a lot of space, so the minimum distance between seedlings should be about 4 m, between rows from 5 to 7 m.
Neighborhood with other cultures
Pay attention to crop rotation rules to ensure a bountiful annual harvest. Experts recommend planting several pear varieties in a single garden, planted close to each other. This is due to the crop's cross-pollinating properties.
The following plants have positive allelopathy (interaction with each other) (pear trees can be planted next to them):
- rowan;
- apple;
- oak;
- tansy;
- black poplar;
- maple.
There are many more unfriendly neighbors:
- chestnut and acacia;
- walnut (Walnut and Manchurian varieties);
- cedar, fir, spruce;
- plum and cherry;
- viburnum and beech;
- peach and apricot;
- jasmine and lilac;
- barberry and rose;
- wheatgrass and juniper;
- cherry plum and cherry;
- raspberries and gooseberries.
What soils are suitable?
The best soil for pear trees is sandy loam and loamy soil. The tree won't thrive in sandy loam, and clay slows growth. Other soil parameters required for pear trees include:
- fertility is abundant;
- medium looseness;
- acidity is neutral (about 5.5-6.5 pH);
- waterlogging of the soil is excluded.
If there are no elevated areas where the groundwater level exceeds 2-3 meters, you will have to create soil ridges yourself. If the soil is too acidic, add 500 g of lime per square meter to reduce the acidity.
Site preparation
It's best to begin preparing the beds for a pear orchard in the fall (if planting in spring) so that the fertilizer applied has time to rot and become saturated with nutrients over the winter. If this isn't possible, it's acceptable to carry out the work immediately before planting the seedlings.
Soil preparation
The method of soil preparation depends on the soil type:
- soil with excess humus, fertile black soil and dense earth - undergoes a process of deep loosening with the addition of sand and perlite;
- depleted sand - peat or humus is added, charcoal is always added.
Before planting the pear tree, dig the area to a depth of 1-1.5 spade depths. As you dig, remove any remaining roots, fallen leaves, branches, and other debris from the soil. Apply fertilizer at a rate of 1 square meter:
- 35 g superphosphate;
- 5 kg of humus;
- 1 tbsp. wood ash;
- 12 g potassium sulfate.
Planting pattern based on pear type
The pear tree is renowned for its enormous diversity of cultivars. Each belongs to a specific species and has its own characteristics, including crown height, branch spread, ripening time, and so on. Based on this, planting patterns and spacing have been developed:
- for low-growing plants – 5x4 m;
- for medium-sized trees – 6x4 m;
- for tall trees – 7x5 m;
- for columnar – 1.2x0.5 m.
Before planting, be sure to mark out the area. Consider the presence of nearby buildings and fences. Maintain a distance of at least 2-3 meters from the former.
Preparing the planting hole
When planting a pear tree in the spring, the hole is prepared 2-3 weeks before the onset of frost (that is, in the fall), and then covered with plastic film until spring. If planting is planned for the fall, the hole is dug 3-4 weeks before planting.
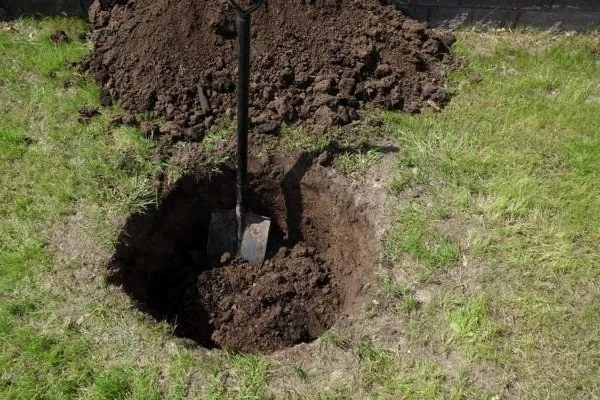
Pit preparation algorithm:
- Mark out the area and dig holes about 1 m deep and 0.8 m wide.
- Loosen the bottom of the hole thoroughly with a shovel and level it.
- Add wood ash (150 g), humus (2 kg), nitrophoska (50 g), and topsoil. Stir the mixture inside the hole.
- Place enough of the seed into the planting hole to fill it 2/3 full.
- Insert a peg in the center.
If the soil is very heavy, proceed as follows:
- Break up the excavated soil thoroughly, down to the smallest particles;
- add dry vermicompost (for example, AgroPrirost) to half of the soil;
- add any mineral fertilizer.
If the drug is in liquid form, then 500 ml of the product is required for one well.
Planting operations
The steps for planting a pear tree are the same, regardless of the time of year. However, there are some special considerations.
In the fall
After preparing the hole, begin planting in 3-4 weeks. Follow these step-by-step instructions:
- Pour 10 liters of water into the hole and wait until it is completely absorbed.
- Dip the soaked seedlings into the clay slurry.
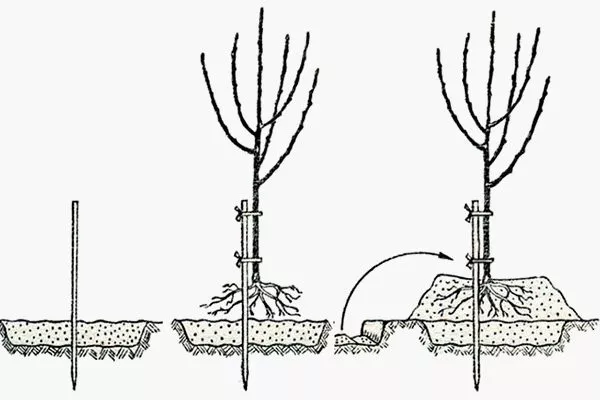
- Form a mound in the planting hole. Place the tree on it. Smooth out the roots of the cutting first and spread them out in the hole.
- Bury the tree so that the root collar is 5-6 cm above ground level. As you add soil, lightly compact it to eliminate air pockets. Failure to do this will cause the seedling to settle significantly after watering and over time.
- Adjust the stake you inserted earlier (while preparing the hole). Tie the bush to it. Use only soft twine to avoid damaging the delicate bark.
- Create a circle around the tree trunk with a raised edge all around the perimeter. Water the planting.
- Mulch the plant using wood shavings, sawdust, or peat.
To see how planting operations are carried out, watch the video:
In the spring
In the spring, it's important to soak the tree in a stimulating bio-product before planting, such as Kornevin or Heteroauxin. This is necessary to accelerate rhizome growth. Avoid planting the root collar too deep, as frequent watering in the spring and summer will cause the soil to settle more than it would if planted in the fall.
The planting instructions are exactly the same as those for fall planting. If you didn't have time to fill the planting hole in the fall, you can do the following:
- Dig planting holes on the site.
- After this, form meter-long grooves at a distance of 0.5 m from the holes on either side. Their width is 0.2 m. The depth is identical to the planting hole.
- Fill the trenches with organic matter, such as wood chips, pine branches, and bark.
- Fill the organic materials with the solution:
- superphosphate – 12 g;
- potassium salt – 12 g;
- heteroauxin – 1 tablet;
- granulated sugar – 20 g;
- water – 10 l.
- Leave the mixture for 24 hours.
- Pour the pre-mixed substrate from the trenches with soil into the planting hole in equal proportions.
- Plant the seedling in the standard way.
- Pour 10 liters of water and sprinkle sawdust on top.
The grooves are necessary so that as the plant grows, the root system draws its shoots toward the sides of the trenches for nutrition. Well-rotted wood waste promotes the formation of strong roots.
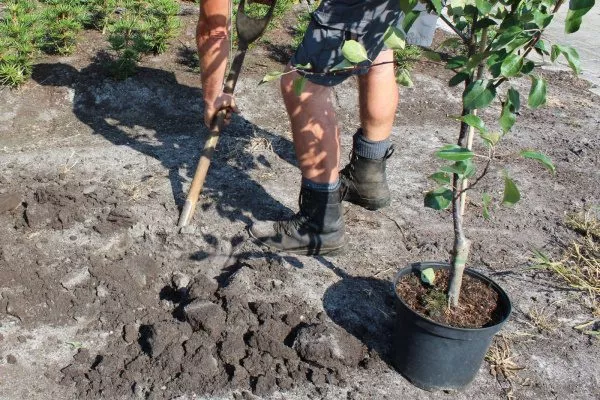
How to plant with a closed root system?
The closed root system of tree planting is classic, but there are some nuances:
- there is no need to drive in a support peg, since there is a lump of earth that will hold the seedling;
- About 24 hours before planting, you need to pour water into the container with the cutting so that a lump of earth forms - this makes the process of removing the plant from the container easier;
- You shouldn’t create a mound in the hole; the bottom should be level, since the roots already have a lump of soil;
- Remove the bush from its container using the transshipment method - tilt the pot and pull it by the trunk.
When the groundwater level is high
If the groundwater level is above the previously mentioned level, planting pear trees becomes pointless. To make this possible, gardeners recommend the following:
- create an artificial hill - bring in soil and spread it over the area;
- make drainage channels - ditches from each planting hole that go to the lowest parts of the garden, where a small pond will form over time;
- Prepare planting holes - place slate sheets on the bottom (depth about 1.5-2 m).
Peculiarities of planting operations in different regions
The most important factor is the timing and specifics of pear planting, which varies from region to region. The main conditions are: in spring, pear trees are planted when temperatures stabilize at 5-8°C, and in autumn, three weeks before the first frost.
During autumn periods
Distinctive features by region:
- Moscow region, Central belt. The optimal period is from September 20 to October 25. Suitable varieties for planting are Chizhovskaya, Rognedo, Allegro, Skazochnaya, and Moskvichka.
- Siberia, Urals. Since autumn is short here, frosts arrive early, so it's best to plant pears throughout September. The best varieties are Tayozhnaya, Lel, Severyanka, Sverdlovskaya, and Skorospelka.
- Leningrad region. The weather here is unpredictable, so experts recommend planting from late September to mid- to late October. The same varieties are suitable as for northern regions.
During spring planting work
Spring work deadlines:
- Volga region, central part of the country. Droughts can set in early here, so it's important to plant pears during periods of abundant moisture, which is between April 1 and 20.
- Central belt, Moscow region. The optimal time is the second half of April.
- Urals, Siberia. Work should not be carried out before early May. Otherwise, the root system will freeze.
Pear propagation
Pear trees are propagated by four methods: cuttings, layering, seeds, and root suckers. Each method has its own advantages and disadvantages, features, and rules.
Cuttings
The most commonly used option, but it is divided into two subtypes: green cuttings and woody cuttings. Cuttings are also used for rooting and vaccinationsIn the second case, a different variety of pear is used: quince, apple, or wild pear.
Features depending on the type of cuttings:
- green – the preparations are collected during the beginning of sap flow, that is, in March-April;
- stiff – after the formation of the current growth of shoots, that is, in June or July.
The process of cuttings is as follows:
- Select a strong shoot.
- Cut it with a sharp knife or pruning shears to form a 45 degree cut.
- Place the cut end in water with any growth stimulator (Kornevin and similar).
- Plant in open ground (if it's spring) or boxes (if it's autumn) in the standard way, but the soil should be as nutritious as possible, so it's best to buy the soil mixture in a specialty store.
- Cover the plantings with plastic sheeting or cut-off plastic bottles. After 2 weeks, remove the covering for a day.
- In the fourth month, roots will begin to form, and in the seventh month you can begin planting.
The best varieties for cuttings:
- Lada;
- Memory of Zhegalov;
- Muscovite;
- Autumn Yakovleva;
- Smartly dressed Efimova.
A helpful video on how to root cuttings:
Layering
Propagation by layering is carried out in two ways:
- layering - branches are lowered to ground level and fixed in the soil (not all varieties are used);
- air - the best option for all varieties of pears.
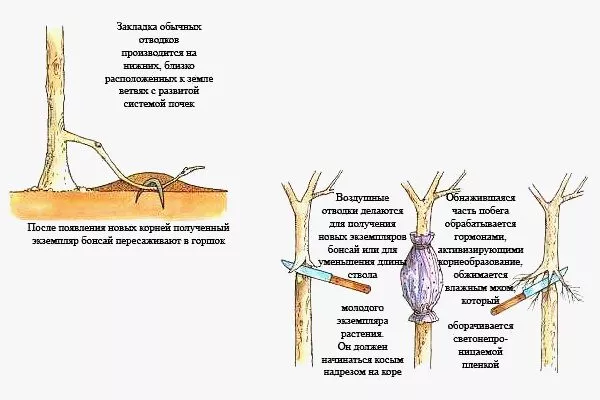
The aerial method involves forming root shoots directly on the tree. Here's how:
- Select a woody branch.
- Remove a ring of bark from the root just below the growth level. The width should be 1 to 1.5 cm.
- Apply a root growth stimulator to this area.
- Attach moistened sphagnum or nutritious soil mixture to this point, wrap it with plastic film, and secure with wire.
- Tie the branch 10 cm above the cut to the support.
- Once the roots have formed, cut the branch with roots and plant using the classic method.
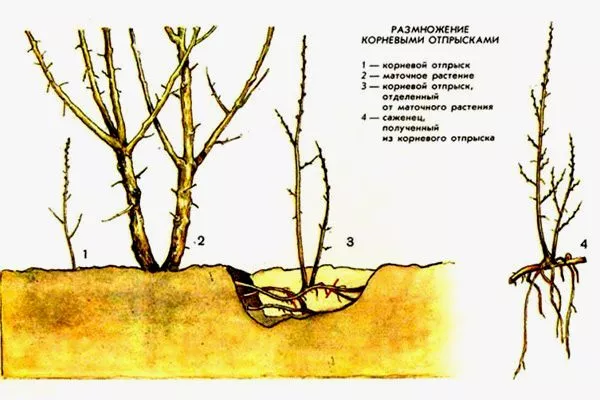
Root suckers
The suckers are located in the trunk area. These are thin shoots that grow from a tree that is not grafted. How to propagate:
- Select the healthiest shoot from among all the root shoots.
- Dig it out, but do it carefully so as not to cut the roots.
- Immediately transplant to a permanent location.
Seeds
The least used method, as it has a huge number of disadvantages:
- duration – you will have to wait at least 3-4 years for roots and shoots to form;
- too much trouble;
- It is not always possible to obtain an original variety, since insects pollinate the flowers with pollen from other fruit trees.
Post-planting care
Immediately after planting, it's important to properly care for pear seedlings. Key steps:
- watering is not carried out during the first 15 days;
- The following waterings require 20 liters of water per tree every week;
- loosen the soil once every 1-2 weeks until autumn; if planting was carried out before wintering, the procedure is canceled;
- formation is carried out 7-10 days after planting - the main trunk is cut by 90 cm, and the shoots on the side by 20 cm;
- fertilization - if you followed the instructions when planting, there is no need to fertilize the pear tree in the first year of its life;
- Be sure to lay a 5 cm mulch layer, and 30 cm before wintering.
Planting a pear tree isn't considered a difficult procedure, but it's important to strictly adhere to certain guidelines. Seasonality, planting methods, and preparatory measures are all important considerations. The combination of these steps determines not only the tree's survival rate but also its yield in future years.