The Moskvichka pear is one of the most sought-after varieties in central Russia. It's easy to grow, productive, and fully meets the expectations of pear lovers—its fruits are tasty, sweet, and juicy. They store well, have a marketable appearance, and are in demand at the market.
History of selection and zoning
The variety was developed by S.T. Chizhov and S.P. Potapov, plant breeders at the K. A. Timiryazev Moscow Agricultural Academy. It was obtained by open pollination of the American pear Kniffer. The variety is most widespread in the Moscow region.
The variety was added to the State Register in 2001. Recommended for cultivation in the Central Region.
Description
The Moskvichka pear variety has a classic appearance—a medium-sized tree with typical pear-shaped fruits. Below is a detailed description of the Moskvichka pear tree and its fruits.
Tree
A mature tree has a standard structure, and the crown is dense, conical, and medium-sized in foliage. The skeletal branches are arranged at an angle to the trunk. Young pear trees have a funnel-shaped crown, which develops into a conical shape over time.
Brief description of the tree:
- height - up to 3-4 m;
- the bark of the trunk is gray, the bark of the skeletal branches is light gray;
- shoots are curved, medium length, covered with many small convex lenticels;
- internodes are of standard length;
- buds are brown, cone-shaped;
- leaves are oval, serrated at the edges, leathery, slightly curved, without pubescence;
- Flowers are cup-shaped, white, collected in racemose inflorescences of 5-7 pieces.
Fruit
Fruit formation occurs on spears, fruiting twigs, rings of various ages, and one-year-old shoots. Fruits form from apical and lateral buds. They lack a funnel, and the saucer is shallow and wide, slightly ribbed.
Brief description of fruits:
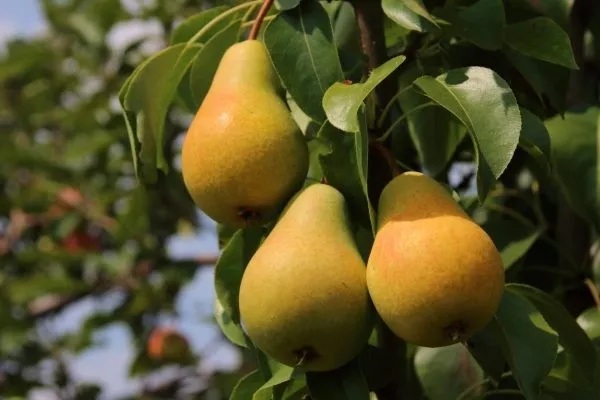
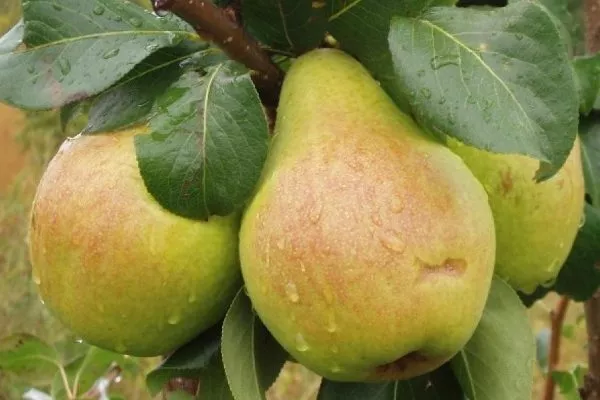
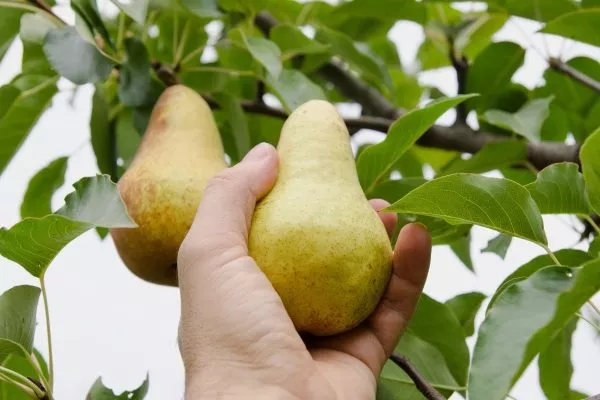
- weight - 120-130 g;
- shape - round, broadly conical;
- color - light yellow, occasionally with a slight blush;
- the skin is dense and thin, oily, with subcutaneous dots, often rusty;
- The pulp is white, fine-grained, juicy, semi-oily, sweet and sour.
The fruits have a pleasant dessert flavor and a distinct pear aroma. Individual specimens can weigh up to 200 g. The pulp contains 9.5% sugar and 0.48% acid.
Characteristics
This variety is considered late-ripening and early-bearing. It boasts stable and high yields, which continue even in unfavorable weather conditions. Moskvichka is resistant to temperature fluctuations, but in Russia's temperate regions, it still requires winter protection.
- ✓ Resistance to temperature changes down to -20°C without cover.
- ✓ Ability to bear fruit even in unfavorable weather conditions.
Main characteristics:
- Early fruiting - begins to bear fruit in the 3rd-4th year after planting.
- Winter hardiness is average, withstands frosts (without shelter) down to -20 °C.
- Drought resistance is average.
- Productivity: up to 50 kg per tree.
- Ripening period: early to mid-September.
- Fruit shedding is low.
- Shoot formation is good.
- Tasting score: 4 out of 5.
- The size of the fruits is uneven.

- Transportability is average.
- Purpose: universal.
- Product characteristics are high.
- Immunity to diseases is increased.
- Resistance to insect pests is high.
Advantages and disadvantages
All the advantages and characteristics of this variety are primarily related to its ability to successfully bear fruit in harsh conditions. At the same time, Moskvichka is almost as good as the best southern varieties in terms of yield and fruit quality. More information about the pros and cons of this variety is provided below:
Pollination
The variety is considered self-sterile, so it requires cross-pollination. Without nearby pollinating trees, Moskvichka will not produce fruit; a maximum of 4% of its flowers will be fertilized.
Varieties that produce 15 to 40% of their total flowers as fruits are considered self-fertile, while 0 to 4% are considered self-sterile. The remaining trees are considered partially self-fertile.
The best pollinators for Moskvichka:
- Marble;
- Beauty Chernenko;
- Memory of Zhegalov;
- Otradnenskaya;
- Lada;
- Yakovleva's Favorite and other autumn and late autumn varieties.
For pollination, use varieties whose flowering time coincides with the self-sterile tree. The pears must bloom simultaneously for at least 5-7 days.
Landing
The key to a pear's successful growth, viability, and yield largely depend on planting. It's important to be attentive at every stage—choosing the right planting material and location, preparing the hole, and planting the seedling according to planting guidelines.
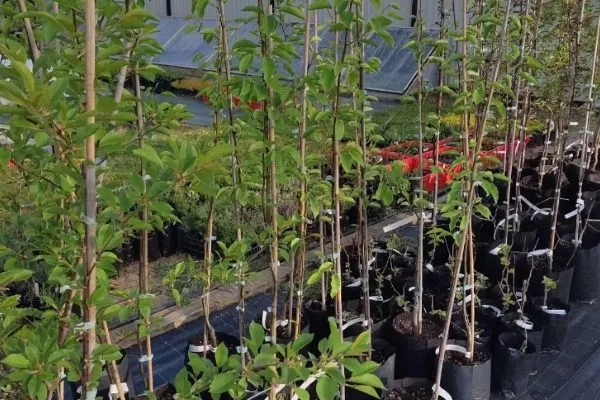
Selecting a seedling
Experienced gardeners advise purchasing seedlings in the fall, when nurseries offer a wide selection of planting material. In the spring, they will dump on the market the seedlings they failed to sell in the fall.
Criteria for selecting pear seedlings:
- optimal age: 1-2 years;
- the bark is clean, smooth, without damage, cuts, bumps, growths, dry areas or peeling;
- roots - healthy, not dry, with a strong central conductor and flexible branches;
- buds (when purchasing a seedling in spring) - slightly swollen, with a greenish tint.
How to save a seedling until spring?
Seedlings purchased in the fall can be stored until spring if fall planting is not recommended or circumstances prevent it.
Work order:
- Dig a small hole (WxD) - 100x30-40 cm.
- Pour a layer of sand on the bottom – about 10 cm.
- Dip the roots in a slurry—mullein mixed with clay to the consistency of thin sour cream. This prevents the roots from drying out.
- Place the seedling at an angle. Place the roots on the sand and rest the top on the edge of the hole.
- Sprinkle the roots with sand.
- Water the buried seedling.
- When frost sets in, fill the hole with soil right up to the top, leaving only the top of the seedling exposed.
You can also store the seedlings in a basement until spring. The roots should be placed in moist soil. The optimal temperature is 0 to +5°C.
How to choose a landing site?
Pears grow best in well-lit areas, away from drafts and cold winds.
Recommendations for choosing a site for planting:
- It is desirable to have a barrier on the north side - a wall, a fence, large trees;
- the soil needs to be fertile and well-drained; the pear will not grow in swampy areas;
- soil acidity - pH 5.5-6;
- maximum groundwater level - up to 2 m.
- ✓ Soil pH levels should be strictly between 5.5-6.0 for optimal growth.
- ✓ The groundwater depth must be at least 2 meters to prevent root rot.
Although the Moskvichka pear has no particular soil requirements, it grows best in loamy and sandy loam-chernozem soils with neutral pH. It does not tolerate alkaline soils.
When to plant?
The Moskvichka pear can be planted in spring or fall—the choice depends on the gardener's preference and the regional climate. In areas where the variety is grown, spring planting is recommended, as fall planting poses a high risk of frost damage to the seedlings.
Recommended planting times:
- in spring - before the buds open, when the soil warms up to +12…+14°C;
- in autumn - 1-2 months before the arrival of serious cold weather.
The optimal time for planting fruit trees in the central zone is the end of April - beginning of May, in the northern regions - the second ten days of May.
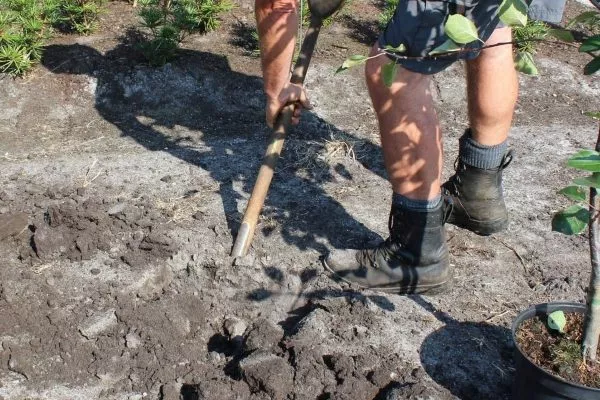
How to prepare a hole?
To ensure the soil settles by planting time, planting holes are prepared in advance. For fall planting, prepare them in the summer; for spring planting, prepare them in the fall. The hole size depends on the extent of the root system—the more extensive the roots, the deeper and wider the hole. The average depth is 1 m, and the diameter is 70 cm.
The procedure for preparing a hole for planting a pear:
- Dig a hole (WxD) 70-80x100-120 cm. When digging the hole, set the top fertile layer (approximately 30 cm) separately from the bottom.
- Add 20 liters of organic fertilizer to the hole - humus or compost mixed with garden soil obtained when digging the hole.
- Add 300 g of superphosphate and 100 g of potassium sulfate to the hole and mix with organic matter. If the soil is highly acidic, add 500 g of lime or dolomite flour.
- Pour 20 liters of water into the hole, cover it with a sheet of slate and roofing felt - let it stand until planting.
Step-by-step landing
Carefully inspect the seedling after purchasing it or removing it from storage. If you find dry or damaged roots, trim them with sharp, disinfected pruning shears until the cut is white.
Disembarkation order:
- Soak the roots of the seedling for several hours in a growth stimulant solution, for example, Heteroauxin, Epin, Kornevin.
- Open the planting hole, remove the slate or roofing felt, and scoop out some of the soil mixture. Just enough to accommodate the seedling's root system.
- Step back 10-12 cm from the center and drive a support into the ground—a wooden stake or metal pipe. The height of the support above ground level should be about 1 m.
- Form a small mound of soil from the soil mixture to neatly support the seedling's roots. Position the tree so that the root collar is 3-5 cm above ground level. Gently spread the roots. Over time, the soil will settle, and the area between the root and the graft will rise to the surface.
- Cover the roots with the remaining soil mixture removed from the hole. Periodically compact the soil and shake the seedling to ensure there are no air pockets between the roots.
- Use a garden tool—a hoe or a flat-cutter—to create a tree trunk circle. Create a small ridge around the perimeter of the planting hole.
- Tie the tree to the support with a soft but strong material, such as twine. Avoid using wire, as it can damage the delicate bark of the young tree.
- Water the seedling with warm, settled water. 20 liters is enough.
- Trim the central conductor so that the height of the tree is 60-80 cm. Shorten the branches by 1/2 their length.
The next day, when the water has been absorbed and the soil has dried out, loosen it and mulch it with hay, humus or other loose organic matter.
We also recommend watching a video about planting a pear tree:
Care
For Moskvichka to grow, bear fruit, and delight the gardener with a harvest every year, no special conditions are required. This variety requires standard care, but the key is to perform them regularly.
Top dressing
If a pear tree lacks nutrition, it won't produce a good harvest. It simply sheds its ovaries and fruits. Fertilizing begins in the third or fourth year after planting—at first, the tree receives sufficient nutrition from the planting hole.
Table 1. What and when to feed a pear tree:
| Period of contribution | Fertilizer | How and how much to contribute? |
| Spring | Organic matter - compost, peat, humus, as well as nitrogen-containing fertilizers - urea, ammonium nitrate, nitroammophoska. | Spread 5-7 kg of organic matter and 20-30 g per 1 sq. m evenly around the tree trunk and dig up the soil. |
| Late spring and early summer | Potassium sulfate or monopotassium phosphate. | Apply the solution when watering - 10-20 g per 1 sq. m. |
| The stage of growth and ripening of fruits | Liquid organic fertilizers. | Add 1 liter of infusion per 1 sq. m (dilute 2 liters of mullein or 1 liter of bird droppings in 10 liters of water and dilute 1:10 after a week of infusion). |
| Autumn | Phosphorus-containing fertilizers. | Scatter granular fertilizers around the tree trunk circle – 20-30 mg per 1 sq. m. |
Trimming
Trimming Affects not only the tree's beauty and practicality, but also its yield, hardiness, and overall health. It is performed twice a year: in the spring, before the buds open, and in the fall, after the leaves have fallen.
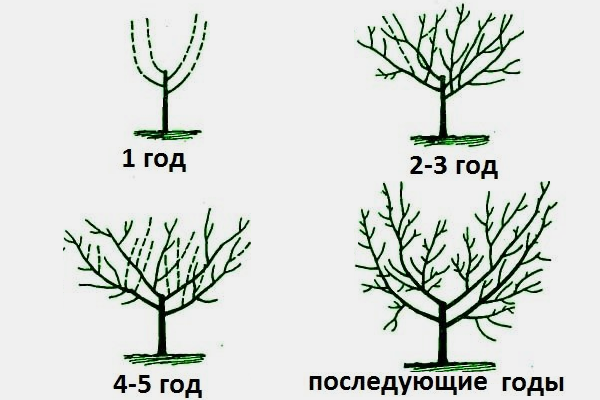
Recommendations for pruning the Moskvichka pear:
- Shorten one-year-old seedlings to 50 cm, cut two-year-old ones by a quarter, leaving 3-4 lateral branches to form skeletal branches.
- In the spring, carry out more extensive pruning. This is the recommended time to shape the crown, as the tree has time to recover over the summer. In the fall, limit yourself to sanitary pruning to avoid weakening the pear tree before winter.
- Regularly thin the crown to keep it neat and well-ventilated. Remove all shoots growing vertically and inward, as well as dried, broken, frost-damaged, and damaged branches.
- Do not prune more than 25-30% of the branches at a time, this will have a detrimental effect on the condition of the tree.
- Be sure to coat all large cuts (more than 1 cm in diameter) with garden pitch. This will prevent infection from penetrating the tree.
For the Moskvichka pear, a sparse-tiered crown training is recommended—it's as close as possible to the tree's natural conical crown shape. With this type of training, branches are arranged in tiers on the trunk—2-3 on each tier, spaced 40-50 cm apart. The crown consists of 4-5 primary branches.
See also a video about pear tree pruning:
Watering
If the spring is dry, watering begins early in the season. The tree should be watered for the first time before flowering, and then every 3-4 weeks, maintaining moderate soil moisture around the tree's trunk.
Watering recommendations:
- Watering is most important for a tree during the period of fruit setting and ripening;
- During the first year of life, the tree is watered more often
- soil moisture depth – 25-30 cm;
- watering is done in a furrow (WxD) - 20x10-15 cm, dug around the perimeter of the tree trunk circle;
- the watering rate for a young tree is 10-15 liters of water, for an adult tree - 30-50 liters of water;
- In the first year of planting, pears are watered more often than adult ones - once a week;
- watering is done using a hose or sprayer;
- In November, it is recommended to carry out moisture-recharging irrigation - 85-90 liters per 1 sq. m.
Soil care
The soil around the tree trunk is regularly loosened, weeded, and mulched. Natural loose materials such as hay, humus, rotted sawdust, sunflower husks, etc. are scattered throughout. Mulching prevents the soil from drying out and forming a crust, improves air permeability, and slows weed growth.
Preparing for winter
The Moskvichka variety is fairly frost-hardy, but the tree may not survive severe frosts. Insulation is especially important for young trees. Begin insulating the trunk and roots after pruning, watering, and whitewashing the trunk. However, don't rush, as covering the tree too early can cause it to rot.
How to prepare the Moskvichka pear for winter:
- mulch the tree trunk circle with a thick layer of horse manure;
- wrap the trunk with covering material and secure it with twine;
- Wrap the lower part of the trunk with netting or cover it with pine branches to protect it from rodents.
A variety of materials can be used to cover the trunk: polyethylene film, paper, roofing felt, sunflower and corn stalks, reeds, etc.
Preventive measures
To ensure a tree grows and bears fruit successfully, it's recommended to prevent problems rather than fight them as they arise. Prevention is a comprehensive set of agricultural measures aimed at preventing adverse effects, such as freezing and damage. diseases etc.
Recommended preventive measures:
- Keep your garden clean. Remove fallen leaves and plant debris in the fall.
- Inspect the tree's bark before winter, and sand away any cracks or damage to reveal healthy wood. Treat the pear tree with a 1% copper sulfate solution and coat the treated areas with garden pitch.
- Whitewash tree trunks before winter by adding 1% copper sulfate to the lime solution. Or use garden paints. Whitewashing will repel insect pests and protect against sunburn.
- Dig up the soil under the tree before frost sets in so that any pests that have settled there for the winter freeze to death.
- Treat the tree with a 3% Bordeaux mixture in spring and fall. It is also recommended to spray the pear tree with a urea solution at a rate of 800 g per 10 liters of water.
- Place trapping belts on the trunks - they will prevent ants, caterpillars, weevils, and other insects from entering the crown.
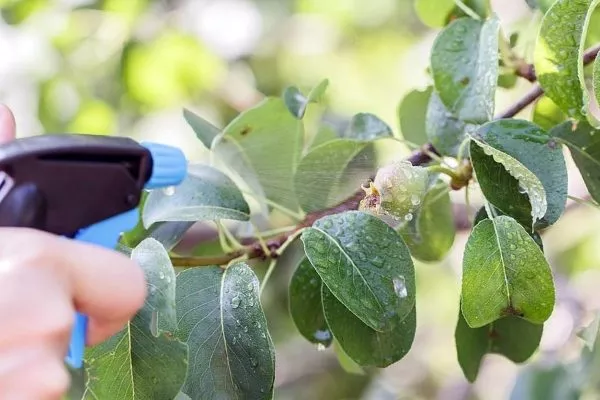
- After flowering, the tree is sprayed with systemic fungicides every 2-3 weeks. These are especially necessary after rainfall, when there is a risk of fungal growth. It is recommended to treat the tree with Skor, Horus, Quadris, etc.
Diseases and pests
The variety is fairly resistant to fruit rot and scab, but it can be affected by septoria leaf spot, rust, bacterial canker, and other diseases. The tree is also susceptible to insect pests, for which modern insecticides are recommended.
Table 2. Diseases and pests of the Moskvichka pear and how to combat them?
| Pests and diseases | Symptoms of damage | When and how to process? | How to prevent defeat? |
| Green aphid | Sucks juices from the above-ground parts of plants. | In early spring, spray with Kinmiks, before flowering - with Agravertin, when ovaries appear - with Iskra. | Treatment with solutions of green soap, garlic, chamomile. |
| Pear sucker | It gnaws at buds, leaves, and flowers; the affected parts dry up and fall off. | During the period of sap flow, spray the tree with Nitrafen (200 g per 10 l of water) or similar. | Dig up the soil, remove fallen fruit, clean the trunk. |
| Hawthorn | They gnaw leaves on young shoots. | Before and after flowering, treat the tree with Karbofos (75 g per 10 l of water) or its analogues. | Cleaning up fallen leaves and weeds. |
| Gall mite | Sucks the juices from the buds. | During the sap flow period, spray the pear with colloidal sulfur (according to the instructions). | Digging up the tree trunk circle, destroying cut branches. |
| Powdery mildew | A grey-white coating appears on the leaves and fruits. | Before and after flowering, spray with Fundazol or Sulfite. | Weeding the soil, removing fallen leaves. |
| Cytosporosis | The bark turns reddish-brown and the affected areas die off. | When symptoms appear, the tree is treated with a saturated solution of potassium permanganate. | Remove affected areas and clear away fallen leaves. |
Harvesting and storage
The ripeness of the fruit is judged by the color of the skin - as soon as it begins to turn yellow, the pears can be picked for fresh consumption.
How long can the Moskvichka variety fruits be stored?
- Pears picked with light green skin can be left to ripen in a normal room. After a week, they reach their optimal condition—sweet and juicy. After this, they can be stored under normal conditions for about 10 more days.
- Pears can be stored longer in a basement—they can remain there for about a month without losing their marketable appearance or consumer qualities.
- In the refrigerator, at a temperature of 0°C, light green fruits can be stored for up to 3 months, yellow ones - a month.
Gardeners' reviews
No matter how undemanding and hardy a fruit tree is, it still requires some care to get the most out of it. With a little attention, the Moskvichka will delight you with ripe, delicious pears every season—for at least 30 years.