Before you start raising poultry, you need to thoroughly understand the intricacies of caring for them. If you've decided to raise ducks, this article will be helpful. It will teach you about the types of waterers, help you choose the right model, and show you how to build one yourself.
What should a drinking bowl be like?
When raising ducks, it's important to keep in mind that they consume a lot of fluid due to their high metabolic rate, so it's important to have fresh, clean water available 24 hours a day.
The amount of fluid consumed is influenced by factors such as the bird's age, food supply, and temperature. An adult bird requires approximately 1.65 liters of water per day.
- ✓ UV resistant to prevent degradation from sunlight.
- ✓ The absence of toxic substances in the material that can be released into the water.
The waterer should be made of high-quality materials that are rot-resistant and temperature-resistant. It should also be easy to clean and durable.
It's most often made of high-quality plastic with well-finished edges. The edge should be completely smooth, or a special rubber rim should be placed on it.
You can either make a duck waterer yourself using materials you have on hand, or buy one ready-made from a specialty store.
Features of drinking bowls for small ducks
It's especially important for ducklings to keep their water clean and avoid spills, as getting wet can easily lead to infection. Duckling waterers should meet the following guidelines:
- The depth of the container should allow the chick to completely immerse its head in it to clear its nasal passages.
- There must be an opportunity for the ducklings to bathe.
- Water must be available 24 hours a day and without interruption.
- The container must be easy to clean and disinfect.
It's crucial that water is readily available to ducklings at all times of the day. Ducklings up to 5 days old require room temperature water. At 10 days old, a metal waterer can be used.
In winter, ducklings' drinking water must be slightly warmed up.
The average length of a drinking bowl is about 20 cm, with sides no wider than 3 cm, so the ducklings can comfortably reach the water. Little ducklings love to splash and spill water on the floor, so a wide bowl with a mesh top can be placed underneath the bowl. They grow very quickly, so it's best to choose the most economical watering option.
Features of drinking bowls for adult ducks
When choosing a duck waterer, it's important to consider the number of bowls and their placement. For adult birds, they should be shallower and wider than those used for young birds.
Basic requirements for drinking cups:
- ease of use;
- location at a comfortable height;
- it must be closed so that dirt does not get into it;
- easy to clean;
- water from it should not spill around.
For adult fish, it's important to securely attach drinking bowls to prevent them from falling and splashing. Adult fish also like to dive directly into their drinking water and swim, contaminating it in the process, so it's best to choose closed nipple bowls for them.
Advantages and disadvantages of different types of drinking bowls
There are different types of waterers, each with its own advantages and disadvantages. You'll learn more about the pros and cons of different waterers below.
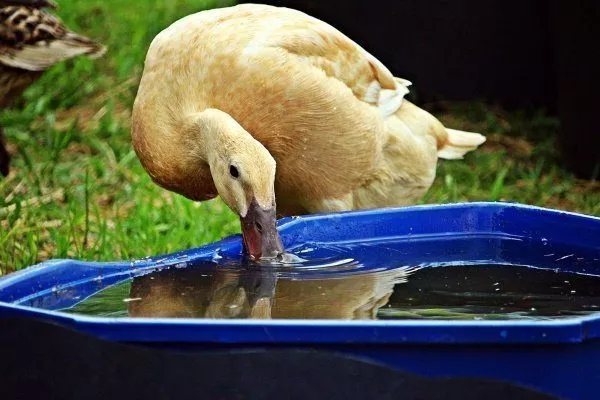
Deep water container
This is the simplest waterer available to everyone. Any bowl or basin of water can be used. Its advantages include its lightness, simplicity, and affordability.
However, it still has more disadvantages, of which the following can be noted:
- open water is easily polluted;
- Due to contamination, water must be changed constantly;
- such a capacity cannot provide water to a large number of birds;
- It can easily tip over from a push or a careless movement of the bird.
Vacuum
The main advantage of this waterer is its very economical water consumption, as it maintains a constant water level for an extended period. Furthermore, it will always have fresh water thanks to the self-filling tray; just make sure to always keep an eye on the water level in the bottle.
Like a nipple drinker, this is a closed drinker, meaning it won't collect debris and droppings, and the water will always remain clean. This is essential to prevent ducks from becoming ill.
One of its drawbacks is its very light weight, which makes it prone to tipping over. However, its advantages far outweigh its disadvantages, making this model particularly popular among farmers.
Nipple (teat)
This is one of the simplest and most convenient waterers. It's very easy to clean, but it must be filled manually. A more modern model that connects to a water supply or water tank is available in stores.
In this type of drinking cup, it's crucial to correctly calculate the number of nipples. The optimal number is considered to be 10 nipples per drinking hole.
The liquid is dispensed in measured doses, meaning the water in the drinker always remains clean and fresh. The main thing is to refill the main tank regularly. For ducks, nipples with large nipples and a good flow rate are best.
There is no need to accustom the birds to it; they quickly understand that to get water they just need to press the nipple.
Grooved
It has the following advantages:
- inexpensive price;
- easy to manufacture;
- durable;
- Due to its length, it provides access to water for a large number of birds at the same time;
- easy to clean and wash;
- With such a drinker, ducks can not only drink, but also dip their heads in it in hot weather and wash their beaks.
The disadvantages of this type of waterer include its heavy weight, which can be harmful to birds if the pipe isn't properly secured. The water in this type of waterer also tends to get dirty and needs to be changed periodically. Due to the pipe's heavy weight, a second person will be needed to change the water each time.
Instructions for making your own water bowls
Making your own waterer doesn't take much time or effort. Each design is easy to use and doesn't require constant monitoring of water levels, as the weight of the birds automatically refills the container as needed.
Automatic waterer made from a plastic bottle or canister
This waterer is especially convenient for adult birds. To make one, place a bottle of the required size in a regular basin. Make a 1.5 cm diameter hole in the bottom; your finger should completely cover the hole.
When pouring water into the bottle, cover the hole with your finger, then place it in the basin, and remove your finger. The waterer is ready. Now the water flows through the hole into the tray, and it will refill automatically as needed.
How this looks in practice is shown in the following video:
Trough drinker made from sewer pipe
It will be the most durable and suitable for ducks of any age. A trough drinker is easy to use and very simple to make. To make a trough drinker, take a section of sewer pipe of the required length.
Then drill the required number of holes in it and secure it to a special stand. A plug is placed at one end of the pipe, and a corner is attached to the other, into which water is poured.
How to make such a drinking bowl is shown in the video below:
An important aspect of using such a waterer is ensuring it is securely fastened. Care must be taken to ensure the pipe does not fall on the birds, as this could cause serious injury.
A sewer pipe can be used to create a self-contained waterer, saving time on poultry maintenance. The design of such a waterer is shown in the following video:
Nipple drinker
This type is best suited for young animals. Its use is similar to how animals extract milk from the breast, which is why it is also called a teat.
This type of waterer is widely used in industrial production because it saves water and prevents splashing. Furthermore, this closed waterer prevents debris from entering the water, which in turn protects birds from various diseases.
To make it yourself, you will need the following items:
- a square-shaped pipe, it can be plastic, and the side of the square should be no more than 2.2 cm;
- nipples, which are selected in accordance with the size of the birds: for babies it is better to take type 3600, and for adults type 1800;
- pipe plug;
- a large tank of water and a rubber hose or tube - the source of water supply;
- adapter for connecting square and round tubes.
- Make sure you have all the necessary tools before starting work.
- Make sure the nipple holes are marked accurately to ensure even water distribution.
You will also need a drill with a 9mm bit and a taper tap.
Step-by-step instructions:
- Drill a 9mm diameter hole into the square tube.
- Using a tap, form a thread and insert the nipple into it.
- Make similar nipples along the entire length of the waterer, ensuring their number corresponds to the number of ducks. Make sure the distance between holes is at least 30 cm.
- A plug is installed at one end of the tube to keep the liquid inside.
- At the end, trays are attached under each nipple, which will collect excess liquid.
Watch below to see how blogger and jack-of-all-trades Dmitry Izyumov assembled a nipple drinker:
Vacuum
This is the simplest type of waterer. Fill the container with enough water, cover it with a small bowl, and press it firmly against the bottle. Now turn the structure upside down so that the bowl is at the bottom.
Place a waterer in the coop and place a small wooden stand under the bottle to allow the liquid to flow freely into the bowl. For very young ducklings, a waterer made from a regular three-liter jar and a plastic bowl will do.
The following video explains how to make an improved vacuum waterer:
For the main reservoir, you can use a container of any volume, even 50 liters. However, it's best to install several smaller waterers to prevent stagnant water and sediment. The main thing is to secure the bottle well so it doesn't fall over and injure the birds.
Using this waterer prevents water from spilling onto the floor, keeping the birds dry and preventing ducks from dying from hypothermia. In winter, to prevent the water in the nipple waterer from freezing, you can place a heater, typically used for heating aquariums, inside it.
What else can be used as a drinking bowl?
Another idea for a watering bowl is to use a burdock leaf or another large-leaved plant. To do this, dip it in a cement solution and let it dry for a few days. This watering bowl won't be practical, but it makes a nice decorative addition to your garden.
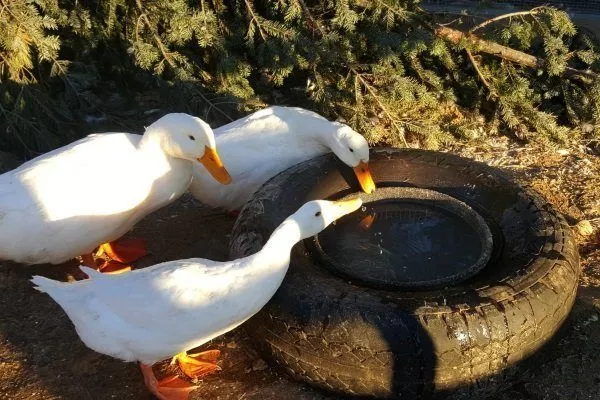
Another original material is a car tire. Cut it in half, fill it with purified water, and it's ready to use. Just be sure to remove the unpleasant odor with a baking soda solution first.
This type of waterer will look unusual and interesting, but it is not suitable for use by a large number of birds.
Installation of drinking bowls
Attaching waterers is an important consideration for anyone starting to raise ducks. They are active birds, moving around a lot, and can easily knock over even a heavy waterer made from a sewer pipe.
Try to secure the waterer as securely as possible. This should be done responsibly, as the health of your duck flock depends on it. For ducklings, the mounting can be a bit simpler, but it's still best to play it safe.
Waterers, like feeders, are readily available at any specialty store, where they are widely available. However, it's much more fun and engaging to design and build one yourself using readily available materials. This option is also ideal for those who live far from stores offering such items.