When keeping ducks, it's important to equip the room with all the necessary accessories, including feeding bowls. But you don't have to buy expensive duck feeders—they're easy to make yourself. We'll explain how to do it quickly and correctly below.
What to consider before starting work?
To ensure that your homemade structure is not only visually appealing but also comfortable for both birds and humans, it's important to consider a few requirements:
- Easy to clean. Feeders need to be cleaned frequently to prevent bird infections, so consider which model is easiest for you to clean.
- Age appropriate ducks. If the ducklings are about a month old, they should have about 5 cm of space for wet food and 3 cm for dry food. At one year, this figure is 12 cm and 6 cm, respectively, and at adulthood, it's 15 cm and 8 cm.
- Material. The main requirement is that it should be free of toxic substances, but at the same time, it should be durable and resistant to rust, rot, and other negative factors. Therefore, plastic or stainless steel are the best choices.
Wood is also suitable, but only if the feeder is used in a room without high humidity and exclusively for dry food. - Safety. It is not allowed to have burrs, sharp corners, protruding nails and other defects that could injure a bird or a person’s hand.
- Economy of feed. This is especially important if you have a large flock. It's important to prevent the ducks from scattering feed, so regular bowls and similar items are not suitable.
- ✓ Consider the material’s resistance to aggressive environments, especially if it is planned to be used for wet food.
- ✓ Check the material for the absence of toxic substances that may be released upon contact with feed or water.
Tray feeder
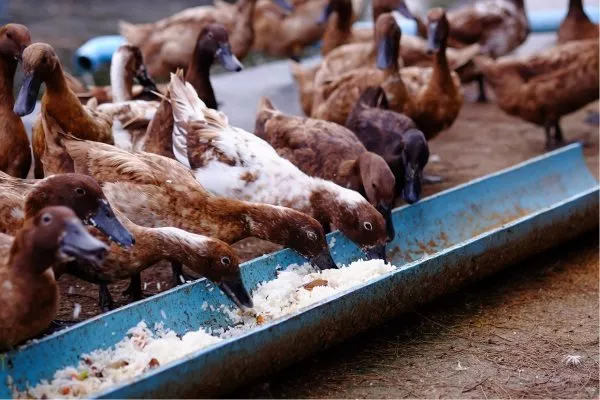
Tray-type structures are considered the simplest. They are made from either metal sheets or wood. They are installed on the floor or suspended at a height of approximately 20 cm (depending on the age of the birds). They are most often rectangular in shape, allowing several ducks to feed simultaneously.
Advantages and disadvantages
The main advantage of tray feeders is their simplicity and ease of construction at home, especially if they're open-sided. However, these feeders also have other pros and cons:
Necessary materials
The easiest way to make a tray feeder is from wood. You'll need the following:
- 2 wide and 2 narrow slats;
- 2 plugs;
- 1 handle strip (if needed);
- 2 bars;
- hammer, fasteners (nails, screws or similar).
Manufacturing process
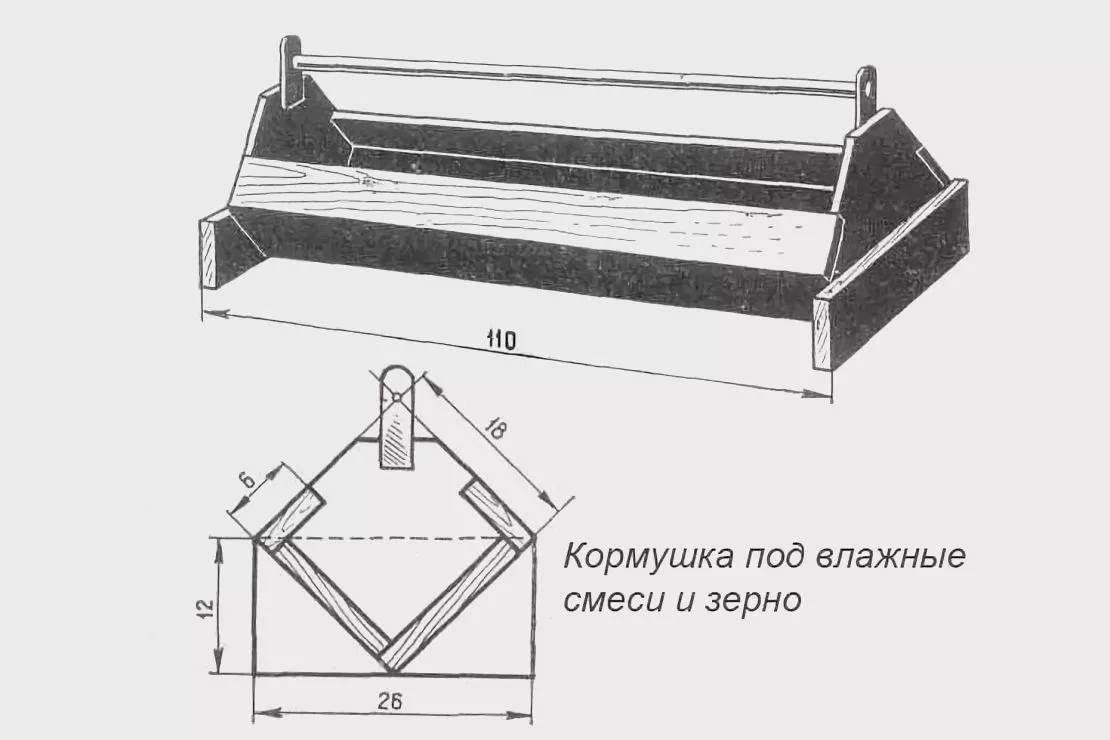
Making a tray feeder is easy:
- Take wide and narrow slats.
- Knock them together to create a box (see diagram above).
- Nail wooden plugs to the sides.
- Attach bars to the plugs to make the structure more stable.
- Nail a strip to the end caps to form a handle.
For more ideas on how to make a tray feeder, watch the video below:
Hopper feeder
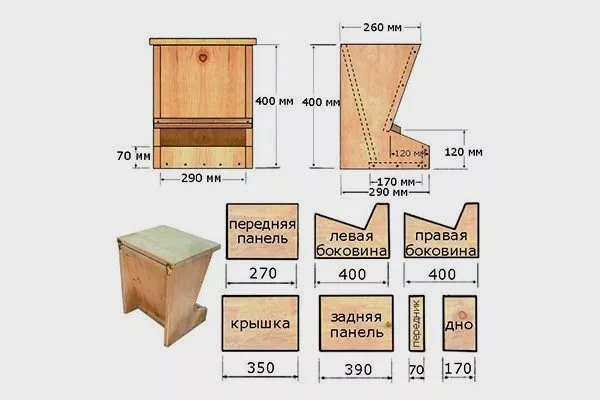
A hopper-type feeder is a container with openings at the bottom and a tray, allowing for individual portions of feed. It's used for dry food. There are several types, but the easiest to make at home is from a simple sheet of plywood.
Advantages and disadvantages
The main advantage of bunker-based systems is the portioned feed delivery. However, there are other advantages and disadvantages:
Necessary materials
To make the simplest design, it is enough to prepare some materials:
- plywood sheet;
- marking marker;
- self-tapping screws;
- hammer and other tools.
- ✓ Make sure the feed holes are sized correctly for the size of the grain or feed you are using.
- ✓ Check that the height of the feeder allows the ducks to feed comfortably without having to bend too low or reach up.
Manufacturing process
Regardless of the material used, it's important to strictly follow a specific sequence when assembling the feeder. We offer a video tutorial on how to make a wall-mounted hopper feeder from pressed plywood, suitable for any bird (chickens, ducks, etc.):
The simplest automatic feeder for ducklings
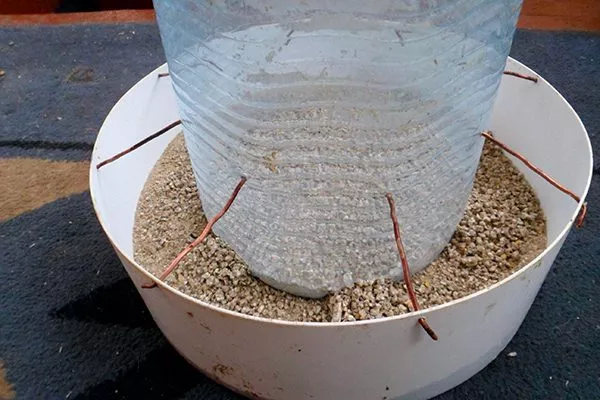
This option is quite simple, as it uses a regular basin and a large plastic bottle or 5-liter canister. This simplified automatic feeder is a hopper-type, but even a child can make it.
Advantages and disadvantages
The main advantage of the design is simplicity, but there are other advantages and disadvantages:
Necessary materials
All you need is:
- pelvis;
- 5 liter bottle;
- wire;
- tool for creating holes.
Manufacturing process
To quickly make a simple automatic feeder, follow the instructions:
- Drill holes in the side walls of the basin (see photo above).
- Make the same holes in the bottle.
- Make larger holes at the bottom of the bottle – food will flow through them.
- Connect the canister to the basin with wire.
- Pour in the food.
You can also see how to make a similar feeder in the video below:
Duck feeder made from a sewer pipe
Universal structures are constructed from sewer pipes that can be used as both a feeder and a waterer. These models can be suspended or placed on the floor, but the latter also requires securing to prevent tipping.
Advantages and disadvantages
Feeders made from plastic (PVC) pipes are considered universal, but they have other positive aspects and only one drawback:
Necessary materials
You can make wall-mounted, floor-mounted, or suspended structures from plastic pipe, but the list of materials and tools required may vary depending on the specifics. But in general, you'll need the following:
- pipe at least 100 cm long;
- lids (plugs);
- building level;
- a hacksaw or a jigsaw with the same blade (the teeth should be fine);
- Phillips screwdriver;
- self-tapping screws or other fasteners;
- marking marker;
- screwdriver or drill;
- drill for metal – 8 mm in diameter;
- rotary knee.
- ✓ Choose pipes with thick walls for greater stability and durability.
- ✓ Make sure that the pipe diameter allows for free passage of feed, but is not too large to avoid feed loss.
Hopper feeder
This is the best option for feeders, as the food always stays clean, as ducks can't get their feet inside. Hanging structures are suspended at a height accessible to the birds and are usually attached to the ceiling, support posts, or a wall.
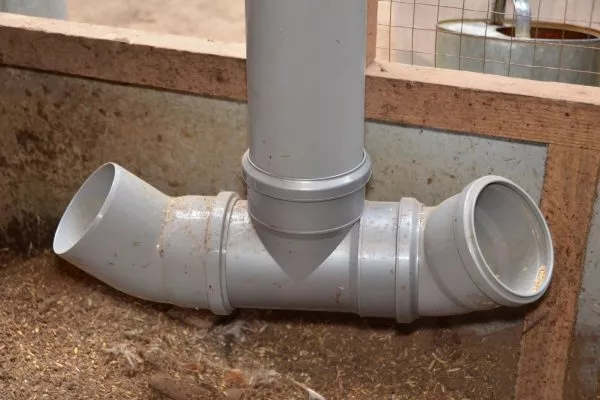
Stages of work:
- Take a plastic pipe of the required length. This will serve as a vertical hopper for filling the feed.
- Attach a plastic three-socket tee to the bottom.
- Insert one knee into each side of the tee.
- Place plugs in them and then make cutouts to access the feed.
- Hang the structure.
To learn how to make a similar bird feeder from PVC pipe, watch the video below:
Floor feeder
A feeder placed directly on the floor is convenient because it can be easily moved, which is especially handy in the summer when ducks are let outside all day. However, it does have a drawback: debris can get inside.
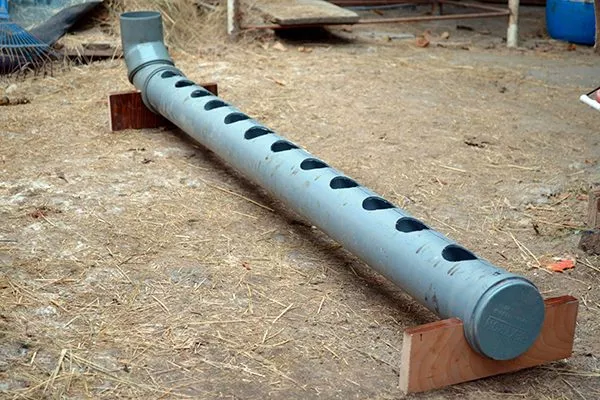
The manufacturing process is as follows:
- Cut a piece of pipe to the required length.
- Use a marker to draw a straight line and draw circles for the holes at a certain distance along it.
- Make cutouts.
- Place a plug on one side.
- On the other side, install a knee into which the feed will be poured (after pouring, you can also install the lid).
- Place the feeder on wooden blocks and fill it with food.
For a visual demonstration of how to make a slightly different floor feeder, watch the video below:
DIY Duck Feeders: Tips from Experienced Farmers
Before making your own duck feeder, consider the recommendations of more experienced farmers to avoid the most common mistakes:
- Choose the material according to the intended use. Wood and rusty metal are not suitable for wet food, but plastic is considered universal.
- When making wooden structures, keep in mind that the thickness of the boards should be about 2 cm.
- Avoid coating wood, metal or other materials with paints and varnishes, as they can be toxic.
- Be sure to take into account the number of ducks in the flock to ensure that all ducks have uninterrupted access to feed.
- Securely fasten feeders so that they do not fall unexpectedly and injure birds.
- Consider the breed of ducks - some cannot be overfed, so bunker options are not suitable for them.
Making a duck feeder at home is quite simple. With a wide variety of models, you can find the simplest and most suitable one for you. Just be sure to adhere to the design requirements and strictly follow the step-by-step instructions.