To ensure proper conditions for the birds, which affects egg production and the health of the flock, they need a properly equipped facility. You can buy ready-made cages at specialty stores or markets, but you can also build a quail shed yourself. Read on to find out how.
Choosing a location
Quail are typically kept in cages placed in various rooms—a summer kitchen, a garage, a chicken coop, and even an apartment. However, the best option is a barn, which will become the birds' permanent home. The structure should be kept cool and drafty, so it's important to learn not only how to properly furnish the interior of the home but also how to choose the right location for the building.
How to choose a site for a building:
- away from the residential building, so that the chirping of birds and unpleasant odors will not be heard;
- the place should be on a hill or on the same level as other areas, as it is usually cold in the lowlands;
- quails do not like exposure to sunlight, so it is better to place their house in a dark place;
- These birds prefer the wild, so there should be trees and bushes around the barn;
- A house in the open sun overheats excessively in the summer, and quails cannot tolerate high temperatures (they start to get sick) – the maximum temperature should be 28-30 degrees.
What materials and tools will be needed?
A shed can be built from wood, brick, foam blocks, and other building materials. However, to save money, it's best to use wooden beams, approximately 100 x 150 mm in size. You'll also need other materials (the quantity depends on the area of the building being constructed):
- foundation blocks;
- antiseptic agents for wood treatment;
- boards (size 50x100 mm);
- roofing slate;
- ondulin;
- window frame;
- OSB boards;
- door;
- siding;
- door handle and latch;
- metal corners;
- fasteners – screws, nails and the like.
- ✓ Insulation for walls and ceiling to maintain a stable temperature in the barn.
- ✓ Sealant for treating cracks around windows and doors to prevent drafts.
To build a structure, the following tools are used:
- hammer;
- saw;
- building level;
- shovel;
- screwdriver.
In each specific case, additional tools, materials, equipment, and containers may be required. This depends on the type of structure and the owner's preferences.
Requirements for a barn
Quails cannot live on the floor (like chickens, for example), so they are housed in special cages. Depending on the size of the room and the number of birds, 3 to 12 tiers are used (the maximum number is suitable for a 30 square meter space). The cages are made of wood and wire mesh (three sides are solid, the fourth is latticed). This reduces the risk of drafts.
How to make cages for quails with your own hands is described here.
But there are special requirements for the barn:
- For 1,000 birds, an area of 35-40 sq. m is required.
- The room temperature should not fall below 18 degrees Celsius. Otherwise, the birds will become sick or begin to huddle together, resulting in crushing. This is especially true for adults, who have slightly less down than young quail. To achieve this, heating equipment—a stove, heater, etc.—should be installed. However, it's important to remember that these devices dry out the air too much.
- The minimum humidity level is 50%. To achieve this when using heaters, simply hang wet rags in the ceiling and moisten them as they dry. Another option is to place buckets filled with water.
- The room should be free of drafts coming from cracks. This is why siding is recommended. Particular attention should be paid to door and window openings. They must be well sealed.
- Quails don't tolerate bright light, but they do require some lighting. It should be subdued. Infrared lamps can be installed for this purpose (they provide additional heating for the coop). The average daylight period for quail is 14-15 hours. To increase egg production, it is recommended to illuminate the coop for two hours and keep the birds in the dark for an hour.
- Avoid placing cages near windows, and avoid making the frame openings too large. All birds react strongly to any environmental changes, which negatively impacts egg production and health.
- Ventilation in a building is essential for its maintenance. Natural and forced (artificial) ventilation systems are installed for this purpose.
Step-by-step manufacturing instructions
To ensure the shed meets all requirements and standards, the work must be carried out in stages. The first step is to construct the structure, after which it is equipped with its interior.
Construction process:
- Choose a suitable place (in the shade among vegetation).
- Determine the dimensions of the building and draw up a diagram or drawing.
- Set up marking lines around the perimeter of the future shed. To do this, use a tape measure to measure the distance on all sides, then install wooden stakes and stretch a strong string between them.
- Next, the selected area is cleared of vegetation (if trees or bushes were growing there, the root system must be completely uprooted, otherwise, over time, the vegetation will break through the flooring, which will lead to destruction).
- Remove a small layer of soil (about 20 cm), level the surface.
- Pour a layer of sand on the bottom (you can add a little crushed stone).
- Check the levelness with a building level.
- Dig a trench around the perimeter of the building to install the foundation. Use a regular shovel for this.
- Pour sand.
- Install foundation blocks.
- Using beams, create the lower part of the frame, which is immediately treated with an antiseptic.
- Lay plank flooring on the bottom of the foundation. Apply an antiseptic to the boards.
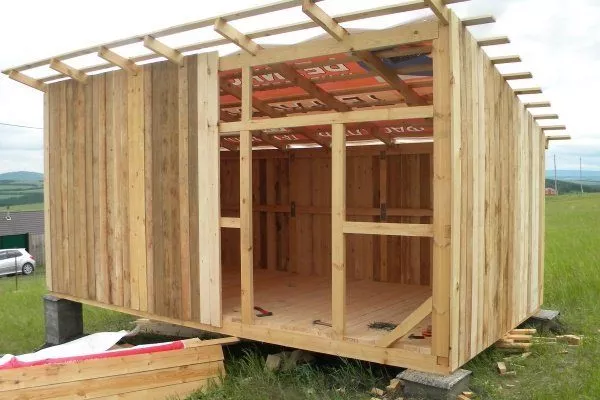
- Install the wall frame by nailing it to the foundation. Don't forget to leave openings for doors and windows.
- Make a lathing system on which the ondulin is laid.
- Now the walls need to be covered with oriented strand boards.
- Next, windows and doors are installed.
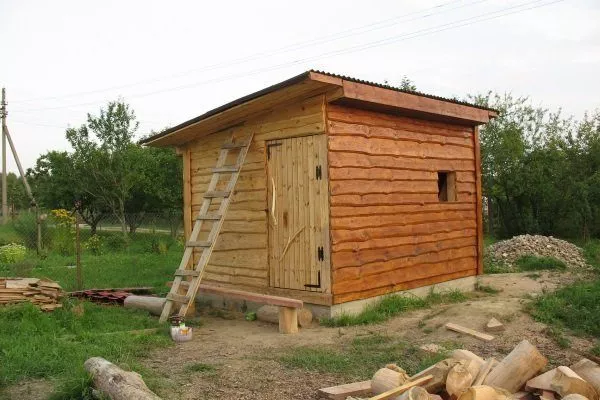
- Install a slate roof.
- Cover the facade with siding.
How to build the barn itself is shown in the video instructions below:
Interior decoration
The walls inside the barn can be left wooden, but to create an optimal temperature inside the room, it is advisable to insulate them and finish them with a material such as plasterboard, after which it is enough to apply putty, whitewash or paint.
Please note that using plasterboard panels in the poultry house will reduce the area, as they are installed on a profile structure.
Humidity and ventilation
To maintain optimal humidity in the poultry house, a ventilation system must be installed. A quail barn must be ventilated hourly, so it's best to install an automated system that switches on and off according to a preset schedule. A wide selection of such fans is available at a specialty store.
You can arrange ventilation in a different way:
- Ventilate the room through a window opening. To do this, install a frame divided into two halves. One half is completely closed but has small openings. The other half should open. This will allow fresh air to circulate.
- Another option is mechanical. An automated fan is installed in the window opening and turns on periodically.
- A more complex but less expensive system is a supply and exhaust system. You'll need to purchase a pair of plastic or metal pipes with a diameter of 20 cm. Each pipe should be 180-220 cm long.
Two holes need to be punched in the roof of the shed to install the pipes (the gaps are then sealed with sealant). The air exchange ducts should be positioned opposite each other. At the top, the pipes should extend beyond the roof, but at different distances (one at 1 m 20 cm, the other at 30 cm below). One of them will supply fresh air, and the other will exhaust carbon dioxide.
It's advisable to equip roof pipes with covers to prevent debris from entering. To speed up air circulation, install a wind deflector in one pipe. Be sure to install dampers to close the openings as needed (for example, during excessive wind).
Remember that ventilation systems without a stationary electric fan can only operate in windy conditions. Therefore, the optimal solution is to install both natural ventilation and a forced-air system. This will save energy in windy conditions.
Lighting
During the interior finishing stage, it's important to consider installing the electrical wiring. A wire is run from the main power supply to the new structure. An outlet and switch are installed inside the coop. A fluorescent lamp is required, suspended from the ceiling, and an infrared lamp is installed to provide subdued light. Be sure to keep it away from the cages.
After installing the electrical system, be sure to test it for proper operation. Follow fire safety precautions to prevent future short circuits and barn fires.
Temperature
Heating units can be used to maintain the temperature, but this option requires energy consumption. To reduce this, the walls can be insulated during construction. The interior is lined with drywall, with thermal insulation material placed between the drywall and the wall. What can be used:
- mineral wool;
- foam plastic;
- old rags;
- straw;
- pressed wood chips, etc.
It is also possible to insulate a building from the outside, using specialized materials.
For more information on the interior design of a quail barn, watch the following video:
10 useful tips
When setting up a quail barn, it's important to follow the basic construction and housing requirements for this species of bird. To avoid making irreversible mistakes, follow the advice of those who have already built one.
What is important to pay attention to:
- To prevent infection, rotting, and other harmful factors from affecting the structure and cages, be sure to disinfect them. During this time, remove the birds from the coop or use non-harmful disinfectants.
- People often introduce bacteria into the barn themselves. To prevent this, you can install a simple disinfection barrier. Place a low-sided box filled with straw or sawdust at the doorway (inside the barn). Place a cloth soaked in a disinfectant solution on top of the material. When the birder steps into the box, their shoes are automatically disinfected.
- Do not use materials and raw materials with high toxic content for construction or interior finishing. This will result in death of livestock.
- The room temperature should always be uniform. To achieve this, a special temperature and humidity sensor can be installed in the poultry house. When the temperature and humidity levels reach critical levels, the sensor emits an alarm.
- Be sure to treat the wooden elements of the barn with antiseptic agents.
- When determining the parameters of the structure, be guided by the fact that it is necessary to install in it not only cages for adult individuals, but also incubator And brooder for chicksDon't forget that you need to set up a separate compartment in the room for storing food and bedding.
- If the shed is being built without windows, the required lighting level is calculated separately. For example, 4 watts per square meter is required.
- Some breeders prefer more durable structures—brick, block, stone, etc.—but this isn't practical for a poultry house, as it's too expensive. Furthermore, it's unlikely you'll be able to lay such materials properly yourself. Therefore, wooden beams are the best option. The exterior can be clad not only with siding but also with materials readily available in any home, such as leftover plywood, boards, planks, plastic, etc. This can significantly reduce the cost of building a poultry house.
- If you plan to release your birds indoors, be sure to set it up so that it's free of harmful materials that quail might peck at. This includes foam, which is the most common material used by poultry farmers (it's inexpensive).
- If you're unsure of your abilities, seek professional help, at least for a preliminary consultation. After making mistakes, it's unlikely you'll be able to correct them without incurring excessive costs.
A quail shed that you make with your own hands is perfect for both summer and winter keeping of birdsYou'll spend a minimum of money, invest your energy, and master a new skill that will surely delight you and your entire household. The main thing is to follow all the instructions and stick to the carefully crafted plan.