Keeping quail requires a well-organized watering system to ensure the birds have unimpeded access to clean water. Naturally, waterers play a key role in this regard. They can be purchased at a pet store, but it's more practical to make your own, based on the number of quail on your farm and your personal needs.
Requirements for drinking bowls
Before you begin building a watering trough, keep in mind that such equipment must meet a number of requirements. Specifically, pay attention to the following parameters:
- DimensionsThe calculation must be based on the number of birds in the farm. Keep in mind that, normally, one adult quail should consume 50-100 mm of water per day. However, in hot weather, this figure can reach 200 mm. Thus, taking into account the number of birds, you can calculate the optimal size of water tanks, as well as their number, to prevent the birds from crowding around and the owner from having to constantly refill them.
- MaterialThey must be non-toxic and hygienic. Plastic or stainless steel best meet these requirements. However, porcelain, glass, and wood can also be used. Structures made from these materials are easy to clean and disinfect.
- Birds' access to waterThe design of the water trough should be such that the quails have constant and free access to water.
- Structural strengthIt must be strong and stable so it doesn't tip over when the birds drink. Furthermore, the birds shouldn't fall into the waterer while drinking.
- Ease of maintenanceThe water trough needs to be cleaned regularly, so it should be easily removed from the cage. Furthermore, it's best to install a removable water bottle outside the cage, on the side. This will not only make it easier to clean and fill, but also save space inside the cage.
- Protection against cloggingPieces of bedding, droppings, and other debris can end up in the water, requiring frequent water changes. To prevent this, install a waterer with a protective guard or grate.
- ✓ Resistance to chemicals used for disinfection.
- ✓ The material does not change the taste of water, which can scare away birds.
By considering all these points, anyone can make a high-quality drinking bowl with their own hands that will serve the farm for many years.
Types of drinking bowls
There are various types of waterers, varying in design and operating principle. We'll look at DIY models below.
| Name | Type of construction | Operating principle | Advantages |
|---|---|---|---|
| Open | Simple container | Free access to water | Ease of manufacture |
| Cup-shaped | Bowl with tongue and ball | Automatic water refill | Provides clean water |
| Nipple | Nipple with drip catcher | Drip feeding | Saving water |
| Vacuum | Bottle and vessel | Atmospheric pressure difference | Clean water, savings |
| Autonomous | Tank with automation | Automatic replenishment | Minimal human involvement |
Open
Open-type equipment is fairly easy to create, as it simply requires taking any suitable container, filling it with water, and placing it in the cage. However, this approach has several significant and obvious drawbacks:
- food, bedding particles and other debris often end up in the water;
- the container often tips over because birds hit it with their feet or wings;
- It is difficult to keep the cage clean because contaminated water often spills onto the floor, which promotes the active growth of microorganisms and bacteria;
- A bird may accidentally jump into a container and choke on water.
The opening of the drinking bowl cannot be used to water the young birds, as during active play the chicks may fall into the water, choke and die.
Cup-shaped
They consist of a small cup containing a floating tab and a small ball that blocks the flow of liquid. Water is supplied through a thin rubber hose. They are primarily used for hatchlings, as they provide them with constant access to clean, fresh water.
This design works on the principle of scales, since the process of water flow is determined by the weight of the container with water itself:
- A cup filled with water is lowered down and blocks the pipe.
- The empty cup rises upwards automatically.
- The ball rises and liquid flows into the empty bowl.
There are also linear designs. In this case, the bowls are filled with water from a common reservoir. When they are full, a valve is activated and the water flow is stopped. As the bowls become empty, the valve opens the flow.
These waterers are sold in specialty stores and online. They cost about 30 rubles each.
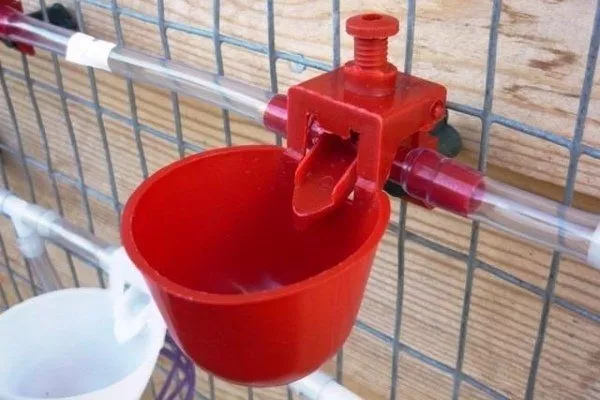
Nipple
They resemble hand sinks, often seen in gardens near country houses and summer cottages. They work like a handwashing basin, as water flows in small drops into the bird's beak or a separate container after pressing a nipple. This prevents the birds from getting soaked while drinking.
For this design to function, pressure in the supply pipe is essential. To prevent water leakage from the water bowl, it's advisable to install a drip catcher at the bottom of the device.
Nipple drinkers are very popular due to the following advantages:
- allow you to save water, since it comes in droplets in exactly the amount that the bird needs;
- quails are constantly provided with fresh and clean water;
- do not require the poultry farmer to constantly monitor the presence of liquid in the container;
- make it easy to add vitamins or medicines to the water for birds.
If the drinking bowl is made for young animals, then in the first 3 weeks of their life it is better to use a soft nipple, which can later be replaced with a hard one.
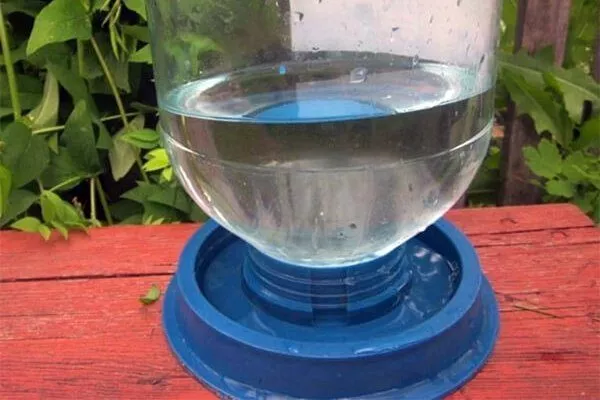
Vacuum
They operate on the principle of the difference between atmospheric pressure outside and inside the tank. This allows for significant water savings, while also keeping water clean.
Typically, this type of waterer consists of a plastic bottle and a container with a special mount for the bottle. This design is inverted, and water flows into the tray due to the difference in atmospheric pressure between the bowl and the container. Water is added to the bottle once it is completely empty.
Vacuum waterers come in various sizes, but smaller ones are best for quail. They are very popular on farms where large numbers of quail are kept.
Autonomous
They operate automatically, so the poultry farmer only needs to regularly monitor the amount of water in a large plastic or metal tank, as well as check the structure for damage and contamination.
They are primarily used on large poultry farms or home farms with large flocks. This allows the birds to be provided with good watering conditions without constant human intervention.
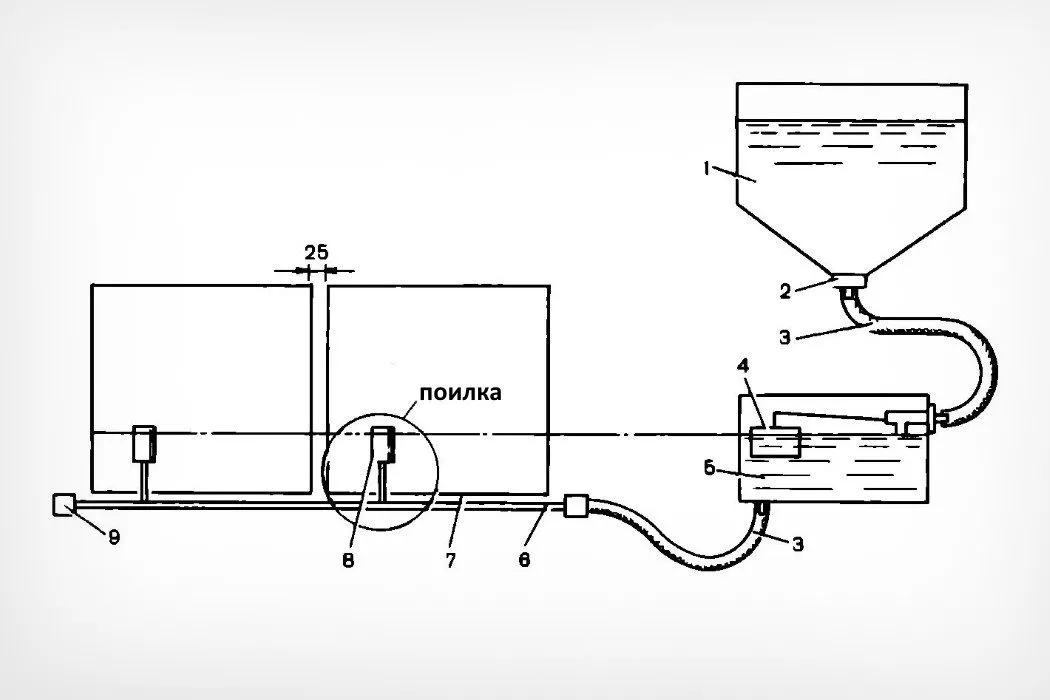
1 — tank; 2 — filter; 3 — hose; 4 — float; 5 — cistern; 6 — main pipe; 7 — cage; 8 — drinker; 9 — plug.
Various drinking bowls made from plastic bottles
These are vacuum-type waterers that hang from a wall or fence, saving space and preventing tipping. They can be made in a variety of ways, which we'll discuss below.
| Name | Material | Volume | Peculiarities |
|---|---|---|---|
| Option No. 1 | Plastic bottles | 5 and 2 liters | Suspended structure |
| Option #2 | plastic bottle | up to 2 l | Simple pendant |
| Option No. 3 | plastic bottle | 1.5 l | Improved suspension |
| Option No. 4 | Plastic bottle | 2-2.5 l | Stable design |
| Option No. 5 | plastic bottle | Not specified | Stable with stand |
Option No. 1
To assemble the drinking bowl, you will need to prepare:
- plastic bottles of 5 and 2 liters – 1 piece each;
- scissors;
- self-tapping screws;
- coils of wire.
The structure is assembled in several stages:
- Cut off the neck of a 5-liter bottle at a distance of 10-12 cm from the neck.
- In the smaller bottle, make several holes 7-8 cm above the lid so the quail can easily stick their heads through them. Don't make the drinking holes too large to prevent the quail from splashing water all over the place while drinking.
- Screw a 2-liter bottle cap into the center of the inside of the 5-liter bottle cap using self-tapping screws.
- Fill the smaller bottle with water, screw it on, and turn the whole structure upside down.
- Attach a wire to the drinking bowl and hang it in the cage.
Option #2
If the herd is small, a drinking bowl can be made from one bottle with a capacity of up to 2 liters, following these instructions:
- Make several small holes in the plastic bottle cap.
- Make a holder out of wire and attach it to the bottle with electrical tape.
- Fill the bottle with water about 2/3 full, turn it upside down and hang it on the wall of the cage.
- Place the tray down.
The water from the bottle will gradually drip into the tray, ensuring the birds have unimpeded access to water. This type of waterer will require refilling 2-3 times a day. However, it has a significant drawback: the water in the tray quickly becomes dirty due to food particles, droppings, and other debris. The water will need to be changed frequently, and the structure will need to be cleaned regularly.
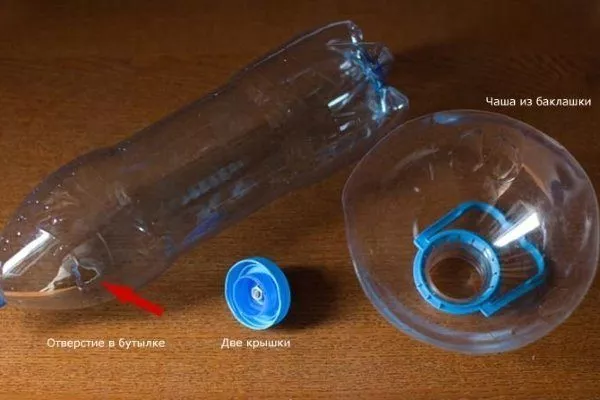
Option No. 3
This waterer is similar to the previous one, but is more advanced. To make it, you'll need:
- 1.5 liter plastic bottle;
- pallet;
- scissors;
- self-tapping screws.
The drinking bowl is assembled as follows:
- Cut off the bottom of the bottle and make several small holes near its neck.
- Screw the lid of the vessel into the center of the tray.
- Turn the bottle over and screw the cap on.
- Pour in water, which will flow through the holes into the tray to the required level.
A simple version of a drinking bowl can be made following the instructions in the video:
Option No. 4
To ensure the structure is stable, it can be built with a special stand. You'll need to prepare:
- a plastic bottle with a capacity of 2-2.5 liters;
- a small bowl (a low tin can or any other shallow bowl);
- plywood sheet;
- bars.
To make the design, you need to follow this sequence:
- Cut two rings from a sheet of plywood. The lower one should be smaller in diameter than the bottle, and the upper one should be larger, allowing the bottle fragment to pass through freely.
- Fasten both rings with bars at a distance of 9-10 cm.
- Attach the frame to the side wall of the poultry house.
- Insert the bottle upside down and place the tray underneath. The neck should almost touch the bottom of the tray.
The principle of manufacturing such a drinking bowl is shown in the drawing:
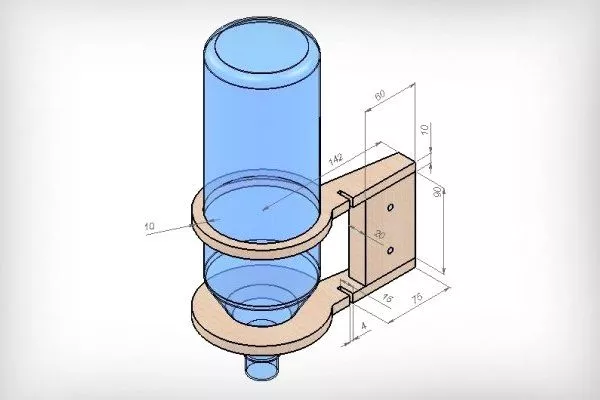
To use this waterer, simply fill the bottle with water, insert it into the frame, and unscrew the lid. The bowl will fill to the desired level.
Option No. 5
You can make the waterer described above in a different way. To do this, you'll need:
- plastic bottle;
- tin;
- thin wire;
- sharp knife;
- drill.
The structure is assembled in the following order:
- Cut the lid off the can and clean the edges so they are perfectly smooth.
- Make 2 holes in the can for fastening at a distance of 6 cm from the bottom.
- Fix the jar to the water dispensing point using screws.
- Drill several very small holes in a circle around the neck of a plastic bottle.
- Fill the bottle with water, screw on the lid and insert it upside down into the tin can.
- Secure the bottle with wire by wrapping it around the drinker in 2 places and attaching it to the support.
There will always be the same amount of water in the bottom, since its consumption for drinking will be compensated by the flow of new liquid through small holes.
The principle of making such a design is shown in the video below:
Nipple drinkers
These designs are popular with poultry farmers because they help conserve water and keep the cage clean. They also work like automatic waterers. They can also be made using various instructions.
Option No. 1
You will need:
- polypropylene pipe with a diameter of 25 mm;
- nipples;
- drip collectors;
- plastic pipe plug;
- drip trays;
- automotive sealant;
- metal angle;
- pencil;
- drill;
- screwdriver.
Having prepared everything you need, you can begin assembling the drinking structure:
- Place the nipples along the pipe strictly in a straight line. Leave 10 cm from the edge of the pipe and 30 cm between the nipples.
- Drill holes according to the completed markings. Start with a small-diameter drill bit, then drill holes 0.5 mm smaller than the thread diameter on the nipple.
- Take one nipple and insert it into the screwdriver with the threads facing outward. Lightly seal the threads with sealant and screw the nipple into the pipe. Screw in the remaining nipples in the same manner to create an even row.
Sealant is used to prevent water leaks. Alternatively, you can use tape or Teflon tape, simply wrapping it around the nipples.
- Seal one end of the pipe tightly by soldering a plug. Attach a hose to the other end of the pipe, which is connected to a water tank.
- For convenience, install a drip catcher (for example, bend a large tablespoon into a “C” shape) under each of the nipples.
- Attach the drinking bowl to the cage, install a water tank and you can start watering the birds.
Option #2
It is simpler, but the result is also an excellent drinking bowl that will last a long time.
You will need:
- 5 liter plastic bottle;
- nipple;
- drip collectors;
- drip trays;
- brackets;
- screwdriver.
A drinking bowl is made from a 5-liter bottle in the following way:
- Use a screwdriver to drill several holes in the lid and install the nipples, then return the lid to the bottle filled with water.
- Attach drip catchers at a level convenient for quails.
- Install the drinker upside down using the brackets.
- Place containers under the nipples to collect water drops.
If you have more than 15 individuals on your farm, you should install several of these waterers. Remember, the water level should always be higher than the existing nipple rim.
To learn how to make a simple nipple drinker in 3 minutes, watch the following video:
- ✓ The need to regularly check the nipples for clogging.
- ✓ The importance of using drip trays to keep the cage clean.
Automatic drinker with dispenser
To minimize the poultry farmer's involvement in quail watering, it's best to install an automatic quail waterer. This is especially important for large flocks.
First of all, you need to prepare the following materials and tools:
- plastic pipe;
- wine bottle cork;
- a sheet of dense foam;
- aluminum or copper wire;
- a piece of rubber (you can use a school eraser);
- window seal (the rubber must be soft);
- a ballpoint pen case with a pointed tip;
- nail;
- sharp knife;
- rubber glue.
Next, you can begin making a drinking bowl with a float system:
- Fold a piece of aluminum in half and screw it onto a nail on both ends. You want to create a sort of "swing" that rotates freely on the nail.
- Remove the nail, insert a piece of hard rubber band into the bent part of the "swing," and squeeze it tightly to prevent it from falling out. Use a knife to trim off the excess rubber to increase the area of the bent part.
- Use an awl to make two small holes in the wine cork. Insert the wire legs through them.
- Cut a piece of plastic pipe in half to create a gutter. Glue a piece of foam to one end of the pipe using rubber cement. Seal the other end with a small piece of plastic.
- Make a through hole in the pipe at a distance of 3-4 cm from the foam.
- Cut the ballpoint pen into 3 parts: 2 small ones of the same size and 1 large one with a pointed tip.
- Insert a nail through the hole and slide one of the small handle pieces onto it. Place the "swing" on the remaining part of the nail, then slide the other handle piece through and pull the nail tip out through the opposite hole.
- Make a hole through the foam at the structure's level and insert the long end of the handle, pointed end first, into the groove. Attach a tube to the other end of the handle, which will draw water from the common reservoir. Once the water level in the fountain reaches the desired level, the wine cork will lift and close the hole, stopping the water supply.
- Make holes in two places and thread a copper wire with a curved end through them. Use this "hook" to hang the structure in the cage.
The length of the plastic pipe is determined based on the length of the cage, but it must be at least 10-15 cm so that the bird cannot reach the mechanism and cause damage to it.
You can see how to assemble a float for this type of drinker in the following video:
An automatic waterer with a float system can also be assembled using a nipple. To see how, watch the video:
Where to place?
Once you've built your waterer, you need to choose the right location for it. To do this, consider a few rules:
- Do not install them alongside feeders, otherwise the food will leak into the water and contaminate it. Furthermore, drips may fall on the food, causing it to swell and spoil.
- Avoid placing the waterer in the center of the coop, as this is where quail actively move and play. They may accidentally knock over the waterer.
- It's best to distribute the water in the corners so everyone has access to it. If this isn't enough due to a large flock, it's worth installing additional troughs. It's worth keeping in mind that one small bottle drinker serves up to 5 birds, while a large nipple drinker serves up to 10 birds.
- If possible, waterers should be installed behind the cage to prevent chicks from falling into the water and choking or drowning. This also minimizes the risk of damage to the structure.
So, if you have quail on your farm, you can make your own waterers using available materials and ready-made instructions. Experienced craftsmen can experiment and create unique designs. In any case, it's important to consider the requirements that both homemade and store-bought waterers must meet.
We saved a lot on homemade waterers. Because once you start raising birds, the expenses are pretty hefty. But at least we didn't have to spend any money on this. I was really impressed with the homemade automatic design. My husband tried making one. The first one turned out so-so, but the others were fantastic.