Quail cages should be equipped with feeders that provide easy access to food. These can be purchased at a store, or you can make your own, depending on the number of quail on your farm. This will require choosing the appropriate type of feeder, gathering the appropriate materials and tools, and then assembling the feeder using the provided drawings and step-by-step instructions.
Types of structures
Quails aren't the cleanest birds, as they often scatter food and make a mess in the cage. Properly designed feeders can help prevent some of this mess. They should be chosen individually, depending on the bird's individual needs.
Depending on the type of feed loading, there are the following feeder options:
- TrayA good option for keeping chicks up to 2 weeks old. They are typically placed inside the brooder, although these structures can also be attached outside the cage to prevent food from scattering. One type of food is poured into the installed trays with small sides.
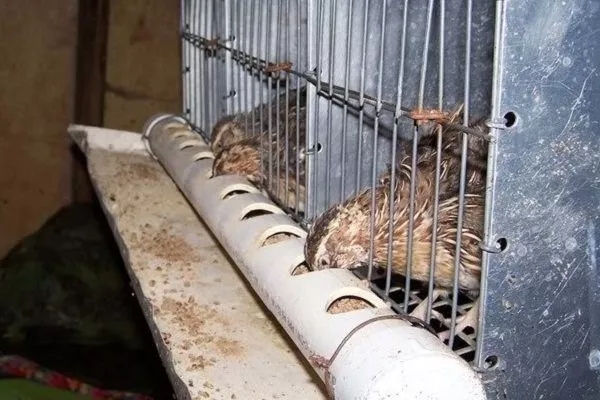
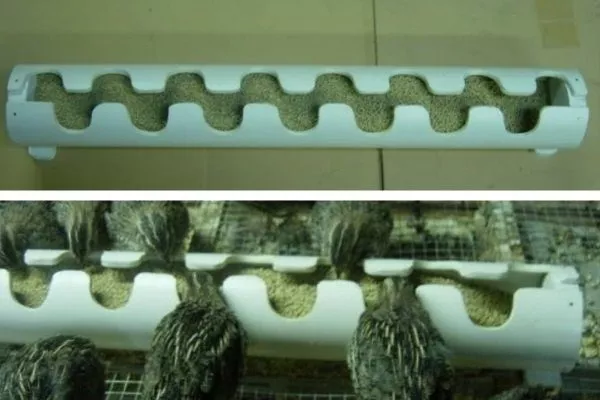
- GroovedThese are more suitable for feeding adult birds, although they can also be used for young birds. They can hold several types of dry food. To prevent the birds from scattering the food, it's necessary to provide a feeding space of 30-50 mm for each bird. These items are typically placed outside the cage.
- BunkerSuitable for adult birds. They are most often placed outside the cage, but there are also models for indoor installation. Hopper feeders can only be filled with dry food, and this can be done once every few days. The food will automatically flow into the tray as it's used.
- AutomaticThis is an improved version of a hopper feeder, which dispenses feed without human intervention. It is equipped with a timer that allows for controlled feed delivery. It also has a dispenser that determines the amount of feed dispensed. Automatic feeders are typically installed on larger farms. This is a rather complex design to construct yourself.
Feeders are also classified by design features. They can be:
- Suspended and floor-standingMany breeders choose hanging models because they can be placed outside the cage, preventing dirt and food from getting into them. This ensures the food is always clean. Floor models are more often used when free-range chicks are kept.
- Cellular and groovedAt the very beginning of chick life, mesh feeders are used, as they allow each chick to have ample space and prevent crowding during feeding. Later, trough feeders are used. When constructing these, it's important to ensure that the feeding space per chick is 17 cm.
- Buffered and openThe first models are equipped with a dispenser that ensures the feed mixture is dispensed in precisely uniform volumes. Therefore, they only need to be refilled every few days. The opening of these models is simpler and requires daily refilling with fresh feed.
Requirements for the feeder
For a homemade bird feeder to be convenient and safe to use, it must meet the following requirements:
- It is made from materials that are safe for birds, do not emit toxic or poisonous substances, are easy to clean, and are durable and long-lasting. Galvanized sheet metal, sheet steel (preferably stainless steel), plastic, wood, and ceramics meet these requirements. Criteria for selecting materials for feeders
- ✓ Ensure that the material does not release toxic substances when in contact with feed or water.
- ✓ Check that the material is resistant to bird beaks and claws.
- ✓ Consider climatic conditions: some materials may deform at high or low temperatures.
When making a feeder, copper or other toxic or potentially poisonous materials should never be used.
- It has volumes larger than the size of the food that is intended for feeding birdsIt is important to remember that the box is not filled completely, but only to 2/3 of its capacity, to prevent food from spilling.
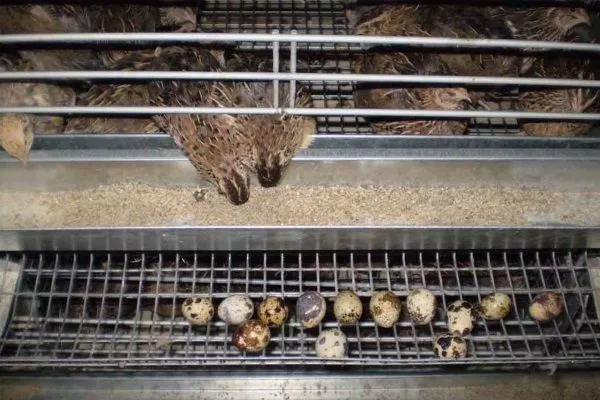
- The dimensions correspond to the cage or brooder size and the number of birds on the farm. Typically, 15 birds are housed per square meter of cage, with a feeding space of 5-9 cm per bird. If an outdoor structure is used, the feeding space per bird is at least 1.1 cm along the length of the tray.

- Provides birds with easy and free access to food. To achieve this, the feeder should have low sides. Furthermore, it should keep the feed clean, with a protective device to prevent droppings, bedding, and other debris from getting inside.
- Easy to maintain. The feeder should be designed so that the owner can easily fill it with food. It should also be easy to clean. For example, it's preferable to use hooks instead of screws. This will allow the feeder to be easily removed and cleaned.
- Check all connections and fasteners for strength.
- Make sure the feeder is stable and will not tip over when in use.
- Check for sharp edges or corners that could injure birds.
Hopper feeder options
There are various variations of this design, which we will examine in more detail below.
Made of chipboard
This option is considered one of the best, although it can be assembled in an hour using materials that can be found in bins or purchased for a small price.
Here are the tools and materials needed:
- CD-60 profile, used for installation of ceilings and walls approximately 20 cm wide (recommended feeder dimensions for adult quails are 2x2.5 cm);
- 2 sheets of chipboard 105x60;
- 4 mm plywood (or any sheet material: fiberboard, plastic, laminate) – 2 sheets measuring 20x10.5 and 20x8.5 cm;
- silicone or similar sealant to seal cracks;
- 10 self-tapping screws measuring 1.6 x 2.5 cm;
- pliers;
- jigsaw;
- drill.
Once you have prepared everything you need, you can begin making the bird feeder:
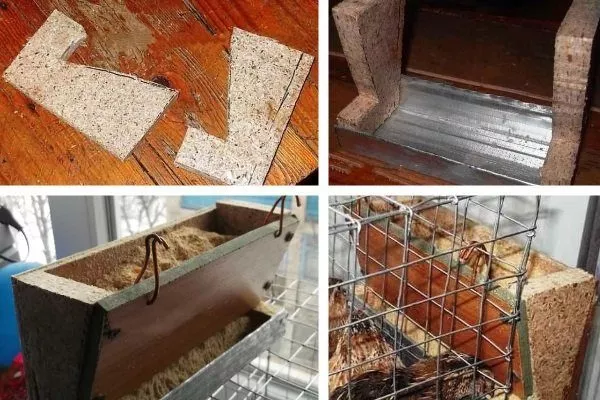
- Cut out two paper templates in the shape of the number "7" to fit the CD-60 profile. The bottom size is 6 cm, the side walls are 2.7 cm. The height is 10.5 cm (based on 1/2 the height of the brooder door).
- Apply the templates to the chipboard sheet and mark them.
- Use a jigsaw to cut out two pieces of the "sevens" to create the side walls. You can see what they look like in the photo below.
- Use pliers to crimp the side of the CD profile that will be facing the cage. Failure to do this may result in injury to the quail in the future.
- The second side, on the contrary, should be straightened.
- Drill holes for the screws in the profile and the ends of the chipboard to prevent cracking. Next, you can install the screws. Typically, one on each side and one on the bottom is sufficient.
Self-tapping screws should be used with cast washers. They don't have a cone under the head, significantly reducing the risk of cracking the ends of chipboard and plywood.
- Measure the width and height of the semi-finished structure. Cut the front and back walls using these measurements. In this case, you can use materials other than plywood, as the sheet material doesn't necessarily have to be rigid. Plastic, laminate, MDF, or thin plywood are all acceptable options. However, if the feeder is taller than 20 cm, it's advisable to combine the use of a "soft" material with a rigid profile for the second wall.
- Screw the walls together and you've got a finished hopper-type feeder. Inspect it carefully. Any uneven spots should be smoothed out with a sharp knife.
- Apply silicone or other sealant to all cracks to prevent the feed from spilling out during use.
- Attach the feeder through the side panel of the brooder door with a screw. If you're installing it in a galvanized steel mesh frame, things are even simpler. Drill two holes in the front wall, thread copper wire through them, and create a hook. Then hang the feeder at the desired height.
It is recommended to fill bunker feeders so that there is enough food for several days and the quails do not go hungry.
From a plastic bottle
This design is simpler than the previous one and takes no more than half an hour to build. It's a great option for inexperienced craftsmen who don't have carpentry or metalworking skills.
To make it you need to prepare:
- plastic bottle;
- sharp knife.
The feeder is made in the following order:
- Cut the plastic bottle almost in half.
- At the bottom, use a sharp knife to cut holes in a circle with a radius of 1 cm so that the quail can stick its head through them.
- Turn the top of the bottle upside down and insert it into the bottom. Pour food into it and place it in the bird cage.
It is recommended to place the resulting feeder in a tray and secure it with a self-tapping screw.
The video shows and explains how to make a simple bunker feeder:
Made of metal
Toxic materials like copper should never be used in making bird feeders, but metal is perfectly acceptable. It's also easy and quick to clean and disinfect. Let's take a closer look at how to make the necessary equipment from it.
Here's what you'll need to prepare:
- sheet metal;
- metalworking scissors;
- sheet bending machine;
- hammer;
- drill;
- riveter;
- pliers;
- clamps;
- calipers;
- ruler.
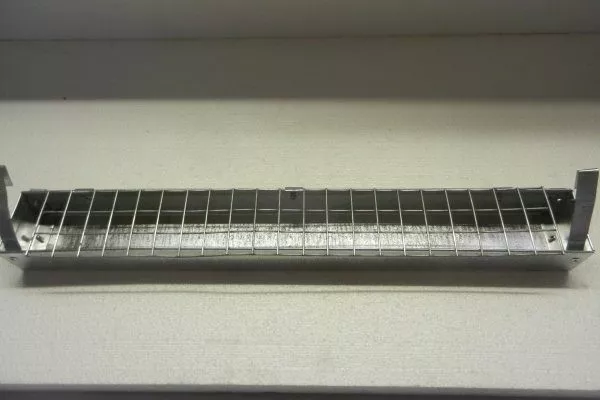
It is necessary to cut 4 blanks from a sheet of metal, using the prepared drawings:
- main part – 340x940 mm;
- internal part or dispenser – 200x940 mm;
- 2 side walls in the shape of a rectangular trapezoid, 180 mm high and with bases of 150 and 100 mm:
The length of the feeder depends on the cage size and can vary. The 940 mm size allows for economical use of metal, as two such feeders and even four trays can be made from a 1250 x 200 mm sheet without waste, making them a must-have.
So, having cut out all the necessary parts, you can begin assembly:
- Bend all edges tightly in one plane by 1 cm to prevent injury to the quail. To ensure even folds, first bend both ends with a hammer, then secure the piece with a clamp and begin working on the entire edge.
- Give all the blanks the desired configuration using a sheet bending machine corner.
- On the sides, fold the short side down by 100 mm, then the rest. Leave small loose tabs at the top of the long side.
- Place the side parts onto the main part and bend the tabs inward with pliers to secure the parts.
- Insert the dispenser inside and secure all components with rivets using a drill and rivet gun. To ensure the dispenser is securely in place and adjustable depending on the feed size, insert two metal retaining strips inside the feeder. The optimal width is 15-20 cm.
If you follow these instructions, you can assemble a feeder that can be filled with 7 kg compound feed, which will provide the birds with food for 5 days. To ensure proper execution, we recommend watching the following video to see the entire process of making the feeder—from cutting the metal to assembling the blanks:
Making tray feeders
Such structures can also be made from a variety of materials, which will determine the complexity of assembly. Let's consider several options.
Made of metal
To assemble a primitive version of the feeder, we use the remains of a metal profile for installing suspended plasterboard ceilings.
The procedure is as follows:
- Cut off a piece of profile of the required size.
- Carefully fold back the edges of the sheet to create a trough. When cut, the piece should have a trapezoid shape. To ensure its strength, the ratio of the base width to the height of the sides should be at least 2:1.
- Make side plugs to prevent food from spilling. You can use galvanized metal, foam, or plywood for this.
- Place a large-mesh grid over the top of the trough to prevent quail from climbing inside and scattering feed. To prevent the birds from tipping the grid over, screw it to the side of the structure.
This feeder can be hung on the cage using the attached metal holders.
From the pipe
To make a plastic tray feeder, use a piece of water pipe. You'll also need a cutting tool.
You can make feed inventory in several stages:
- Cut the pipe to the required length.
- Cut a snake-shaped pattern into the pipe, as shown in the photo below.
- Place a plug on one end of the pipe and an 87 degree elbow on the other.
Made of wood
This is the most complex design, but it will last significantly longer and prevent the birds from scattering the feed. Interestingly, it is versatile, as it has a removable partition. If installed, the feeder becomes a hopper feeder and can be used for feeding fattening birds.
To make it you will need:
- tree;
- plywood scraps;
- jigsaw;
- circular saw;
- hole saw;
- screwdriver;
- calipers;
- ruler.
The structure is assembled in the following order:
- Prepare the “foundation” – a wooden lath measuring 5x100 cm and 1.5 cm thick.
- Cut two side pieces and one crosspiece in the shape of rectangular trapezoids. Their height is 11.5 cm, and the bases are 9.5 cm and 5 mm long. Make grooves in the middle of them to later insert plywood, which will serve as the hopper feeder.
- From 6 mm thick plywood, cut out 2 side pieces measuring 14x100 and 13x100 cm.
- In the larger side, cut 15-16 holes with a diameter of 3.5 cm and a distance of 3 cm. It is advisable to use a hole saw for this.
- Connect the bottom and side parts with holes using a screwdriver.
- Lubricate the sides and the crossbar with glue and also attach them with a screwdriver, aligning them with a metal corner.
- Attach the last part - the solid side.
If you insert plywood partitions that do not reach the bottom by 2-2.5 cm, you can get a bunker-type feeder.
The entire assembly process can be seen in the video:
How to make a trough hanging feeder?
This is a simple structure, most easily made from galvanized sheet metal. If you don't have any on hand, you can use aluminum.
You need to prepare in advance:
- galvanized sheet 0.5 mm thick;
- pieces of plywood;
- a jigsaw or a hand saw for wood;
- metal shears;
- small carnations.
It is manufactured according to the following drawing:
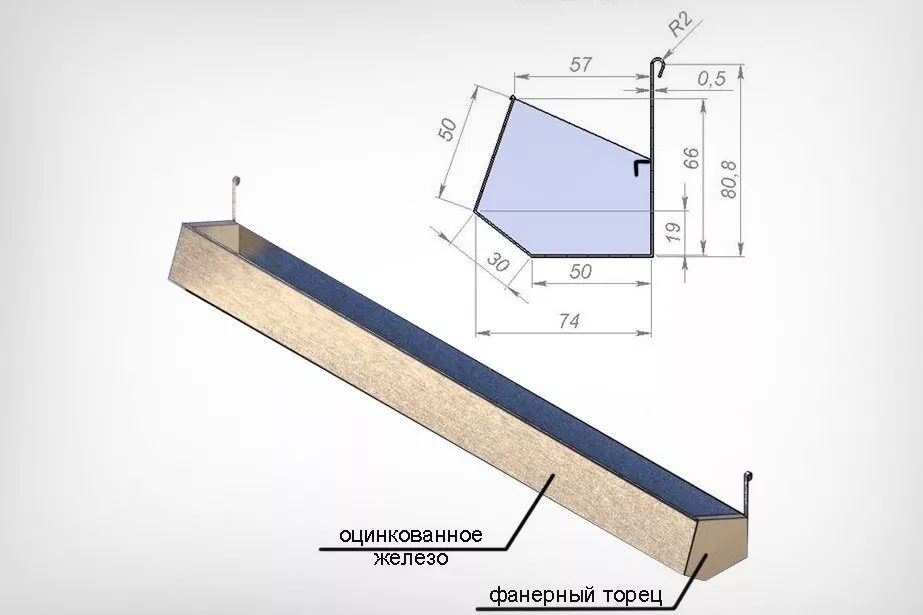
The sequence of actions is as follows:
- Cut out the sides from the plywood sheet.
- Use a pencil to mark the fold lines of a metal sheet 18 cm wide. Step back 5 cm from the wide edge, draw the first line, 3 cm later – the second, 5 cm later – the third, and 4 cm later – the fourth.
- Bend the side that will be parallel to the cage at a 30-45 degree angle to facilitate feeding. Bend the other sides at a 90 degree angle.
- Fold the side adjacent to the cage outward by 1.5 cm to prevent food from getting inside the cage.
- Secure the plywood sides with nails.
- Attach 4mm wide steel strips to the end faces. Bend them, and hang the structure in the desired location using the resulting hooks.
- Bend the edges of the feeder to prevent the quails from getting hurt.
Trough-type equipment should be covered with a net, similar to tray feeders, to prevent quails from scattering valuable feed.
There are various types of bird feeders that a DIYer can make. Some options are simpler, while others are more complex, so anyone can choose the right one based on their skill level. However, certain requirements must be met to ensure the feeder is easy to maintain and poses no risk to the birds.