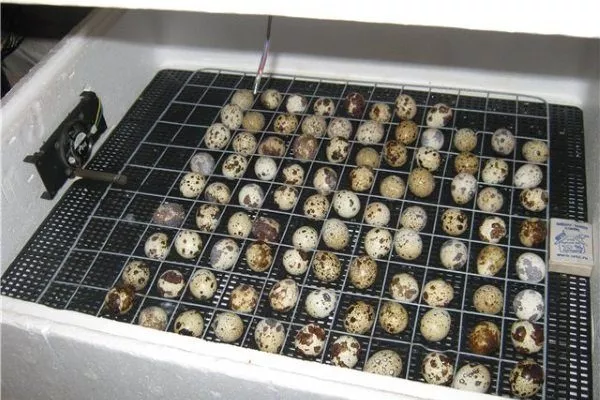
Domesticated female quail may lose their instinct to brood. However, even if a bird is capable of brooding, she will still be unable to lay more than 15 eggs. Therefore, a quail breeder must acquire an incubator, which will serve as a laying hen. A trip to the hardware store is not necessary; a modern device can be made in a home workshop.
Why do you need an incubator?
Quail are usually kept in large numbers due to their small size. However, natural offspring are sometimes insufficient to maintain a healthy population, as a single female can only incubate 12-15 eggs. Furthermore, she may refuse to incubate them at all.
To solve this problem, an incubator is needed—a hermetically sealed box with insulation, a special heater, and egg trays. This artificially creates all the conditions necessary for the production of healthy chicks from fertilized eggs.
There are a wide variety of incubator models available at hardware stores, but they can be expensive. To significantly reduce your costs, you can build your own unit using readily available materials and ready-made plans.
Requirements
If the device doesn't meet certain requirements, you could lose all your eggs at once during operation. Therefore, when building your own incubator, please consider the following rules:
- The incubator temperature should be maintained between 37.3 and 38.3°C. The temperature in the room where the incubator will be located should not fall below 20°C. Humidity should be maintained at 50-50% inside the chamber and 20% outside.
- The easiest way to heat a drawer is with standard 40-watt incandescent bulbs. Four of these bulbs are sufficient to heat a small space. A heating element can be used as an alternative, but the design will be more complex.
- Heat must be evenly distributed throughout the incubator. This is no easy task, given that warm air rises. Therefore, hatching eggs often need to be rearranged. In industrial units, this requires swapping the trays, while in domestic units, the eggs need to be moved from the middle to the edges. However, another option is to equip the incubator with two heat sources, placing the first under the lid and the second on the lid. 25-watt incandescent bulbs (two each at the top and bottom) can be used as heating elements.
- To optimize temperature control, the tray bottoms should be made of metal mesh, as it allows warm air to pass through much more quickly. The trays themselves are best made movable rather than stationary, with two trays measuring 1/3 of the row's area instead of one solid one. This will eliminate temperature fluctuations, as the egg will remain centered in the unit, ensuring optimal incubation throughout the entire process.
- If possible, the lid of the device should be positioned on the top, not the side (covering the entire wall). This will prevent the incubator from cooling down too quickly when turning the eggs.
- The device's housing can be made from a variety of materials, from a wooden box to an old refrigerator. However, in any case, it will be necessary to provide the device with adequate thermal insulation using modern insulating materials.
During the incubation period, the temperature inside the device should be maintained at 37.3-38.3°C and humidity at 50-55%. These parameters should not be affected by fluctuations in the outlet current or power outages. You can read more about how quail eggs are incubated here. here.
Construction principle
When making a homemade incubator, you can use a variety of materials and designs. However, the operating principle is essentially the same:
- A box of the appropriate size is used as the body, and insulated walls are installed to maintain a stable temperature and humidity. The outside can also be lined with polystyrene foam boards or rolled insulation, and the top can be covered with plywood. An old refrigerator can also be used as the body, with several holes drilled in the top for ventilation and a glass panel installed to monitor the eggs.
- The inside of the chamber or box is cleaned to allow for future cleaning and disinfection of the cavity.
- To install the net with eggs, stops and a sealed hatch are made.
- To maintain the desired humidity level, an evaporator is installed at the bottom of the chamber. The screens must be installed higher, otherwise the chicks may drown in the bath.
- To ensure that all eggs are heated evenly, an internal fan with an intermittent switching mode is installed on the upper and lower grids.
- An air space is created in the chamber to allow the egg nets to be rotated 45 degrees. The distance from the floor to the tray should be at least 10 cm. The distance from the tray to the ceiling or the upper viewing window should be calculated based on the heating method. If 40-watt bulbs are used, this distance should also be at least 10 cm.
- To make egg trays, you can stretch any suitable material, such as nylon fishing line, over a foam frame. The main thing is to ensure that the eggs don't roll when the tray is turned over, and that the hatchlings don't fall into the cells.
- Mains power is used for incubating birds. However, it's recommended to connect a battery in case of emergency.
- To monitor the temperature in the chamber, a mercury thermometer is installed, which is typically used to monitor the operation of temperature sensors. It should not touch the eggshells. A psychrometer is installed to measure humidity.
- When the chicks hatch, a fine mist is created in the chamber to ensure the shells are easily removed when cracked by the chicks' beaks. The chicks dry in the chamber for 1-2 days.
- The finished incubator is installed on a raised platform.
- ✓ First 12 days of incubation: temperature 37.8°C, humidity 60%.
- ✓ From the 13th day until hatching: temperature 37.5°C, humidity 70%.
- ✓ Eggs should be turned at least 3 times a day until the 18th day of incubation.
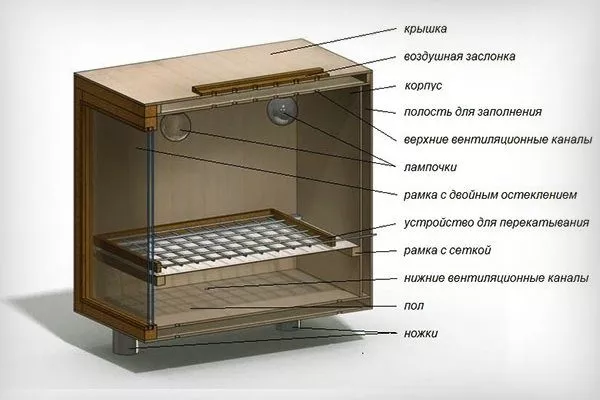
By assembling an incubator yourself, you can get a design like this:
How to make an incubator from a foam box?
Foam plastic has the property of maintaining the required temperature, therefore it can be used as the main material in the manufacture of an incubator.
Option No. 1
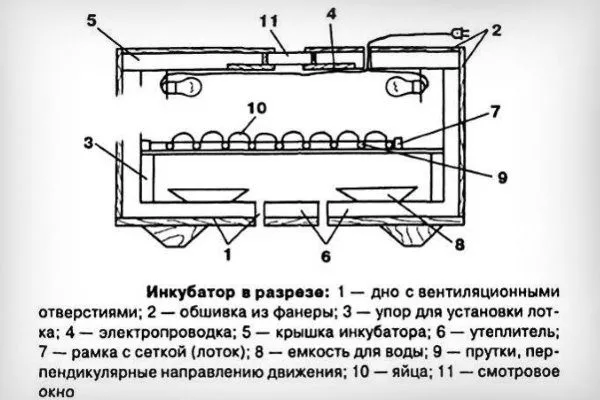
You can see how the device will look in section in the diagram:
Before assembling the device, you need to prepare:
- 2 sheets of foam or a ready-made foam box;
- 40 W incandescent lamp or 4 lamps of 15 W;
- glass or plastic;
- egg tray;
- water tray;
- fan;
- heat-insulating foil;
- thermostat;
- scotch;
- glue;
- soldering iron;
- drill.
The structure is assembled in the following order:
- Cut the first sheet of foam into four equal pieces to form the sides of the box. Glue the resulting sides together to form a box.
- Cut the second sheet of foam into two equal pieces. Take the first piece and divide it into two pieces, 60 cm and 40 cm wide, to form the lid and bottom of the structure.
- Cut a window with equal sides (square-shaped) in the lid. Cover it with glass or plastic.
- Glue the bottom to the previously assembled box. Seal the seams with additional tape, and line the interior walls with insulating foil.
- From the last sheet of foam, cut out legs - bars 6 cm high and 4 cm wide. Glue them to the bottom.
- Drill or solder three 12mm diameter ventilation holes in each side. They should be 1cm above the bottom.
- Attach lamp sockets inside the box.
- Install a thermostat on the outside of the lid and attach the sensor inside at a height of 1 cm from the egg tray.
- Insert the egg tray.
- Attach a fan to the lid of the structure.
- Place a tray of water on the bottom of the incubator.
You can see what a homemade incubator made from 4 cm thick foam looks like in the following video:
Option #2
A more complex incubator can be built from a foam box. This will also require tin cans, aluminum sheeting, 15-watt light bulbs, and a cooler to maintain a uniform temperature inside the device. Assemble the structure as follows:
- Cover the inside walls of the box with foil-coated polyethylene to help the incubator retain heat.
- Attach the cooler and light bulbs to the plywood sheet, as direct mounting to the foam core will be unreliable. The cooler should be angled so it blows air over the light bulbs.
- Cut out “screens” from tin cans to evenly distribute the heat radiation from the light bulbs.
- Cut holes in the lid of the box and attach a piece of glass so that the farmer can observe the condition of the eggs.
- Make several small holes in the box to provide the chicks with fresh air.
- Place a metal grid with 40x30 mesh cells on the bottom. Sharpen all mesh edges with a file.
- Attach a piece of wire to the grate to create a handle for turning the tray.
- Place containers of water at the bottom of the structure to maintain humidity levels.
To regulate the temperature, you can install a digital controller in the incubator. A psychrometer will also help maintain a constant humidity level.
Options for assembling an incubator from a wooden box
The base of such an incubator is a wooden box or frame. It is insulated from the inside with plywood, foam, or thermal insulation. Heat lamps and water trays are also installed to create the necessary conditions. There are several options for assembling this type of structure.
Option No. 1
A simple design, for assembly you will need:
- box;
- foam sheets;
- plywood sheet;
- metal construction mesh;
- one 40W incandescent lamp or 4 15W lamps.
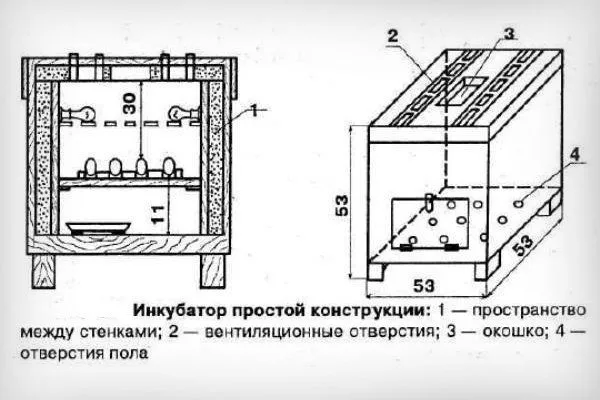
When assembling a product from a wooden frame made from beams, you can use the following drawing as a reference:
The incubator assembly is carried out in several stages:
- Cover the box with pieces of plywood and additionally insulate the walls with foam.
- Drill several ventilation holes with a diameter of 1 cm in the bottom.
- Make a glass window in the lid so that you can monitor the eggs in the trays and control the temperature inside the incubator.
- Under the cover, install electrical wiring with lamp holders, which must be located in each corner of the product.
- Attach an egg tray to a foam support approximately 10 cm above the bottom.
- Place a metal mesh over the top of the tray.
Option #2
Advantages of the model:
- wooden box;
- a sheet of plywood, foam or thermal insulation;
- lid;
- 3 wooden joists;
- 2 water trays;
- metal mesh;
- fixing strips;
- 2 heating resistors (PEV-100, 300 Ohm);
- 40W incandescent lamps;
- wire in heat-resistant insulation.
To make an incubator, you need to follow this sequence:
- Cover the walls of the box with heat-insulating material - plywood, foam or heat insulator.
- Make a viewing window in the lid and cover it with glass.
- Drill through holes in the lid and equip them with movable strips that can be opened or closed as needed.
- Install 40W lamps in each corner. Run the wiring 20 cm below the lid.
- Stretch mesh or grating over the metal frame to create an egg tray. Place it 10 cm above the bottom of the egg carton.
- Install a fan, thermometers, and a thermostat inside the box. This will allow you to monitor the microclimate inside the device and adjust the temperature and humidity levels as needed.
- Place trays of water on the "floor".
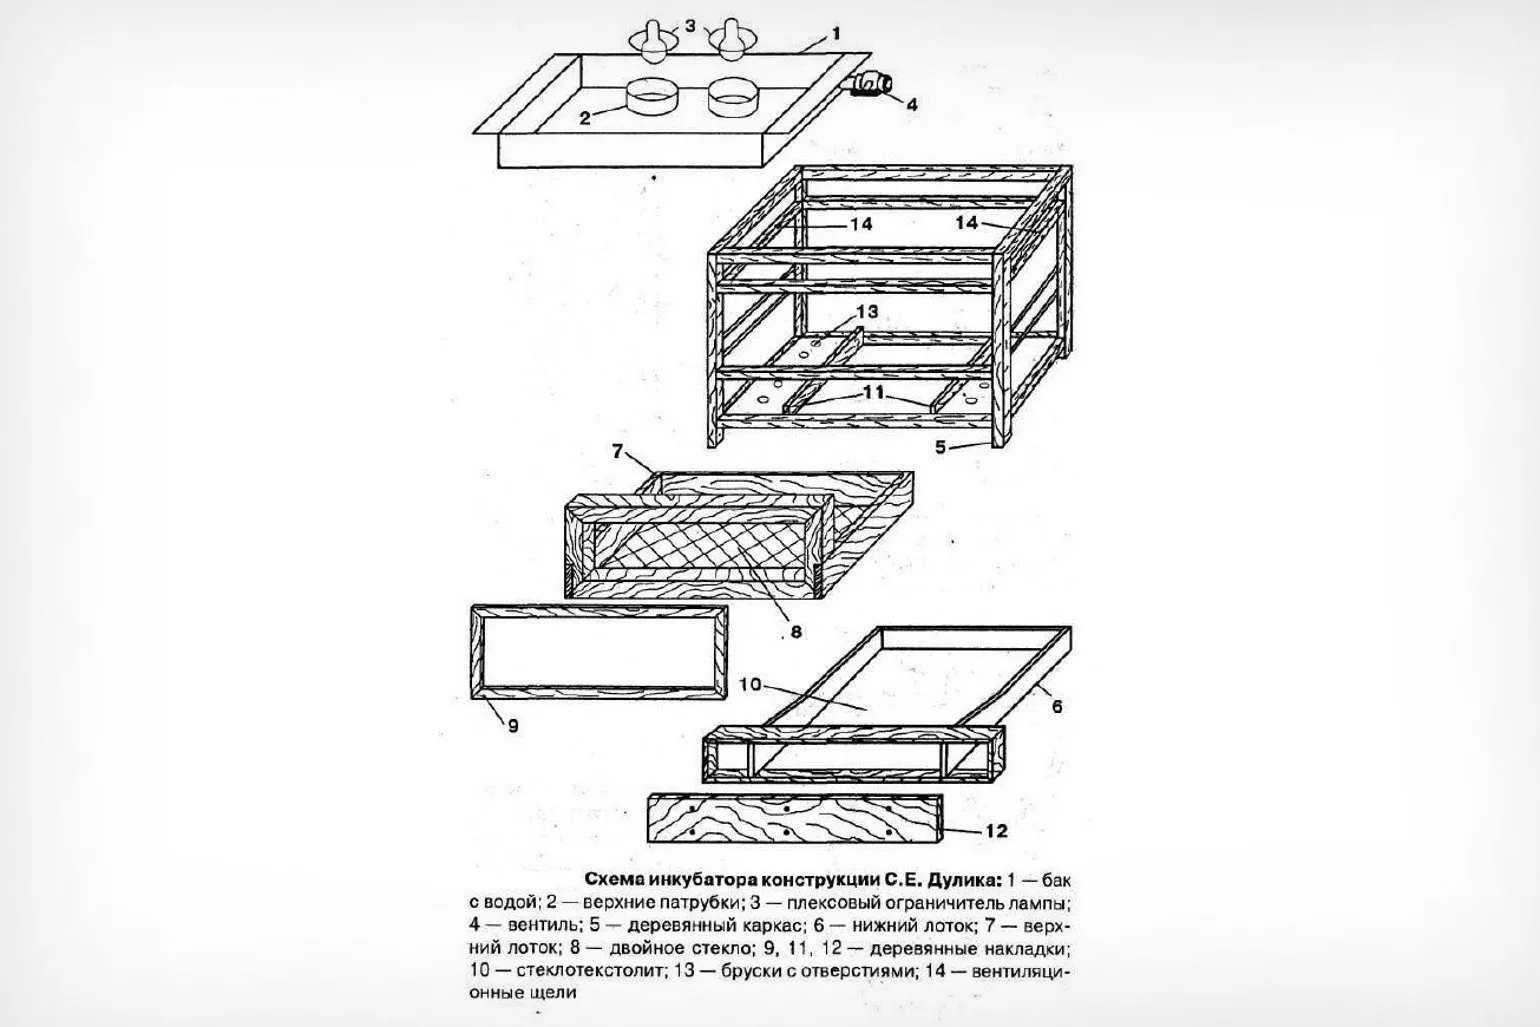
Homemade incubator based on Dulik's design
Amateur poultry farmer S. E. Dulik proposes a rather complex design, equipped with a heating element in the form of an iron tank filled with water. However, this ensures good operating results, as this heating method is independent of voltage and ensures uniform heating. Even in the event of a power outage, the chicks will remain healthy.
Dulik's diagram looks like this:
To make such an incubator yourself, you need to understand the principle of its construction:
- The incubator's distinctive feature is its heating element, a water tank (1). It ensures uniform heat distribution within the unit. Importantly, it will function regardless of the presence of power. This tank is made of 4 mm thick iron. It can be made of galvanized iron, but the seams must be soldered.
- The 30 mm high pipes (2) are made from 4-inch diameter pipe sections and welded into the top cover of the tank. The internal hole should be 10 mm smaller than the pipe diameter.
- The formed flange is needed for the lamp stop (3) made from 4-5 mm thick plastic. Two disks must also be cut from it: an outer one with a diameter of 95 mm and an inner one, the size of which must match the socket. The resulting fastening elements will also serve as heating indicator lights, as they allow you to see the water heating process.
- In the design itself, the 100W lamp bulbs are submerged in water up to the sockets. They should be selected with an external nut to allow for adjustment of the lamps relative to the socket height. In addition, two lamps are required to double as heaters. They are connected in parallel with the thermostat load.
- The tank is filled to the brim with water. To allow for drainage, a valve (4) is installed on the side of the tank. Additionally, it is recommended to insulate the tank with 40 mm of foam. This way, during a power outage for 10-12 hours, the water will cool by only 0.5-1°C.
- The structure itself is made from a wooden frame consisting of five 40x40 mm beams and two trays: the lower one (6) is used for water baths, and the upper one (7) is for laying eggs. The upper tray should be made from 12 mm thick planks, and the bottom of the incubator should be lined with mesh with 13x13 mm mesh. A nylon mesh for storing the eggs should be placed on top of this mesh.
- The front wall of the top tray is sealed with double-glazed glass (8) to retain heat and control the temperature inside the chamber. Wooden strips (9) are attached to the glass frame using screws and PVA glue. These strips should extend approximately 20 mm beyond the front wall on all sides to allow the tray to be sealed with foam gaskets and prevent heat loss from the hatching chamber.
- The bottom wooden tray (6) should have a 2 mm thick fiberglass bottom (10). It should be attached to the frame with screws from below. The bottom should extend 20 mm over the sides of the tray to allow the container to be pushed into the incubator along the grooves cut into the wooden strips (11), if necessary. The front strip (12) should be attached to this tray with screws. It is advisable to cover the front with foam.
- The bottom of the frame contains bars with nine holes on each side, each 12 mm in diameter. These should be opened to allow ventilation of the incubator. Additionally, 180 mm long, through-holes (14) should be made at the top of the frame, located on the right and left sides. Therefore, the top of the holes should be level with the bottom of the tank. They should also be fitted with small, two-part latches.
- The finished frame is covered with foam plastic and fiberboard on all sides.
Small incubator made from a plastic bucket
If you hatch a small number of eggs, it's best to make a compact incubator from a plastic bucket with a lid. The design is as follows:
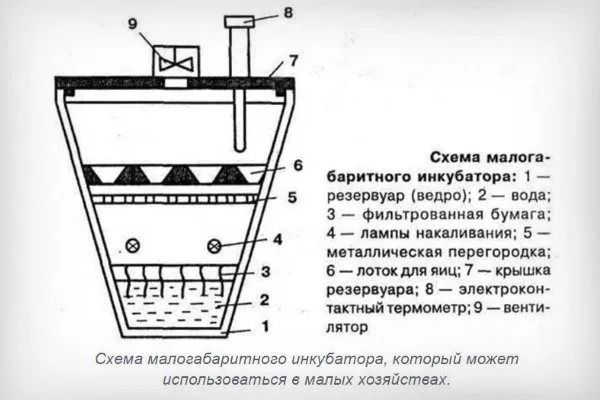
This incubator is very easy to make:
- Cut a small viewing window in the lid.
- Attach a heat source to the inside of the lid. One or two incandescent bulbs are sufficient.
- Place a mesh egg tray in the middle of the bucket.
- At a distance of 70-80 mm from the bottom, drill several ventilation holes in the side wall.
- Pour a little water into the bottom of the bucket to create the desired humidity level.
In this type of incubator, the tray containing the eggs must be turned regularly. This can be accomplished by slightly tilting the bucket, but the angle should not exceed 45 degrees.
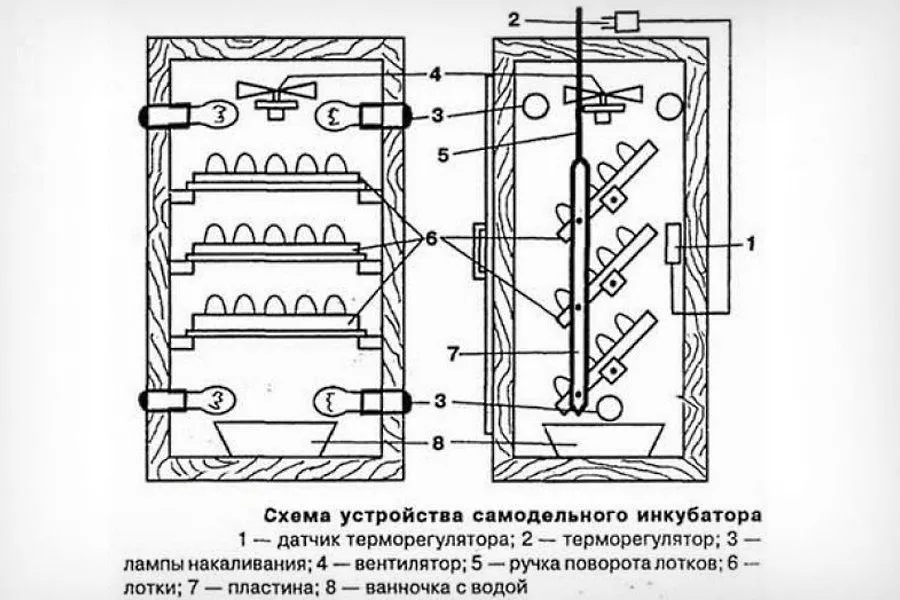
How to make an incubator from an old refrigerator?
An old refrigerator body is ideal for making an incubator unit, as it's spacious enough and has the required level of airtightness and thermal insulation. This option is especially attractive to hobby poultry farmers, as it allows for easy installation, as evident from the design drawing:

To convert a refrigerator into an incubator, you need to follow several steps:
- Instead of shelves for storing food, install trays with eggs;
- insulate the walls from the inside with foam;
- for ventilation, make holes in the walls and install a fan;
- install incandescent lamps for heating and a thermostat for temperature control;
- To maintain the required humidity level, place trays with water on the bottom;
- Make a metal lever to turn the eggs over.
Therefore, to refit a refrigerator, you need to prepare the following materials and tools:
- egg trays with grates – 3 pcs.;
- tray turning handle;
- 100W bulbs – 6 pcs.;
- fan;
- thermostat sensor;
- thermometer;
- psychrometer;
- water tray;
- metal plates – 2 pcs.;
- window glass;
- scotch;
- drill;
- screwdrivers;
- screws.
Dismantling the refrigerator is carried out in the following order:
- Drill 4 through holes with a diameter of 1-1.5 cm in the lid and bottom of the refrigerator to ensure natural air exchange.
- Attach a fan to the top wall.
- Install a thermostat on the lid.
- Attach light bulbs to the side panels—four at the top and two at the bottom. Connect them to the thermostat. Alternatively, simply attach two or four light sockets to the ceiling of the chamber using regular screws and run electrical wiring to them.
- Attach temperature and humidity sensors to the inner walls.
- Attach metal plates to the side panels, and screw the trays to them. They should be positioned at a 45-degree angle in both directions.
- Attach a metal lever or handle to turn the trays over at the same time.
- Make a viewing window in the door and glaze it. Place a tray of water on the bottom.
To ensure good heat retention in the refrigerator compartment, it is recommended to insulate the interior of the refrigerator with foam plastic plates.
The diagram of the finished incubator will look like this:
A review of a homemade incubator made from a refrigerator is offered in the video below:
Helpful tips
When making an incubation box, experienced breeders recommend following these guidelines:
- To ensure uniform heating of the grid with eggs, incandescent lamps are installed both at the bottom and under the lid.
- To ensure natural ventilation, be sure to make several round holes in the lid.
- Provide a backup heat source in case of a power outage. To do this, create a special chamber in the bottom, separating it from the rest of the incubator with three-layer plywood. Drill numerous holes in it. Place an aluminum canister in this compartment. If the power goes out, pour boiling water into the canister, then close all ventilation and cover the incubator with a blanket. The homemade radiator will provide heat for 12-14 hours.
- Avoid sudden shocks and noise in the room, otherwise the embryos may become frightened and their development may be delayed.
- Avoid using outdoor thermometers to monitor temperature, as they have a significant margin of error. A better option is medical thermometers. They can be placed near the eggs, but avoid allowing them to come into contact with the shell, as this will reduce the accuracy of their readings. To ensure accurate readings, take measurements some time after turning on the incubator and at regular intervals.
- If the device is large, you can use a regular fan, which will help maintain the temperature balance inside the chamber.
- The incubator should be placed on an elevated surface in a room where room temperature is maintained, direct sunlight does not fall, and there are no drafts.
Video: DIY Incubator with a Reversal
The following video explains how to build a tilting incubator with two separate chambers. It runs on 12W and can be connected to a car battery. A 1209 thermostat is used for temperature control:
Knowing the design features of an incubator, you can build one yourself using ready-made plans and instructions. However, any homemade design should be tested before use. Run it idle for several days to monitor the operation of the sensors and ensure the temperature is maintained properly.