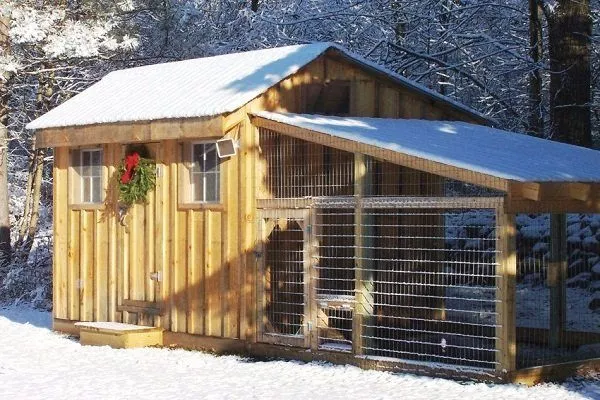
During winter, chickens need to be kept in a warm coop, otherwise they will become lethargic, unhealthy, and less productive. You can build such a structure yourself, having first decided on the type of coop, drawn up a detailed plan, and gathered all the necessary materials.
Requirements for a winter chicken coop
To keep your hens healthy during the winter and produce a large number of eggs from your hens, you need to build a poultry house that meets the following requirements:
- equipped with electric lighting to ensure continuous daylight for 11 hours;
- insulated and maintains an optimal temperature regime (above +12°C);
The conditions in which chickens are kept must be balanced, since with high humidity they become fluffy and lethargic, and in hot and stuffy conditions they experience a severe lack of moisture, which threatens dehydration and death of the birds.
- equipped with a ventilation system and waterproofing, otherwise the air will be stifling and excessively warm;
- It requires a place for walking, since chickens can walk outside in the absence of wind and precipitation, and also at an air temperature of at least -15°C.
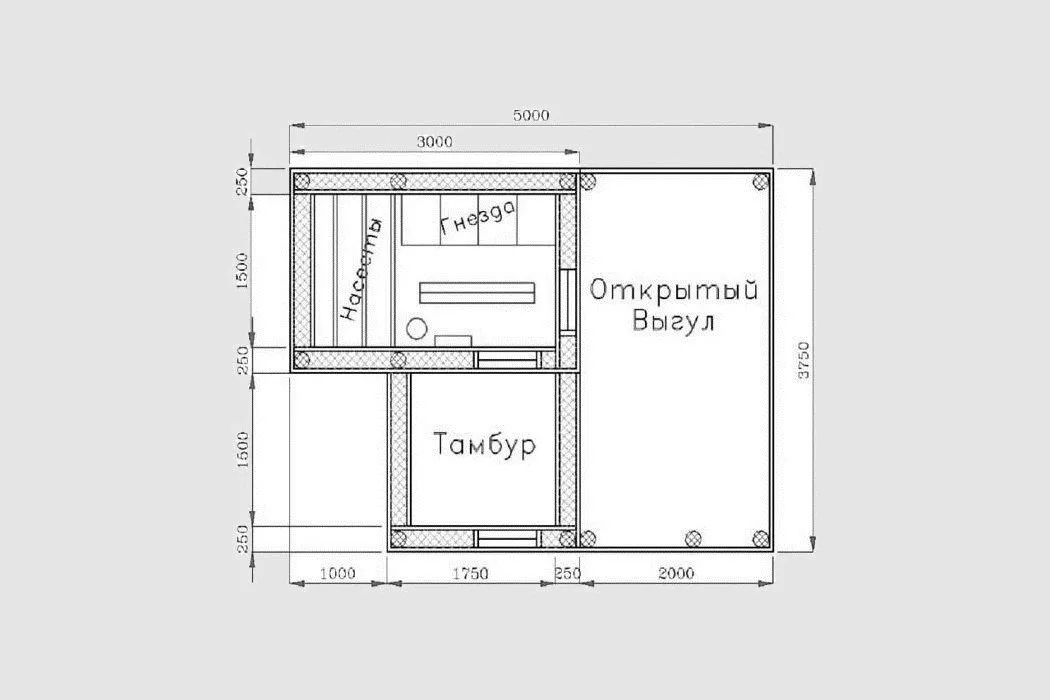
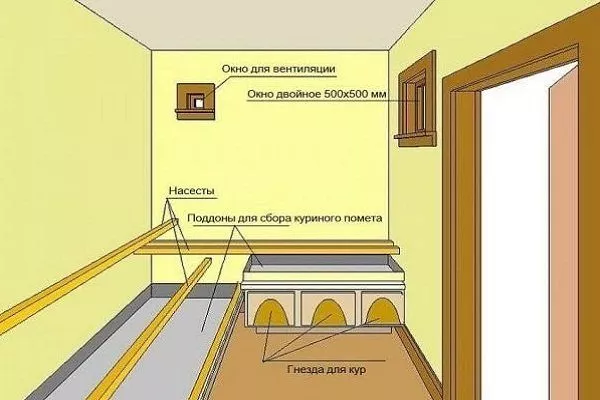
There are different types of chicken coops, but for 20 hens, the best option is a two-part run structure consisting of a heated room and an open mesh yard. Here's an example of a layout for such a coop:
Where to set up a winter chicken coop?
The location of the poultry house will be comfortable for chickens if it meets the following requirements:
- away from sources of noise and active recreation, since birds love peace and quiet;
- is located on a hill, not in a lowland where it is very damp and the soil dries slowly after the snow melts and becomes covered with puddles after rain;
- located on dry sandy soil (if the soil is clayey, marshy or simply wet, it must be drained before construction work);
- reliably protected from cold winds, for example, by planting trees and shrubs;
- located close to the breeder’s home so that he can regularly monitor the animals;
- It is well lit by sunlight, since the health of the birds is proportional to the amount of sunlight they receive (in extreme heat, the windows should still be shaded).
If you plan to increase your chicken population in the future, the chicken coop should, if possible, be located in a location where additional structures can be erected if necessary.
Calculating the dimensions of the chicken coop and preparing drawings
To calculate the optimal size of a chicken coop for 20 chickens, you need to consider the following parameters:
- square - at least 15-20 sq. m, so that inside the chicken coop there is at least 1 sq. m for 2 heads, and there is also the possibility to allocate part of the room for drinking bowls, feeders and other auxiliary elements;
Chickens experience significant discomfort in cramped conditions, which impacts their health and egg production. If your property isn't large enough to accommodate 20 hens, it's best to reduce the number of hens.
- height – about 2 m, so that the chickens and the breeder feel comfortable in the room.
It is not recommended to make the room very high, as it will be difficult to heat it in winter.
The proportions of the run depend on the size of the birdhouse. If it's 2 m wide, the aviary should be at least 2 x 6 m.
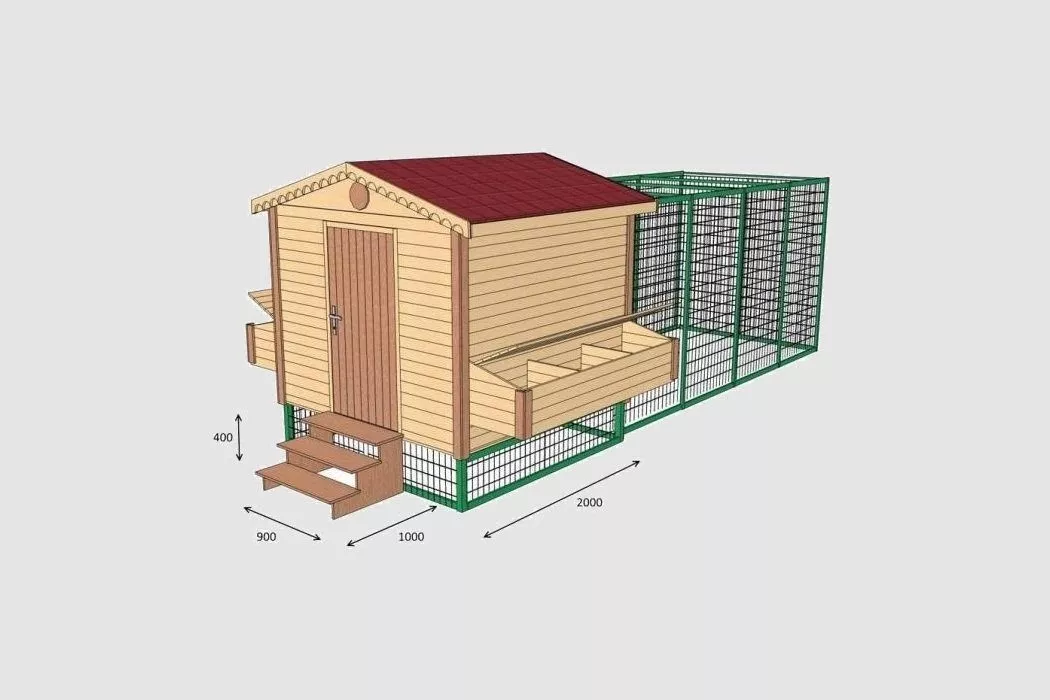
Once you've determined the dimensions of your chicken coop, you can begin preparing a custom design. To make it easier to draw, consider a typical layout for a 20-chicken coop with an open-air run made of wire mesh:
It is advisable to design a chicken coop so that the windows face south.
Selection of materials
When building a chicken coop, you need to use durable materials, among which the following can be highlighted:
- WoodThe most popular solution, attractive for its cost-effectiveness and practicality. To ensure the longevity of the wooden structure, the timbers must be carefully treated. A finished wooden house fits harmoniously into any landscape.
In warm climates, you can avoid insulation by building a poultry house from logs or timber. All seams should be caulked with oakum and then covered with wooden planks.
- Sheet materialsThese are used when implementing budget-friendly frame construction. Using beams, you construct the skeleton of the house, which is then covered with sheet material such as boards, OSB, etc. Thermal insulation must be placed between the inner and outer sheathing of the frame, covered on both sides with fine-mesh steel mesh to protect against mice.
- Cinder blocksThey consist of several materials: sand, cement, slag, and water. They are ideal for building chicken coop walls, as they are very warm and can withstand the low temperatures common in winter. This building material can be purchased in packs placed on wooden pallets.
- BrickThe material is durable, so with proper maintenance, a brick building will last for decades. A disadvantage of brick is its poor thermal insulation.
- Foam blocksThis material is a bit pricey, but it's the most comfortable option for chickens.
- PrimingIf materials are in short supply, the house can be built as a dirt house, extending the walls 0.5 meters above the ground. Install double-glazed windows on the south side of the house, and insulate the roof and any exposed wall sections with any material. All three walls, except the south side with the windows, can be filled with soil.
Particular attention should be paid to the choice of material for the foundation, which depends on its type:
- ColumnarThis type of foundation requires the construction of pedestals. For this purpose, ordinary stone or any brick can be used.
- RibbonIt is made of reinforced concrete. Metal reinforcement will be required for the frame. All necessary components for the concrete mixture must also be prepared in advance.
- PileIt is constructed from special piles made of reinforced concrete or metal. Metal piles are more popular because they can be easily screwed into the ground without professional assistance.
A chicken coop is a lightweight structure, so it can be built with a columnar foundation. This doesn't require much time or effort, but it guarantees reliability and stability.
How to build a wooden chicken coop?
A chicken coop for 20 chickens can be built from timber and then expertly furnished. Here's a rough diagram of such a structure:
We will consider each stage of organizing a wooden chicken coop separately.
Installation of the foundation
The columnar foundation for the chicken coop must be prepared in the following order:
- Mark out the area. To do this, drive a stake into each corner of the future chicken coop, spaced 1 meter apart, and tie a rope or metal rod taut. Be careful to ensure the markings are straight. The rope should be taut, but can also lie on the top layer of soil.
- Using a shovel, remove a 15-20 cm thick layer of sod inside the resulting rectangle. Then, at the locations of the driven stakes, dig holes for the posts to a depth of 60-70 cm. The width of the walls should be determined by the blocks used for the foundation. For example, if the blocks are two bricks, the optimal width for the walls is 50-55 cm.
- Stretch another rope over the rods to level the posts. Its height above ground level should be 20-25 cm.
- Fill each hole with sand and gravel in 5-7 cm layers to form a foundation pad. Lay two bricks on top, apply a 1:3 cement mortar, and lay two more bricks across. Repeat this process until the posts reach the height of the taut rope. If they are not high enough, level the posts with cement.
Instead of constructing formwork, you can insert asbestos-cement pipes into the holes.
- To protect the foundation from the destructive effects of moisture, fill the depression inside the marked rectangle with gravel or small crushed stone.
Floor and wall arrangement
The floor in the chicken coop can be made in two ways:
- Laying boards on joistsThis is a simple option, but it requires proper cutting of the boards to avoid holes in the floor. To ensure this type of flooring retains heat in winter, it should be insulated with sawdust or straw. If you use OSB boards, the flooring will be impervious to moisture and insects.
- Make a two-layer floorA more complex option, but the floor is insulated. To do this, install beams under the joists, then a layer of boards on top of them as a subfloor, then insulate another layer of boards.
The wooden walls of the chicken coop should be installed in the following order:
- Build the main frame from 100x100 mm load-bearing beams, which are placed on the foundation pillars, not forgetting to put in pieces of waterproofing, for example, roofing felt.
- Nail vertical posts made from the same timber to the frame, and then horizontal crossbars to them, which will form the base of the ceiling. Attach crossbars between the posts in the window and door openings.
- Cover the assembled frame with the selected material.
Construction of the ceiling and roof
To build a ceiling, you need to secure beams, to which you attach boards, insulation, and waterproofing. Finally, you lay the finished ceiling itself. The roof itself comes in three types:
- FlatThe main beams should be spaced 50-100 cm apart, and then covered with a continuous deck of planks or OSB boards, along with insulation and moisture-resistant layers. This option is considered the least practical, as the builder won't be able to create an attic. In winter, the flat roof could collapse under the weight of snow.
- Single-pitchedThis type of roof is somewhat more complex to construct, as it requires a pitch. This requires attaching vertical posts to the supporting beams, and then nailing boards (which should extend beyond the walls) and a sheet of fiberboard to them. To use the roof as an attic, it can be covered with roofing felt and slate or shingles.
- Gable roofTriangular rafters should be constructed from 50x100 mm lumber, and the finished structures should be attached to the top frame rail at 600 mm intervals. All elements should be connected with sheathing made from 25 mm thick lumber. For roofing, it's best to use lightweight materials such as corrugated sheeting or soft roofing.
The best option for a winter chicken coop is a gable roof, which can be used to store bird feed.
Regardless of the chosen type, roof installation requires special attention, as the temperature inside the building depends on its reliability. It's important to ensure there are no gaps or leaks in the roof.
Ventilation
There are various ways to organize ventilation in a chicken coop:
- Install several ventilation ducts at different ends of the coop. Ideally, one end of the ventilation duct should be at ceiling level, and the other 50 cm lower. The ventilation pipes should be fitted with dampers to control the flow of fresh air and the temperature in the coop.
- Make several ventilation holes in the floor. These should be plugged in the winter and covered with a grid that allows air flow in the summer.
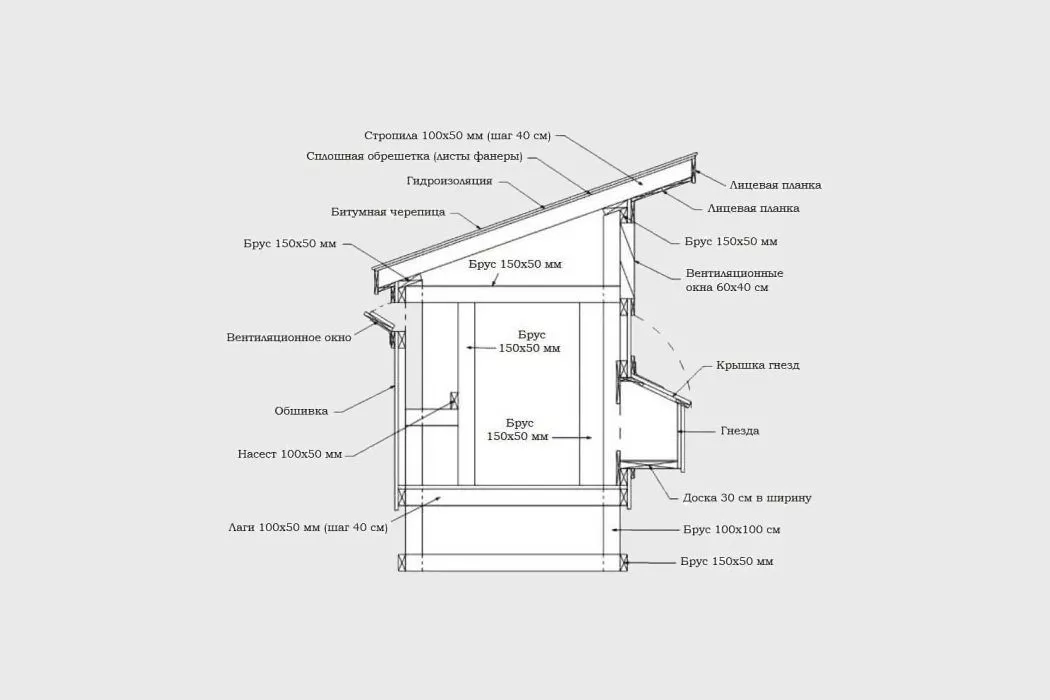
Here is a diagram of a chicken coop with proper ventilation:
Lighting
While supplemental lighting isn't necessary for a chicken coop in summer, it's essential in winter. Therefore, for additional lighting in a winter chicken coop, you'll need to install electricity and a lamp. It's advisable to cover it with a shade to prevent hay or cobwebs from getting in, as well as to prevent dust.
Heating
In winter, it's crucial to heat the chicken coop to ensure the temperature inside doesn't drop below 0°C. For this purpose, you can use the following units:
- Fan heatersIt's best to choose programmable models. They're more expensive, but they use little electricity, so you'll pay less over the winter than with a standard unit. The automatic system can be adjusted by time or temperature. For chickens, it's best to choose a unit with adjustable temperature. This allows you to maintain a constant temperature in the coop during the winter. For example, when the temperature drops to 0°C, the unit will turn on and raise the temperature to 3°C, after which it will automatically turn off.
- Infrared lampsUnlike traditional devices, these lamps heat objects within the area they reach, not the air in the room. Infrared lamps are ideally placed above perches and the floor. When the chickens feel cold, they can gather within the heating zone and create an optimal temperature for themselves. For fire safety, the lamps should be placed in wire cages. This will prevent them from falling out and causing irreversible damage.
Constantly turning on and off will cause infrared lamps to burn out quickly. To prevent this, leave them on continuously. In this mode, they can operate reliably for several months without consuming much energy.
- Potbelly stove, wood-burning boiler or brick stoveThese are alternative options. heating the chicken coop, which don't require electricity. The main thing is to route the pipe throughout the room so it distributes maximum heat. For greater efficiency, it can be lined with bricks, which retain heat for a long time.
Interior decoration
A winter chicken coop should be equipped with the following elements:
- PerchesTo construct them, use a 40x50 mm beam, slightly round its top edges, and secure it in a quiet area at a distance of 30 cm from each other. To prevent the hens from crowding, each head should have approximately 30 cm of perch. Therefore, if you're keeping 20 hens, the perch should be at least 5-6 m long. Place waste trays underneath the perch to make cleaning the house easier.
- NestsThey come in open and closed types. The former are easier to install, while the latter are preferable for chickens because they provide them with a sense of security. For a winter chicken coop, an open coop measuring at least 30x40 cm will suffice. Chicken nests The best choice is wood—planks or plywood. Ten nests are enough for 20 hens. Line the bottom with sawdust or straw to make the hens more comfortable.
- Feeders, drinkersPlace several feeders and waterers around the perimeter of the coop to prevent the birds from crowding while drinking and feeding. The dishes should be positioned a few centimeters above the floor to prevent droppings and debris from falling into them.
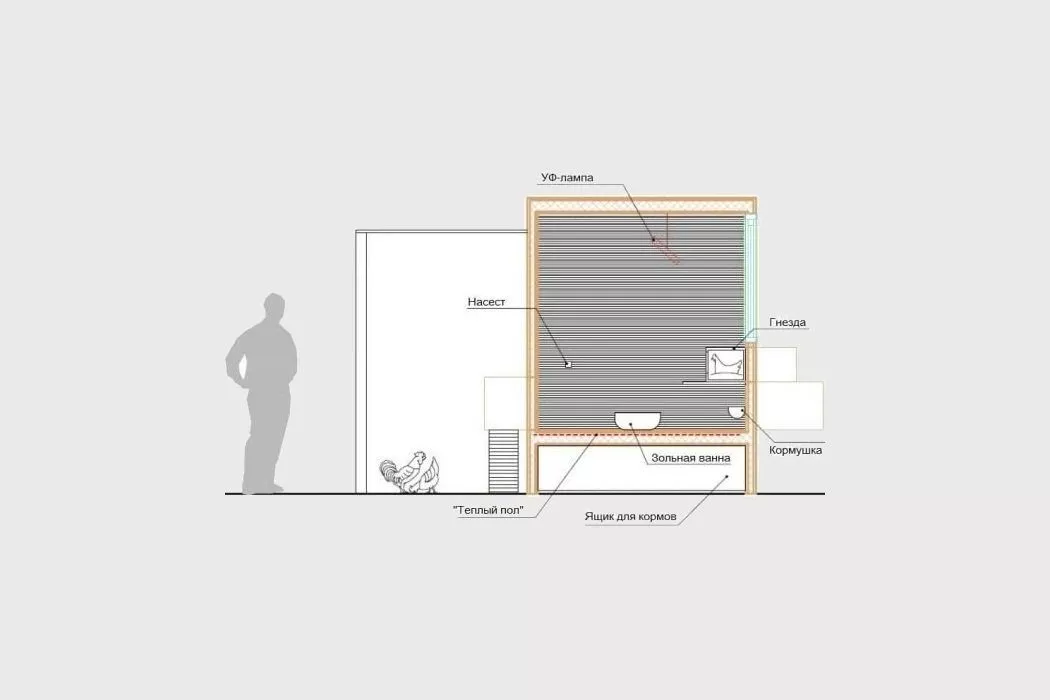
Here is a diagram of a well-designed winter chicken coop for 20 chickens:
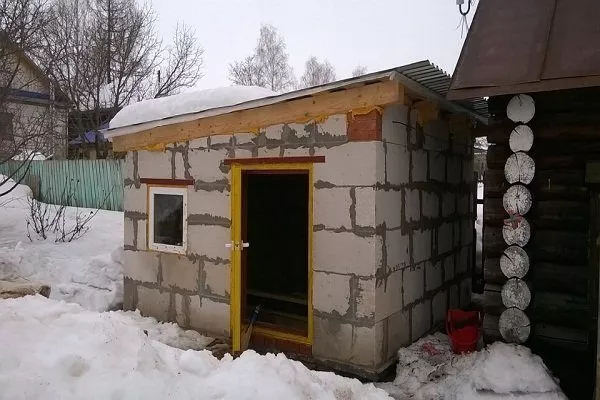
DIY winter chicken coop made from cinder blocks
A chicken coop for 20 chickens can be built from cinder blocks. The optimal size for such a structure is 6 x 4 m. We'll look at each stage of its construction separately.
Site preparation and excavation work
The selected plot of land must be prepared as follows:
- Clear the ground of weeds and level the surface of the soil with a bayonet shovel.
- Remove the top 15-20 cm layer of soil and place it in a separate pile.
- Measure the levelness of the site using a spirit level and mark the foundation. To do this, use wooden stakes to mark the corners of the future structure, tie a synthetic cord to them, and stretch it around the site.
- In the resulting rectangle, use a bayonet shovel to dig a hole for the foundation until red clay appears.
- Using a hammer and metal nails, assemble a formwork from wooden planks without gaps, which is reinforced with crossbars and braces.
- Fill the outside of the formwork with soil and compact it thoroughly.
Preparing the concrete mix and pouring it into the foundation formwork
The concrete mixture must be mixed in an electric concrete mixer using bulk building material and fresh, lump-free cement. Follow these steps:
- Pour clean water into the mixer while stirring constantly.
- Pour in the required proportions of cement and add sand and gravel mixture in small portions.
- If necessary, add a little water to make the mixture homogeneous and plastic.
Place the prepared mixture into a construction container and deliver it to the construction site, then pour it into the formwork in the following order:
- Place a layer of gravel at the bottom of the formwork and compact it thoroughly. The surface of this bed can be slightly moistened to promote better adhesion of the concrete.
- Place the concrete mixture using a shovel and compact it well to remove all voids and strengthen the foundation.
- Carefully smooth the concrete on top with a trowel, regularly wetting it with clean water.
- Cover the foundation with a thick cloth to protect it from sunlight and leave it for 2-3 days. It must be kept moist to prevent it from drying out and cracking. To achieve this, regularly moisten the concrete surface with water.
Laying walls with cement mortar
The construction of the walls of the chicken coop is carried out in the following manner:
- Lay the cinder blocks, securing them with mortar at the corners, and stretch a synthetic cord along the perimeter of the wall.
- Using a trowel, lay an even layer of mortar on the foundation surface, place the cinder blocks on top of it, and use a construction hammer to secure them in a level position, focusing on the taut cord and not going beyond its limits.
- Use a plumb line to check the verticality of the walls, paying particular attention to the corners. These can be further checked with a metal square.
- In the wall facing south, leave openings for windows of the appropriate size, and install a concrete lintel on top.
- Build scaffolding for the elevated work. Use softwood planks and beams, nails, and a hammer. Add crossbars to the sides to strengthen the structure.
- Install scaffolding along the wall and secure it securely. Cinder blocks and a container of cement mortar can be placed on it, and then the walls can be laid. If necessary, the scaffolding can be moved and installed elsewhere.
Installation of wooden beams
Beams measuring 150 x 150 mm should be used for the flooring. They must have smooth edges, free of knots and cracks. They should be laid on walls pre-treated with cement-sand mortar, spaced 2 meters apart, and secured with forged metal brackets. To protect the beams from rot and damage, they should be wrapped with roofing felt.
Ceiling installation
To complete this project, you'll need boards 50 mm thick and 15 cm wide. They need to be dried, drilled, and then nailed together with a hammer and metal nails, preventing them from splitting. Clamps should be used to ensure a tight fit.
For waterproofing purposes, lay a layer of roofing felt over the boards with a 10 cm overlap. Cracks and cracks in the ceiling are unacceptable.
Manufacturing and installation of rafters on walls
To make rafters, you need to proceed in the following order:
- Place the blocks on the ground and then mark them using a tape measure and a wood pencil.
- Cut the bars at an angle of 45°C along the edges and connect them with metal screws.
- To strengthen the structure, mark the rafters and cut them to the required size, and install wooden blocks across them and secure them with screws.
To stiffen the rafters, make studs from timber and nail them in place with a hammer. These rafters are then raised with ropes and installed vertically at intervals of 2 meters. Their alignment can be checked with a level, and then secured to the walls with forged clamps. Reinforce the structure with wooden blocks and metal nails.
Laying and fastening the lathing
Next, prepare the sheathing using 30 mm thick, 15 cm wide boards. Secure it to the rafters with nails using a hammer. Stretch a vapor barrier film under the sheathing and secure it with metal staples. When attaching the boards, leave small gaps to evenly distribute the roof load. Secure the sheathing on the inside with planed boards and screws.
The roof outlet and overhangs must be made with a reserve to protect the walls of the chicken coop from precipitation.
Corrugated metal sheets should be cut to the roof dimensions, preferably with a small allowance. Use this to create a deck from one end of the sheathing. Attach the corrugated metal sheets to the sheathing one by one with metal screws using an electric drill. It's important to use these to align the roof's overhang and eaves, stretching a cord along the eaves. Finally, attach the corner trim to the ridge. It's best to secure them with screws and rubber washers to ensure a tight seal.
A finished cinder block chicken coop should be equipped in the same way as a wooden chicken house.
Features of winter chicken coop insulation
For winter chicken coop insulation, it's best to line the walls with foam, but it must be sealed, otherwise the birds will peck at it. If the coop is made of planks, it's best to place mineral wool between the two layers.
To maintain an optimal temperature inside the chicken coop without additional heating, you can use regular sawdust, as it releases heat as it decomposes. Starting in the fall, before the first frosts arrive, spread a 10-15 cm layer of sawdust on the coop floor. After 30-35 days, add another 10 cm layer of sawdust. Repeat this process over time until a 50 cm layer of sawdust forms in the coop by the end of the winter season.
- ✓ The thickness of the initial layer of sawdust should be at least 15 cm for effective thermal insulation.
- ✓ A new layer of sawdust should be added every 30-35 days, maintaining the total thickness of the litter up to 50 cm by the end of winter.
Sawdust is superior to hay in its properties, as it regulates humidity in the room. Chickens also enjoy digging in the litter, where the temperature is maintained at 20°C.
In the spring, all the sawdust mixture should be taken to a compost pit so that after some time, they will become excellent fertilizer.
To learn how to inexpensively insulate a chicken coop for the winter, watch the following video:
You can build a winter chicken coop for 20 hens yourself using various materials and plans. If done correctly, the birds will overwinter in comfortable conditions, preventing illness and laying eggs even in the coldest weather.
How wonderful that there's such a detailed article!!! Thank you! I gave it to my husband to read and…voila, our chicken coop is ready))))