Although chickens are considered the most low-maintenance poultry, ventilation in the coop is an important factor affecting the health of the flock. A ventilation system can be purchased at a specialty store or built at home, which can save a significant amount of money.
Why is ventilation needed in a chicken coop?
Few farmers consider installing ventilation in their chicken coop, believing it to be a waste of time and money. However, this is far from true, as a ventilation system provides the following:
- ammonia vapors from bird waste products are removed;
- air humidity is regulated;
- there is no dampness or heat;
- the room is saturated with oxygen;
- drafts, which often cause livestock mortality, are eliminated.
All this helps prevent illness and toxic poisoning. Furthermore, hens gain weight faster, lay better eggs, and hatched chicks are born healthy and strong.
Without ventilation, conditions are ideal for the growth of fungi, pathogenic bacteria, viruses, and mold. Why does this happen? Birds, being living creatures, breathe oxygen, which is replaced by carbon dioxide, which is harmful to any organism. If air exchange is not maintained in a hermetically sealed chicken coop, the atmosphere becomes damp, heavy, and stifling, which can lead to death.
Methods of organizing ventilation
A chicken coop ventilation system is simple in design and requires little effort or expense to construct. A traditional exhaust hood or a supply-and-exhaust system is most commonly used, but other methods exist. Each type has its own characteristics, which poultry farmers use to make their selection:
- Ventilation. This is the most cost-effective and simple ventilation option. To ventilate the coop, simply cut a hole in the shed and install a vent. A natural vent can be mounted on a wall or ceiling, but a ceiling vent is preferable, as it provides additional daylight for the coop.

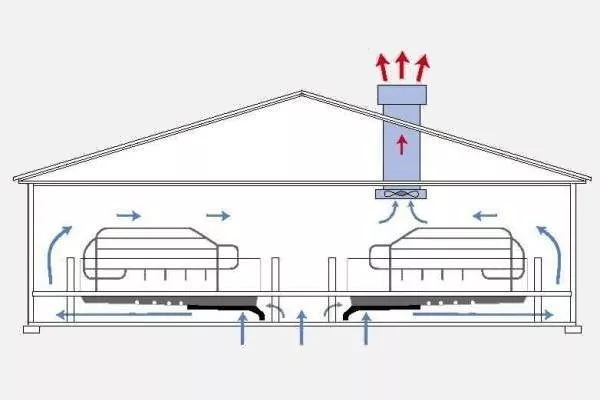
- Supply and exhaust system. It's based on the inflow and outflow of air, requiring only a couple of pipes. One of them supplies fresh air, while the other exhausts stale air.
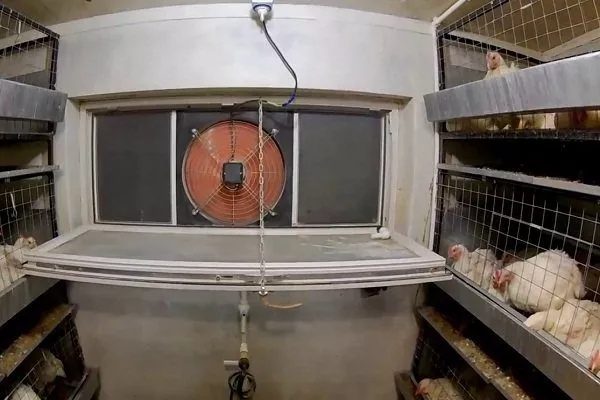
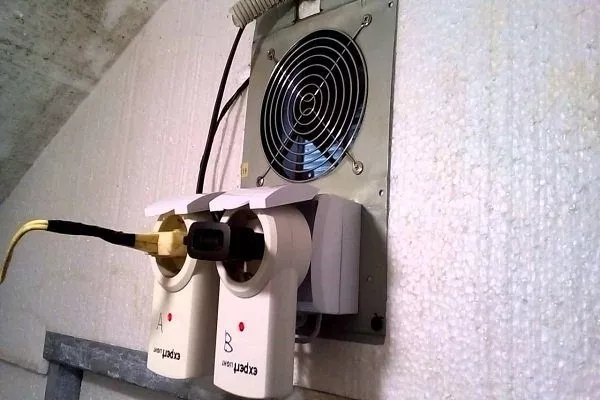
- Mechanical ventilation. This variation is used in rare cases—when keeping a large number of birds in a single room. This requires ample space. To achieve this, you need to purchase a fan that turns on as needed. A standard fan is installed on the ceiling, while an axial fan is mounted in a window opening.
- Tunnel system or turbine. The system is based on a roof-mounted turbine (about the diameter of a basketball) connected to a pipe (a special tunnel). It can only be used in windy conditions, as the force of the wind causes the turbine blades to rotate. This action removes stale air from the coop.
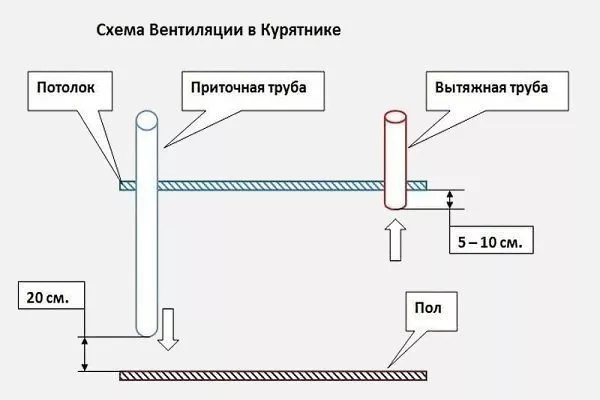
- ✓ The optimal pipe diameter for a medium-sized chicken coop is 150-200 mm.
- ✓ The distance between the supply and exhaust pipes must be at least 2 meters for effective air exchange.
DIY Chicken Coop Ventilation: A Step-by-Step Guide
Each ventilation system has its own characteristics, but there are basic general requirements:
- It must constantly provide the room with fresh air, which reduces the risk of infection and improves the health of the livestock.
- The structure should not create a draft, so special attention is paid to its location.
- To prevent the system from becoming clogged, it is necessary to promptly clean the chicken coop of excess debris, droppings, and stale feed.
- The air humidity level should not exceed 75%.
- The temperature regime should be at least +16-17 degrees for adults, and for young, immature chickens – 25-28.
- The flow rate of fresh air in summer is 0.7-0.8 meters per second, in winter – 0.4-0.5 m/sec.
- Ventilation capacity is calculated as follows: there should be 5 chickens per 1 square meter.
- It is essential to periodically disinfect the chicken coop against rodents and pathogenic microorganisms.
To determine if the ventilation system is installed correctly, enter the coop and spend about half an hour there. If you begin to feel unwell during this time (headache, shortness of breath, etc.), the system is installed incorrectly, meaning there's no proper air circulation.
Any type of ventilation structure requires the use of different materials and tools. If wood is used, you'll need a wood saw, nails, and boards. If metal is used, you'll need metalworking tools, etc. Sealant, paint, and other supplies are essential.
As an example, let's look at the installation and manufacture of the main types of ventilation that are most appropriate for use in a chicken coop:
- Natural ventilation. Punch a square hole in the ceiling or wall. The optimal size is 20x20 cm. Next, construct a frame from planks. Divide the interior of the window into two sections. One of them should be completely covered with wood, then painted and pierced with small holes. The walls are sealed with sealant. This allows fresh air to flow through the longitudinal section, while carbon dioxide is expelled through the other section.
A DIY natural ventilation system is clearly demonstrated in this video:
- Mechanical system using an axial fan. To do this, you need to make a window into which a special frame is installed. The structure is then attached to it. A power supply is essential, as a stationary fan is powered by the mains. Modern models have sensors that monitor humidity and temperature. The only drawback is power consumption.
- Supply and exhaust option. You'll need two plastic or metal pipes (2 meters long, approximately 20-22 cm in diameter) and a 90-degree elbow. The first pipe should be used for fresh air intake, and the second for exhaust. Installation process:
- make a round hole in the ceiling with a diameter equal to the diameter of the pipe;
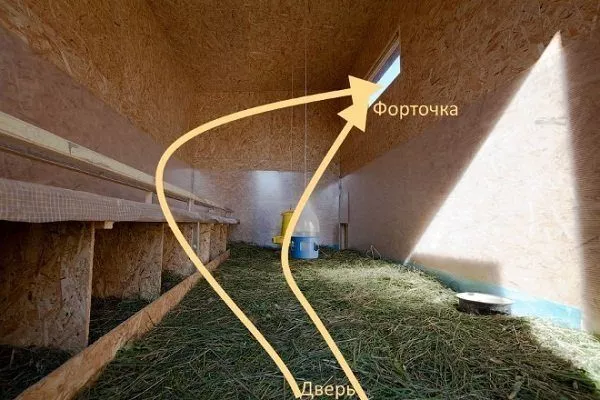
- install pipe No. 1 in the ceiling in a place where birds rarely sit (the distance from the roof to the top of the structure should be at least 1 m 30 cm);
- in the chicken coop, the distance from the floor to the bottom of the pipe should be 20-30 cm;
- in the area above the perch, also make a hole in the ceiling;
- insert the pipe so that it is 30-50 cm lower than the first one on the street;
- Both holes with pipes are sealed with sealed foam to eliminate gaps;
- Install special umbrella-shaped canopies over the pipes to prevent precipitation (snow, rain, hail) and debris from penetrating into the building.
Manufacturing of a deflector
A deflector is a structure designed to deflect wind blowing toward it. This reduces pressure inside the device and increases draft in the exhaust pipe. The device is installed on the roof. It can be purchased at a hardware store, but to save money, poultry farmers make their own.
Before starting work, the following calculations are carried out:
- To determine the height, you need to multiply the pipe cross-section size by 1.8;
- to determine the width of the cap, the section is multiplied by 1.7;
- To calculate the diffuser width, multiply by 1.4.
Next, take sheets of thick paper, transfer all the measurements, and cut out the templates. After this, place the blanks on a steel sheet and trace the lines. Use metal shears to cut out the elements, which can be joined using a rivet gun. The final step is installing the deflector into the exhaust pipe.
Manufacturing of a butterfly valve
To make a butterfly valve, you need to do the following:
- To create the structure, you'll need metal angles, wood, and a welding machine. The angles are welded into a frame, with holes drilled in the sides for the axle to pass through.
- Make bushings from the pipe (you can use pieces) and weld them.
- Take a sheet of steel and cut out a shut-off plate. Its size should match the diameter of the exhaust pipe.
- Install the damper into the frame made of corners and weld it to the axis.
- Mount a wooden handle on the axle to allow adjustment of the damper.
- In strong winds, the locking device may open on its own. To prevent this, a wooden latch is installed.
Features of ventilation in a chicken coop in winter
During the cold season, chickens especially need warmth, so chicken coops are equipped with special equipment, insulated with airtight materials, etc. This helps achieve a certain air temperature, but without ventilation, the room becomes stuffy.
You can simply open the doors periodically to let in fresh air, but in this case heat will be lost, and there is a risk of creating a draft, which has a detrimental effect on the birds.
In winter for heating the chicken coop Electrical appliances are often used, consuming significant amounts of electricity. Therefore, installing a mechanical fan is out of the question. However, there is a universal ventilation system that does not require electricity. This is passive ventilation. It operates silently, fulfills its primary purpose, consumes no energy, and operates autonomously throughout the day.
How to do it:
- Draw a diagram of the ventilation structure location, taking into account the features of the room.
- Make holes in the ceiling (one above the perch or place where the birds gather, the other on the opposite side).
- Install 2 pipes according to the principle of a supply and exhaust system, but use corrugated pipes instead of plastic ones (also 20 cm in diameter).
Additionally, specialized sensors can be installed to monitor temperature and humidity. The latter is especially important. It's best to turn them on only when humidity levels are high, which can save energy.
10 useful tips
If a chicken breeder lacks specialized training and is installing a ventilation system for the first time, they may make a number of irreparable mistakes. In this case, there are two options: entrust the installation to a professional (which will incur additional costs) or carefully review the information and follow the recommendations of experienced professionals. Here's what to consider:
- When using pipes, choose a round cross-section, as it creates better air exchange.
- If you're installing plastic or metal structures for the winter, be sure to insulate them with appropriate materials. Large temperature differences promote condensation. You can use foam, mineral wool, or even improvised materials (straw, woolen rags, old coats) for insulation. Wrap the pipes and secure the materials in place.
- To ensure a secure fit, pipe structures are positioned close to the rafters. For a more secure fit, it's best to use staples.
- If you can't afford plastic or metal pipes, but have wooden planks, feel free to use them. To do this, create long structures by connecting the planks together with special fixtures. Use construction foam to seal any gaps. Remember that a square duct cross-section isn't as effective as a round one.
- If the roof of the chicken coop is 2-pitched, then the pull-in structure should be installed on the canopy.
- If the roof is flat but has a slight slope, then the upper part of the supply pipe is lowered by up to 30 cm in relation to standard norms (approximately one and a half meters).
- Both pipes must be located on opposite sides of each other. This is the only way to ensure adequate air exchange.
- To avoid condensation in the elbow located on the street side, it is recommended to make a small hole (4-5 mm).
- The exhaust system needs to be cleaned twice a year, as it accumulates debris, cobwebs, dirt, dust, dry leaves, etc. If the design does not have a damper or visor, it is advisable to do this 3-4 times a year.
- When installing electrical equipment, several factors must be taken into account. Noise levels should not exceed 60-70 decibels.
Choosing a ventilation system is a personal decision for every poultry farmer. However, ventilation is essential. Not everyone realizes this right away and installs new systems only after negative consequences have occurred. Don't skimp on equipment; take care of your birds in a timely manner.