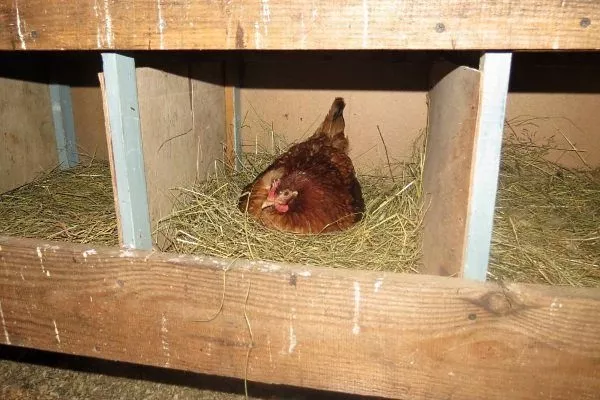
Many chicken breeders prefer nest boxes to traditional chicken coops with perches, often making their own using readily available materials and tools. These devices can increase hens' egg production, improve the quality of the eggs they lay, and protect them from pecking. Various homemade nest box options are available, so every breeder can find the perfect one for their chicken coop.
Nest requirements
When making chicken houses at home, you need to pay attention to the following parameters.
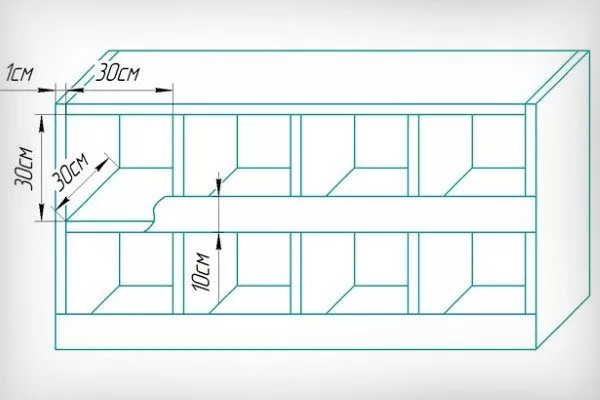
DimensionsThis is one of the most important criteria, as a hen won't lay eggs in a cramped nest box. According to the accepted standard, the nest box depth should be between 30 and 40 cm, and the height and width should be at least 30 cm. The threshold height cannot be less than 5 cm.
The optimal nest dimensions depending on the bird breed are given in the table:
| Breed | Width, cm | Depth, cm | Height, cm |
| Laying hen | 25 | 35 | 35 |
| Meat and egg | 30 | 40 | 45 |
MaterialIt must be durable to ensure the structure's longevity. Therefore, avoid using paper, cardboard, or other similar materials. Typically, breeders choose boards that are well polished and trim off any protruding parts with a grinder to prevent injury to the hens. It's also advisable to use short nails. If only long screws are available, their protruding parts will also need to be trimmed with a grinder and filed down, otherwise the sharp edges will pose a danger to the birds.
The nest should be as comfortable as possible for the hen to be comfortable in. Untreated wood with splinters, sharp edges, nails, or screws—none of these should be present, otherwise the hens may be injured or refuse to lay eggs in such a nest.
MicroclimateThere should be no drafts or high humidity inside the nest, as these negatively impact the birds' health, increase the risk of disease, and reduce egg production. Therefore, chicken coops should not be placed near the entrance to the coop, near ventilation openings, or close to the walls of the room.
- ✓ Maintain the nest temperature within 15-20°C for the comfort of the hens.
- ✓ Maintain humidity at 60-70% to prevent eggs from drying out.
- ✓ Place nests in areas with natural ventilation, but without drafts.
Roof pitchIf possible, maintain a 45° tilt to prevent the bird from constantly sitting on top of the nest.
The presence of a baton for take-offIt should be placed in front of the entrance, at least 10 cm away. The optimal cross-section for such a shelf is 5 x 2 cm.
A drawing of a standard-sized chicken nest that meets all requirements is presented below:
The number of nests depends on the size of the farm, but it is important to remember that there should be at least 1 nest for every 5 individuals.
Types of design
| Name | Convenience for chickens | Durability | Difficulty of manufacturing |
|---|---|---|---|
| In the form of boxes | High | High | Average |
| From scrap materials (boxes, baskets) | Average | Low | Low |
| With an egg collector | High | High | High |
There are different types of nests for laying hens:
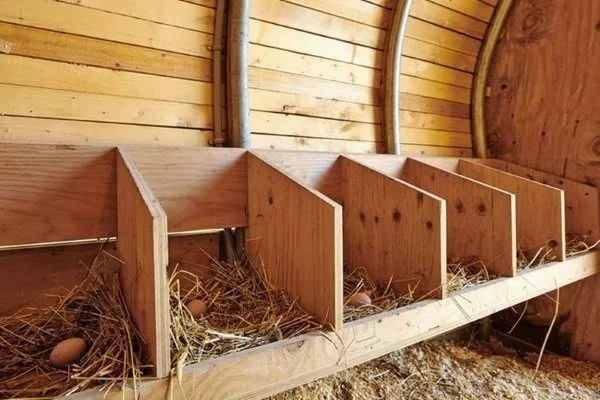
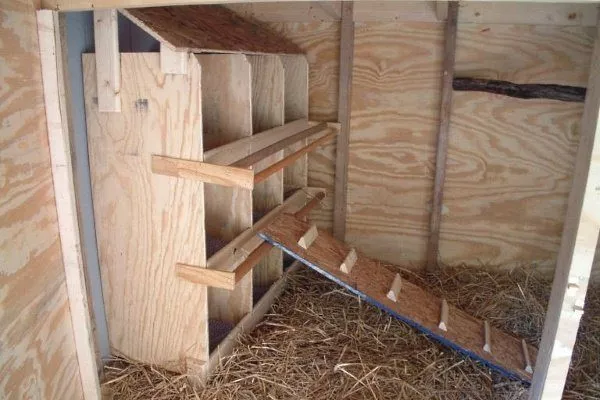
- In the form of boxesThese are unique houses that resemble a box with openings for entry. Inside, they create a comfortable space where the hens can retreat and lay eggs in peace. The boxes can vary in the number of cells. In any case, the hens will quickly become accustomed to them. To do this, simply close them inside the house for a while.
- From scrap materials (boxes, baskets)These types of nests are often used by breeders who haven't yet fully equipped their chicken coop, have a small flock, or are only planning to breed them temporarily. These nests are quite comfortable for hens if made from solid, clean materials. Their main drawbacks are that they don't always make efficient use of space and are not durable.
- With an egg collectorThis type of nest requires a designated area for egg collection. This is achieved by creating either a funnel-shaped hole or a sloping floor. This way, the eggs will fall directly into a special tray, significantly simplifying the collection process. This way, the hen won't have any contact with the eggs, minimizing the risk of them being damaged or pecking.
The most preferable option is a nest with an egg collector, although making it yourself is more difficult than other types of this product.
Instructions for making nests
There are various nesting methods, depending on the type of nest. With a little effort, you can create a truly comfortable nesting house for birds to nest in and lay eggs. We'll explore these options below.
In the form of a box
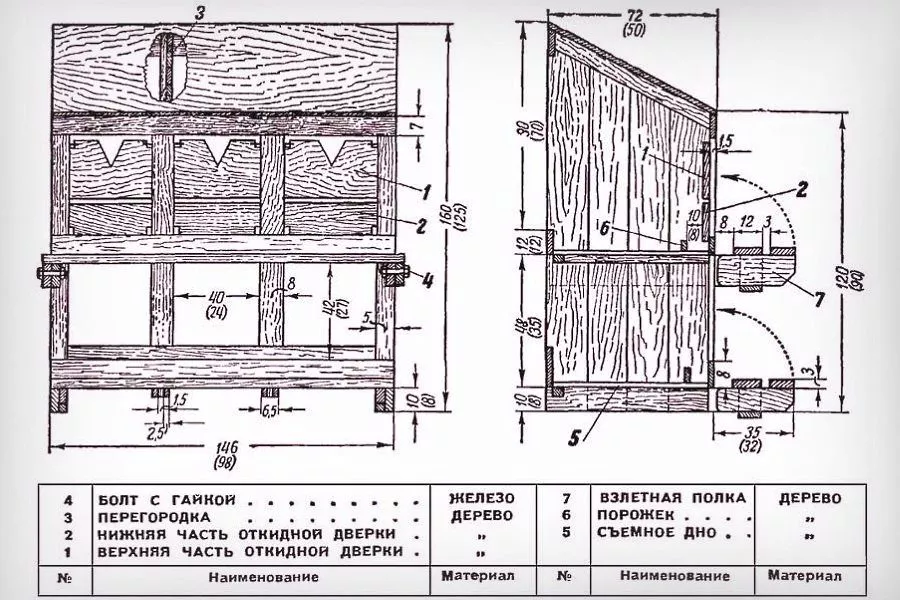
This is a rectangular box, the dimensions of which can be adjusted depending on the size of the coop and the breed of hens kept. It can be stacked not only in a row but also in several tiers. A rough drawing of a two-tiered structure looks like this:
There are two ways to assemble such a structure.
Option No. 1
The box is designed with the following parameters:
- width – 0.25 m;
- height – 0.35 m;
- depth – 0.35-0.45 m.
To assemble such a nest, you need to prepare:
- plywood or boards;
- timber;
- fasteners;
- sandpaper;
- screwdriver;
- hammer;
- electric jigsaw.
When assembling a nest in the form of a box, the procedure is as follows:
- The wooden material used should be treated with sandpaper.
- Cut out the blanks, strictly adhering to the calculations made in advance. First, determine the optimal number of cells and multiply this number by the width of one cell (at least 25 cm). Use a similar formula to determine the height of the box. If you are housing a large number of birds, you should create several tiers.
- Connect the pieces together using fasteners such as nails.
- Attach a beam diagonally (at the corners) to the inside of the resulting box. This will make the structure more durable.
- Leave the entrance open or cut out entrance holes that correspond to the number of nesting places for the hens. Then, cover the box.
- Make a threshold at least 10 cm wide. To do this, take a strip of appropriate size and secure it from below along the entire length of the divided structure.
- Secure the take-off platform at a distance of 10 cm from the entrance hole.
When constructing a nest in several tiers, it is necessary to make the ladders in such a way that there is one ladder for each tier.
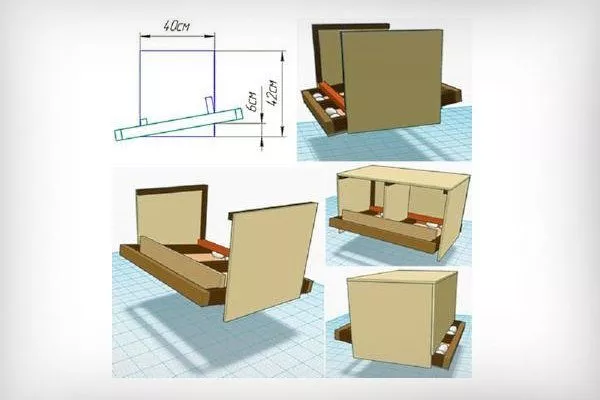
Option #2
This nest-making option requires the same tools as the previous one. The required materials are as follows:
- plywood board 5-15 mm thick;
- square burs with a side of 25 mm;
- a metal mesh for the bottom with a diameter of no more than 7 mm, otherwise chicken feet will get stuck in it, and the pallet flooring will also fall through;
- fasteners (nails, screws or hardware 15-25 mm long and 2-3 mm thick);
- straw or sawdust for bedding.
The wooden materials used must be well dried to prevent moisture from accumulating in the chicken coops.
Having prepared everything you need, you can begin making the nest:
- Sand roughly hewn boards or timber. They can be first planed and then sanded with a sander.
- Using a jigsaw, cut out the bottom and sides of the drawers from the plywood board.
- Divide the timber into 4 vertical supports 0.3 m high, and then connect them along the perimeter with a horizontal timber to obtain a structure similar to the frame of a bench without a seat.
- Place a tray on the assembled frame, which should protrude forward by 10 cm.
- Attach two beams to the pallet. They should be positioned one above the other to create a 5 cm rise. The distance between the double beams should be 30-40 cm, so that each one is located under the adjacent wall of the adjacent nests.
- Install a metal mesh on the elevation, along the entire length of the assembled structure.
- Place the first tier of boxes without bottoms on the mesh, and install a 10-12 cm high threshold as the front wall, otherwise the eggs will fall out of the boxes. The connections between the side walls and the lid and back wall should be reinforced from the inside with longitudinal beams.
- On the first tier, install two more beams at each end with mesh, as in step 5. Next, build all the upper tiers of boxes. For each tier, install a 10 cm-high pallet, which will also serve as a threshold. Attach a round beam to this pallet along the entire length of the tier to create a landing platform.
- Install the top tier roof at a 35-45° angle relative to the horizontal. This is necessary to prevent hens from sitting on it to incubate their eggs. However, this angle is unnecessary if the distance between the coop ceiling and the top roof is small.
- Use a solid plywood sheet 20-30 cm wide to make a staircase for the upper tiers. To do this, simply nail pieces of lumber to the sheet every 10-15 cm.
- Sprinkle sawdust or straw over the wire mesh. Over time, it will become damp and fall into the tray, so you'll need to remove it and renew the mesh covering.
When assembling a multi-tiered structure, it is important to remember that it is better to assemble the boxes in whole tiers, since this way you can save on plywood by installing common adjacent walls.
With an egg collector and a double bottom
This design is also called a "trap nest" and has the following differences:
- provides a slope for the box in which the chicken will lay eggs, thanks to which the eggs will roll into a special tray, remaining intact due to the lack of contact with the birds;
- It is equipped with a double bottom, and the upper floor has a slope and a hole through which the eggs will roll into a special collection tray.
Such a nest should be at least 40-45 cm high to ensure the required bottom slope. Its design looks like this:
Such nests can also be arranged in tiers, but in this case, it's important to consider that the egg collector is located behind the nest, so additional planning will be required for collecting eggs from the middle boxes. This can be done in two ways:
- organize a space for passage between the tiers of the structure and the wall of the chicken coop;
- shorten the length of the tiers to ensure that all eggs can be collected from the sides of the nests.
Regardless of the method you choose, you can use two instructions to make a nest with an egg collector.
Option No. 1
Along with the basic materials and tools listed above, you also need to prepare:
- 2 cm wide plywood slats for the sides of the pallet;
- glazing beads with a cross-section of 10 mm;
- upholstery material for the tray (rubber, non-slip felt, inside-out linoleum);
- knife and scissors.
The nest with a double bottom is assembled according to the following instructions:
- Calculate the optimal nest dimensions, and then increase its height by 5 cm. The optimal dimensions of such a house are 60 x 35 x 35 cm.
- After completing the calculations, assemble the supporting structure according to the instructions given earlier.
- At the front of the assembled frame, identify the locations of the future walls and install short vertical beams 6 cm high if the tray depth is 40 cm. If it is different, it is necessary to calculate the optimal height of the support beams to ensure a 5° slope from the bottom to the rear wall of the structure.
- Place the plywood tray sheet on the assembled frame so that it protrudes 10 cm forward (for the threshold) and 20 cm behind (for the egg collector).
- Place the nests on the inclined tray so that the distance from the back wall to the bottom is 6-8 cm. This will create a passage for the eggs.
- Attach glazing beads around the perimeter of the egg collector to prevent eggs from falling out. Install 2-cm-high vertical slats in front of them.
- Cover the bottom of the tray with felt, rubber or other soft material.
- Nail opaque fabric to both sides of the passage. It should also be flexible so it bends under the pressure of the eggs. A loose, rubberized fabric is ideal.
- Set up a take-off platform and fill the net with straw or sawdust.
How to construct nests with a trap is described in detail in the video below:
Option #2
In this case, after assembling the supporting structure, you need to perform the following steps:
- Cut two halves of the sloping floor, each measuring 35 x 15 cm. When attached, they should create a gap large enough for eggs to pass through. Attach one piece to the back wall at a height of 20 cm and an angle of 15°.
- Attach two partitions to the front wall. First, nail the other half of the sloping floor to the lower one, measuring 10 x 35 cm. Leave a gap between it and the bottom for the collection tray.
- Attach a second partition measuring 15x35 cm to the top of the nest to cover the entrance.
- Make a pull-out tray by knocking it together to size or using any suitable tray. Its depth should be 10 cm greater than the nest's depth, otherwise it will be impossible to easily collect the eggs from the outside. Set the tray at a 5° angle. Line its bottom with a thick layer of soft material to ensure a soft landing for the eggs and prevent them from breaking.
It's recommended to use a mesh floor in the nest to ensure ventilation. For this purpose, you can use wire braided into 4x5 cm mesh. Straw or sawdust should be placed on this floor.
To combat pecking, you can use homemade nest boxes with a roll-out feature. The following video explains how to make one:
With egg container
In this case, the nest is equipped with a special egg container, which will serve as an egg collector. To construct the structure, you will need:
- plywood sheet, chipboard;
- egg container;
- soft material;
- nails;
- hacksaw;
- milk.
The design is made in the following sequence:
- Assemble the box using the methods described earlier, taking into account that the bottom must be secured at an angle of 10°.
- Cut an entrance hole and close the front of the nest.
- On the lower part of the back wall, cut out a hole, the diameter of which is slightly larger than a chicken egg.
- Place a container underneath the bottom, lining it with soft material to prevent the eggs from breaking while rolling. However, the padding should be light enough to allow the eggs to fall into the container.
The bottom of the nest should be covered with a thin layer of bedding, otherwise it may make it difficult for the eggs to roll into the tray.
The following video clearly demonstrates how to make a chicken nest with an egg tray:
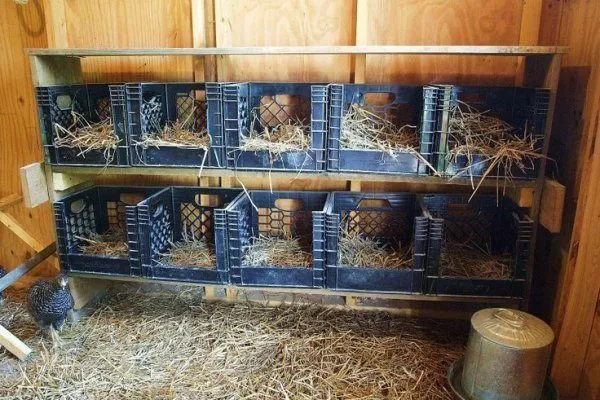
Hanging nests
Similar structures can be made from a variety of readily available materials. For example, ready-made lightweight wooden boxes or plastic crates with a lattice bottom, often used for storing fruit, are excellent options.
The main criterion for such a design is sufficient strength, as hanging nests lack support and are attached only by side fasteners. If you are unsure whether the structure will support a hen and her eggs, the soft nest box should be installed with additional fasteners in the form of wire cords that will support its edges to the wall of the coop.
Hanging nests must be insulated using the following materials:
- with felt;
- thick woolen fabric;
- foam covered with thin plywood;
- compacted straw.
Mineral wool should not be used as insulation, as it can be easily damaged by insects.
The wall adjacent to the main wall of the chicken coop requires insulation. To reduce the weight of the structure, it's best to use thin plywood (up to 0.5 cm thick) for the back wall of the nest box. The insulation material should be sandwiched between it and the coop wall.
Of course, hanging nests can also be assembled from wooden material, following these instructions:
- Prepare a drawing based on the dimensions of the chicken coop.
- Build a frame from 5x5 cm timber and attach plywood to it.
- Build the bottom using timber or metal mesh.
- Attach the sheathing material and lay the insulation on top of it.
- Connect all the nest parts together with bolts, with the sheathed side facing inward, and then drill holes in the rear beams to subsequently attach them to the wall of the chicken coop.
- To ensure free access to the eggs, build a door in the front part of the structure, which should also be insulated.
- Attach a plywood roof. Cover its surface with foil, and then lay metal roofing tiles on top of that.
- Construct partitions, placing them inside the nest. To do this, cut a sheet of paper to the required size and attach it to the bottom using planks.
Hanging nest boxes are an excellent option for wooden chicken coops, as they allow for more efficient use of available space. However, it's important to remember that they require insulation.
Where to place homemade nests?
Nests must be installed in designated locations. When choosing locations, consider the following rules:
- The location should be dark or shaded, meaning protected from direct sunlight. If this is not possible due to the small size of the coop, front walls can be installed instead of thresholds. These should be drilled with openings 20-25 cm in diameter to allow passage. These openings should be located at least 8 cm above the level of the mesh flooring.
- The location should be warm and dry. If the floor is made of plywood, it's a good idea to make ventilation holes in it to allow air to circulate and keep the playhouse dry.
- The location of the nests should be such that the breeder has easy access to them for constant disinfection and cleaning.
- Nests should not be placed in corners or near the entrance to the coop. Although these areas are dark, they are cool and prone to drafts, making them prone to bird illness.
- Nests should be placed at least 30 cm above the floor, as the ground is always cold and damp, which can easily cause birds to catch a cold and become less active, which will inevitably affect their egg production.
- Avoid attaching nest boxes directly to the wall, as this placement will shorten the lifespan of the entire structure. Furthermore, during cold weather, the nest box will become quite cold, which will negatively impact the hens' productivity.
For nest placement, it is worth choosing dark and warm places, protected from drafts.
Alternatively, you can use available items to build nests according to the recommendations above:
Helpful tips
When assembling and using chicken nests, the following recommendations should be taken into account:
- To create a comfortable nesting environment for the hens, line the floor with hay or sawdust. The latter option is preferable, as the birds can easily throw the hay out of the nest box. To prevent eggs from rolling out, the flooring should be 3-4 cm below the sides of the structure.
- Place the nests in the poultry house before the hens are introduced so that they can get used to them faster.
- After assembly, carefully inspect the inside of the nest to ensure it fits comfortably and is free of nails and other sharp protrusions.
- Keep the nests clean and dry. To do this, change the bedding as it becomes wet from chicken excrement. Wipe the mesh with disinfectant solutions, and then air out the nest. This procedure should be performed at least once a week.
- Every three months, check the strength of the nest boxes' attachment to the floor and walls of the coop. If necessary, reinforce them to prevent structural damage.
- Before the onset of cold weather, check the quality of all insulating materials. If they are damaged, they must be replaced. Once frost sets in, check the temperature in the nesting boxes at least twice a day to ensure the insulation is adequate. Keep in mind that the temperature in the chicken coop should not drop below 15°C in winter.
Nests can increase the quantity and quality of eggs your hens lay. They can be purchased or made yourself using ready-made plans and instructions. Of course, this depends on a number of individual factors, including the number of hens on your farm and the available space in the coop.
I want to express my sincere gratitude for the article! We built nest boxes this year following your advice—now the coop is clean, everything looks neat and tidy. And most importantly, the hens are happy. They seem to enjoy laying eggs in their own "rooms."