When raising chicks, it's important to plan in advance where they will be kept from the first days of their lives. For this purpose, breeders often use brooders—specialized devices that provide all the necessary conditions for the chicks' growth and development. They can be easily made in a home workshop using ready-made instructions.
Requirements
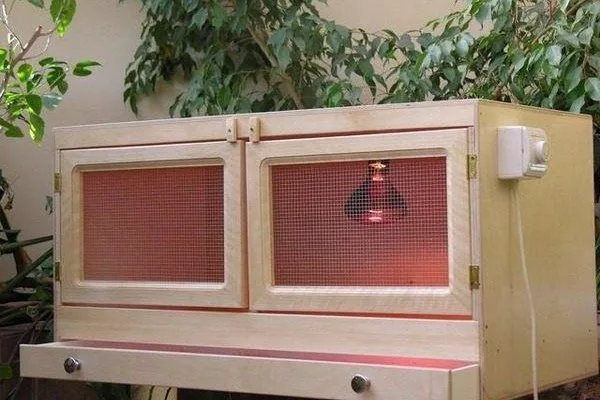
A brooder essentially serves as a broody hen for chicks, serving as a small box in which they are kept during the first weeks of their lives if they are bred in artificial conditions. When making one yourself, pay attention to the following parameters:
- DimensionsThey depend on the number of chicks, as there shouldn't be more than 25 chicks per square meter. Considering they will be kept in the brooder until they are 2 or 3 months old, at least 0.1 square meters of space should be allocated per chick. A standard "house" can often hold 50 day-old chicks. Its acceptable dimensions are as follows:
- length – 100 cm;
- height – 50 cm;
- width – 50 cm.
Critical parameters for successful chicken rearing- ✓ Optimal stocking density: no more than 25 chickens per 1 sq. m.
- ✓ Temperature regime: the first days of life - 35°C, gradually decreasing to 30°C.
- ✓ Humidity: first day – 60-70%, then keep dry.
Thus, the dimensions of a standard box for 50 chicks are 100 x 50 x 50 cm. If you plan to house broilers or more than 60 chickens, you can increase the width and length to 60 cm and 1 m, respectively, with a height of 50 cm.
- VentilationThe brooder should be well ventilated, but drafts should be avoided, as chicks are extremely sensitive to cold.
- HumidityExcessive humidity in the box should be avoided, as this can weaken the young animals' immune system. Only during the first day should it be maintained at 60-70%.
- FloorIt must be dry and non-slip, otherwise the chicks may get sick or injured.
- Availability of a tray for collecting droppingsIf possible, install a special tray under the floor to collect excrement. This will make keeping the brooder clean much easier. While droppings need to be removed regularly, it's important to avoid constantly disturbing the chicks, especially those under 50 days old. A special tray will help solve this problem.
- HeatingA moderate heat source should be installed inside the brooder to maintain the desired temperature. During the first few days of the chicks' lives, it should be approximately 35°C, but can later be lowered to 30°C. The heat source should be positioned so that the chicks cannot reach it.
Taking these parameters into account, a home craftsman can assemble a brooder using the following scheme:

If necessary, several such boxes can be made and stacked on top of each other to create a battery where a large number of chickens can be bred.
The key nuances and parameters that a home craftsman should consider when building a brooder are outlined in the following video:
Selection of materials and tools
To ensure a product has superior performance characteristics and lasts for many seasons, it's crucial to choose the right materials for its construction. Here are some acceptable options:
- Oriented strand board (OSB)It is used as a base for the structure. The optimal thickness of the board is 9 mm. It should be noted that it should not be used as the main material, as it has an uneven surface and is difficult to clean.
- PlywoodIt's considered a good choice for frames and doors because it's a smooth material that's easy to clean and disinfect. However, plywood is quite brittle and can break under weight. Therefore, if you plan to build a radiator, you should use more durable sheets, although they will be significantly more expensive.
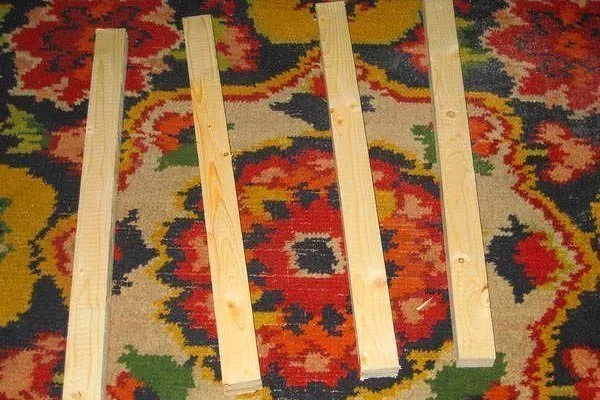
- Wooden slats, beamsThey are suitable as raw material for assembling frames and doors. They can also be used to create a lattice floor.
To ensure a secure structure, the frame should be made from wooden planks and beams, and OSB or plywood sheets should be attached to it. These materials heat up well, helping to keep the box dry and warm.
- Expanded meshThis mesh is used to cover the viewing windows in the doors. It also allows sunlight to pass through, which is beneficial for the chicks.
- Galvanized metal meshA tray for collecting droppings is made from it. For this, a piece measuring 1.0 x 0.5 cm should be used. This mesh should have small holes (about 1 cm).
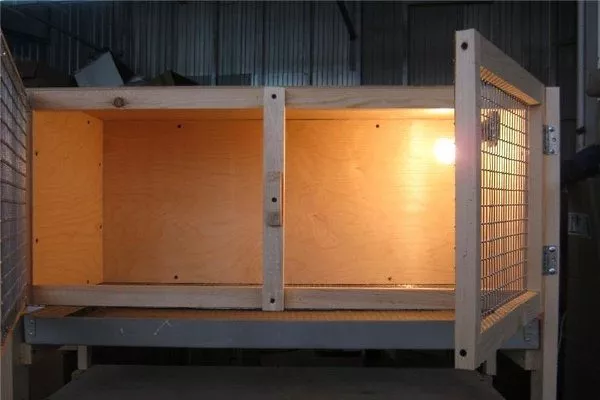
- Incandescent lamp. It is installed inside the brooder as a source of light and heating.
- Self-tapping screwsThey should be used when assembling a product that can be completely disassembled in the future, if necessary.
- ✓ Plywood: smooth surface for easy cleaning and disinfection.
- ✓ Wooden slats: strength and reliability for the frame.
- ✓ Expanded mesh: allows light to pass through, essential for chicks.
Some craftsmen mistakenly use polymeric materials like polycarbonate. They are easy to clean and disinfect, but they are practically non-breathable, making it difficult to maintain optimal temperature and humidity conditions inside the structure.
The complete set of necessary tools looks like this:
- a hacksaw or power tool for cutting wood;
- electric jigsaw or wood saw;
- drill and screwdriver for quick assembly of the structure;
- metal shears for cutting expanded metal mesh or metal sheets;
- hammer, wire cutters, pliers;
- tape measure, pencil.
- ✓ Electric jigsaw or saw: for precise cutting of wood.
- ✓ Drill and screwdriver: for quick and reliable assembly.
- ✓ Metal scissors: for cutting mesh.
Assembly instructions
After calculating the dimensions and preparing the drawings, you can begin assembling the structure, which consists of a box with doors, a mesh bottom, and a litter tray. We'll discuss effective assembly methods below.
Method No. 1
To make a "house" for the young, you need to have the following materials on hand:
- 2 sheets of plywood measuring 1.5 x 1.5 m;
- metal corners;
- steel mesh with 10x10 mm cells;
- wooden slats 50x15 mm;
- fasteners (the best option is galvanized self-tapping screws);
- wooden hinges – 4 pieces.
Assembly work is carried out in the following sequence:
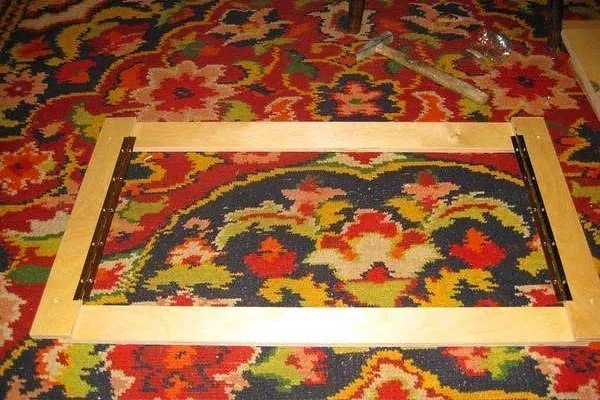
- To create the frame, cut the plywood sheet into two pieces, then cut one of them in half again to create a pair of 75x75 cm plywood squares (the future side walls). The remaining 150x75 cm plywood pieces will serve as the back wall, ceiling, and floor.
- Cut four strips of equal length for the side panels and two for the end, 2 cm shorter than the length of the walls. These will serve as guides for the removable lattice bottom.
- Attach the bottom planks along the edges of the walls, 1 cm from the side edges. Keeping a 3 cm gap from the bottom planks, attach another plank parallel to them. It's crucial to maintain the distance between the elements, along with the makeshift skids, to ensure the removable base and tray can slide smoothly.
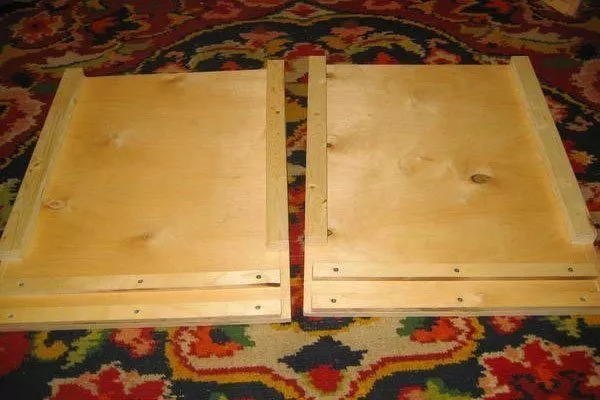
- Attach timber strips to the sidewalls as stiffeners. Their size should be calculated so that they are flush with the wall edge at the top and 3 cm higher than the top bar at the bottom. Next, connect the sidewalls to the back wall using galvanized screws and metal corners. It is recommended to insert the fasteners into pre-drilled holes. The grooves in the bottom of the structure should align perfectly.
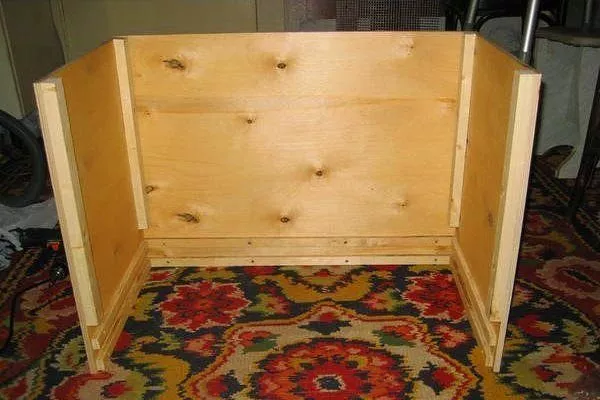
- Assemble the frame of the front panel, and attach hinges to the inside of the sides of the resulting frame, on which the door can later be hung.
- Screw the previously prepared parts for the two doors to the hinges:
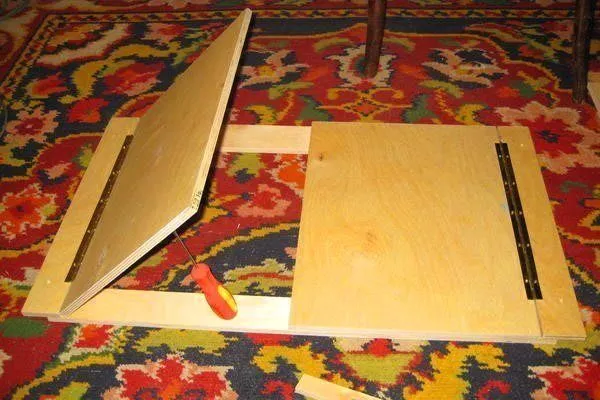
- Attach the bottom and ceiling, cut from the same sheet of plywood:
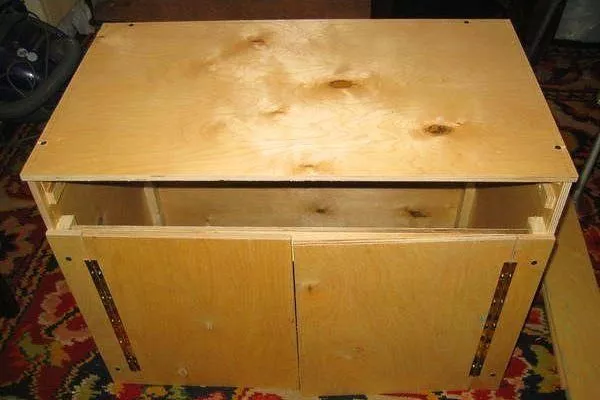
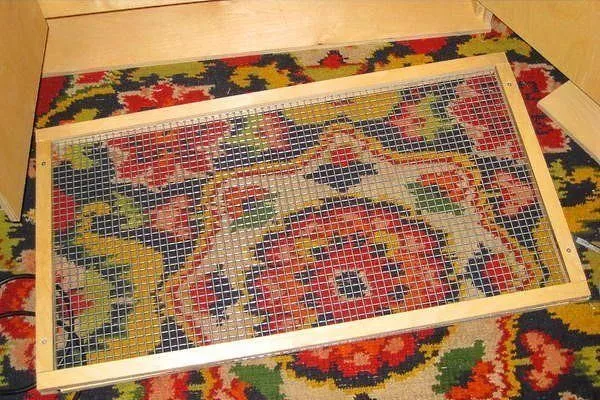
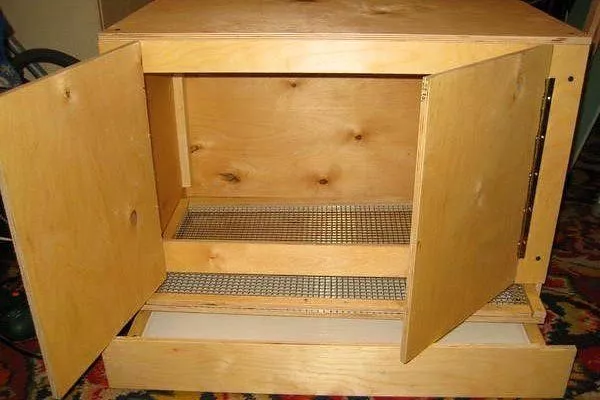
- Prepare a removable mesh bottom. The mesh should be secured between plywood planks like a frame to ensure strength and practicality.
- Make a litter tray similar to the mesh bottom, but use a lightweight, hygienic plastic panel as the base. Keep in mind that the tray should be slightly smaller than the plywood bottom. This will allow it to move freely but securely. Its bottom should be lined with wood shavings or paper.
- Cover the space between the mesh and the bottom with a wide strip, which is screwed to the frame. This will prevent droppings from spilling out and limit the spread of their unpleasant odor.
- Make mesh windows on the doors. To do this, use a jigsaw to cut out the center of the plywood piece and attach strong plastic mesh to the resulting frame.

Instead of doors, you can attach a plastic sheet to the top bar and secure it with nails underneath. When the chicks grow up, replace the plastic sheet with plastic or metal mesh.
Method #2
Initially, you need to prepare the following materials:
- a sheet of moisture-resistant plywood measuring 1.5 x 1.5 cm and 1-2 cm thick;
- wooden blocks or slats;
- metal corners;
- self-tapping screws.
The assembly instructions for the structure are as follows:
- Using a saw or jigsaw, cut a 0.5 x 1.5 m section from a sheet of plywood. Next, cut it into three equal pieces measuring 0.5 x 0.5 m, two of which will serve as the sides. Cut the remaining piece into three pieces measuring 1.0 x 0.5 m to form the ceiling, floor, and bottom of the pull-out litter tray.
- Attach the top and back walls of the future box to the sides. To make assembly easier, you can initially prepare a frame of suitable shape from wooden slats or sections of metal profile.
To prevent the plywood from cracking when it is fixed with screws, small holes should be made in it beforehand.
- Assemble a frame for the tray from wooden slats. Its dimensions should be such that it fits easily under the bottom of the brooder (approximately 97 x 48 cm). Next, trim a piece of plywood to fit the frame and attach it with nails. The tray should also be lined with plastic sheeting to make it easier to dispose of the collected droppings.
- Attach guide strips to the sides to support the tray and base. After that, you can install the tray.
- Build a floor frame out of slats, then attach wire mesh to it to allow droppings to flow into the installed tray. If the brooder is for newborn chicks, it's a good idea to line the bottom with newspaper or fabric for the first few days.
- Using slats, assemble the door frame and attach the plaster mesh to it. Next, attach hinges to the sides to hang the door. It's also a good idea to install door latches or a wooden block stop in the center of the front of the frame.
If desired, the assembled structure can be painted on top, and then placed in a suitable location and the chickens can be released into it.
Step-by-step instructions for assembling a brooder for home use are provided in the video below:
Method No. 3
The fundamental difference of this model of homemade brooder is that it is made from ready-made materials, namely:
- wooden box;
- canisters;
- piece of fabric.
Using a ready-made box or having assembled a 120 cm long frame according to the instructions above, you need to perform the following steps:
- Divide the brooder into two sections, 70 cm and 50 cm respectively. The larger section will have a plexiglass or glass window, while the smaller section will remain closed and be used for overnight roosting of the chicks.
- Create double walls, spaced 15 cm apart. They should be positioned above the floor in a closed section. Attach canister holders to them.
- Make a frame for the window and insert glass (plexiglass).
- Attach frame holders to the open part of the brooder and install the frame using hinges. This will allow the window to open.
- Create a side door. This can be a small opening or an opening front panel.
- Hang a fabric screen between the segments.
- Fill the gap between the walls in the closed part with peat, and make a double lid over the canister similar to the walls, filling the space with thermal insulation material.
- Place a canister of hot water in the canister and close it with a lid. Change the water in the canister periodically.
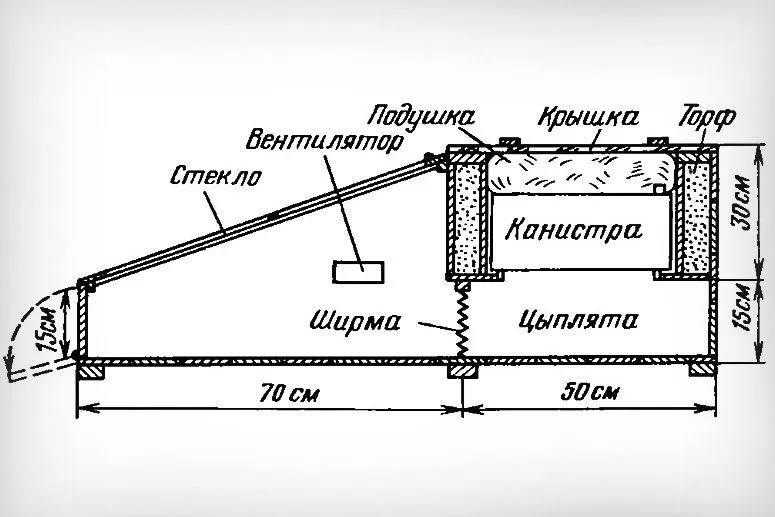
In addition to the canister, an incandescent lamp can be installed in the brooder, but it should not be allowed to come into contact with the fabric, otherwise it may ignite.
Organization of lighting and temperature
To ensure the chicks feel comfortable, it is necessary to set up a proper lighting and heating system, installing an infrared lamp or a standard 60W lamp and infrared heating film.
It's generally accepted that the required heating power per square meter is approximately 0.28 kW. The quality of the heating system can be assessed by the chicks' activity. If the temperature is set correctly, they will actively eat and drink; if it's too low, they will huddle together and try to stay warm; and if it's too high, they will become unable to breathe and die. The temperature regime should be adjusted depending on the chicks' age:
| Age (days) | Temperature in the box (°C) | Room temperature (°C) |
| 1-5 | 35-34 | 23-24 |
| 6-10 | 29-27 | 22-23 |
| 11-20 | 26-24 | 22-23 |
| 9:30 PM | 24-22 | 21-22 |
| 31-40 | 22-20 | 21-20 |
| 41-60 | 20-18 | — |
| 60 and more | 18-16 | — |
To maintain the specified parameters, experienced professionals recommend organizing a lighting and heating system using an electric lamp, socket, plug, and cable. Installation is performed in the following order:
- Drill a hole in the ceiling of the box for the cable, then thread it through and attach the socket to it. Connect the outer end of the cable to the plug.
- Install a dimmer and a plug on the outside of the box.
- On the back wall, provide a place to attach a thermometer, which will allow you to monitor the temperature inside the box.
- Install a lamp in the socket. To create areas with varying degrees of heat, use a lamp with a reflector. This way, the chicks can gather under the reflector if they get cold and move away from it in extreme heat.
During the first three days, chicks need to be provided with light for 23 hours a day.
Arrangement of a feeder and drinker
Regular galvanized scraps of food, which simply need to be wrapped, work well as feeders. This allows the feeder to be filled from the outside without disturbing the chicks. Furthermore, it holds enough food at a time, ensuring no chick goes hungry.
As for waterers, it's best to choose nipple systems with drip catchers, as they're safe for chicks and, thanks to the measured flow, prevent dampness from building up in the tray, which is very dangerous for young birds. For the same reason, vacuum drinkers or saucers should be avoided. Furthermore, chicks can drown or choke in them while drinking.
What can I use as a temporary replacement for a brooder?
If the chicks are already on hand and it takes some time to build a "house" for them, the breeder must consider temporary housing. For this, an appliance box can be used, which only requires minor modifications:
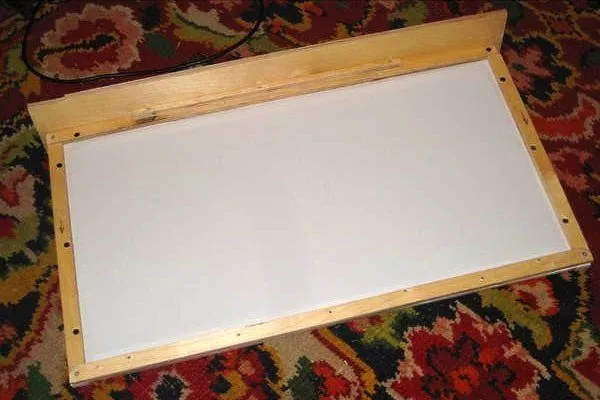
- Insulate the bottom to make it non-slip. To do this, you can cover it with 2-3 layers of gauze or a sheet of corrugated cardboard.
- Cut a viewing window in the side of the box at a convenient height and then cover it with clear plastic film. This will allow you to check on the chicks at any time without opening the box or disturbing them.
- Create a heating and lighting system in the box. For this, you can use a liter-sized jar with a screw-on metal lid. Attach a small metal socket to the inside of the jar with screws, and screw in a light bulb. It's a good idea to place a non-flammable gasket, such as PCB, between the lid and the socket. To ensure proper air circulation, pierce the lid several times. Next, fill the jar 1/3 full with fine sand, and wrap the bottom with a cloth or place a thick sock over it to prevent the chicks from getting burned.
If the box is large, you need to place several similar jars of sand in it.
A brooder can be purchased at a store for 6,000-10,000 rubles, or you can build one yourself using ready-made plans and readily available materials. Once assembled, it will need to be equipped with a light bulb, feeders, and waterers. If you plan to raise a large flock, you can build multi-tiered cages for the chicks.