An automatic feeder is a device that dispenses the required amount of feed at a set time or as needed. This ensures that hens receive regular portions of food, don't go hungry, and, consequently, continue to lay abundant eggs. Furthermore, the breeder no longer has to constantly check the feeder's contents, significantly simplifying farm management.
Operating principle
There are a large number of automatic feeder designs, but they all have a similar operating principle:
- The poultry farmer pours the required amount of feed into the loading container. It is airtight and seals tightly once filled.
- The feed is automatically and portioned into a compartment from which the chickens can eat it.
- ✓ Consider the size of your chicken flock to determine the volume of your feeder.
- ✓ Check the feeder's compatibility with the type of food you are using.
This way, the poultry farmer only needs to refill the common container with feed as it empties. A similar feeder can be purchased at any hardware store or made at home.
Features of the design of bunker automatic feeders
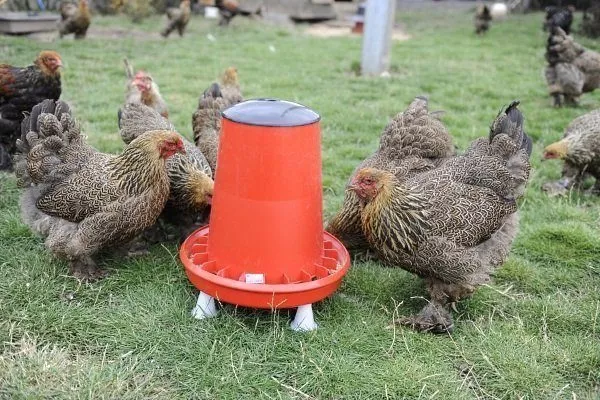
The most convenient for feeding a large flock of chickens are bunker (vacuum) structures, which consist of two parts:
- closed container for feed (bunker);
- feeding compartments.
The hole through which food enters the compartments is made small to prevent the birds from reaching the grain themselves. Therefore, the breeder must pour food into the common reservoir in the morning to ensure the birds are properly fed throughout the day or even the week.
- ✓ Regularly clean the feeder from food residues to prevent the growth of bacteria.
- ✓ Check the feed delivery mechanism for blockages and wear of parts.
Before assembling such a structure yourself, you should plan ahead for its fastening. It must be securely fastened to prevent the hens from tipping it over and scattering feed throughout the coop. It should also be removable, as the brooder needs to be regularly cleaned of old feed residue and disinfected.
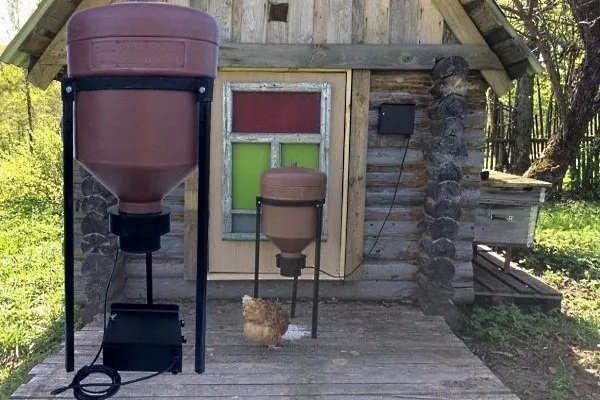
How does an automatic feeder with a timer work?
This type of device is also called a stand-alone feeder. It's ideal for feeding poultry in backyards and on farms. Obviously, this type of feeder is equipped with a timer, allowing the breeder to program the feeding schedule, the frequency of feedings (usually up to eight times), and the breaks between feedings.
The autonomous feeder consists of two units:
- the first one is with a feed distribution system (feed distributor);
- the second one – with the control system and power supply.
The second unit, which is external and can be remotely mounted, is equipped with an electronic timer. In this case, it can be installed in any convenient location for controlling the feed dispenser.
All timer feeders feature a backup battery, a dry food storage container, and an auger that feeds pellets directly into the tray. The auger is removable, making it easy to remove and clean. The compartment itself is securely protected by a tightly sealed lid.
Pros and cons
A feeder with automatic feed delivery offers the following advantages:
- Automated feeding process. Feed is automatically transferred from the loading container to the trough, eliminating the need for the owner to visit the coop every 2-3 hours. The breeder's primary responsibility is to accurately calculate the amount of feed required for the entire flock and maintain it.
- Feed savings. Feed is dispensed into the chicken compartment in measured doses, significantly reducing feed consumption. In other words, the feed is dispensed in the same amount as the birds consumed.
- Feed storage. The feeder can hold a large supply of feed. It also closes securely, preventing birds from accessing the feed and scattering it throughout the coop. This is especially important for raising boisterous birds, such as Andalusian chickens.
Given the obvious advantages of an automatic feeder, it's also worth noting its limitation in feed type selection. This device is designed only for feeding grain, pellets, or free-flowing dry feed. It is not suitable for feeding mash or grated vegetables.
Grain or dry feed alone will not be enough to provide a complete diet for chickens, so you will also need to add feeders for mash, grated vegetables, etc. to the coop.
It's worth noting that the main drawback of a standalone feeder is its high cost. However, its advantage is obvious: the installed timer allows for maximum automation of the feeding process, so the breeder only needs to set the correct time and refill the hopper with food when it's empty.
Factory-made automatic feeders
Home improvement stores offer a variety of automatic feeders made of plastic or powder-coated sheet metal. They are generally classified into two broad groups:
- Cheap modelsThese are often feed containers with trays and a hopper. When purchased, the farmer receives a ready-to-use unit that simply needs to be installed and filled with feed. If the model is very inexpensive and sold without a hopper, the farmer also needs to find a container that can be used as a feed reservoir. Typically, a tray without a hopper is sold with a special mount designed to fit a glass jar or plastic bottle.
Various trays with screw-on fasteners designed to hold a can or bottle are available. These are designed for young chickens, but if you have 5-10 adult chickens in your barn, you should choose a model with a hopper or make your own.
- Expensive modelsThese are often feeders with a timer and a special mechanism for distributing the feed. Their average price starts at 6,000 rubles. Some feeders require the addition of a 20-liter barrel, with the steel pipe structure itself mounted on stands underneath. They operate on standard batteries or a rechargeable battery. There are also automatic feeders that can be powered not only by 6- or 12-volt batteries, but also by a specially designed transformer from a 220-volt network.
If you have a large flock of chickens, it's worth purchasing a relatively expensive automatic feeder. For a small flock, however, you can use cheaper or homemade options.
Primitive plastic automatic feeders
A simple automatic feeder can be easily made by hand using the instructions below.
Read another article of ours about How to make a chicken feeder yourselfThe article describes options for making various types of feeders.
From a plastic bucket
This design is recommended if you don't plan to install it outdoors, as moisture will contaminate the feed, which will compromise its quality. It's also a good option for feeding birds in a chicken coop.
To make a vacuum feeder you will need the following materials and tools:
- a plastic bucket with a tight lid and a volume of 5-10 liters;
- a tray with dividers, a basin, a tray or other flat container, the diameter of which is 20-30 cm larger than the diameter of the bucket;
- plastic cutter or other suitable tool;
- screws and nuts.
To assemble the feeder, you will need to do the following:
- Punch several semicircular holes with a radius of 4-5 cm at the bottom of the bucket. The exact number and radius should be determined based on the optimal volume of incoming feed. If using a tray with dividers, the number of holes should correspond to the number of dividers.
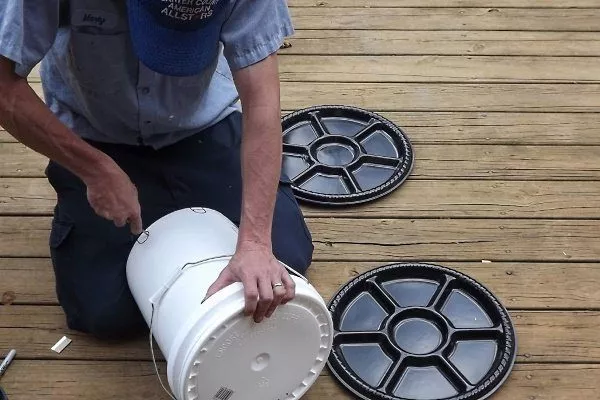
- Screw the tray to the bucket using screws.
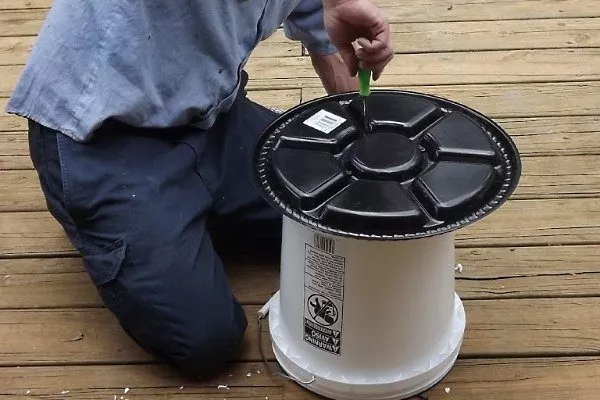
- Fill the feeder with feed and close the lid. To prevent the chickens from injuring themselves while feeding, trim the holes, if necessary, to remove any burrs that may have formed during cutting.
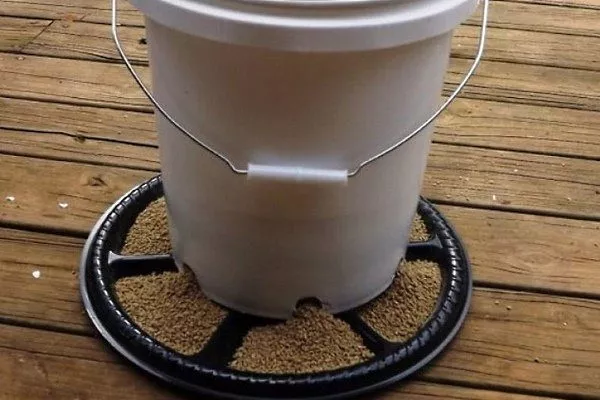
Experienced bird feeders recommend placing something cone-shaped inside the bucket, such as the top of a plastic bottle. This way, the food won't sit at the bottom, but will instead flow down the sides to the edges of the tray, making it easier for the birds to access.
From plastic bottles
This feeder shares the same drawback as the previous one: it lacks weather protection. Therefore, it can only be used indoors.
To make such a product, you will need:
- plastic bottles – 2 pcs.;
- a flat bowl or basin, the diameter of which is slightly larger than the diameter of the bottom of the bottle;
- a sharp knife or other tool for cutting plastic.
The assembly instructions for a simple design are as follows:
- Cut the first bottle in half. Only the bottom half will be used later, so the top half with the cone can be set aside.
- Cut holes around the bottle to allow the hens to easily stick their heads through during feeding. The edges of the holes should be sealed to prevent injury.
- Cut off the bottom of the second bottle, then place it in the first bottle with the neck down and connect it in a convenient way, for example, with screws.
- Pour feed into the top bottle and cover its bottom tightly with a wide bowl or basin. The "lid" should not be easily removed, otherwise the birds will get to the feed.
From plastic bottles (for chickens)
The chicks are kept separately from the adults, so it's important to provide them with separate, small feeders to prevent them from reaching the food. To do this, you'll need:
- 2 plastic bottles with a capacity of 1.5 and 3 liters (they need to be selected in such a way that the top and neck of one bottle fit freely into the middle part of the other);
- a feeding tray (lid, plastic bowl or other container with low sides);
- a tool for cutting plastic (such as a utility knife).
You can assemble the feeder in this way:
- Cut off the top cone from the smaller bottle, which will be used later.
- Cut off the top cone and bottom of a large bottle, then make small holes about 2 cm in diameter in the bottom. Attach a feeding tray to the top of the bottle.
- Close the top cone of the small bottle and place it inside the larger container, upside down, to prevent food from accumulating at the bottom of the feeder.
Instead of a large bottle, you can use a small plastic bucket or a CD container.

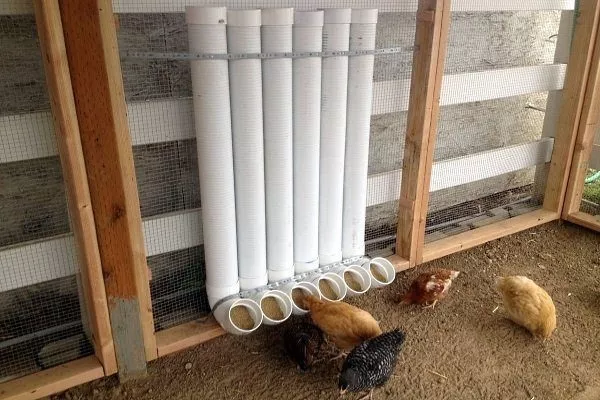
Automatic PVC pipe feeder
This design is popular among chicken breeders because it can hold up to 10 kg of feed and is secured to the walls of the coop, eliminating the risk of tipping over and spoiling the feed. One drawback is the difficulty in cleaning, as this type of feeder cannot be easily removed and rinsed under running water. However, it can be easily assembled using the step-by-step instructions.
With a tee
To make it you will need:
- 3 PVC pipes with a diameter of 110 m and a length of 70 cm, 20 cm and 10 cm;
- 2 plugs;
- 45˚ angle tee;
- Brackets for ventilation pipes or other material for attaching the feeder to the wall.
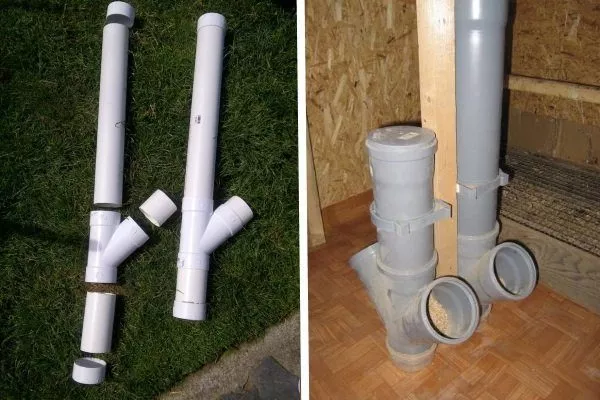
Assembly is carried out in the following sequence:
- Attach a plug to one end of the 20 cm pipe to form the bottom of the feeder, and a tee to the other (its side elbow should point upwards relative to the bottom).
- Attach a 10 cm piece of pipe to the side elbow of the tee. Its edges should be treated to prevent the birds from injuring themselves while feeding.
- Attach a 70 cm pipe to the third hole of the tee. This is where you will pour the feed, after which you will need to close it with a second plug.
- Attach the resulting feeder to the wall using a bracket.
The downside of this type of feeder is that any food remaining on the bottom will need to be scooped out by hand.
Another version of assembling a feeder with a tee can be seen in the video below:
With a knee
It's considered a more suitable option. To make it, you'll need:
- PVC pipe with a diameter of 110 mm and a length of 1.5 m;
- 2 knees – 45˚ and 90˚;
- plug;
- mounting brackets.
To assemble the feeder, connect the pipe, 45°, and 90° elbows. This sequence must not be disrupted. Ensure that the elbow ends are free of burrs and sharp protrusions that could pose a hazard to birds. Secure the assembled structure to the wall, then pour feed into the pipe and close it with a cap.
You can see how to make a knee-shaped feeder in the video below:
Types of wooden automatic feeders
Such products are considered more reliable because, unlike plastic feeders, they don't dry out over time, don't crack, and are virtually impervious to accidental mechanical impacts. The challenge is that they require more time and effort to manufacture. If you don't mind these challenges, you can follow the instructions for assembling automatic feeders from sheet materials such as chipboard or plywood.
Without a pedal
A standard feeder is 29 cm long and is designed for 2-3 birds, as each bird should receive 20-15 cm of food. For larger flocks, you can make several of these designs or calculate your own dimensions.
The diagram of a classic automatic feeder looks like this:
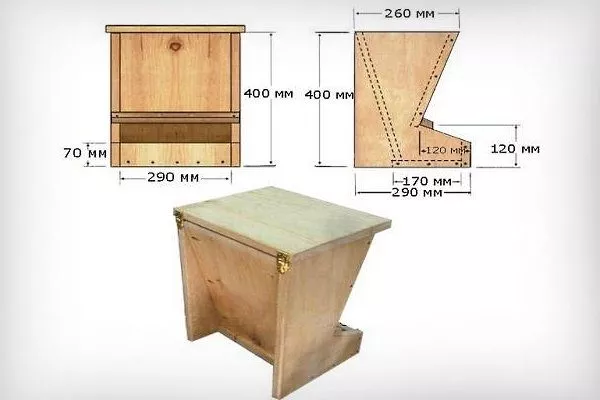
To assemble such a “box”, you need to acquire:
- thick plywood or wooden boards;
- with a drill;
- with a screwdriver, screws;
- loops;
- with sandpaper;
- with a saw;
- with a pencil or marker;
- with a tape measure or ruler.
Before you begin assembly, you need to prepare sketches according to which the parts of the future automatic feeder will be cut out:
- for the sides - 2 figures 40 cm high, with an upper edge of 26 cm and a lower edge of 29 cm (2 triangles also need to be cut out on the walls);
- for the front part – 2 rectangles 28x29 cm and 7x29 cm;
- for the lid – a rectangle 26x29 cm;
- for the bottom – a rectangle 29x17 cm;
- for the back wall – a rectangle 41x29 cm.
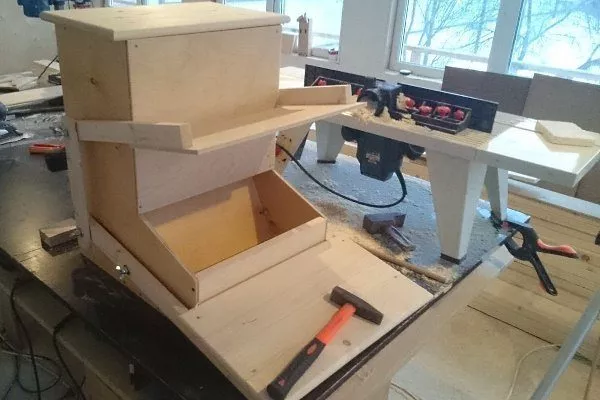
Once all the drawings are prepared, you can proceed to the following work:
- Transfer all drawings onto sheet material, and then cut out all the parts along the lines.
- Use an electric drill to make holes in the attachment points.
- Sand the cut out pieces to remove burrs and smooth out their surface.
- Assemble the feeder according to the diagram above, keeping in mind that the front and back walls should be positioned at a 15-degree angle relative to the horizontal. This will prevent feed from stagnating in the far corner of the box. For greater density, you can use a clamp.
- Screw the lid to the back of the sides using two hinges.
- The assembled box should be treated with an antiseptic, but varnish and paint should not be used, as this will negatively affect the quality of the food and the health of the birds.
With a pedal
This type of automatic feeder also consists of a hopper with a tray, but it also has a pedal. The chicken presses the pedal, causing the tray lid to rise via a rod, allowing access to the feed. When the bird is satisfied, it moves away from the pedal, causing it to rise, closing the tray lid.
The operating principle of this design is shown in the following video:
To make this feeder, you can use the previous diagram. There's no need to increase the dimensions, as the mechanism works flawlessly as long as the tray lid isn't heavier than the chicken that's stepped onto the pedal. This diagram should be supplemented with two rectangles for the tray lid and the pedal. The rods should be made from six pieces of wood:
- 2 longest blanks - for securing the pedal;
- 2 medium-length bars – for fixing the tray lid;
- 2 short blanks – for connecting the lifting mechanism together.
Once you've assembled the hopper feeder using the method described above, all that's left is to install the pedal mechanism. To do this, follow these steps:
- Attach two medium-length blocks to the lid of the food tray using screws. Drill two holes at each end to secure the mechanism with bolts. One of the bolts should be slightly larger in diameter than the bolt and positioned closer to the end of the block. Drill similar holes on the sides of the box, then screw in the bolts so the blocks can slide freely along their axes, lifting the lid.
- Attach the longest bars to the pedal in the same manner. Drill holes approximately 1/5 of the way down the bars to connect them to the brooder walls.
- Connect the entire mechanism using short bars, drilling holes into the ends. The already-fixed bars will have two free holes on each side (one each on the top and bottom bars). Screw the short bars to these, but be sure the connection is rigid and strong, otherwise the lid won't lift when the pedal is pressed. If necessary, adjust the bolt tension.
- Treat the finished structure with an antiseptic and use as intended.
An automatic feeder with a pedal can be placed outside, but it should first be treated with a waterproof solution that is safe for chickens.
Automatic feeders can significantly reduce feed consumption and make feeding your birds easier. They can be purchased at the store, choosing from a simple design or a more advanced model with a self-contained unit and timer. There are also various homemade automatic feeders that even an inexperienced homeowner can build, significantly reducing the cost of setting up a chicken coop.