When artificially hatching turkey eggs, it's important to properly prepare the eggs, place them in the incubator, adjust the settings, and monitor the embryo's development. Even one mistake can result in the loss of the entire batch. The article below details all the rules and fundamentals of successful turkey egg incubation.
Selecting a turkey breed for incubation
| Name | Weight of turkeys, kg | Weight of turkeys, kg | Egg production, pcs/year |
|---|---|---|---|
| North Caucasian bronze | 15 | 8 | 80 |
| Bronze broad-breasted | 19 | 12 | 110 |
| Station wagon | 18 | 10 | 65 |
| Moscow White | 16 | 8 | 100 |
To get the maximum profit from turkey breeding, it is important to choose a breed with optimal productivity.
Experienced poultry farmers recommend choosing one of the following breeds:
- North Caucasian bronze. This is one of the most popular turkey breeds. Adult male turkeys weigh up to 15 kg, while female turkeys weigh up to 8 kg. A female turkey can lay up to 80 eggs per year.
- Bronze broad-breasted. This popular meat breed is similar to North Caucasian turkeys. Male turkeys weigh 19 kg, while female turkeys weigh 12 kg. They produce 100-120 eggs per year.
- Station wagon. The breed is known for its rapid weight gain. Female turkeys weigh 10 kg, while male turkeys weigh up to 18 kg. They lay 60-70 eggs per year.
- Moscow white. A highly productive breed, they easily adapt to various weather conditions. Female turkeys weigh 8 kg, while male turkeys weigh up to 16 kg. They lay up to 100 eggs per year.
More information about turkey breeds suitable for home breeding is available in the article located Here.
The genetic and physiological health of the laying hen is also crucial for successful incubation, as the quality of the eggs selected for hatching depends on this. When selecting eggs for hatching, they are taken from hens with the following characteristics:
- broad chest;
- massive hips;
- straight and powerful legs;
- long and straight keel;
- healthy eyes - they should be round, with clearly defined edges.
Features of incubators for hatching turkeys
When turkeys hatch naturally—under a turkey hen—the hatchability is higher than in an incubator. However, if the goal is to sell the chicks, only an incubator can ensure a large number of chicks.
- ✓ Availability of an autonomous power source for uninterrupted operation in the event of a power outage.
- ✓ Ability to maintain stable temperature and humidity without significant fluctuations.
- ✓ Automatic egg turning to minimize manual labor.
An incubator is a device that uses heating and insulation to maintain a stable temperature and humidity. All incubators operate similarly, but their design may vary.
According to the heating type, incubators are classified as:
- With top heating. This option is closer to natural brooding—the hen sits on top of the eggs, and the embryo is positioned at the top of the egg. However, this design is not technically efficient—warm air rises and is expelled through ventilation.
- With bottom heating. Warm air rises only after it warms the eggs. This method is more economical than the previous one.
A common problem with incubation is uneven heating. To avoid this, eggs need to be turned. Incubators with the following types of turning are available:
- With automatic. A convenient, but expensive option. The eggs are turned without human intervention, according to a preset program.
- With mechanical. There is a rotating mechanism that is activated by mechanical force – pressing a lever.
- With manual. Eggs have to be turned manually, which is time-consuming.
According to their purpose, incubators are classified as:
- industrial – for large farms, designed for thousands of eggs;
- farm – up to 5,000 eggs;
- household – up to 300 eggs.
A major drawback of mains-powered incubators is the risk of power outages. This can result in egg death. Depending on the power source, the following types of incubators are available:
- Without additional power source. They operate on a 220V power supply. If the power goes out, the units shut off. Thermal insulation maintains the temperature for a short time, but not for long.
- Autonomous. In addition to the mains power supply, there is a 12 V battery – such devices operate without interruption.
Selecting and Storing Suitable Eggs
You can't place eggs in an incubator without first selecting them, as this will result in a very high percentage of defects. The following eggs are selected for incubation:
- fertilized;
- weighing 80 g, in some breeds – 90 g;
- no shell defects, no build-up, cracks or inclusions;
- with a white, beige or slightly brownish shell.
Eggs that meet standard parameters are selected – spherical specimens, those that are too small or too large, or those with green or blue spots are rejected.
Eggs of a uniform size are selected for the incubator. All selected eggs are candled. Turkey eggs are stored for no more than 10 days. Keeping the eggs longer reduces hatchability.
Dependence of hatchability on the duration of egg storage:
| Duration, days | Hatchability percentage, % |
| 5 | 85 |
| 10 | 73 |
| 15 | 62 |
| 20 | 54 |
| 25 | 0 |
The following conditions are maintained in the room where the incubation material is stored:
- temperature – 8-12 °C;
- humidity – 80%;
- lack of light.
When eggs are stored, they are turned over at least once every 4 days.
Incubation rules
Incubation of turkey eggs is carried out in compliance with the following parameters:
- temperature inside the incubator;
- humidity and ventilation;
- frequency of turning, cooling and spraying.
A special feature of incubating turkey eggs is the high frequency of turning, which is higher than when hatching chickens, ducklings and goslings.
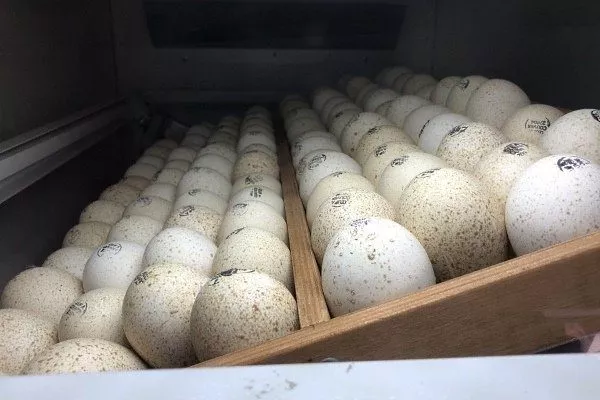
Preparing the incubator
Before laying the eggs, prepare the incubator:
- The day before incubation, the apparatus is cleaned, washed, and disinfected. Clean, unfiltered water is poured into the water containers.
- Half a day before laying the eggs, the incubator is heated to 38-38.3°C. Humidity is increased to 60-65%.
- Check the incubator for functionality 48 hours before laying the eggs.
- Calibrate thermometers and hygrometers to accurately monitor incubation conditions.
- Ensure a stable power supply or prepare an alternative power source.
Simple models require the use of thermometers—at least two—placed 2 cm from the eggs. More advanced incubators have built-in temperature sensors that display information on the control panel.
Preparing and laying eggs
Features of preparation and laying of eggs:
- 24 hours before the start of incubation, the eggs are warmed to room temperature.
- Clean from dirt by wiping with a cloth soaked in a solution of potassium permanganate or hydrogen peroxide.
- Different marks are placed on both sides—for example, "+" and "-." These marks are used if the eggs are to be turned manually—these marks help ensure they are turned correctly.
- In automatic egg-turning machines, eggs are placed with the pointed end facing downward at a 45-degree angle. In other types of egg-turning machines—those with manual or mechanical turning—eggs are placed horizontally.
- The eggs are turned for the first time 12 hours after incubation begins. Thereafter, the eggs are turned every 3-6 hours. The intervals between turnings should be equal.
Video review of preparing and placing eggs in an incubator:
Stages of embryonic development
There are four stages of incubation:
- From days 1 to 8, the circulatory system develops. The embryo is embedded in the yolk. At this stage, it's important to turn the eggs, otherwise the embryo will stick to the shell and die.
- From day 8 to day 14. By day 14, if the embryo is developing normally, the allantois—the fetus's respiratory organ—closes.
- From day 15 to 24-25. Embryos consume oxygen from the environment.
- From the 25th day – hatching.
Translucence at different stages
To discard defective eggs early, they are candled periodically. The candling procedure is as follows:
| Duration, days | What can you see? | Which eggs are rejected? |
| 8 | Assessing the embryo's condition. In a normally developing embryo, the circulatory system and the air cell located at the blunt end can be seen. The embryo is not yet visible—it is encased in the yolk. | Unfertilized and with a blood ring around the yolk. |
| 13 | By this point, the allontois has already closed. The embryo is visible as a dark spot. The vascular network is visible. | With the absence of blood vessels. If only a dark spot is visible, dangling and unattached, the embryo is dead. |
| 26 | A healthy embryo occupies the entire egg. The entire space is dark, with only the air cell visible—its borders are uneven and mobile. Movement and protrusion of the neck are visible. | If there's no movement, the embryo's development has stopped. Small embryo size and the absence of blood vessels in the visible areas also indicate growth retardation. |
In addition to candling, shell temperature measurements are also taken:
- Until the 13th day – 37.6-38 °C.
- From 14 to 20 – 38-38.5 °C.
- After 20 – 39 °C.
Table of modes for the entire incubation period
The temperature and humidity maintained in the incubator are adjusted to the body temperature of the turkey brooding the chicks.
Turkey egg incubation modes:
| Stage | Days of incubation, days | Temperature, °C | Humidity, % |
| 1 | 1-8 | 38-38.3 | 60-65 |
| 2 | 8-14 | 37.6-38 | 40-45 |
| 3 | 15-24 | 37.5-38 | 60-65 |
| 4 | 24-27 | 37 | 65-70 |
Incubation periods
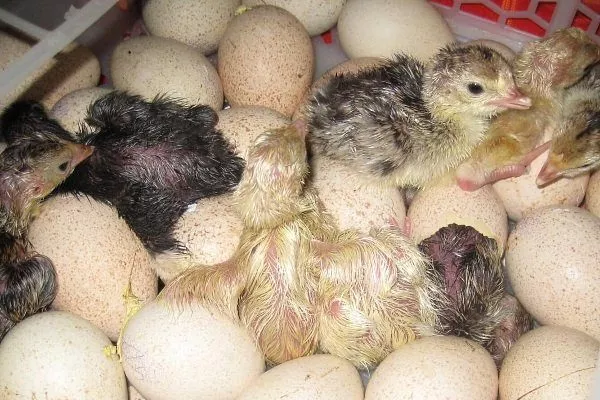
The incubation period is 27 days. The first hatching occurs on the 25th-26th day. By the end of the 27th day, the chicks hatch en masse. The hatching period lasts 6-8 hours.
Avoid opening the incubator frequently to check on the hatching process—wet chicks can become chilled. Hatched turkeys should be allowed to dry before being removed from the incubator.
If hatching is delayed and after 8 hours some chicks have not emerged, it is recommended to make two extractions - when the first batch of chicks has dried out, and then remove those that were late.
Features of incubation
As the embryos develop, the conditions for hatching also change:
- Days 1 to 8 It's important to turn the eggs regularly. Turn them at least six times.
- 8 to 14 days. The eggs continue to be turned six times a day. Starting on the 10th day, the incubator is ventilated and cooled twice a day for 5-10 minutes.
- 15 to 24-25 days. Now, four turnings are sufficient. Monitor the humidity and temperature to ensure the eggs don't dry out or overheat. Increase the humidity in the incubator. Regularly ventilate the incubator—the embryos consume oxygen from the air, so it's important to ensure a fresh supply. Ventilate and cool the incubator four times for 10-15 minutes.
- Day 25-27. There's no need to ventilate or turn the eggs. The temperature is reduced so the chicks can get used to the new environment.
During incubation, ventilation is activated—the units are equipped with ventilation openings covered by movable partitions. The frequency with which the partitions are opened depends on the unit's design.
The breeder demonstrates the entire process of hatching turkeys in an incubator in the video below:
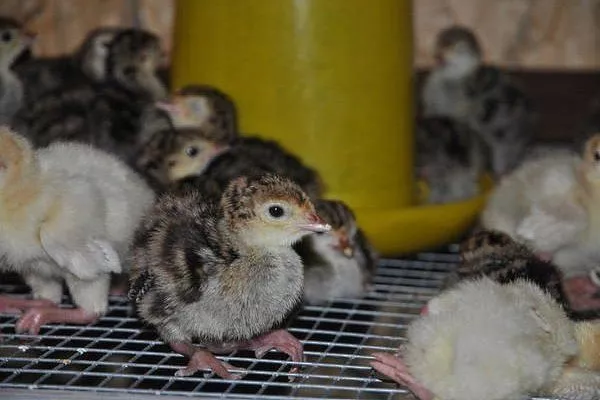
The hatching process and subsequent care of turkey poults
When hatching begins, fresh air should be supplied to the incubator. However, drafts are essential, as the chicks could catch a cold and die. While the hatching process is underway, avoid peering into the incubator to prevent the wet turkeys from becoming chilled by the cold air entering the incubator when the lid is opened.
Most turkey poults hatch at the same time. The interval between the first and last hatchlings is a day or more. During mass hatching, the temperature is lowered to 37°C.
The first two weeks are the most challenging. It's important to provide ideal conditions for the turkey poults:
- The hatched chicks are placed in a box with a heating pad. A cloth is placed on the bottom. The optimal temperature is 35°C.
- From the 6th to the 10th day, the temperature is lowered to 30 °C.
- By the 30th day, the optimal temperature is 20 °C
Keeping turkey poults in an open-air cage is permitted on the 10th day.
The shells left after hatching are boiled for 20 minutes and fed to the turkey poults. These chicks require more care than other poultry. For nine weeks, they are kept warm and fed highly digestible, vitamin-enriched, high-protein feed.
On the first day, turkey poults are fed only boiled eggs mixed with wheat or corn flour. Once the chicks are a week old, eggs are removed from their diet.
During the first two weeks, turkey poults are fed:
- onion greens;
- grated carrots;
- millet;
- low-fat cottage cheese;
- corn grits;
- nettle and dandelion.
From the 15th day, turkey poults are given boiled and finely chopped giblets.
Place trays filled with chalk, fine gravel, and shells next to the feeders. Initially, the turkeys are fed at three-hour intervals. Over time, the frequency of feedings is reduced.
If the chicks don't have a mother hen, they have to be taught to eat by tapping their fingers on a food bowl. Dipping their beaks in water teaches them to drink.
During the first few hours, poultry farmers give turkey poults glucose and vitamin C dissolved in water. Potassium permanganate is added to the drinking water for disinfection.
Common mistakes beginners make
Beginners often make mistakes when incubating turkey eggs:
- Low temperature. This leads to delayed hatching. Poults are born weak and immobile, and may have swelling on the head and neck.
- Overheating of eggs. Hatching begins earlier than expected. Turkey poults are born underdeveloped. Their yolk sacs are usually not retracted, and their internal organs are sagging.
- Overwatering. Hatching is delayed. Chicks, unable to escape from the shell, may choke on amniotic fluid. The chicks are born weak, with dirty, matted down.
- Dryness. Egg weight decreases. Chicks hatch prematurely, and the poults are small and weak.
- Insufficient turning. The embryos stick to the shell and die. If the eggs are rarely turned, most of the chicks die, and the rest are born with defects, sick, and weakened.
Co-incubation
Reasons why turkey eggs are allowed to be hatched together with chicken eggs:
- Chicken and turkey eggs are almost the same size. However, they look completely different—you can't confuse them in an incubator.
- The hatching conditions for chicken and turkey eggs – temperature, humidity and candling times – are practically identical.
Incubation of chickens and turkey poults differs in the number of times they are turned—turkey eggs require more frequent turning. Chicken eggs, on the other hand, require daily ventilation from day 11.
The chicks hatch on the 21st day, and the turkey poults hatch a week after the chicks.
There's a downside to incubating chickens with them: during the final days of incubation, the chicken eggs require high humidity—80%—which can negatively impact the turkey poults' development. It's advisable to have a second incubator for this purpose, where the eggs that are the first to hatch are transferred.
Goose eggs can be hatched alongside turkey eggs. They have identical temperature requirements and the same number of turnings. Geese hatch 1-3 days later than turkey poults. On the 28th day, increase the humidity to encourage the goslings to hatch. This increase won't harm the poults, as they will already have hatched by then.
Advantages and disadvantages of hatching turkeys in an incubator
Benefits of using an incubator:
- the possibility of simultaneously producing a large number of turkey poults;
- Thanks to a wide range of incubator models, every farmer can choose the option that best suits their needs;
- The cost of incubators is relatively low, and the free time gained is colossal.
Disadvantages of incubators:
- If the device is energy-dependent and does not have an autonomous energy source, there is a risk of the eggs dying – all or a significant part of them – if the power goes out;
- the need to disinfect the device.
The key to successful turkey hatching is choosing the right incubator and following the correct incubation schedule throughout the process. However, hatching the chicks is only half the battle; preserving the young is crucial, and this requires maximum attention and care from the poultry farmer.
Good afternoon! Could you please tell me anything about the Nesushka, Farmer 189, and 300 incubators? Thank you. I'm looking to buy one, but I'm apprehensive. I'd appreciate your advice. I need semi-professional ones for 100-300 eggs. I have Chinese Janoil 24 and NND 24 incubators, but they don't maintain the temperature when the heater is turned on, even though they're limited to 38.1°C (98.5°F) and monitored by the egg sensor, they heat up to 42°C (104°F). This results in crooked-legged and weaklings. The hatch rate is 50%.
Hello, Nikolai! You left a comment under an article about incubating turkey eggs, but the Nesushka Farmer series incubators don't have a rack for turkey/goose eggs. As a result, the eggs will turn incorrectly or drag, or not turn at all. Incidentally, in addition to overheating, improper turning of turkey eggs can also cause low hatch rates.
What I want to say about overheating:
1. If the room is very hot and the incubator is poorly ventilated, overheating is guaranteed. Move the incubator to a room where the temperature does not exceed 23 degrees Celsius.
2. Check your incubator's instructions. Typically, it's recommended to keep the vents closed during the first incubation period, moderately open midway through, and fully open toward the end. The Janoil-24 has a top air damper, while the HHD 24 doesn't seem to have any ventilation at all.
3. During the final stages of development in the incubator, each fertilized turkey egg produces metabolic heat. Therefore, it is essential to cool the eggs. The number of eggs set is also important. Avoid setting too many turkey eggs.
PS: Indeed, there are frequent complaints about the Janoil-24, with temperature fluctuations and incorrect readings. The HHD 24 incubator is generally considered a poor model with low hatchability. If you need to successfully hatch turkey poults, I recommend the Blitz Norma incubator.