If you want to save money and get a feeder and waterer that are ideal for your specific pigeon fancier, it's worth learning how to make such equipment yourself. There are many types of feeders and waterers, but we'll look at the most optimal and versatile ones, taking into account the proportionality of sizes and volumes.
Basic requirements for pigeon feeders
Each feeder must meet certain standards, making the process of caring for and feeding the birds easier. Ease of feeding ensures comfort for the birds, and cleanliness eliminates the risk of disease. Size is also important, as feeders with different dimensions are needed for adults and young birds.
What requirements must be met:
- the feed must not be exposed to contamination;
- The feeder should be easy to maintain (clean, add food, etc.);
- the body and legs of the birds should not come into contact with the food - only the beak;
- grain should not fall out of the feeder;
- the material must be selected to be environmentally friendly;
- long service life;
- the ability to wash the structure without consequences;
- Direct access to feed is required.
What equipment and materials will be needed?
Making bird feeders at home is unlikely to require any special, expensive equipment. A simple set of tools (saw, hammer, nails, etc.) and the materials to construct the structure are sufficient. Plastic, cardboard, and wood are considered the most popular materials among beginning pigeon fanciers. Before choosing one, consider the advantages and disadvantages of each:
- Cardboard – the cheapest and least durable material.
Pros: no difficulties in manufacturing, a minimum supply of tools is required, the design is simple.
Cons: lightness of construction (can be blown away by the wind), short lifespan (maximum a couple of months), cannot withstand precipitation, can only be used in summer. - Plastic – the most popular and widely available material.
Advantages: low cost, easy availability, minimal tools, resistance to any temperature and precipitation, durability, and ease of maintenance. Furthermore, thanks to the transparent plastic, birds can see the food from afar.
Flaws: the need to make the structure heavier due to the lightness of the material. - Tree – the most reliable and durable material that will last for many years. Absolutely any structure can be created from wood.
Among disadvantages It is worth noting the relatively high cost (in contrast to plastic and cardboard) and the need to use additional tools.
- ✓ Consider the climatic conditions of your region when choosing the material for the feeder.
- ✓ To ensure the durability of the structure, it is preferable to use materials that are resistant to moisture and temperature changes.
Even a beginner can make a pigeon feeder. The key is to carefully read the instructions and strictly follow all recommendations.
Step-by-step instructions for making your own bird feeders
Wooden bird feeders
To create a wooden structure you will need the following (parameters are given as an example):
- plywood;
- boards – 4 pieces (two of them are 70x8 cm in size, the rest are 25x20 cm);
- tin;
- a wooden block 70 cm long;
- nails;
- slats.
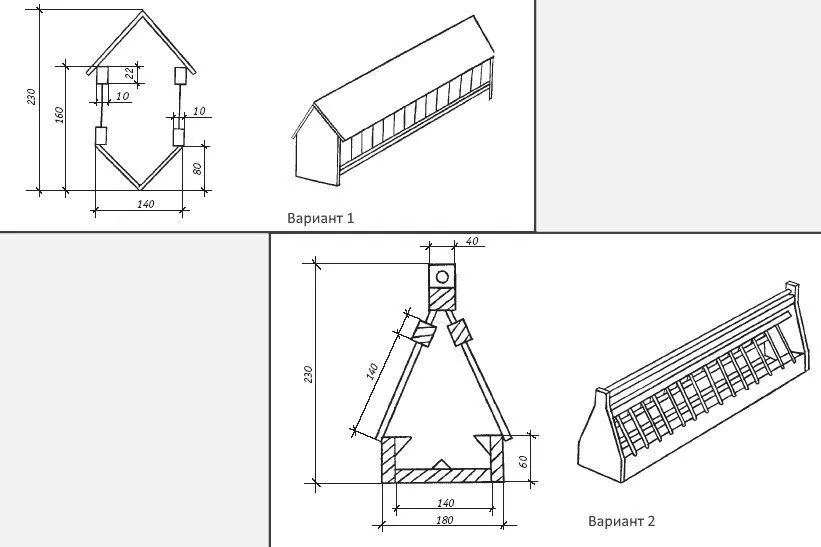
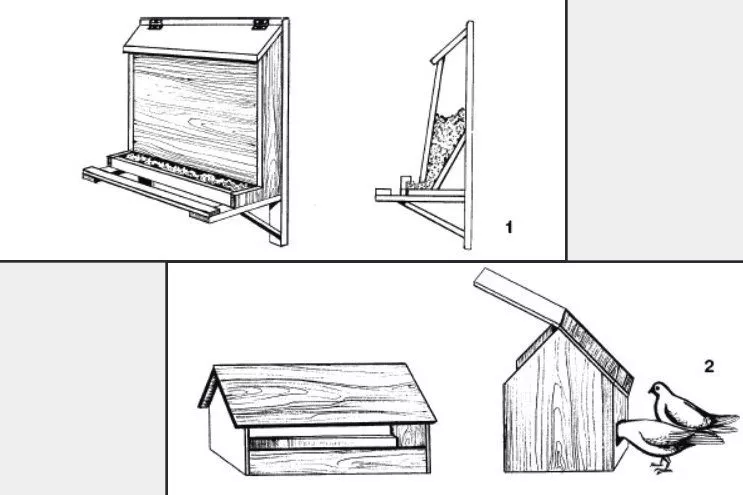
The process of making a house-shaped bird feeder:
- Nail the box together from planks. The back and sides should be high. A plank lid is a must.
- Make a roof from 2 pieces of plywood, which should protrude above the structure.
- Make a separate (movable) tray from plywood and slats. It's installed on the bottom of the feeder.
- Attach a weather vane to the roof to scare away birds (to prevent them from landing on top).
- Nail the wooden block so that there is space between it and the bottom to insert the pull-out tray.
- Tin is needed to create the restrictor strips (cut into strips). They are mounted vertically on the front of the feeder and secured between the lid and the block.
Other options for wooden feeders are shown schematically below:
Cardboard bird feeder
Cardboard boxes can be made for temporary use (until you can build or purchase a more durable structure). You can use cardboard boxes of any size, but shoe boxes are best (the cardboard is thick and the perfect size). You'll also need scissors and tape.
Work process:
- make holes for the rope at the corners of the lid and bottom;
- thread;
- hang from a support.
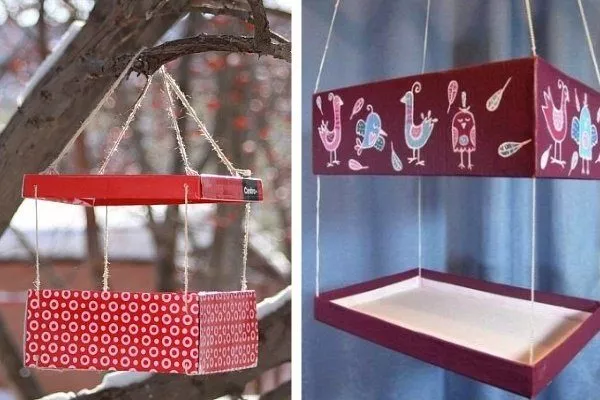
These feeders can be used to feed wild birds in parks and yards.
From a cardboard box:
- give the box the appearance of a house;
- fasten with tape;
- make holes for entry.
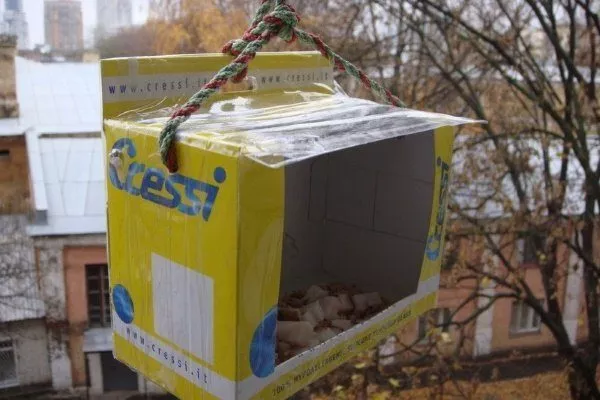
These feeders can be hung on a balcony (if keeping pigeons indoors) or placed on the floor of a dovecote (in this case, small stones are placed on the bottom of the paper structure to act as weights to prevent the wind from shaking the structure).
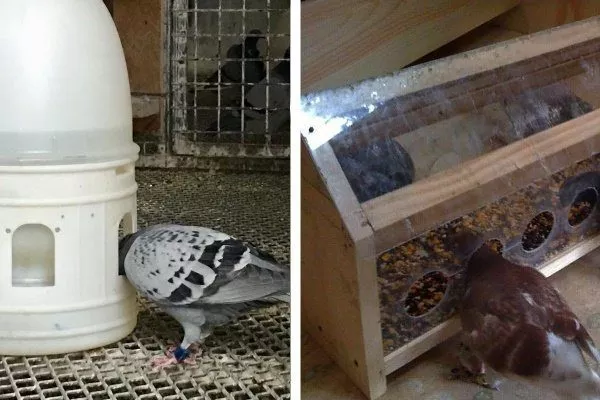
Plastic feeder
For this purpose, 5- or 6-liter plastic bottles are used. They can be installed either vertically or horizontally, with holes cut out for the birds.
Watch the video below to learn how to make a bird feeder from a plastic bucket and a plastic bottle:
Automatic bunker feeder
This method allows you to control the amount of feed supplied. A large amount of seed can be poured into this type of feeder at once, and it will then flow into the feeding compartment as it empties. This is convenient if the dovecote owner is away for a few days (the pigeons won't go hungry). Feeding is automatic.
The design consists of two main sections – a compartment for storing grain and a feeding tray:
The video below shows how to make the simplest self-refilling hopper feeder from a plastic bottle:
How to make a feeder for pigeons?
Separate feeders should be provided for the chicks, from which they will feed after weaning. This is because chicks experience some stress during this period, so feeding with adults is contraindicated. Furthermore, a change in diet can impact the chicks' overall well-being.
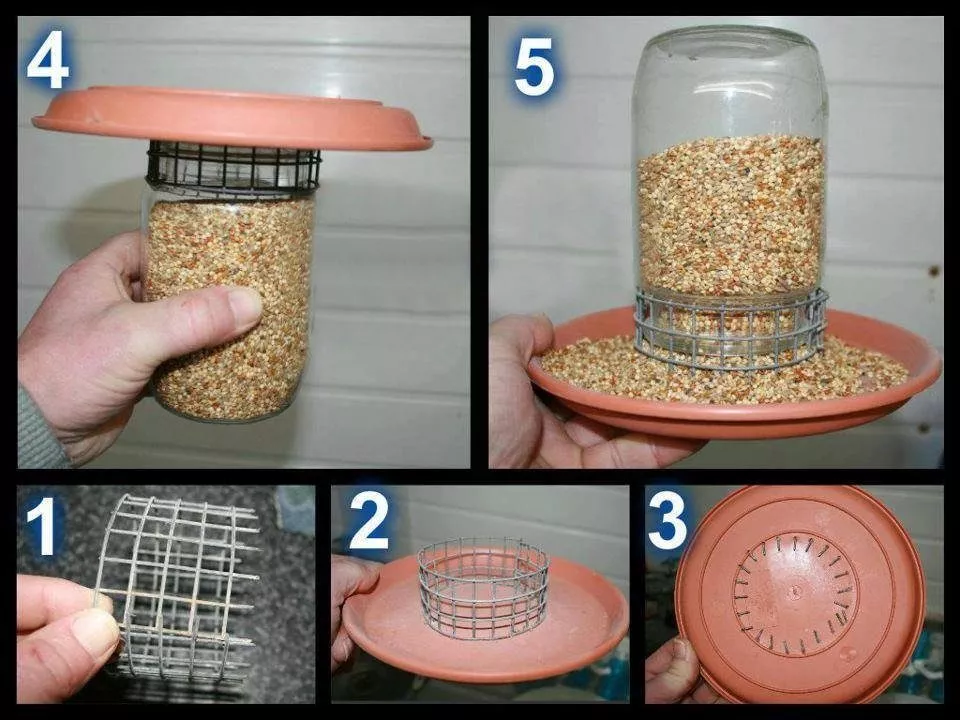
To make this, we'll use a plastic flowerpot stand, a glass jar, and some wire mesh. You'll also need wire cutters and some wire.
Preparation:
- Cut a strip of mesh 5 cm wide. The length of the strip should be 2 cm longer than the circumference of the jar neck.
- Roll the mesh into a ring and secure it with wire. The diameter of the mesh ring should be a couple of millimeters larger than the diameter of the jar neck.
Assembly process:
- Cut off the rods of the bottom row of mesh to form vertical pins (see point 1 in the photo below).
- Heat the pins over a flame and press them into the center of the plastic stand (see point 2 in the photo below).
- Bend the pins on the back of the stand (see step 3).
- Fill the jar with grains and insert the neck into the mesh ring, as shown in the photo below. Note that the neck of the jar does not touch the stand. If this happens, cut another strip of mesh, but make it wider.
- Turn the jar over so the grains fall into the tray. As the bird eats the food, more grains will fall into the tray.
- ✓ The feeder for pigeons should be easily accessible and located in a quiet place.
- ✓ Consider the size of the feeder so that the chicks can easily reach the food.
How to make a drinking bowl?
Feeding pigeons requires providing them with water, so a watering bowl is essential. There are various ways to do this.
Automatic heated drinker
It's used during freezing temperatures to prevent liquid from freezing and ensure birds always have a drink. The drinker consists of the following components: a stand, a heating element, a drinking container, and a bottle with a dosing tube that's filled with liquid. How to make it:
- The container is a round plastic container with a hole punched in the side for the pigeons to drink through. The hole should be 6-10 cm from the bottom.
- A tin can filled with paraffin is suitable for the burner. A wick is required (asbestos rope can be used). Lighter fluid is used instead of fuel.
- The stand should also be made of tin. The burner is placed on it and lit. Cover it with a protective tin case, in which several holes should be made (to allow gas exchange).
- A plastic waterer with a small weight is placed on top to prevent it from tipping over. A round hole, the diameter of a 1.5-liter plastic bottle, should be made in the top of the container. This bottle is filled with water and inserted upside down into the waterer. A dosing tube is installed inside to prevent the waterer from overflowing. This way, as the container empties, the waterer gradually refills.
An example of making another automatic waterer is shown in the video below:
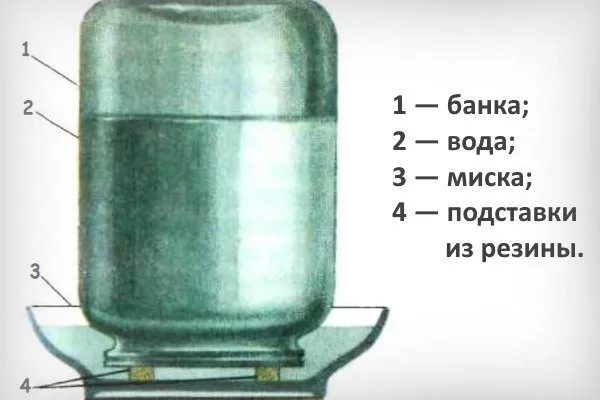
Vacuum drinking bowl
How to make it yourself:
- Use a bowl and a glass jar. The bowl should be larger in diameter than the neck of the jar.
- Glue four rubber cubes to the bottom of the bowl, describing the circumference of the neck of the jar.
- Pour water into the jar, cover it with a bowl, and turn the jar upside down. This will fill the bowl and refill it as it empties.
Homemade bird feeders are almost as good as factory-made ones, and making them at home saves a significant amount of money. The key is to carefully study all the intricacies of construction, adhere to the basic rules, and choose the most suitable option from among the many models.