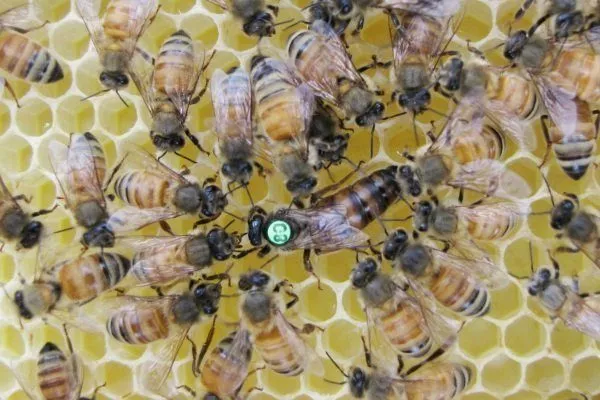
Among bees, special attention should be paid to uterusTo make it easier to locate her among other bees and obtain specific information, beekeepers resort to marking. This offers numerous advantages. There are various ways to mark the queen, each with its own advantages.
Why is it necessary to mark queens?
Queen marking is done for various purposes. It significantly simplifies the beekeeper's work, as finding the queen among thousands of other bees is difficult, even given her larger size. Marking is also used to obtain specific information about a specific individual or the entire apiary:
- Age. Using a special marking system, you can determine the age of the queen, as it affects her egg production and the ratio of fertilized to unfertilized eggs (as she ages, the number of unfertilized eggs from which eggs hatch increases). drones). A total of 5 colors are used—one for each year, as the average lifespan of a queen is 5 years. The year of birth of an individual is determined according to the international system:
- 2014, 2019 – green;
- 2015, 2020 – blue;
- 2016, 2021 – white;
- 2017, 2022 – yellow;
- 2018, 2023 – red.
- Beekeeper. This option is convenient during swarming, especially if there are several apiaries in the area. Beekeepers agree among themselves and each choose their own marking color.
- A hive in an apiary. Marking using this principle helps during swarming and if the queen gets lost.
- Origin of the individual. Queens are marked for breeding purposes, differences breeds, monitoring the quality of the individual and the productivity of itself and its offspring.
- Time to replace the uterus.
- Isolation of infertile queens before mating.
- Monitoring cases of silent uterine replacement.
- Keeping records of queens.
Methods of marking queens
Beekeepers mark queens in a variety of ways. The appropriate method depends on their preferences and the marking goals.
Special stickers for marking
This method is attractive due to its simplicity and minimal preparatory work. Special stickers (opalettes) are used for marking, typically made of foil or a curved plastic casing.
There are special five-year sticker sets, meaning each year uses a specific color. They can also be numbered from 1 to 100—this option is convenient for breeding purposes.
These tags are applied using BF medical glue or a special adhesive included in the kit (usually an alcohol solution). To tag a queen, apply a small drop of the adhesive to the area between her wings and quickly apply the tag, applying gentle pressure. The tagged queen should be held in the cage for a while to allow the adhesive to dry and the tag to adhere securely.
In the video below, an experienced beekeeper demonstrates and explains how to mark queens with scorch marks:
Marking queens with paint
Using dye to mark queens is a common method. The dye can be purchased at a beekeeping supply store or veterinary pharmacy. Marking can be done using a year-by-year color system, a specific color for a specific apiary, or any other option convenient for the beekeeper.
The marking paint must be of a specific consistency. If necessary, use acetone to thin it, as too thick a paint will curdle. Avoid thinning it too much, as the liquid paint will spread and could harm the insect.
- ✓ The paint must be non-toxic and safe for bees.
- ✓ The consistency of the paint should allow it to be easily applied in a thin layer without spreading.
- ✓ UV and water resistant for long lasting label.
It's easier to apply paint with a thin brush. A diameter of 1-1.5 cm is sufficient. You can use a single brush, rinsing it with acetone each time, but it's more convenient to buy several brushes—one for each color. A match or toothpick can be used as a substitute.
The marking is performed according to the following algorithm:
- Take the insect with your right hand and place it in your left hand (vice versa for left-handed people). Hold the queen between your thumb and index finger so that its abdomen is near the nail of your middle finger.
- The abdomen of the individual must not be touched.
- A colored circle is drawn on the insect's back. Its dimensions should be no more than 3 mm.
- Place the insect in the cage to allow the paint to dry. Half an hour is enough, but to be on the safe side, it's best to wait 1-1.5 hours.
The marking paint is applied exclusively to the insect's back. The substance should not come into contact with its wings or head. Beginners are advised to use it for training drones or worker bees – the loss of several individuals of such status is not terrible.
The video below shows how to mark the queen with paint:
Marking bees with paint has several drawbacks: it's impossible to number the bees due to their size, the paint doesn't last long (it wears off fairly quickly, and bees are eager to clean their queens of fresh paint), and it's toxic. There's also the risk of disturbing the hive, as the paint has a distinctive odor. This factor must be taken into account when choosing the paint, as well as after application—the longer you keep the bees away from each other, the better the odor will dissipate.
Some beekeepers use nail polish instead of paint. This option is attractive due to its low cost and wide range of colors. The polish doesn't last long, making it convenient for specific purposes, such as marking barren queens.
Marking queens with a marker
Specialized marking markers have become an excellent alternative to paint. They are easy to use, even for beginners in beekeeping. A key advantage of the composition is its non-toxicity, meaning it is harmless to bees. The markers are easy to carry—they fit in your pocket, allowing you to mark bees at any time. Another advantage is the durability of the composition—trusted manufacturers use high-quality dyes that are resistant to UV radiation and water.
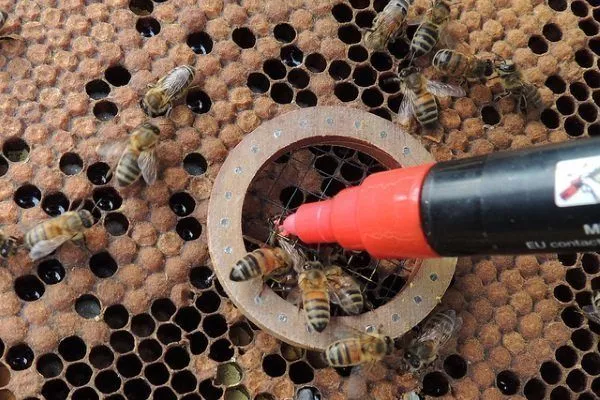
Marking the uterus with a marker using a special ring
Colored markers are used for marking. The range includes not only the five basic colors, but also other options. This allows each apiary to develop its own marking system.
- Choose a marker with non-toxic, water-resistant and UV-resistant ink.
- Prepare a special ring or cap to fix the uterus.
- Make sure the marker is ready for use (check the paint supply).
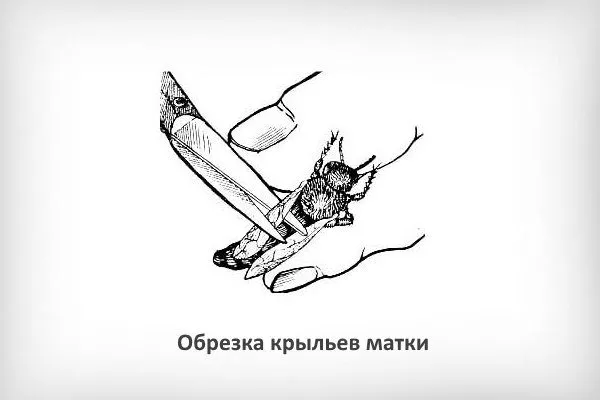
Clipping wings
This method should only be used by professional beekeepers, as there is a high risk of harming the queen. If there are several bees in the apiary bee colonies, then to distinguish between queens, their wings are cut in a special way - on the right or on the left, a certain half, to a specific length.
Often, the clipping pattern is adjusted year-by-year: in odd years, the wings are clipped on one side, and in even years, on the opposite side. This method is effective because queens are usually replaced every two years.
In any case, proceed according to the following algorithm:
- Hold the bird by the breast with your left hand, using your thumb and index finger to secure it. This should release the wings.
- Trim half of a specific wing. Use small, sharp scissors with rounded tips to avoid accidentally injuring the queen.
Wing clipping is performed after the queen has mated, when she has already begun laying eggs. This marking method has an undeniable advantage: it prevents swarming.
Many modern beekeepers consider wing clipping a barbaric practice, preferring instead to use paint, markers, or stickers. Some believe that clipped queen wings negatively impact her vitality and effectiveness.
When marking queens by clipping their wings, there's a risk that the rest of the colony will perceive her as unhealthy and damaged. This could lead to a queen replacement.
Another drawback of this method is that clipped wings make the queen difficult to identify. She can also be difficult to find among other bees, and careful examination is required to identify the clipped wing pattern. Colored spots and numbering are much more effective.
Peculiarities of queen marking
It is recommended to mark queens immediately after they emerge from the brood cell. During this period, they are kept in a calm state and kept in special cages.
An experienced beekeeper can mark the queen directly near the nest. The insect may fly away during the process, so marking is recommended in front of a closed window—it's easiest to catch the bee on the glass. This option is especially good for marking barren queens, as they fly very well.
For easier marking, you can use a special cap or ring. A ring is used if the queen needs to be marked with a marker, paint, or sticker. This device is used to gently press down on the queen. This option allows you to mark the queen directly on the comb, but only with a marker—the paint won't have time to dry, so the worker bees will simply brush it off.
Caps are used to mark the bee's head. This method is convenient when using markers.
To facilitate queen marking, a special tube resembling a syringe is also used. One end of the tube is enclosed by a grid, against which the queen will be pressed during the process. The queen is pressed using a piston with a soft foam base to prevent damage to the bee.
For information on marking the uterus using a Flobert tube, see the following video:
When marking queens using the international system, colored pins are also used for frames (hives). The color of the queen's pin should match the color of the pin. Alternatively, you can mark the frame or hive with a matching paint.
Queen marking is an important process in apiaries. It significantly simplifies the beekeeper's work—they can quickly find the queen among thousands of other bees and obtain specific information about a specific individual. Queen marking is performed in a variety of ways, each with its own characteristics, advantages, and disadvantages.