The Nikot system is a modernized version of the Gener comb. It allows for the rearing of queens without contact with the larvae, significantly simplifying the process. The design has specific features and components. It must be used according to the instructions. You can make the Nikot system yourself.
Design features, equipment
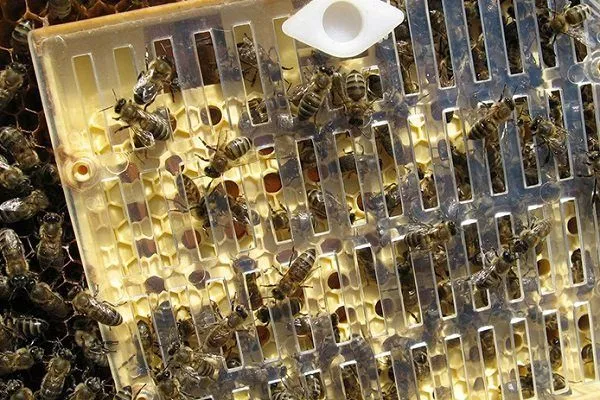
The standard Nikot system is designed for raising 30 queens. Its main component is a cassette—an artificial honeycomb. It contains 110 cells (11x10) into which small bowls are inserted. One side of the cassette is covered by a separator grid, and the other by a lid (plexiglass). Queens are placed under this lid.
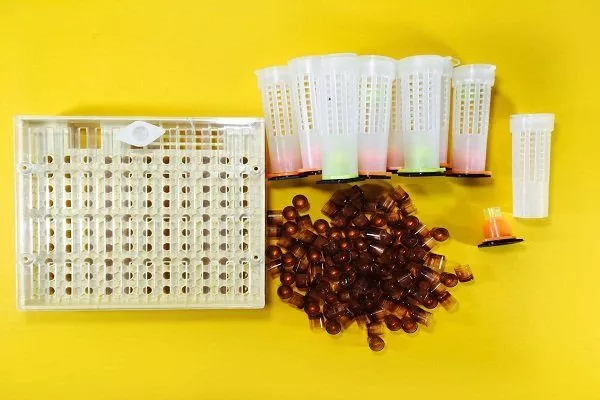
In addition to the cassette, the Nikot system includes:
- artificial bowls – 100 pieces;
- bowl holders – 30 pieces;
- bases for grafting frames – 30 pieces;
- queen cells – 30 pieces.
The kit also includes instructions for use. Additional system components, including the Nikot cassette itself, can be purchased separately. Artificial bowls are sold separately in sets of 25 to 200. A standard Nikot set weighs 0.58 kg.
The cassette lid, made of plexiglass, has an opening and a plug for it. The separator grid also has an opening for the queen to be placed into.
Advantages of the system
The Nicot system has several important advantages:
- almost 100% egg laying in the cassette;
- Contactless transfer of larvae to the grafting frame – the process is simplified, the absence of contact eliminates damage to the larvae;
- accelerated process of grafting larvae onto a frame;
- breeding full-fledged and highly productive queens;
- simultaneous emergence of young queens;
- the possibility of obtaining queens even without experience and fundamental knowledge in this area;
- The system is reusable – it only needs to be cleaned regularly; lost elements can be easily replaced.
Features and rules of use, instructions for use
Using the Nikot system is quite simple. Simply follow the following algorithm:
- Install the cassette on the frame.
- Make a grafting frame.
- Ensure the cassette is cleaned and polished.
- Place the queen in the cassette.
- Form a foster family.
- Place the grafting frame into the formed bee colony.
- Monitor the intake of larvae.
- Cull the queen cells.
- Select mature queen cells.
- Monitor the reception of the queen upon her exit and subsequent egg laying.
- ✓ The temperature in the room where the system is being used must be at least 20°C to prevent the larvae from becoming overcooled.
- ✓ Air humidity should be maintained at 60-70% to prevent the larvae from drying out.
Each stage has its own characteristics and nuances.
Installing the cassette and preparing the grafting frame
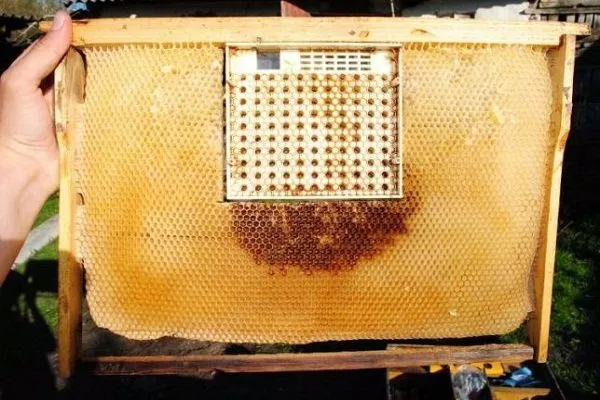
To secure the cassette to the frame, you need two screws, for which there are special holes. The cassette can be attached in various ways: to a frame with dry or waxed foundation, or to an empty frame (the top bar is sufficient for mounting).
After installing the cassette, the bases—the brown parts with four small holes—need to be secured. They are partially attached to the top bar and partially to an additional horizontal bar (optional). Any frame, even one with defects, can be used as a grafting frame. A bottom bar is not required.
After all these preparations, remove the plexiglass lid from the back of the cassette and insert the artificial bowls. The holders for them are mounted on the bases. It is recommended to position the hangers perpendicular to the frame bars – this makes it easier to remove the holders later.
When using the cassette, do not allow it to heat above 65 degrees Celsius. Otherwise, there is a risk of deformation and subsequent unusability.
Placing the grafting frame in the foster family
It's important to properly prepare the foster family—the success of the process depends largely on it. Once the foster family is formed and the grafting frame is prepared, proceed as follows:
- Prepare a warm and humid room.
- When the larvae hatch, place the frame with the cassette in the frame carrier and be sure to cover it with a damp cloth - this measure prevents the larvae from drying out, which is fatal to them.
- Bring the ramos indoors.
- Remove the back cover from the cassette to select the larvae - the choice is usually determined by their size and the amount of milk around them (the more, the better).
- Transfer the bowls to the frame - you need to act quickly so that the larvae do not cool down and dry out, otherwise they can be destroyed.
- Place the prepared frame into a frame carrier and cover with a damp cloth.
- Transport the frame with one-day-old larvae to the apiary and place it in the nest with the foster colony – the well for the frame must be formed in advance.
- Provide a cover - a canvas, a feeder with syrup or a rich one - the amount of feeding should be small (it is recommended to start feeding the foster family a week before the main process).
A warm and humid environment is not a prerequisite for performing the necessary actions. This microclimate is created during poor weather or when performing spring hatching. During warm summer weather, all necessary actions can be performed on-site.
Control of larval intake
The entire process of queen rearing with the Nicot system must be monitored. It is essential to track the acceptance of larvae for queen rearing. Monitoring times should be determined in accordance with the queen rearing calendar.
Monitoring the process is easy. To do this, lift the canvas in the pre-opened hive and remove the grafting frame. Count the queen cells already being drawn by the bees—their number corresponds to the number of larvae accepted. Depending on the results, the procedure can be repeated if necessary.
Culling of queen cells and selection of mature queens
This step should begin once the queen cells have been sealed. The specifics of the process depend on personal preference and goals. Only smooth and large queen cells should remain; small and uneven ones are considered defective and should be discarded.
- Check the condition of the queen cells every 12 hours after they have been sealed.
- Select mature queen cells 24 hours before the expected queen emergence.
Mature queen cells should be collected the day before they hatch. To be on the safe side, they should be placed in cages, which will allow the remaining individuals to be preserved once the first one hatches.
After enclosing mature queen cells in cages, there are several options:
- form colonies from the nurse colony (base - mature queen cells);
- place mature individuals into queenless bee colonies (nuclei);
- maintain the queen cells until the infertile individuals emerge.
Cages should only be used for mature queen cells at the hatching stage. Applying them too early risks damaging the queens' development, as it makes it more difficult to warm them. This factor is especially important in the spring.
An excellent option is to divide the nurse colony into divisions, each of which is provided with a queen cell. Queens were raised by these bees, so they are rarely rejected.
To locate the queen cells in the correct locations, remove them along with the cages from the bowl holders. To do this, grasp the holder by the shoulders, which will also serve as support when placing the queen cells between the frames.
Control of the queen's exit, her reception and egg laying
Monitoring procedures allow us to assess the quality of the resulting offspring, as well as the success of their primary functions. When placing queens in small nucleus colonies, it's important to remember that the flight will occur more quickly.
Watch the video instructions on how to use the Nikot system for breeding queen bees:
DIY
You can make the Nikot system yourself. You can use plywood or plastic. The material should be 10-15 mm thick. The standard cassette size is 248.4 x 174.5 x 108 cm. The base should be marked and holes drilled: 11 in the horizontal row and 10 in the vertical row.
A dividing grid and lid with holes and plugs are essential. Bowls and holders can be purchased separately or made by hand. For the bowls, use wax and a suitable wooden blank. This blank should be dipped in water, then in melted wax, and the process repeated 1-2 more times. The resulting bowl is then removed from the blank—the process takes just seconds.
Watch the video to see the homemade Nikot system:
Cleaning the system and subsequent implantation of the uterus into the cassette
The Nicot comb is reusable. Cleaning is mandatory. This process is performed before introducing a queen, as well as after prolonged storage of the comb.
The system is cleaned according to the following algorithm:
- Fix the honeycomb in the frame – the bowls must be installed.
- Remove the dividing grid.
- Treat the honeycomb with honey (made from dewdrops).
- Place the honeycomb into the bee colony that is planned to be used as the mother colony.
- The bees themselves will clean and polish the honeycomb; it is advisable to leave the structure in the brood nest for at least a day.
This procedure, in addition to cleaning and polishing the structure, has another purpose. During the process, the bees become accustomed to the comb, which is foreign to the nest. The system absorbs the nest's scent and warms up to its temperature. This significantly facilitates the process of introducing the queen.
The queen is introduced into the cassette after it has been cleaned. It's best to use a cage for this to avoid damaging the insect. Before catching the queen, place the separator grid on the cassette and remove the plug, then:
- Place the cage with the queen next to the hole in the divider grid.
- After the queen enters the honeycomb, close the cap.
- Check the tightness of the separator grid to the front wall and the lid to the back of the structure - if there are gaps, there is a risk of the queen escaping.
- Place the frame with the cassette in the nest with open brood - there should be enough distance to the neighboring comb for the bees to pass through.
Free movement of bees between combs is necessary for feeding the queen—workers easily pass through the separator grid to reach her. During this time, the queen herself lays eggs.
It's recommended to leave the queen in the comb for 24 hours, but the process should be checked several times during this time—a few hours may be enough to lay the required number of eggs. The first check should be made after 4 hours. If there is no hatching or only a small number of eggs, wait 24 hours.
If the worm comb is successfully bred, the queen should be released and the frame with the cassette left to mature - after 3 days, one-day-old larvae will appear, the cups with which are moved to the grafting frame.
The Nikot system is a fairly simple design that can be made at home. It provides queen rearing with certain advantages. Its use is straightforward, making it suitable even for beekeeping novices.
Irina, good evening. The description of working with Nikota comb is wonderfully and clearly described; any novice beekeeper will understand it. Thank you for your work. I have a question for you: why do the bees discard the eggs laid by the queen after removing them from Nikota comb? I await your answer, and thank you in advance.
Hello, Vladimir! I hope I can answer your question.
I'd like to point out two things right away: 1) the problem is that the bees discard the eggs and leave the larvae alone, so our goal is to preserve the eggs until the larvae hatch; 2) the eggs develop into larvae without the bees' involvement (only when the eggs reach a horizontal position do the bees begin to fill the comb with royal jelly).
Here are some methods recommended by beekeepers who have encountered a similar problem:
• Prepare the Nikot cassette in advance so that it warms up and acquires the scent of the colony where it will be used. Cover the front side of the cassette with a thin layer of thickened (settled) honey or sprinkle with syrup, and give it to the bees to dry in the spring, and only then release the queen (preferably in the evening).
• “Marinate” the Nikot cassette in honey for several days to remove the smell of plastic, and only then insert Nikot into the frame from the middle of the nest, and immediately after brooding, place the comb between the frames with open brood.
• Place Nikot with eggs in a micronucleus for 2.5-3 days. And as soon as the eggs turn into larvae, transfer them to the foster colony.
• Give the sown honeycomb to the queenless bee colony, placing it on top of the frames (flat).
• Plastic comb cools down at night, so Nikot should be placed in either a strong or a compressed colony so that the nest with artificial comb remains warm.
Queen rearing begins in the spring. But first, it's essential to wait for three factors to come together for a successful queen rearing: 1) consistently warm weather; 2) flowering of spring honey plants; 3) the emergence of the first capped drone brood. The brood nest temperature for queen development should be 37-38 degrees Celsius. Wishing you successful queen rearing!
My friend tried queen rearing with the Nikot system, but he always had problems. He ended up using the bowls included in the kit and also bought a Chinese queen rearing spatula. Of course, he had to do a lot of research, but now he has no problems rearing queens.