Making bee foundation from natural wax is not only a fun and rewarding activity, but also an essential component of successful beekeeping. Properly prepared and processed foundation provides bees with comfortable conditions for building combs and hatching, contributing to increased honey production and quality.
What is wax foundation and what is it used for?
Beeswax foundation is a natural product produced by bees. It is obtained from the wax glands of these striped insects. The material hardens when exposed to air, turning into a waxy mass used by bees for various purposes in the apiary.
Wax foundation plays an important role in beekeeping and has several key purposes:
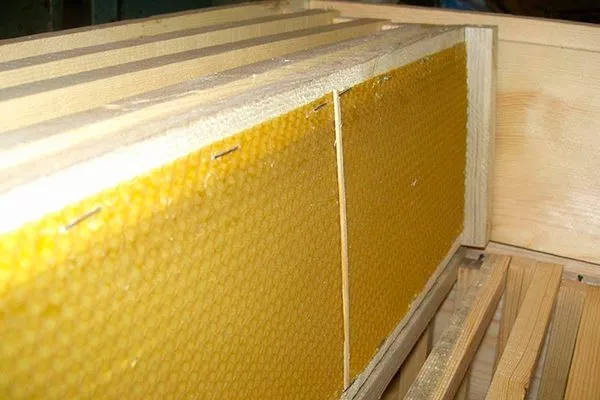
- Construction of honeycombs. Bees use wax foundation to build hexagonal combs in which they store honey and raise their young. The combs serve both as storehouses for honey reserves and as nurseries for eggs and larvae.
- Making hives. Wax foundation is used to create hives and frames that provide space for bees to build honeycombs and house the colony.
- Honeycomb protection. A thin layer of wax foundation covers the honeycomb walls, ensuring their strength and tightness. This helps preserve the honey and protect it from moisture and external influences.
- Production of honey and care products. Bees create wax caps on honey cells, and they also use wax foundation to seal and seal honeycombs. Furthermore, wax foundation is used in the production of bee products, such as royal jelly and ointments for hive and beekeeping.
- Apiary equipment. Wax foundation is used to seal and tighten joints and seams in various parts of apiary equipment to prevent moisture and insect penetration.
Types of wax foundation
For bees to recognize hand-made wax foundation as their own and not reject it, it must be of high quality. There are several types of wax foundation.
By manufacturing method
| Name | Method of manufacture | Thickness and strength | Cell size |
|---|---|---|---|
| Natural | Made from pure beeswax | High | Standard |
| Semi-natural | Made from beeswax with additives | Average | Standard |
| Artificial (plastic) | Made of wax-coated plastic | Low | Standard |
| Store | Not specified | Minimum | Standard |
| Nesting | Not specified | More durable | Standard |
| Classic wax foundation | Not specified | Not specified | Standard |
| Drone wax foundation | Not specified | Not specified | Large |
Depending on the manufacturing method, wax foundation can be natural, semi-natural, or artificial. Let's take a closer look:
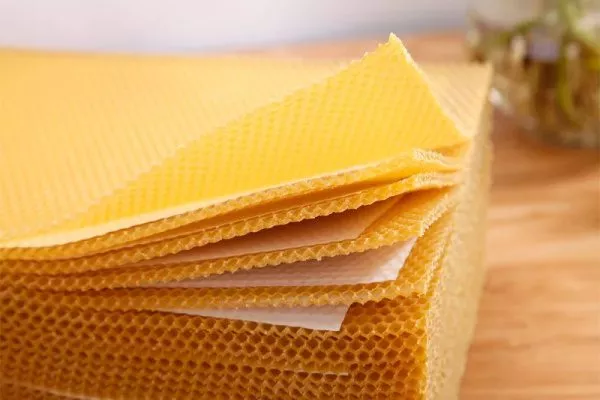
- Natural. Made from pure white beeswax without any additives, this product is completely pure, does not release toxins, and leaves no residue after melting.
- Semi-natural. It is made from a small amount of beeswax, paraffin and other additives.
- Artificial (plastic). It's made of plastic using specialized equipment and used as a frame for honeycombs. A thin layer of a mixture consisting of paraffin with additives or natural wax is applied over this frame.
Often artificial wax is dyed yellow to give it a more natural look.
By thickness and strength
Depending on thickness and strength, wax foundation is divided into several types. It is classified as follows:
- Store. The thinnest wax foundation, typically used for making honeycombs in hive frames. It has minimal strength.
- Nesting. This wax foundation is typically used to build honeycombs in honey nests where bees raise their young. It is more durable than store-bought wax.
There's also reinforced wax foundation. In this case, it's reinforced with wire reinforcement and three layers of wax are applied. This is done to increase strength, for example, when creating particularly durable combs or beehive frames.
By cell size
Wax foundation is also classified by cell size. The following types exist:
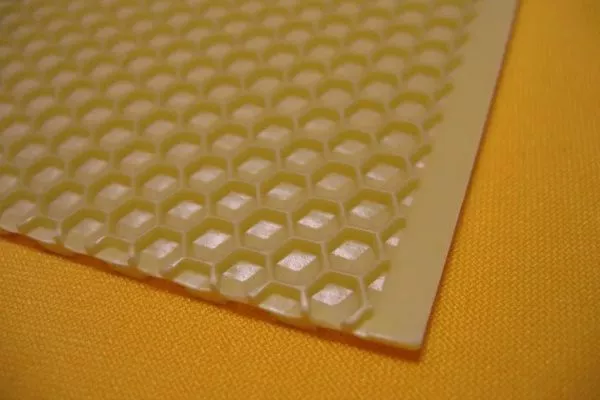
- Classic wax foundation. It has the exact same cell size as the cells worker bees construct to raise their brood. It is used in hives to create honeycomb and is considered the standard type of wax foundation.
- Drone wax foundation. This type is characterized by larger honeycomb cells, which are not used in hives but are intended for those who purchase honey in combs. Due to the larger cells, the finest wax particles remain visible in the honey, giving the product a unique texture and quality.
Drone wax foundation usually has a higher price due to the specifics of its use.
- Check the wax for any foreign matter or debris.
- Divide the wax into small pieces to ensure even melting.
- Prepare a wax melter or double boiler, making sure it is clean.
Preparing wax
The wax sterilization process is crucial for ensuring the health of bee colonies and preventing the spread of various diseases. Here's how wax sterilization works:
- The collected honeycombs or wax waste are cleaned of impurities and debris to obtain pure wax.
- Pure wax is melted in a wax melter or double boiler. Melting occurs at a temperature above the boiling point of water to ensure the evaporation of the water contained in the wax.
- The hot wax is poured into an oil sterilizer, and the sterilization process begins. The temperature rises to 100 degrees Celsius, which is the boiling point of water. At this temperature, any water contained in the wax begins to evaporate.
- Sterilization continues at a higher temperature, typically between 120-140 degrees Celsius, for 2-3 hours. This ensures that all wax is sterilized and free of any potential pathogens.
- After sterilization, the hot wax is poured into another container, straining it as it goes. This removes any remaining debris and particles.
- ✓ The wax must be absolutely pure, without any paraffin or other additives, so as not to harm the bees.
- ✓ The color of the wax should be natural, without artificial dyes that can repel bees or affect the quality of the honey.
How to easily make wax foundation for bees using a matrix?
The process of creating natural wax foundation using a silicone mold is simple. This method involves coating the mold with melted wax:
- Dip a paint roller into the melted wax. You can find these rollers at any hardware store.
- Roll the roller over the matrix. Repeat the procedure several times.
- Let the wax dry and turn the die over.
- Carefully separate the silicone matrix from the wax foundation.
Watch the video to see the entire process clearly demonstrated:
How to make wax foundation using a press?
The easiest and most cost-effective way to convert wax into a sheet is to use a hand press, which you can purchase or make yourself. This device consists of two metal plates with sides.
DIY press for making wax foundation
Despite their low productivity, homemade presses for producing wax foundation remain popular among beekeepers. Domestic presses are not always available on the market, and imported equivalents are expensive.
To make a press you will need the following materials and tools:
- beeswax for making wax sheets;
- silicone for molds;
- two wooden plates for the base of the press;
- fasteners for the plate.
Instructions for creating a press:
- Take one of the wooden slabs and place a wax sheet on it. Apply a layer of silicone and smooth it out thoroughly to fill all the spaces. Then apply the silicone to the slab itself and spread it out well.
- Cover the wax sheet with a second layer of silicone and smooth it out. Then attach the sheet to the wooden plate, sandwiching the wax between the two.
- Treat the back of the sheet and the second wooden plate with silicone in the same way.
- Attach the metal hinges to the wooden planks and wait for the silicone to completely harden. You can speed up this process by placing the structure in the oven and heating it to 70-100°C.
Once the silicone has completely cured, unclamp the plates and attach the handle and additional side stops. You'll need a special container to collect any excess wax.
How to make wax foundation on a press: step-by-step instructions
Using a wax press is quite simple. Follow these instructions:
- Spread the melted wax evenly over the bottom wooden plate with a ribbed silicone surface, then press the top plate on top.
- Wait until the wax hardens, and then release the plates.
- Use a spatula to cut off any remaining hardened wax on the edges of the sheets and carefully remove the finished wax sheet.
- To prevent wax from sticking to the silicone, spray the mold with water. Honey diluted in warm water can also be used as a lubricant for the silicone mold.
The whole process looks like this:
The final product is a light, translucent wax sheet with a textured surface. Although the edges of the hexagonal cells may be less pronounced, this has virtually no effect on the bees' ability to build honeycomb.
Making wax foundation blanks
Making honeycomb blanks from wax involves dipping a prepared sheet of plywood into hot wax.
First, we prepare the plywood:
- Take a non-moisture-resistant sheet of plywood, 4-10 mm thick. Make the sheet's dimensions suitable for the machine that will be used to create a honeycomb pattern on the wax blanks.
- Soak the plywood sheet in water for at least 2 hours.
The process of creating wax blanks then looks like this:
- Dip the soaked plywood sheet into the melted wax at 70-80 degrees Celsius. Repeat this step several times. During the dipping process, a thin layer of wax will form on the surface. The thickness of this layer depends on the number of dips.
- Once the wax layer has reached the required thickness, lower the plywood into water and wait a while until the wax mass has completely hardened.
- Once the wax has hardened, the piece can be easily separated from the plywood sheet.
Next, the wax blanks can be placed between two sheets of mold and rolled over them with a regular kitchen rolling pin. Alternatively, the blanks can be passed through special rollers to shape the wax into the desired pattern.
Also watch the video, where everything is clearly shown:
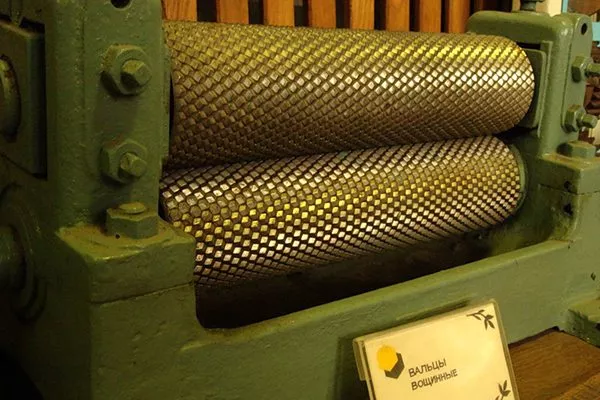
Rollers for making wax foundation
Homemade rollers for making wax foundation at home are simple and effective. They consist of several components: engraved rollers, gears, adjustment bolts, and a base.
How to make rollers for making wax foundation?
Homemade hand-held wax rollers are a convenient and efficient device that requires no electricity. Building one can save you significant money compared to purchasing a factory-made model.
The process of creating homemade wax rollers can be complex, but with the right skills and tools, it's a completely doable task. To begin, it's worth preparing by having ready-made drawings or creating your own, clearly showing how all the moving parts work.
The approximate order of work for the production of rollers is as follows:
- Make the frame from a pipe or solid profile. It will serve as the foundation for the entire device.
- Install the U-shaped profile. It serves as a vertical support for the mechanism and is attached to the top of the frame.
- To form wax sheets, install a deforming element. Attach it to a threaded clamp.
- Attach the sprockets to the shafts, then install the chain. It's important to tension the chain correctly and test the mechanism's operation. A handle for rotating the chain drive is also installed.
- The shafts through which the wax passes are made of hardened steel.
- On the rollers, create reliefs that give the sheets of wax the desired appearance.
- To control the thickness of the wax sheets, install an adjustment mechanism between the rollers.
- Attach the rollers to the frame using rolling bearings, ensuring smooth movement of the mechanism.
By following this procedure and using the right materials and tools, you can create your own hand-held wax rollers at home.
How to Make Wax Foundation with Hand Rollers: A Step-by-Step Guide
Making wax foundation using hand rollers is a relatively easy and straightforward process. The procedure is as follows:
- Lubricate the rollers with water so that the finished wax foundation does not stick to them.
- Take a sheet of wax blank and insert the edge of the sheet between the rollers. Roll the blank, rotating the rollers.
- Carefully lift the edge of the wax foundation, and as the sheet of workpiece moves through the rollers, gently pull the wax foundation towards you.
Here's an example of how it's done:
How to store natural wax foundation?
Prepared wax sheets can retain their quality for several years. Follow the storage instructions:
- Wrap the wax foundation in paper and place it in a cardboard box or plywood crate. This helps protect the wax from external influences.
- The best place to store wax foundation is in a cool, dry place free from odors. This helps preserve the quality of the product.
- Be careful that your wax foundation supplies don't attract rodents. They can even damage paraffin candles and soap, so a natural honey-scented product may be a prime target.
- For winter storage, store wax foundation in a location where the temperature does not drop below 0°C. Frost affects the shape of the sheets, and they may warp or crack. Avoid severe frosts.
Store the wax foundation in frames in a vertical position, which ensures its best preservation.
Experienced beekeepers always resort to using wax foundation, which not only makes life easier for the bees but also significantly reduces honey collection time. There are several different types of wax foundation, applied using different methods. Each has its own unique advantages and characteristics.