To solve the transportation problem bee colony, experienced beekeepers build boxes for bee packages, which create all the necessary conditions for insects. These structures resemble beehives, but are much simpler and lighter to manufacture, as they only require minimal space, namely, providing sufficient space for easy transport of bees. Let's explore how to make these boxes below.
Why do you need a box?
A bee package is a complete bee colony for sale, which has uterus and a certain number of bees. The formation of the package determines the basis of the future honey colony. It occurs according to the following principle:
- A healthy bee colony is selected.
- Part of the honeycombs, food and the insects themselves are taken from the selected hive.
- All of this is carefully moved into a special box in which the bees will be delivered to the buyer.
- ✓ The activity of bees in the hive should be high, without signs of lethargy.
- ✓ Absence of visible signs of disease in bees and brood.
- ✓ The presence of a young, fertile uterus, which guarantees the continuation of the family line.
Thus, a bee package box is a container used to hold frames of honeycomb for subsequent transport. The number of these frames can vary, but is often 4 (500x200x400 mm) or 6 (500x300x400 mm).
Some beekeepers use trussed hives to transport insects, but these often fall apart like a house of cards during transport. Therefore, specialized crates are a preferable option.
Construction of boxes
Such products can come in various sizes and types, but in any case, they must be designed in such a way that they accommodate the following fundamental components:
- frames with printed bee brood, between which there should be free space;
- strong frame fastenings, which should be located at the top and bottom to prevent damage during transportation;
- ventilation holes;
- feeders.
- ✓ The size of the ventilation holes must be at least 10x10 cm.
- ✓ The holes must be covered with a fine mesh to prevent bees from escaping.
- ✓ The arrangement of the holes should ensure uniform ventilation of the entire volume of the box.
Beekeepers typically make 4- or 6-frame boxes based on a special GOST standard for honeycomb packages containing bees. It defines the basic standards and limits for different honeycomb packages. These can be found in the table below:
| Parameter | Package for 4 frames | 6-frame package | Notes |
| Number of bees | 1.2 kg | 1.5 kg | — |
| Fertile uterus | 1 kg | 1 kg | — |
| Honeycombs | 4 pieces | 6 pieces | — |
| Brood transferred to honeycombs measuring 435x300 mm | 1.5 pieces | 2 pieces | — |
| Drones | are permissible if the supplied bee colonies correspond to the zoned bee breed | ||
| Food for bees (up to 1.5 kg in one honeycomb) | 3 kg | 4 kg | Natural honey or 60% sugar syrup is suitable as food |
| Food for the queen | 15 g | 15 g | used as feed Candy |
When making a box for bee packages, you can follow the specified standards, while adapting it to frames of the required size, since all hives are different, and therefore, so are the bee frames.
Types of crates and packages
Depending on the presence of honeycomb, bee package boxes come in two types: honeycomb and honeycomb-free. Honeycomb packages are more popular in modern beekeeping, and special shipping containers are made for them. The characteristics of these designs will be discussed separately.
| Name | Type | Number of frames | Weight of bees |
|---|---|---|---|
| Cellular (frame) | Cellular | 4 or 6 | 1.2 kg or 1.5 kg |
| Cellular (frameless) | Cellless | No | 1.2 kg |
Cellular (frame)
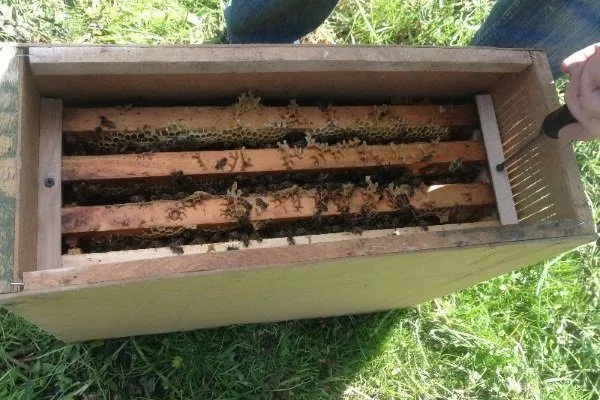
These packages consist of four or six Dadan-Blatt frames measuring 435 x 300 mm. The standard configuration includes three frames with brood and one with food. However, a beekeeper can adjust these parameters, for example, using two frames with brood and two with food. However, it's important to remember that the less food in the package, the shorter the distance the bees can be transported. This package resembles a small, narrow hive.
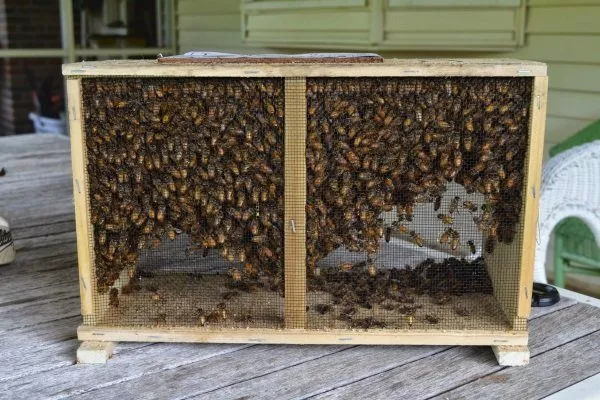
Cellular (frameless)
A similar package contains a complex of one fertilized queen, which is placed in a separate cage. Others are also populated into it. worker bees, and also include feeders and waterers. Syrup or candy can be used as food.
According to GOST, a honeycomb-free package must contain at least 1.2 kg of worker insects. However, deviations of 100-200 g are permissible.
These packages are suitable for all types of hives. They are essentially rectangular boxes. The front and back walls are made of mesh, while the sides are wooden. The floor and ceiling are also made of wood.
Such designs allow:
- minimize cash costs for prevention and control bee diseases;
- update your cellular network quickly and easily;
- reduce the cost of transporting bee colonies;
- to simplify the maintenance and care of bee colonies obtained from packages after a month-long transplant;
- Regularly check the condition of the queen and the entire family, without disturbing the insects.
Drawings for constructing a box
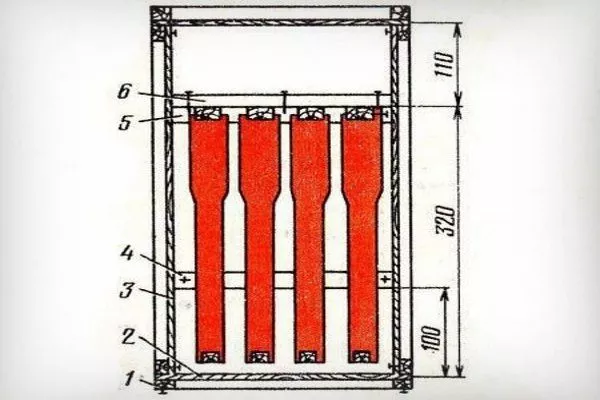
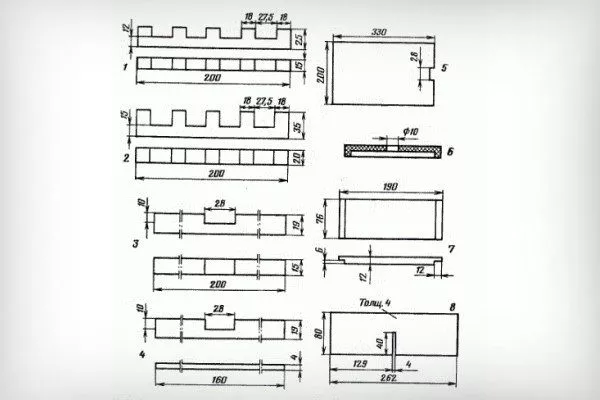
The literature on the subject provides drawings of honeycomb boxes for bee packages, with precise dimensions for all components indicated. Classic diagrams look like this:
The components of the structure: 1 - bar 5x19x520 (8 pieces); 2 - bar 15x19x200 (9 pieces); 3 - upper comb (2 pieces); 4 - plate 4x200x330 (1 piece); 5 - bar 15x19x390 (8 pieces); 6 - lower comb (2 pieces); 7 - bar 15x19x160 (2 pieces); 8 - plate 4x20x100 (4 pieces); 9 - bar 15x19x240 (4 pieces); 10 - plate 4x20x160 (1 piece); 11 - plate with a notch (1 piece); 12 - honeycomb frame; 13 - nail 2x45; 14 – nail 1.6x40; 15 – mesh 120x200 (2 pieces); 16 – cell; 17 – nail 1.8x32; 18 – nail 1.2x20; 19 – plate 4x20x70 (1 piece); 20 – block with a notch (1 piece).
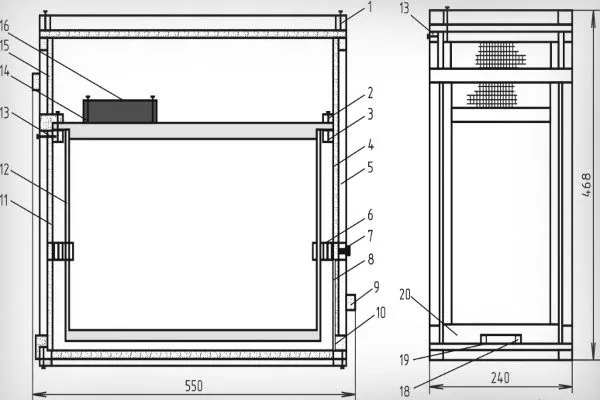
To understand how the frames are secured and at what distance to prevent damage to the shoulders during transportation, look at the cross-sectional drawing of the box:
The following parts are shown in this diagram: 1 – 15x19x520 bar (8 pieces); 2 – 4x240x520 plywood plate (2 pieces); 3 – 4x430x520 plate (2 pieces); 4 and 5 – lower and upper combs; 6 – pressure bar.
To better understand all the components of the box, it is worth examining their general appearance, which looks like this:
The diagram shows the following design parts: 1 and 2 – lower and upper combs; 3 – block with a notch; 4 and 5 – plates with a notch; 6 – lid; 7 – side wall of the feeder; 8 – scion petal.
Based on the provided drawings, any home craftsman can design a box for bee packages, adjusting only its height, depth and width.
Instructions for making
There are various instructions for assembling a beekeeping box, but plywood or fiberboard is recommended as the primary material, as it's lightweight and inexpensive and doesn't require extensive preparation. We'll discuss options for assembling a beekeeping box using plywood or fiberboard below.
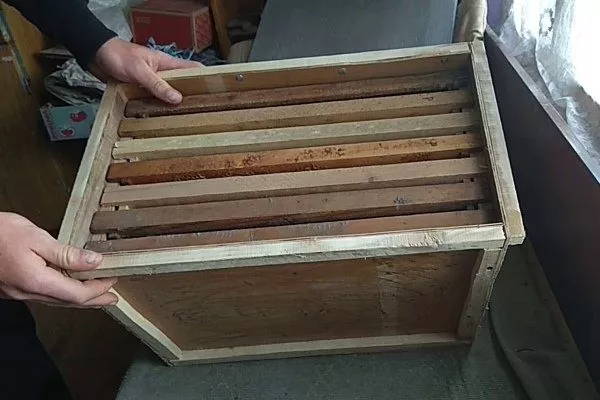
Box for 8 frames
To ensure the box is spacious yet easily portable, it's best to make it for 8 frames. Such a box should also be equipped with a straight lid and a special strap attachment to make it easier for the beekeeper to carry. The following drawings will help with assembly:
| Do | Drawing |
| Front panel | 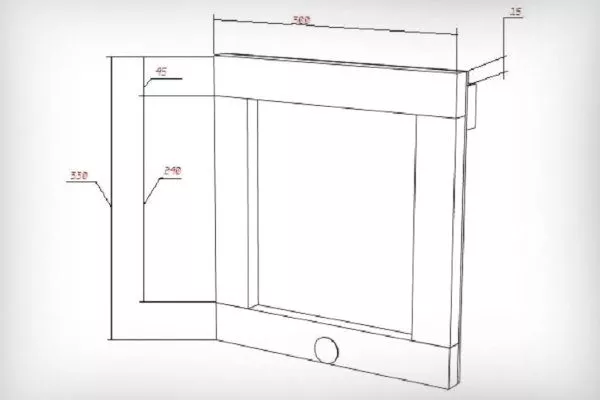 |
| Sidebar | 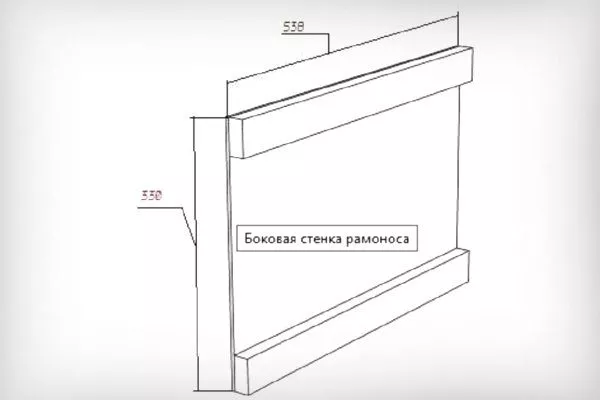 |
| Lid | 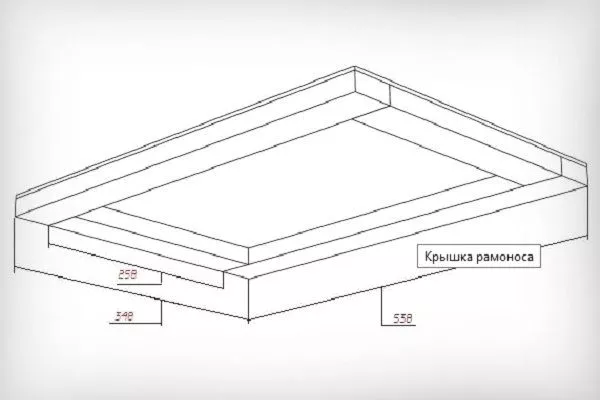 |
| General scheme | 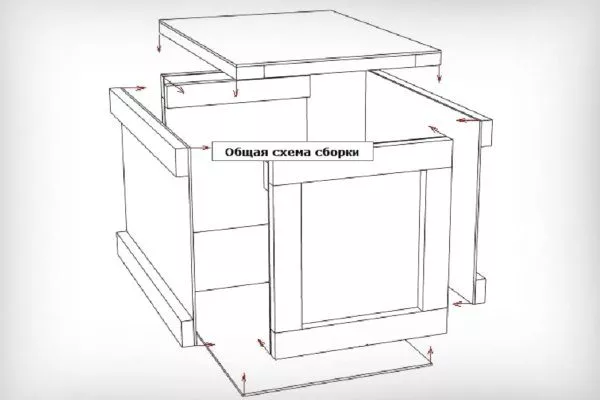 |
To assemble the box, you need to prepare the following materials and tools:
- plywood sheets at least 4 mm thick (if the box is planned to be used as a garden chair in the future, it can be made from more durable chipboard sheets);
- slats measuring 45x20 mm;
- self-tapping screws or thin shoe nails;
- galvanized clip for external fixation of the lid;
- 2 regular hinges for internal fixation of the lid;
- nylon belt and stainless steel fastening for it (for example, self-tapping screws);
- thermal tape approximately 1 mm thick, which is used to insulate windows for the winter.
The box is assembled in the following order:
- Prepare the component parts of the structure – front, back and 2 side walls (dimensions 300x330), lid and bottom.
- Nail a 300mm long, 45mm wide, and 20mm high strip 15mm from the top edge of the front wall. This will create the rabbets, which will serve as the stop for the future structure. Nail similar strips on the outside, but without the indents.
- Cut a ventilation hole at the bottom of the front of the box and cover it with fine mesh, which can be attached with a regular construction stapler. Some beekeepers neglect this hole, but this isn't the best solution, as without proper ventilation, the honey inside the box will suffocate.
- Attach the slats to the back wall (which has the same dimensions as the front), but only on the outside—at the top and bottom. No need to leave any space from the edges.
- Nail 300x330 mm side panels to the front and back walls, then nail two slats to the outer surface of each panel—one at the top and one at the bottom. This will make the drawer easier to handle.
- To seal the box, cover the lid panel from the inside with thermal tape along the entire perimeter, and then attach it to the walls using hinges.
- Nail the bottom.
- Screw the closing part of the galvanized fastener to the lid and the fixed part to the side. Finally, attach a carrying strap to the box.
The 8-frame box holds over 10 kg. It closes tightly and can be stored near the hive without worrying about the safety of the collected honey.
The following video clearly demonstrates how to assemble a 6-frame "3-in-1" beekeeping box with a latch handle and tool pockets:
Box for 10 frames
It's a lightweight structure that takes up little space and can be used to transport bees by car. It looks like this:
This box holds 10 Dadan frames (470 x 300 mm) and is a frame structure. To construct it, use beams at least 25 x 25 mm in size. It's best to use identical dimensions to ensure the finished box is as neat as possible. The sides can be made of hardboard (thick pressed cardboard), the front and back walls of at least 4 mm thick plywood, and the bottom and lid of 10 mm thick plywood.
The calculation of the internal dimensions of the box is as follows:
- 37 (frame thickness) x 10 (number of frames) = 370 mm (width);
- 300 (frame height) + 20 (space between frames) = 230 mm (height);
- 470 mm (length of the drawer in accordance with the length of the frame).
The drawer's external dimensions are calculated based on the dimensions of the slats used. They are presented in the following table:
| Detail | Dimensions (length x height x width), mm | Quantity, pieces |
| Horizontal bars | 430x30x30 | 4 |
| Horizontal bars for the sides | 530x30x30 | 4 |
| Vertical bars | 320x30x30 | 8 |
| Internal bars | 370x15x10 | 2 |
| Hardboard for side walls | 530x380 | 2 |
| 4mm plywood for front and back walls | 430x380 | 2 |
| 10mm plywood for the bottom and lid | 530x430 | 2 |
| Nails or furniture staples | 15-20 | 20-30 |
| Screws for assembling the drawer | 50-60 | 16 |
| Screws for hinges, summer door | 15 | 10 |
| Screws for closing the drawer | 30 | 7-10 |
| Loops | — | 2 |
Having prepared everything you need, you can make a box according to this scheme:
- Assemble the wall frame and nail plywood or hardboard to it.
- Nail a strip to the inside of the front and back walls to hold the drawer in place. This can be done after assembly, although it will be less convenient.
- After assembling all four parts, connect the pieces together using screws and a 90º angle bracket.
- Level the bottom and nail it in place.
- Install hinges on the lid and then screw them to the walls. The lid will open fully, causing discomfort during work. However, this can be avoided by attaching a rope using two furniture staples so that the lid only opens to 110-120º.

And finally, place a small piece of hardboard on a small screw and close the entrance.
An experienced craftsman can easily handle this type of assembly and operation of a finished box, but even in this case, a number of nuances should be taken into account:
- A ventilation hole measuring 10 x 10 cm should be made in the lid and then covered with metal or plastic mesh. However, this approach is ineffective if a sheet is placed over the bees during transport to prevent them from escaping. In this case, it's better to drill multiple 3 mm holes in the front and back walls with a thin drill.
Even if there are ventilation holes, when transporting bees in a car, it is worth opening the windows to provide the insects with a supply of fresh air.
- When transporting bees, it is worth closing the lid and summerTo do this, you'll need a screwdriver and a set of screws. Of course, you can also use regular locks, if you buy them at a hardware store first.
- During transport, bees will move around or huddle together. Therefore, you'll need to bring small wedges to secure the frames with dividers. If you don't have these, you'll need to use metal strapping, which you'll need to thread over the frames and secure with the same method. An alternative is to use small wedges, but these won't hold the frames in place for the entire journey.
The finished box can also be used as a trap, swarm box or storage container for frames.
Features of frame fastening
This step is just as important as the stage of forming the bee packages. The fastening technique is simple, but it must be strictly followed, otherwise the bees may be harmed during transport.
The frames should be secured so that the frames containing the queen and brood are in the center, and the frames containing the cells that will later be filled with honey are positioned closer to the walls. Empty combs will be placed between them. The total weight of the package can reach 16 kg.
How to transfer bees from a homemade box to a hive?
After transport, cover the box with a lid and leave it for a few days to allow the insects to calm down and fly around. During this time, feed them sugar syrup, which will speed up their adaptation period after the journey. The bees should also be examined, removing any that appear sick after the trip. Healthy ones should be discarded. insects can be moved into a hiveIn this case, you need to take into account the type of bee package:
- CellularThe work is carried out in cool weather. Initially, the bag is placed in front of the hive so that the entrances face the same direction. The entrance is then opened, after which the bees fly out and become accustomed to their new location. During this time, the beekeeper should move the frames from the box into the hive, maintaining the same order. If not all the bees have flown out and remain in the bag, they should be carefully moved onto the frames in the hive. The queen should be released only after all the bees have calmed down.
- FramelessIn this case, the comb should be prepared in advance, allocating approximately 3-4 Dadan-Blatt frames per 1.3 kg of bees. After transport, the bees should be placed in a cool place (such as a cellar) for 3-7 days, providing them with water and food. When relocating the bees, open the box lid, find the queen in a small box, open her slightly, and place her in the center between the rows, without completely releasing her from the cage. The entire opened bag should be placed in the hive, but if there is no space, the bees can be released inside. The queen can also be relocated the following day. By this time, the bees will have adapted, so the entire bag can be removed from the hive.
Video: Tips for making a box
The following video explains what you need to consider when assembling a beekeeper's box:
If you need to make a box and a funnel for a honeycomb-free bag, you should take into account the recommendations in the video below:
Bee package boxes are simple structures that can be easily made in a home workshop using ready-made plans, available materials, and tools. However, care and attention must be taken to ensure the finished box is sturdy and suitable for transporting bees.