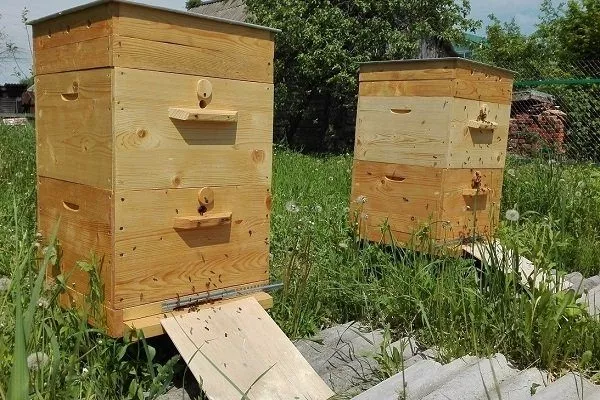
A beekeeper can build a beehive himself, using wood, plywood, and even foam. The conditions created in the bee house will determine the development of the pupae and the productivity of the adults, so its design and construction must be approached with the utmost care.
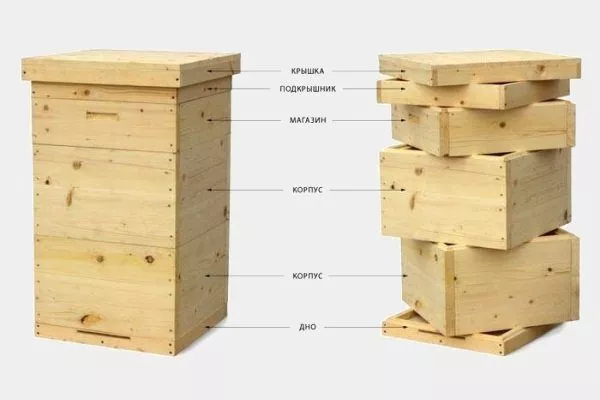
Typical structure of hives and their components
To build a bee house yourself, you first need to understand its basic structure. Any model should include the following components:
- FrameLocated at the bottom of the structure, it features special grooves for the frames to be installed. Depending on the size and type of hive, the number of grooves varies from 9 to 16. Typically, these joints are installed parallel to each other. The walls of the frame are insulated with velite, a paper insulation board impregnated with bitumen. Linen mats and polystyrene foam are the main alternatives.
- BottomIt serves two functions simultaneously: as the foundation of the structure and as a "landing strip" for the bees. The bottom can be fixed or removable. In terms of operation, the latter option is optimal, as it simplifies cleaning the nest. A space of at least 20-25 mm should be created between the bottom and the frames. This space is necessary for cleaning the hive before the spring flight of the bees. Some beekeepers leave a space of 40-60 mm and place a container of insect food under the frames.
The subframe space forms a steam-air valve, without which the swarming activity of the bee colony will decrease, since the flying bees will not land on the combs with brood.
- LetokThis is the opening that allows bees to freely exit and return to the hive. It is cut in the front of the hive, often at the bottom, as the upper opening absorbs about a third of the heat. It is closed with a hinged flap attached to the front wall of the hive with rotating hinges. Some models have two entrances—an upper and a lower one. The upper entrance opens in the spring and summer and is closed in the winter. The lower entrance is slightly opened during the winter to allow fresh air to enter.
If the bottom is removable, the entrance hole is often made slightly above the center, forming a semicircle with a diameter of 30 mm. If the bottom is nailed down, the slotted entrance hole should be at least 100 mm in diameter and approximately 10 mm in length.
- Magazine (magazine extension)The section of the hive located above the body. Bees store honey in this compartment during the flow period, making it much easier for the beekeeper to collect it. The super is typically made with the same linear dimensions as the body, so it can accommodate the same number of comb frames. Sometimes, the super is used to house the colony during the winter, so it is insulated along with the body or is double-walled. Some models do not have a super.
Experts recommend using the store for small bee colonies that do not produce large quantities of the sweet product.
- Roof linerThe upper part of the hive house covers the super or brood box to protect the bees from precipitation and simultaneously create an attic-like air space that helps maintain an optimal temperature in the hive. A hole is made in the ceiling to allow ventilation and free movement of the bees. If the roof is replaced by a roof, it is made of plywood or boards and covered with a thin sheet of steel to protect the wooden parts of the hive from moisture.
Such structures are often equipped with the following components:
- FramesDepending on the hive's shape, they can be square, low-wide, or narrow-high, but in all cases, they have equally protruding edges—the rebates—that rest on slats attached to the walls of the super or body. The thickness of natural wood frames is usually 10-40 mm. To assist the bees in creating comb, stainless steel wire or thick fishing line is sometimes stretched across them. A 6 mm gap should be left between the frames and the walls of the body to create an interframe flyway through which the bees will fly after building comb.
- SeparatorsThey ensure the necessary distance between frames. The gaps in them are designed to allow worker bees to fly upward. Permanent dividers can be either point-type or linear. The former fasten adjacent frames at the required distance at only one point, while the latter do so along the entire bottom bar. There are also profiled side dividers, which are an extension of the side bars at the top that prevents the combs created by the bees from touching each other inside the frame. These are also called shoulders and are typically about 100 mm long.
- Diaphragm (insert board)This is a plank or wooden slab, the width and height of which correspond to the internal dimensions of the hive body. It is placed inside the hive and divides it into two parts. It is often used when keeping two bee colonies in a single hive.
- With roofing felt subframeA sheet of roofing felt, the length and width of which correspond to the dimensions of the hive's bottom. It is inserted into the hive through the entrance when refilling the hive with food for the winter. During the winter, wax crumbs and dead bees accumulate on it, so it should be removed in early spring and stored until the end of the season.
- Dividing gridIt is installed between the hive body and the super to prevent the queen from moving from one part of the hive to the other. The screen is made of wire or plastic and has mesh sizes of at least 4.2 mm. This allows worker bees to pass through freely, while larger queens and drones remain in the main brood section.
- Ventilation frameA lightweight structure made of wooden slats with a metal mesh stretched over them, the mesh size being 3x3 mm. It is installed at the top of the hive in place of the ceiling panel, but sometimes a ventilation window is also installed in the roof lining.
- With folding panelsThese are used to connect the body and the super. The hinges are attached to the corners of the front wall of the hive, between the body and the super. They allow the super to be folded back or completely removed, freeing up the interior of the brood box. Some models use retractable brackets instead of hinges.
- With connecting tapeEnsures a secure connection between the body, magazine, and underhood. It is installed along the joint lines. Typically, a steel strip 25 mm wide and 2 mm thick is used.
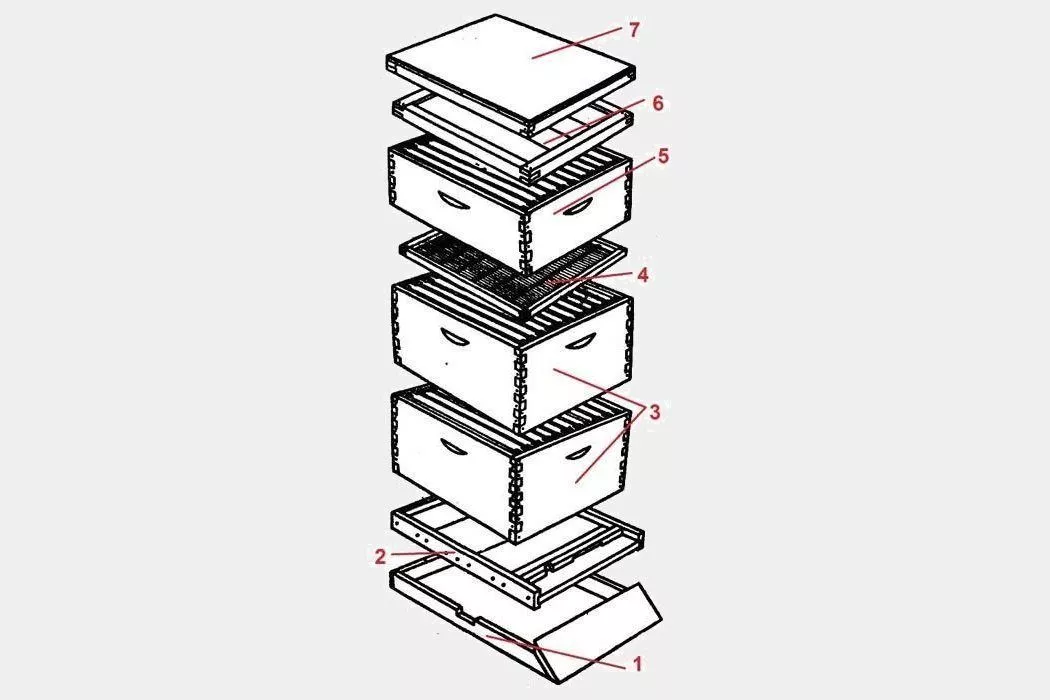
The following diagram shows the basic structure of a hive, where 1 is the base, 2 is the bottom, 3 is the body, 4 is the divider, 5 is the super with frames, 6 is the ceiling, 7 is the lid:
Main types of hives with drawings
You can make your own hives in a variety of shapes and sizes. We'll discuss the most popular options among beekeepers separately.
Dadan hive
Found in almost all apiaries, it's made of wood—cedar, spruce, pine, linden, or aspen. It looks like this:
Its clear advantages are its simplicity, capacity, and modularity. The classic model consists of 12 frames, but as the bee colony grows, it can be expanded with new bodies or supers. Here's a drawing of a classic 12-frame Dadan hive:
The roof can be made not flat, but with a single or double slope, so that raindrops roll off the roof surface better.
Alpine Hive
The design principle resembles a hollow, since when developing it, beekeeper Roger Delon tried to recreate conditions for the bees that were as close to natural as possible.
Externally, the Alpine hive resembles a multi-body vertical "pyramid," as the nest boxes are arranged one above the other. This results in a compact design, but a taller height, and also features the following features:
- the buildings have no partitions, ventilation gaps or grilles;
- a flight hole is installed in the lower part of the house, through which natural air circulation occurs and the accumulation of moisture and condensation are prevented;
- a feeder or ceiling is made at the top of the hive to create an air cushion;
- all the cases, except the bottom one, have no bottom, therefore, to install the frames on the walls, combs or slats are fixed;
- Each section of the common body contains from 3 to 8 frames, depending on the number of individuals in the bee colony.
There is no need to insulate the walls of the hive, since in winter it is simply covered with a plastic bag.
Langstroth-Root hive
The vertical hive structure consists of several tiers of 10 frames each and takes up minimal space. Experienced beekeepers build hives of this type with up to 7-8 tiers, harvesting over 200 kg of honey per season. Beginners, however, can opt for a minimal design—one body and a semi-super, as a large super would significantly increase the overall volume of the structure and make it difficult to insulate the nest.
Here is a diagram of a multi-body hive:
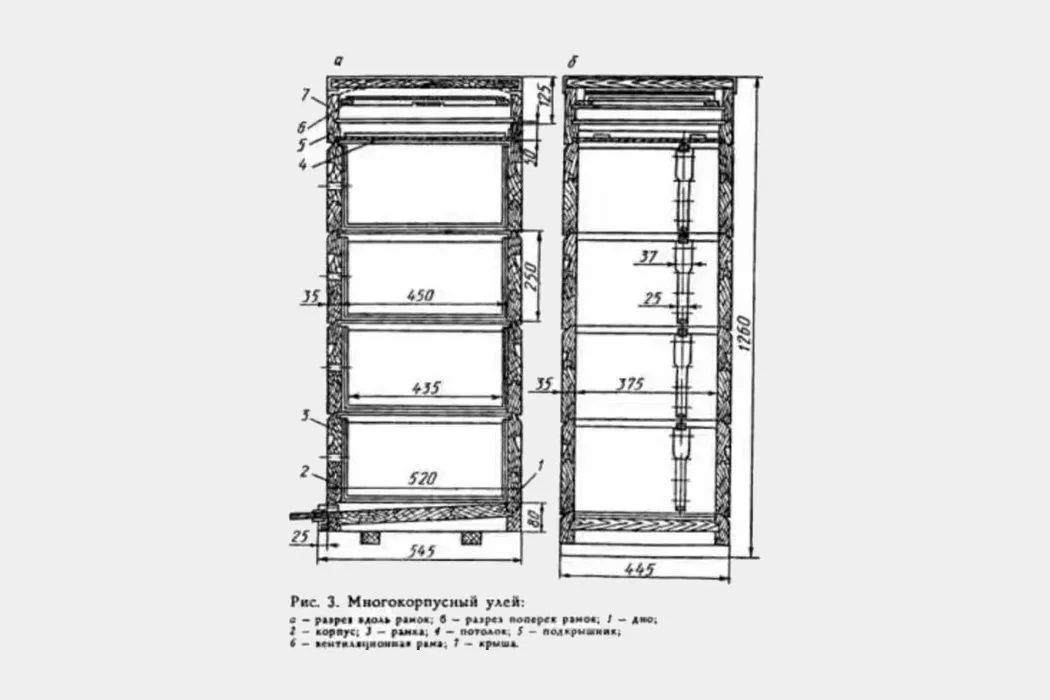
If individual blocks of the structure are equipped with pins, a more reliable structure can be obtained.
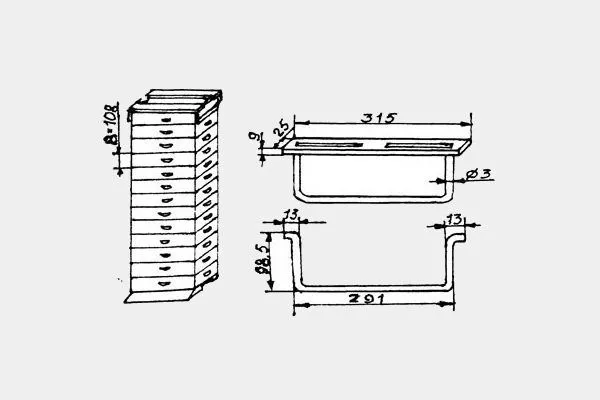
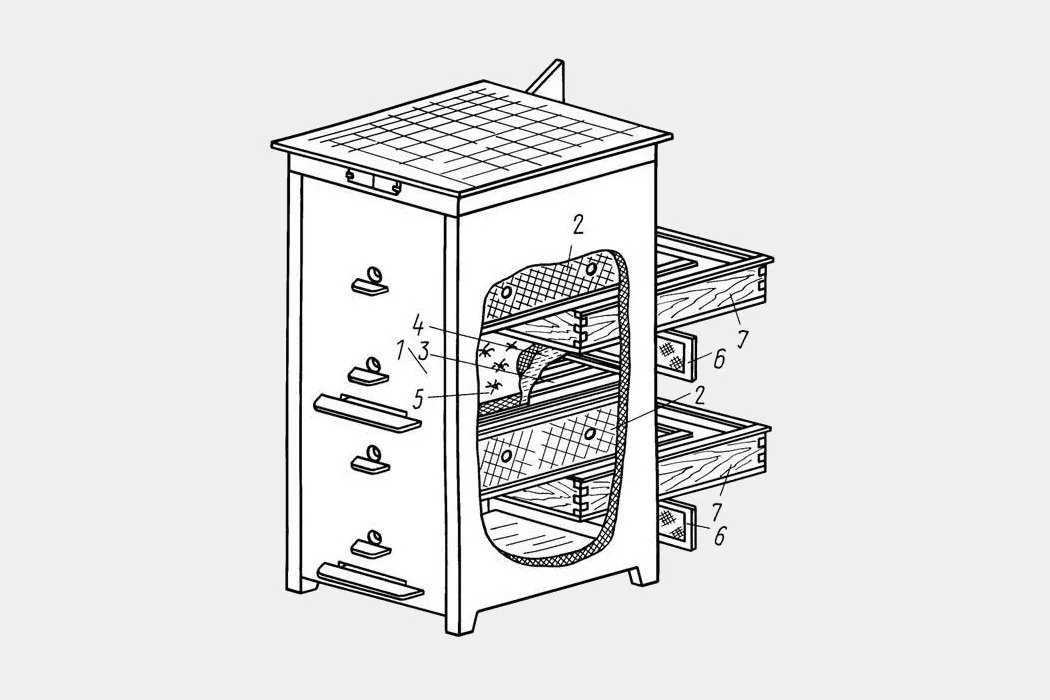
Cassette hive
Unlike other models, this hive's nesting boxes are made as pull-out drawers that fit into a larger frame with runners attached to its sides, along which the cassettes will slide. The distance between frames in the frame should be at least 10 mm, allowing for the possibility of separating a portion of the hive from the main space using horizontal bars or plywood partitions.
Each sliding body of this hive has entrances, the central ones being 25-30 mm in diameter, and the slotted ones being 200 mm long and 10 mm high. If a common door is planned, the entrance holes should be made in it, opposite the gaps between the cassettes. A landing strip is attached under each entrance. The entire structure is protected by a pitched roof with ventilation holes underneath.
A cassette multi-body hive for 10 frames can be assembled according to the following scheme: 1 – single body, 2 – cassettes, 3 – frames, 4 – dividing panel, 5 – insulation layer, 6 – protective covers, 7 – sub-cassette sections:
A cassette hive requires more effort and materials to make, but it is more convenient to transport than others, making it the best option for mobile apiaries.
Sunbed beehive
Unlike the models mentioned above, this hive is horizontal and ideal for housing multiple bee colonies. This design consists of a box divided by fixed partitions into several sections, each housing a separate colony of bees with its own queen.
The hive can be additionally equipped with a super, placing it on top of or between the brood compartments. An entrance is prepared for each compartment at the bottom of the front wall. It's best to have a gable roof to protect the structure from precipitation and overheating in extreme heat.
A hive bed can be made for a single bee colony. Here's a drawing of such a primitive design:
Selection of materials
When making a hive, you can use various materials:
- TreeA classic option for building a bee house. It helps create a natural environment for the insects. Cedar is the best choice of wood, although linden or aspen can be used, but the structure will require additional insulation. These hives are dry, breathe well, and have a pleasant scent. Avoid pine, spruce, and fir, as these hives are warm, but they accumulate moisture and resin, and they also emit a pine aroma.
To make a hive, you need to choose wooden boards whose moisture content is kept within 15-16%.
- PlywoodIt's considered a durable and environmentally friendly material, but a structure constructed from it must be painted and insulated with expanded polystyrene foam to retain heat and dryness. Plywood is extremely sensitive to moisture, so it requires regular and proper maintenance.
- Expanded polystyreneA relatively new material for beehive construction, it's attractive due to its low cost and lack of need for additional insulation in winter. Expanded polystyrene has its drawbacks: it's brittle and fragile. Using poor-quality material can degrade the honey's quality.
- StyrofoamThese are among the most economical and affordable options, as you can even use packaging from household appliances. The foam construction is lightweight even with filled frames and provides excellent thermal insulation. However, it is very fragile and requires regular painting to protect it from sunlight.
- PolyurethaneIt has good thermal insulation and is impermeable to moisture, preventing fungi and bacteria from developing inside the hive. This material is virtually uneaten by bees, mice, and birds, but it does have its drawbacks: it is highly flammable and practically impermeable to air.
- ✓ Consider the climatic conditions of your region when choosing material for the hive.
- ✓ Pay attention to the durability and weather resistance of the material.
- ✓ Ensure that the material does not emit harmful substances that may affect the health of bees.
A hive made of any material should be painted white, as it is easier for insects to remember and repels sunlight.
How to make a wooden beehive?
This design often comes in two types: vertical and horizontal. We'll discuss the assembly of each model separately.
Horizontal hive for 16, 20 and 24 frames
The principle of making a sun lounger is the same, regardless of its capacity, but before starting construction work, you need to correctly calculate its dimensions:
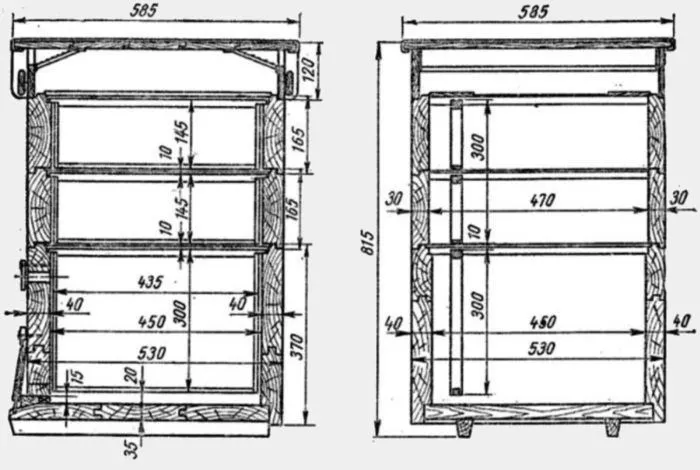
- For 16 framesThe inner casing is 2-2.5 cm thick. The front and rear walls are 60.5 cm high and 32 cm long. The side walls are 53 cm and 32 cm long, respectively. The outer walls are 1.5 cm thick. The front and rear walls are 67.5 cm high and 50 cm long, respectively. The outer side walls are 56 cm and 50 cm long.
- For 20 framesThe thickness of the structure remains unchanged, but the dimensions of the walls are adjusted. The height and length of the front wall are 87 and 37 cm. The same parameters are for the back wall: 87 and 44 cm, and for the sides: 49 and 44 cm. The dimensions of the base are as follows: height - 84 cm, width - 54.5 cm, thickness - 3.5 cm.
- For 24 framesThe body is made 84 cm long, 56.6 cm wide, and 63.5 cm high. Its bottom should be 3.5 cm thick. The roof is 93.5 cm long on the outside and 81 cm on the inside.
- ✓ Make sure the insulation does not absorb moisture to avoid mold formation.
- ✓ Check that the insulation does not attract rodents and other pests.
To ensure that the beehive is even and without large gaps, its dimensions must be precisely observed.
To make a hive you will need the following materials and tools:
- well-dried wooden boards, plywood, foam;
- board processing machine;
- a hacksaw or other tool for cutting blanks;
- hammer;
- drill, drill bit, self-tapping screws;
- chisels;
- casein glue;
- square;
- pencil.
The assembly instructions for a lounger of any size are as follows:
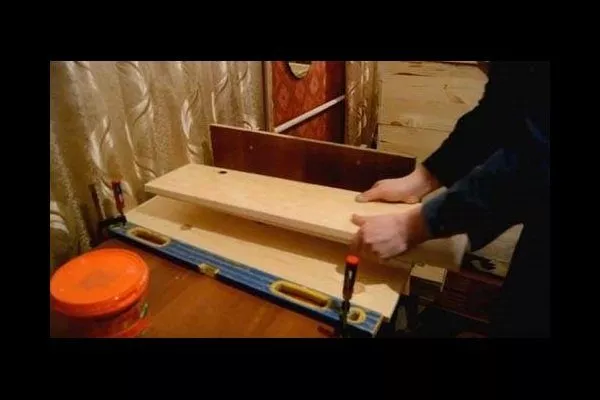
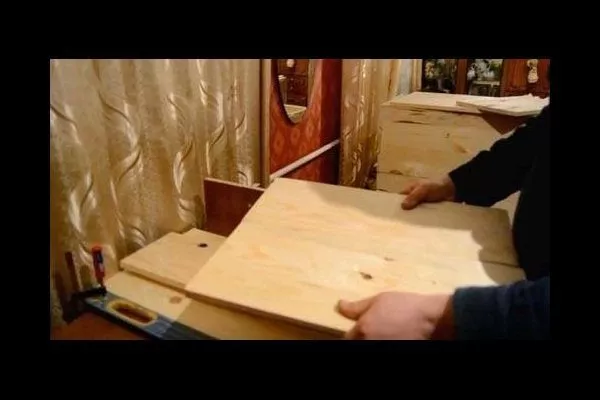
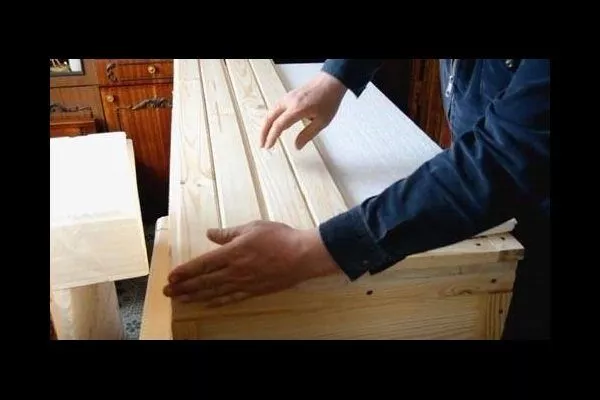
- Cut the board to the required dimensions and plane off any burrs. Sand the surface with sandpaper until it's smooth and free of defects.
- Attach the side pieces using wood glue. Apply some glue to the ends and press the pieces together on a flat surface. To secure the pieces, install a vertical rib on one side of the table, and clamp a spirit level to the other side. You can place another piece on top for additional pressure and to even out any unevenness.

- Glue the end walls and bottom of the drawer together using the same method. Remove any uneven surfaces using a sander.
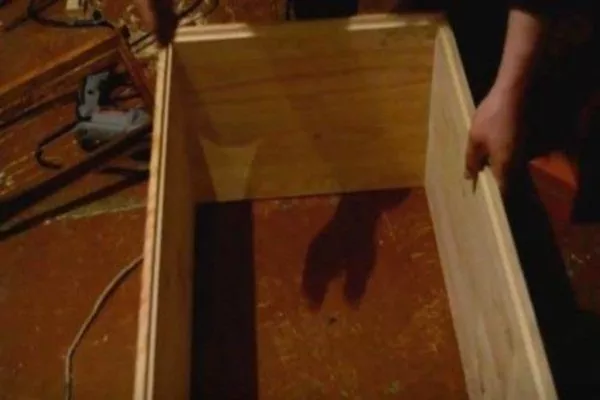
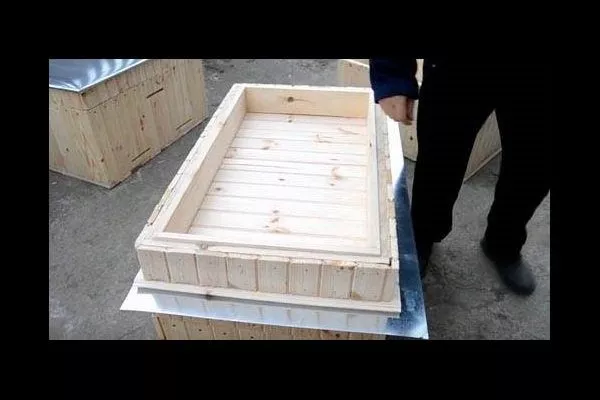
- Check the dimensions and correct any minor defects, then assemble the box, securing the parts with glue and screws. Use a level to check the angles for accuracy.
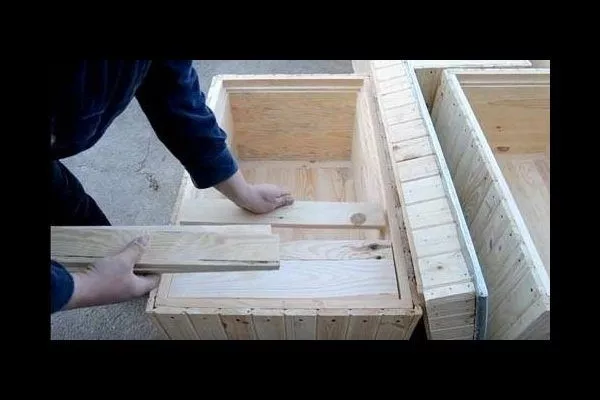
- Make supports for the frames from wooden planks (10x10 mm), securing them with glue and nails. Then check the dimensions of the parts for correctness.
- For each edge of the box, create a frame using 40x20 mm slats.
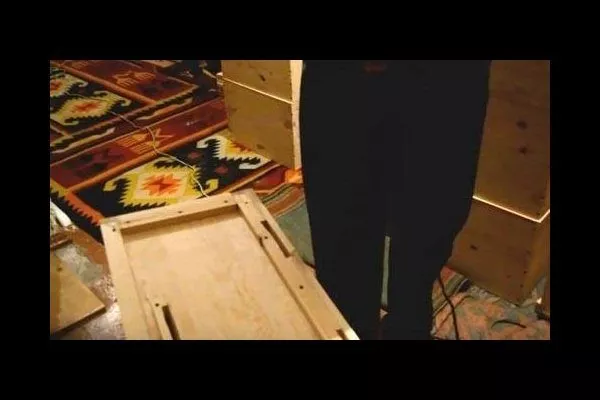
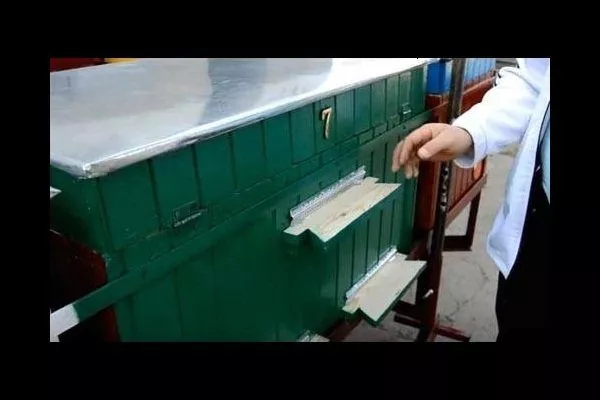
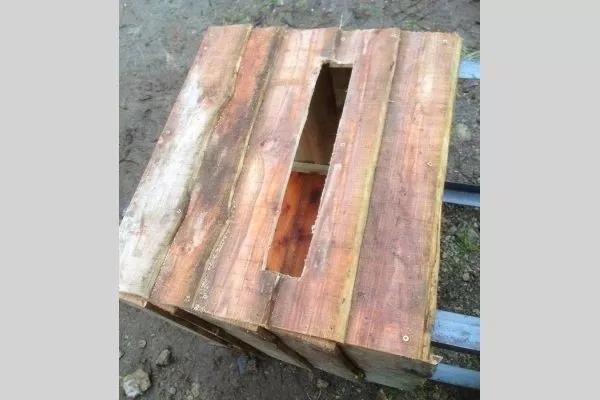
- Use a jigsaw to cut out entrance holes in the side wall—two at the bottom and one in the center. Open these holes as the colony grows. Cut grooves in the front and back walls for 1.8 x 1.1 cm frames.
- Attach the bottom. It can be assembled from two slats and decking using soil and nails. It's a good idea to leave a 2 cm overhang beyond the slats.
- Install foam sheets—20 mm thick, 25 kg/m3 density. Mount the cladding on top. The resulting structure will be multi-layered and have good insulating properties.
- Make the roof. To do this, cut boards to 100 mm lengths and form a box out of them. Install a batten at the bottom and check the dimensions. Create the roof surface with clapboards, cut ventilation holes in them, and cover them with galvanized sheet metal to protect them from the elements.
- Lay out the prefabricated ceiling with boards.
- At the final stage, install the landing board, paint the box and install a special latch to secure the lid during transportation.
- Use flexible tape to secure the top in the raised position.

You can attach handles to the finished box for carrying.
You can learn how to build a budget 12-frame hive from the following video:
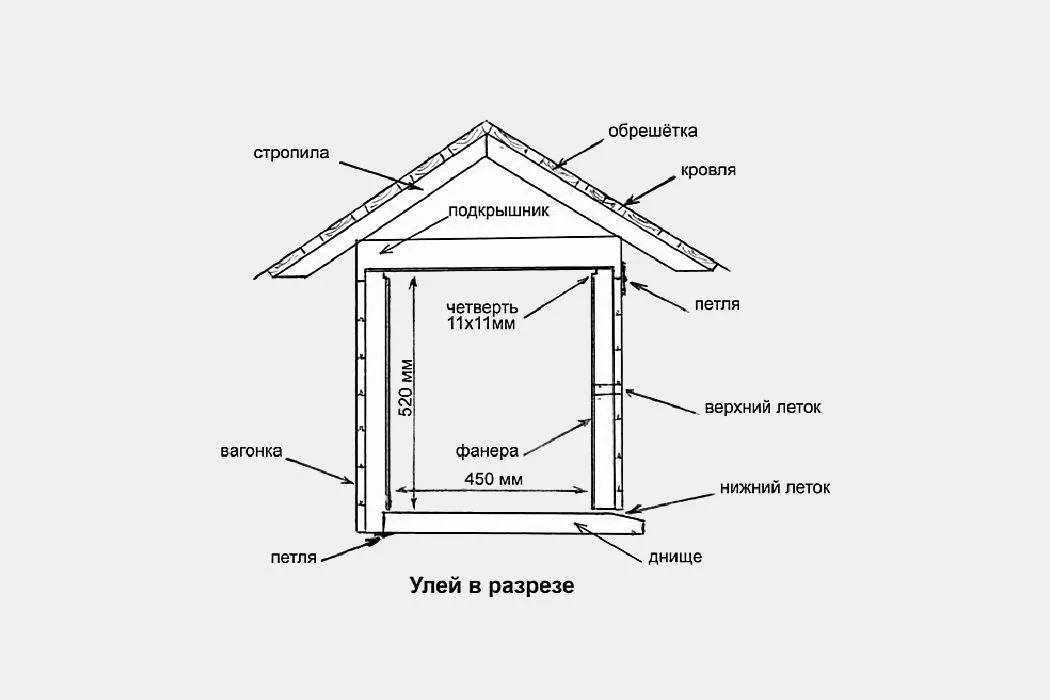
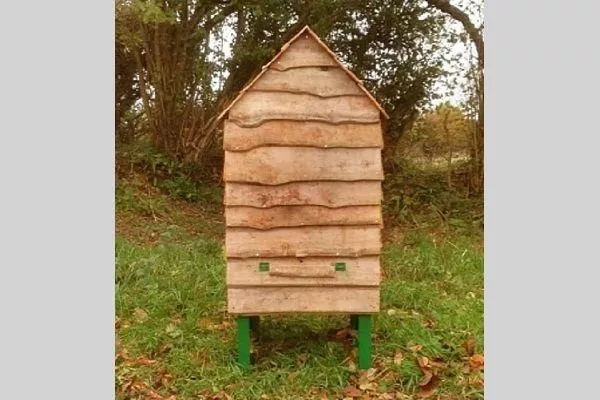
Vertical hive with a gable roof
The optimal dimensions for such a house are 130 x 60 x 60 cm, with the height measured from the roof ridge. Here's the drawing:
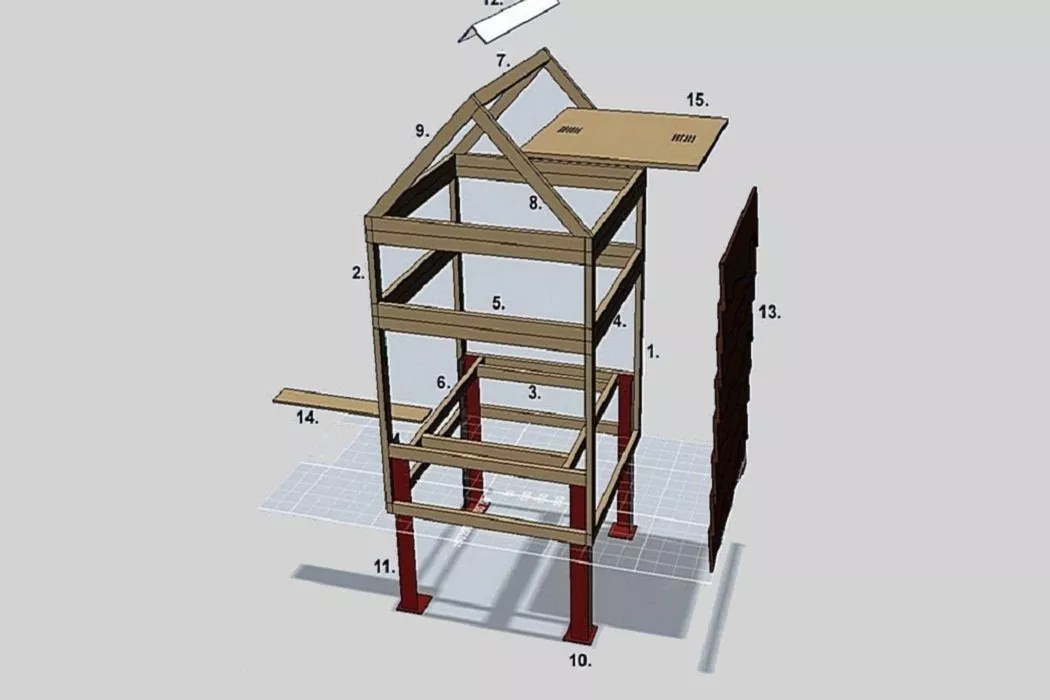
A similar design is made up of the following wood and metal parts:
- vertical body posts (1) 48.6x3.2x1.8 cm – 4 pcs.;
- vertical magazine posts (2) 15.4 x 3.2 x 1.8 cm – 4 pcs.;
- longitudinal bars of the bottom of the nesting compartment (3) 42.4x3.2x1.8 cm – 2 pcs.;
- crossbars for the nesting compartment, store, bottom and roof cover (4) 60x3.2x1.8 cm – 10 pcs.;
- longitudinal bars for the nesting compartment, store, bottom and roof cover (5) 56.4x3.2x1.8 cm – 12 pcs.;
- crossbars for the bottom of the nest box (6) 56.4x3.2x1.8 cm – 2 pcs.;
- roof ridge beam (7) 56.4x3.2x1.8 cm – 1 pc.;
- roof rafter legs (8) 39.2x3.2x1.8 cm – 2 pcs.;
- roof rafter legs (9) 42.4x3.2x1.8 cm – 2 pcs.;
- footrests (10) 8x8x0.3 cm – 4 pcs.;
- support legs in the form of a steel angle (11) 50x5x5x0.3 cm – 4 pcs.;
- ridge beam covering in the form of an aluminum corner (12) 68x5x5x0.3 cm – 1 pc.;
- facing board (13) 6-8 mm thick – 1 pc.;
- landing board (14) 46x7x0.6 cm – 1 pc.;
- plywood panel with ventilation holes (15) 46x46x1.2 cm – 1 pc.
To manufacture the designated structural elements and insulate it, you need to prepare the following materials:
- plywood 10-12 mm thick;
- timber with a cross-section of 32x18 mm – 20 linear meters;
- unedged board or wooden lining 6-8 mm thick;
- nails 5 cm long;
- screws 2.5 cm long;
- steel angle 200 cm long;
- aluminum corner (5x5x0.3 cm) 70 cm long;
- steel plates (8x8x0.3 cm) – 4 pcs.;
- a sheet of steel 1-1.5 mm thick and 60x100 cm in size for roofing (instead of it, you can use the same board as for wall cladding);
- folding hinges – 4 pcs.;
- window hinges (5x3 cm) – 2 pcs.;
- flax insulation;
- linseed oil for wood impregnation;
- wood paint.
The following tools will be needed:
- welding machine;
- electric drill with a set of drill bits;
- screwdriver;
- electric jigsaw or wood saw;
- grinder for cutting metal;
- tape measure, set square, pencil;
- hammer;
- paint brush.
Once you have everything you need, you can begin making the hive by following these instructions:
- Prepare the frame components. To do this, plane the timber, soak it in linseed oil, mark it, and cut it into pieces using a jigsaw or a regular wood saw. To prevent the timber from cracking when hammering nails, hammer them in at an angle. You can pre-drill a hole in the timber at a 30° angle, the diameter of which is 1-1.5 mm smaller than the thickness of the nail shank.
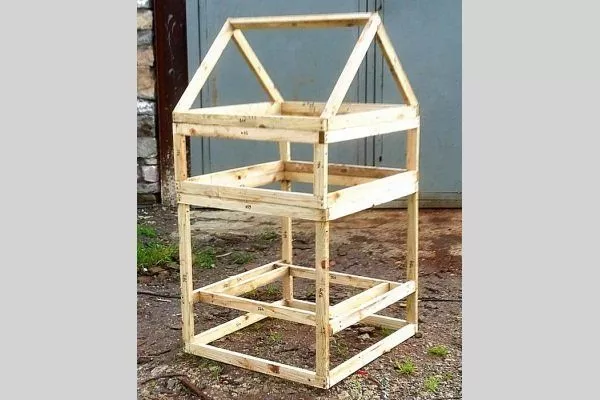
- Construct the lower frame of the frame, first laying the timber on a building square to prevent the corners from warping. Fasten each side with two nails or screws, driving them through the longer timber into the end of the shorter one. Assemble the upper frame of the body in the same manner. Next, connect the two frames together with vertical angled timbers.
- Measure 18.2 cm from the bottom frame and at this level, between the vertical posts on the front and back sides of the frame, nail horizontal bars so that their upper edge coincides with the top of the steel angle of the legs.
- Measure 5.2 cm from the edges of the secured beam and nail #6 beams perpendicular to them along the walls. This will create a space between them and the vertical posts, large enough to accommodate the corner legs. These will serve as supports for the ventilation grille and the internal corridor leading from the entrance hole. Measure 5.5 cm from the edges of these beams and attach short #3 beams perpendicular to them.
- Assemble the store extension by first making the lower and upper frames, and then fastening them together with vertical stands.
- Attach the roof elements. To do this, first assemble the bottom frame, then attach the rafters to it, installed at an angle, and connect them together with a ridge beam. At this stage, the assembled structure looks like this:
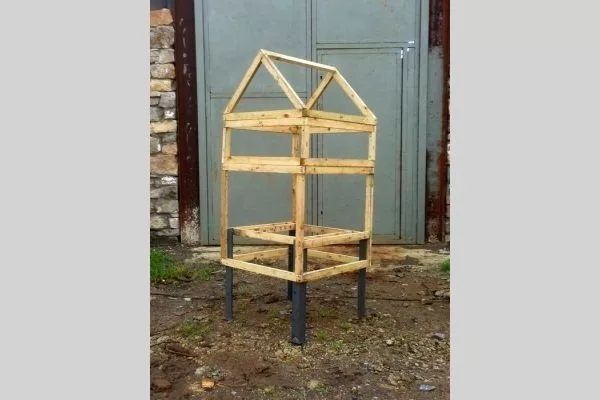
- Prepare the hive legs. To do this, mark the steel angle and cut it into 50 cm long pieces. Mark two holes 2 cm from the top of the angle, and two more 18 cm apart. The diameter of the holes should be 5 mm. Next, take the steel plates and weld them to the legs on the side opposite the drilled holes.
Some beekeepers use wood to make the hive legs, but in this case, the material must first be thoroughly treated with a protective solution, since the stand will later need to be deepened into the ground to ensure the stability of the hive.
- Press the finished legs against the bottom of the frame's vertical supports, then screw them in place using the pre-drilled holes. The optimal distance from the footboard to the bottom frame rail is 30 cm.
- Attach protruding stops to the inside of the top frame beam of the super and brood box, where the frames will be secured. Attach 8-9 mm wide slats along the entire length of the side beams of the frame. Attach hinged hinges to one side of the hive, to the roof frame and the top frame of the super, as well as to the bottom frame of the super and the top frame of the brood box. This will make it easier to remove frames of comb from the hive later.
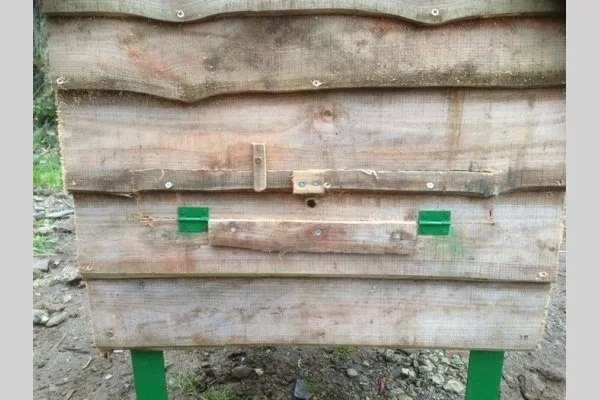
- Cover the front of the nesting box with cladding material—wooden boards pre-treated with linseed oil. Mount them at an angle to the frame timbers, so that each upper board rests on the lower one.
- Cut a rectangular hole measuring 46 x 7 cm into the secured lining of the lower part of the hive. Save the cut-out part of the board to use it for constructing a hinged door.
- Attach a small board under the cut-out window to serve as a support for the hinged entrance door. When opened, it will become a landing pad.
- Attach the cut-out trim piece to hinges that will be installed underneath it so it opens outward. To secure the door closed, screw a small board or metal strip over the cut-out opening. This strip should flip freely and act as a simple latch.
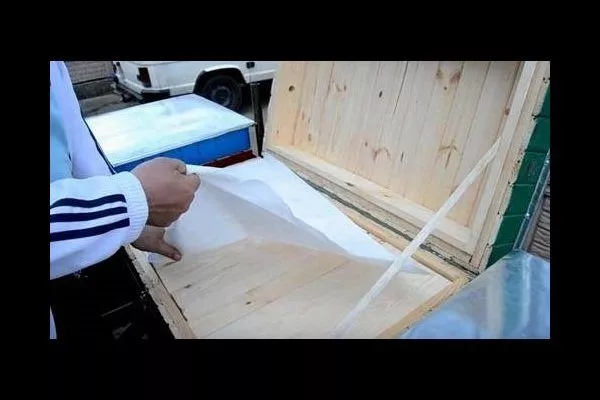
- Attach a corridor board to the frame beam on the inside of the hive entrance hole. Next, insulate the floors. To do this, turn the nest box over, lay linen mats on the boards underneath, and cover them with waterproofing material. Cover the outside of the bottom with plywood. Cover the remaining sections of the hive with plywood on the inside, and then install linen mats on the outside of the frame frames. Cover the insulation with a windproof, waterproofing film.
- Cover the roof with the same boards as the walls, or with galvanized steel sheeting. In the latter case, add 2-3 rafters to the slopes of the structure, then sheathe the roof with plywood before laying the metal roofing.
The second option is optimal, as it eliminates the risk of bleeding. If boards are used, begin attaching them from the eaves and work their way up to the ridge. Each subsequent board should be installed overlapping the previous one. Finally, secure an aluminum corner to the ridge. - Install a plywood panel with ventilation holes in the under-roof space. When using the hive, install a separator grid between the super and the hive body, and a syrup feeder on the panel and the bottom.

The external cladding of the hive can be done either before installation in a permanent location or after digging the stands into the ground.
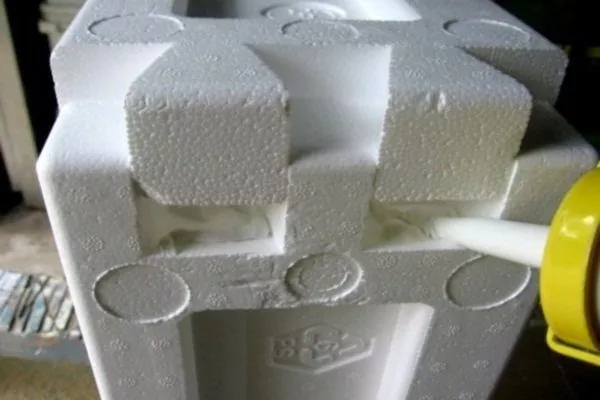
How to make a beehive from polystyrene foam?
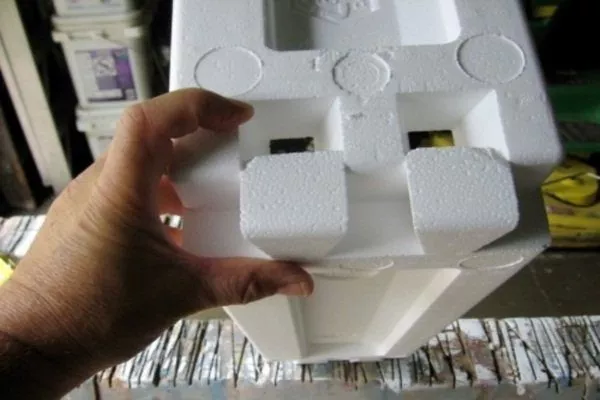
A typical polystyrene foam cage is a 44x25 cm enclosure with a lid, bottom, and feeder. Wooden frames weighing approximately 10-12 kg are mounted inside.
To manufacture the structure, you will need the following materials and tools:
- expanded polystyrene sheet;
- wood screws 5-7 cm long;
- fine-grain sandpaper;
- liquid nails;
- aluminum mesh with cell sizes up to 3.5 mm;
- water-based paint mixture;
- steel angle;
- a circular saw or a utility knife with a strong, hard blade to ensure the cut pieces are even;
- screwdriver;
- a metal ruler at least 100 cm long.
To make a beehive, you need to follow this plan:
- Mark the polystyrene foam sheet using a regular marker and a metal ruler, then cut out all the pieces for the future structure. Sand the edges with sandpaper to ensure smoothness.
- Using a utility knife or saw, cut "quarters" along each wall, each equal in size to half the thickness of the polystyrene foam sheet. These are necessary for joining the structural sections together.
- Place both walls of the case so that the protrusions fit into the grooves, and then apply liquid nails to the joints.
- Once the glue has dried and the joints are secured, tighten the structure from the outside with screws at 10-12 cm intervals. Each screw should be driven 5 mm deeper into the sheet.
- Assemble the finished bodies of each segment into a single structure, fitting the upper section onto the lower section. Ensure there are no gaps or cracks during assembly, as these will negatively impact the thermal insulation of the house.
The beehive can be insulated with tiles, the thickness of which corresponds to the dimensions of the finished product, but varies within 2 cm, 3 cm or 5 cm.
Instructions for making a polyurethane beehive
Creating a hive from such material is a rather labor-intensive process, so it makes sense to divide it into several stages, each of which we will consider below.
Assembling the case
To do this, you'll need eight metal plates—four each for the outer and inner contours. Spacers should be installed between the opposite sides, and the outer plates should be secured with bolts. To create recesses in the housing for grip, screw metal plates to the inner sides of the outer plates.
The base and cover should be made with grooves into which the slabs will be inserted. Place metal strips along the edges and secure them with bolts. Drill holes along the inner and outer perimeters of the frame to insert threaded metal rods during assembly. Screw bolts into these, holding the entire structure in place. Make a hole in the cover for pouring the mixture and install a valve with a plug to close it.
Installation of the bottom and roof
The roof is made from two rectangular pieces, one of which should have protruding sides at the edges, and the other should have a protruding rectangular inner part.
The bottom is a rectangular frame with a metal mesh in the center. It's best assembled from individual polyurethane foam blocks, bolted together.
Separately, you need to make molds for the side, rear, and front beams. Lay a strip of metal along the inner perimeter of each beam to create a fold. Place the metal mesh on top and staple it in place. It's best to position the front beam lower to create a flight hole.
After casting the inner sidewalls, use a milling cutter to create a groove for the bottom latch. Cut it out of polycarbonate. Position the rear block lower to allow the latch to be inserted into the resulting gap and guided into the grooves in the sidewalls.
Preparation of polyurethane foam mixture
This material is produced by the reaction of a polyol and a polyisocyanate. When pouring the mixture, the total weight must be calculated correctly, following this order:
- Calculate the volume of the hive part and multiply it by the width, thickness and length.
- The obtained value is multiplied by the coefficient of technological losses (1.15) and the estimated density of polyurethane foam (60 kg/sq. m).
Typically, one 5 cm thick hive body requires approximately 1.5 kg of polyol and 1.7 kg of polyisocyanate. The mixture must be poured very quickly—within 10 seconds—as it hardens quickly. For mixing and pouring, use special devices or a standard construction mixer. In the latter case, pour the polyisocyanate into a flexible container and immediately mix it with a mixer. Then pour in the polyol and mix for 3 seconds. Then, pour the mixture into the mold.
Removing and painting the hive
Allow the mixture to harden for 30 minutes. After this, loosen the bolts holding the rods. Knock down the top of the mold using a wooden block and a hammer. Next, loosen the bolts on the edges of the mold, being careful not to deform the structure. Repeat this process twice on all the bolts and remove the spacers. Remove any excess polyurethane foam from the edges of the mold with a sharp knife.
Finally, cover the structure with fine-grain sandpaper and paint the exterior with acrylic paint to protect the hive from UV rays. Paint the hive within a week of construction, but not earlier than 8 hours after construction.
You can make a beehive yourself using various plans and materials. You should also first choose a suitable design based on your region and the size of your apiary. In any case, the finished hive should be completely airtight and have good thermal insulation properties.