Building a winter house helps protect beehives during the winter. The advantages of this design include heat retention, reduced feed consumption, and increased safety for the bees. Read this article to learn about the requirements for building a winter house and the rules for preparing the space.
What is it used for?
A moss house is a small room where beehives are kept during the cold winter months. Another name for this structure is a winter house. It is primarily built in cold regions where winters are particularly harsh.
Thanks to the moss house, bees survive the winter more easily and use up less of their honey reserves. Furthermore, the design allows the beekeeper to monitor the bees' health without disturbing them too much. During the winter, the moss house should be visited several times to check the room temperature, food supplies, and the health of the bees.
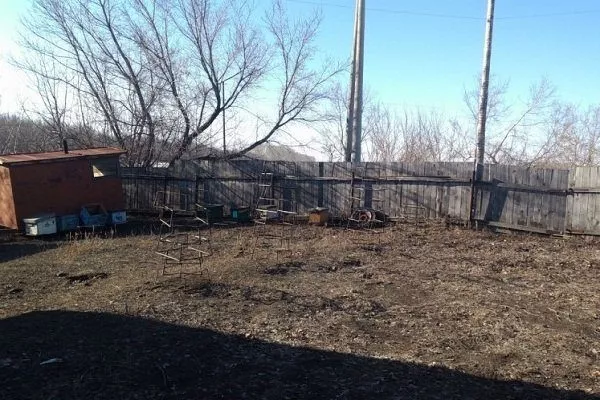
In summer, the need for a winter shed decreases. However, it can be used as a storage room for tools.
Pros
The main advantages of using this design are:
- Bee health. The insects are warm and less likely to get sick. A reduced need for honey protects the bees from digestive problems. Defecation usually occurs only outside the nest, so overfeeding can cause a blockage in the rectum, worsening the insects' condition.
- No problems with nutrition. If there is insufficient heating and low humidity levels, honey becomes crystallized, making it more difficult for bees to consume it.
- Safety. The risk of the hive being knocked over by an accidental jolt or a strong gust of wind is reduced.
- Convenience. Beekeepers don't have to worry about their hives being plundered by wild animals. The wooden structure of the nest is better preserved. It's easier to inspect and treat sick bees. Far fewer insects die during the winter in the moss house.
Types
In total, 3 types of designs are used.
| Name | Type of construction | Thermal insulation level | Difficulty of construction |
|---|---|---|---|
| Ground | Aboveground | Short | Low |
| Underground | Underground | High | High |
| Semi-underground | Semi-underground | Average | Average |
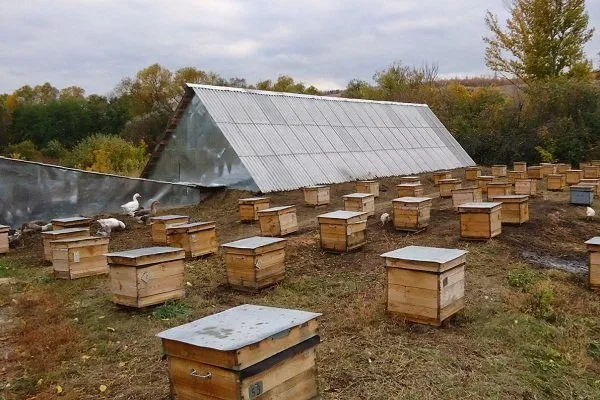
Ground
The least convenient type of moss house. It's easy to build, requiring little time or materials. However, such a room requires additional insulation, as the walls retain little heat.
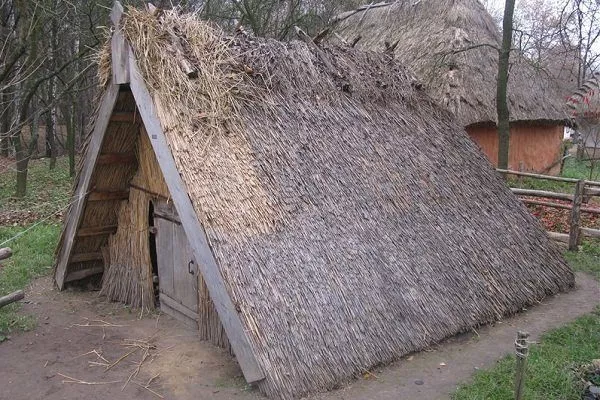
Externally, an above-ground wintering shed resembles a regular building that can be used as a shed. Bee nests can be easily placed inside and removed after the cold weather has passed. Furthermore, if you cut windows, artificial lighting is not required.
Underground
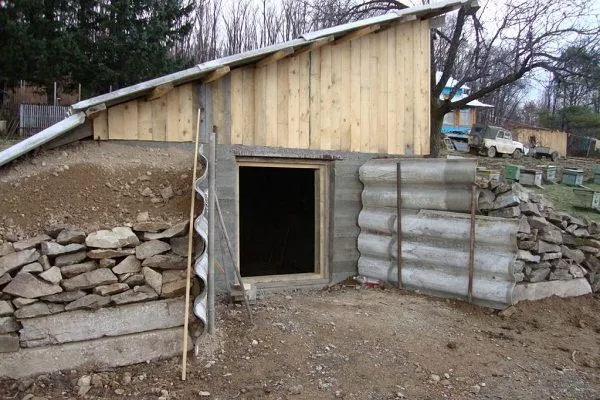
This design is considered the most convenient. The structure is located almost entirely underground, with only the roof remaining above ground. These winter huts retain heat and maintain optimal humidity levels.
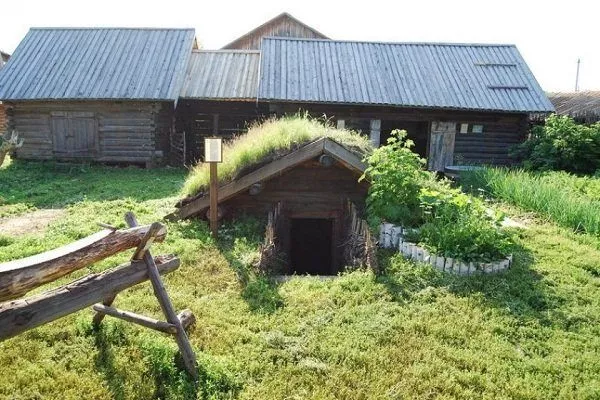
However, building a structure is only necessary in areas where groundwater levels are deeper than 4 meters. Furthermore, construction requires more materials and effort.
Another disadvantage is the inconvenience of moving the hives into the moss house and removing them during warmer periods.
Semi-underground
It's built if groundwater is located shallowly underground. This type of wintering house combines the advantages of the other two. It's bright, and moving the hives requires less effort. However, constant monitoring of the temperature and humidity is necessary, otherwise the nests may become damp.
Basic requirements for construction
When constructing a moss house, it is necessary to take into account the basic requirements.
Humidity
Changes in humidity levels have a negative impact on the health of bees.
There are 2 options:
- Reduced. Insects become stressed and restless, which leads to increased consumption of honey reserves. Digestion is disrupted. Honey crystallizes, causing reserves to be depleted more quickly. Bees may die of starvation.
- Exceeded. Honey begins to sour, which also leads to starvation. High humidity in the nests creates a breeding ground for fungus and increases insect mortality from disease.
The optimal humidity level is 85%.
Thermoregulation
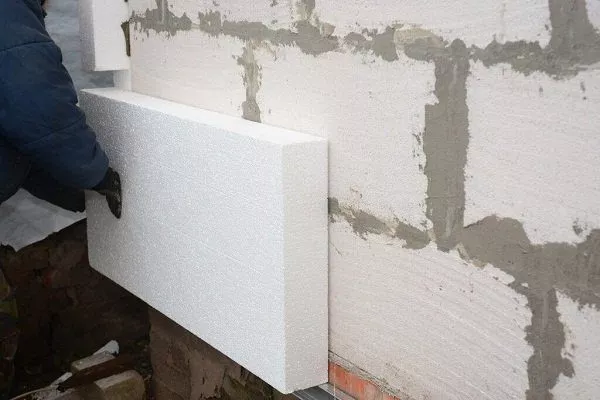
The optimal indoor temperature is between 0 and 2 degrees Celsius. In underground structures, temperature regulation occurs naturally. In above-ground and semi-underground structures, the walls must be insulated manually. Artificial materials such as polystyrene foam or isolon can be used for this. However, it's best to find more natural solutions to avoid harming the bees' health.
If there are a lot of bees and they have enough food, they can survive the winter at temperatures slightly below normal.
Ventilation
Ventilation is especially important for temperature regulation and humidity control. Bees provide ventilation inside their hives, leaving openings for air flow. Similarly, a beekeeper sets up a ventilation system in a bee house, using inlet and outlet pipes.
There are two possible ways to create ventilation using pipes:
- Single pipe. A single pipe is installed to facilitate air circulation. It ensures the flow of cool air into the room below and the exit of hot air through the top. If the pipe exits through the roof, it must be additionally insulated. A damper is also installed at the top to control ventilation in the moss house. This type of air regulation is less commonly used today.
- Double-pipe. This option involves installing two pipes. The first distributes oxygen throughout the wintering house. The second allows stale air to escape. Dampers can also be installed on the pipes. More experienced beekeepers attach fans near the pipe outlets to improve air circulation.
Instead of pipes, you can use dry sanded boards that are installed in the corners of the room.
How to build?
When building a moss house, you need to decide on the type of structure and only then begin preparation.
Preparatory work
Particular attention should be paid to the area where the winter hut will be built.
- ✓ The groundwater level must be below 4 meters for the underground type.
- ✓ The presence of a natural slope or ravine for protection from the wind.
It must meet the requirements:
- Water resistant. To check the depth of the groundwater, dig several holes in the spring. If water begins to collect in them, the area is unsuitable for construction. It's also important to ensure there's no risk of flooding.
- Location. The moss house should be located close to the apiary to make it easier to bring the hives in. Ideally, it should be placed in a ravine or on the slope of a small hill. This will provide protection from the wind.
- Entrance placement. It's best to install it on the south side to reduce the cold wind entering the room when the door is opened. In wintering houses housing more than 100 insect families, two entrances are made – on the north and south sides.
- Calculation of area. When planning the layout, keep in mind that the aisle width between racks should be approximately 1 m. A rack for placing hives in a single row should be at least 70 cm, and for two rows, 160 cm. A distance of approximately 20 cm should be left between hives. Also, avoid placing hives right up against a wall. The total area of the structure is calculated with this in mind. It's best to make the apiary slightly larger than necessary, as the number of bee colonies may increase in the future.
- Calculating expenses. It's important to determine in advance what materials will be needed for construction and calculate the required quantities. Mark out the area where the winter hut will be located.
Selection of materials
It is important to remember that when building a moss house, you will need materials not only for the construction of the building, but also for the manufacture of shelves, doors and ventilation pipes.
Therefore, you need to prepare the following:
- Tree. You'll need beams or logs. Prepare sanded boards, logs, and slabs. It's best to choose durable wood that retains heat well.
- Stone. You'll need bricks and regular stones. To strengthen the walls, prepare sand, crushed stone, and lime.
- Metal. Metal corners, channels and pipes.
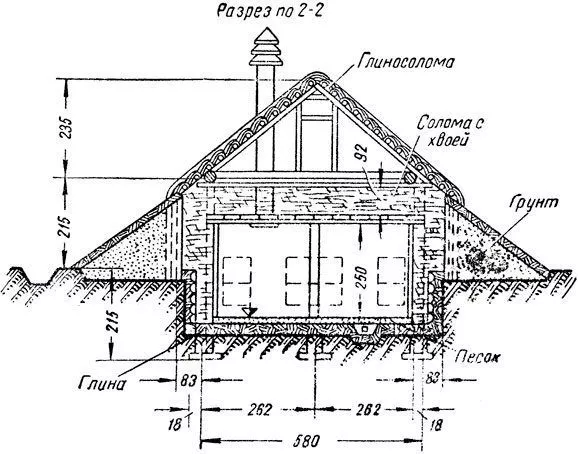
- Insulation. Due to the roofing material, waterproofing is created. You will need film, reed slabs and adobe.
Pay special attention to the materials for creating individual elements of the moss house:
- Floor. It can be created from concrete, clay, wood.
- Walls. In the underground structure they are made of brick, in others - of wood.
- Overlap. Reinforced concrete is used. Waterproofing is essential.
- Roof. It can be made from planks. For insulation, the ceiling is lined with moss, straw, sawdust, or foam.
Construction
Below are step-by-step instructions for building different types of moss houses.
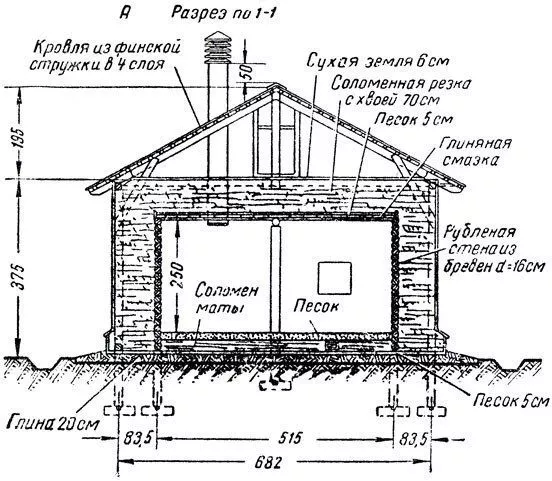
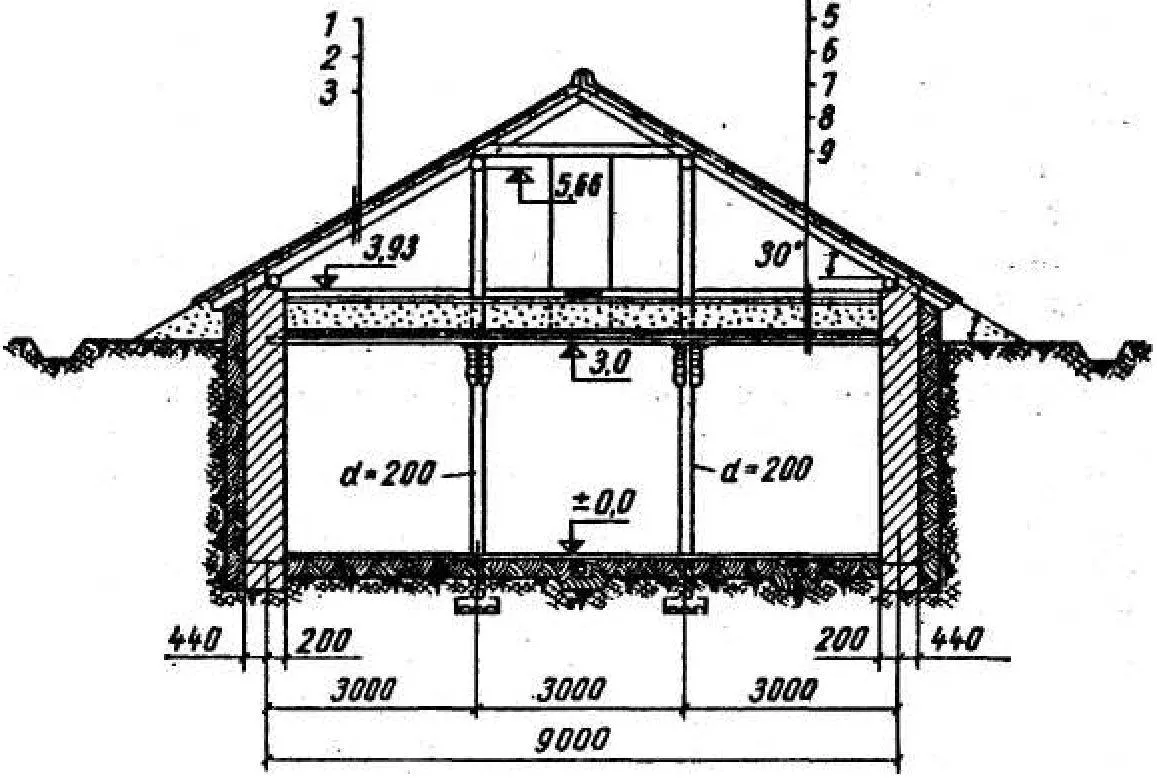
More details on the construction of an underground moss house:
- Dig a pit. It's easier to hire an excavator for this. A shovel can be used, but it takes much longer. The pit depth is 3-5.5 meters. After excavating, level the area thoroughly. Use a leveling ruler for this. Use a shovel to create a channel for condensation to drain, and also dig a slanted space for the ladder. The width should be at least 1 meter.

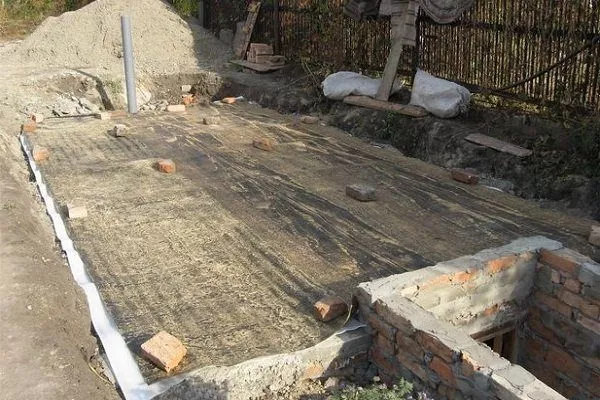
- Manufacturing of the floor. Fill the bottom of the pit with concrete or line it with planks for spacers. Place formwork boards along the edges. They should be at the same level. Pour a layer of concrete approximately 20 cm thick. Level it. Allow it to dry. The formwork can be removed two weeks after the concrete is poured.
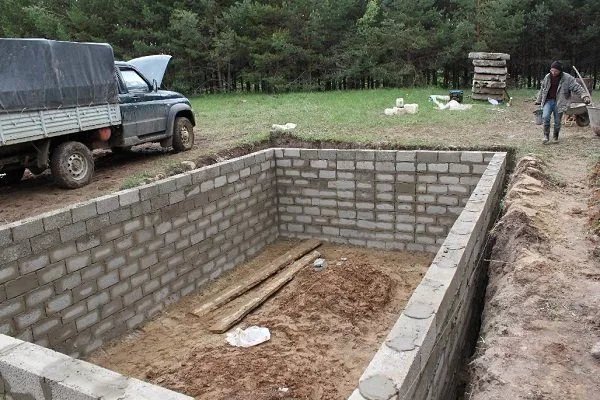
- Walling. It's best to use a double layer of bricks. Before laying, moisten each brick with water. Dry bricks can crack. Fill the gap between the lower bricks and the floor with clay. Use metal tubing to reinforce the structure. Make a metal frame at the bottom and lay a channel on top. Weld the metal frame elements together for strength. A frame on top is also required.
- Creating a roof. Lay the boards on top of the frame. They should be well reinforced with concrete and covered with plastic film. Lay a double layer of reinforcing mesh underneath. Top with a concrete pour. Allow the concrete to cure for one week.

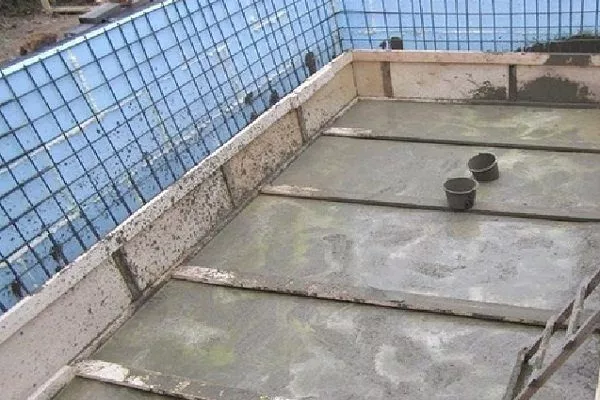
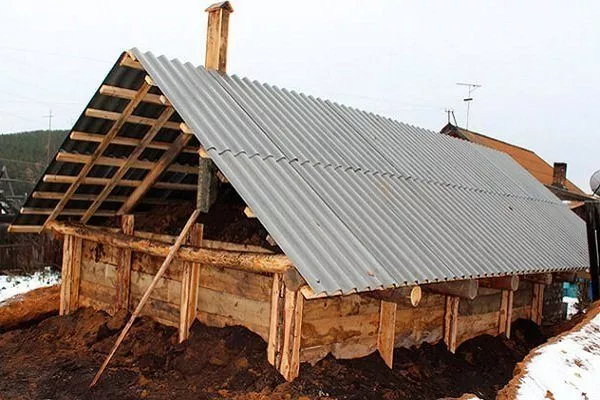
After this, you can lay a layer of roofing felt and cover it with soil. An attic space can be built above the ceiling to accommodate ventilation pipes and tool storage. The roof itself can be made of planks or slate. Insulate with reeds.
- Arrangement. Lay the steps with concrete slabs or fill them with mortar. A vestibule can be installed in front of the entrance to the moss house to help retain heat.
Whitewash the interior walls. Provide ventilation using plastic or metal pipes. Be sure to provide adequate lighting in the wintering house. Dual lighting is ideal. Diffused red is ideal for beekeeping.
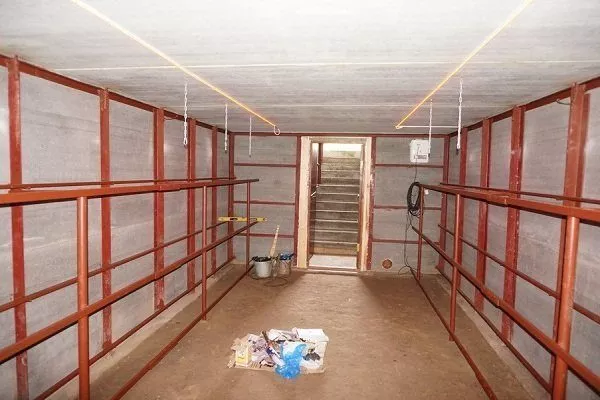
Make sure there are no cracks in the moss house. If any are found, seal them with a layer of foam.
You can see a visual representation of the finished underground winter hut structure by watching the video below:
The method of constructing a semi-underground barn is similar to the construction of an underground barn.
The steps are as follows:
- Site preparation. To do this, clear the area where you plan to install the winter shelter, removing weeds and small debris. It's best to have a level surface.
- Creating the foundation. Dig a hole 1 meter deep.
- Making the frame. It's made of beams or brick. When constructing the walls, space for windows and a door must be planned in advance. Wooden planks are nailed onto the frame.
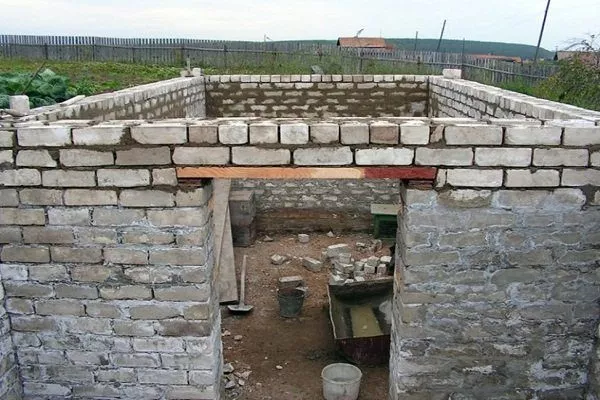
Be sure to insulate the walls. If foam is used, secure it with foam. Plywood sheathing is also an option, but the materials will be more expensive.
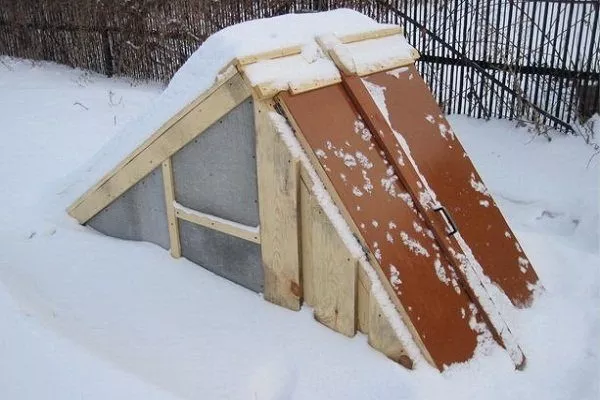
- Erection of the roof. It's usually made with a single slope, using wood, roofing felt, and insulation. If the roof is made gable, the resulting attic can be used to store beekeeping equipment.
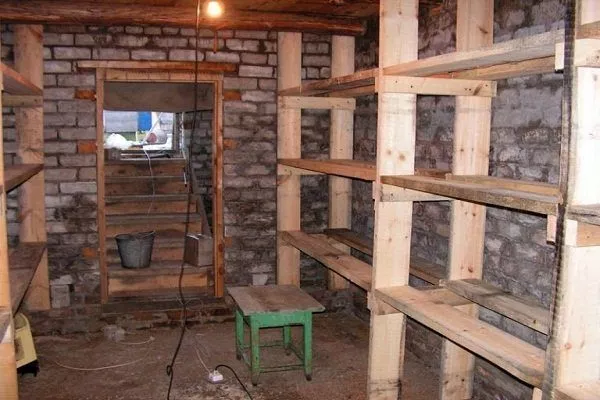
- Interior decoration. Wooden shelving units are installed inside; they can be made with one or two tiers. Ventilation pipes are attached. They should be routed to the ceiling or into the attic.
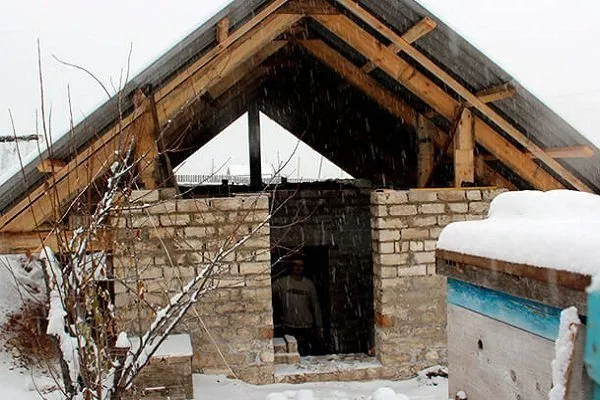
Sequence of works during the construction of an above-ground type:
- Place wooden posts around the perimeter. They should be driven into the ground to a depth of about 80 cm. The total height of the posts is 1 m.
- On top, you need to make a frame from a bar and nail on logs about 60 cm long.
- Cover the floor with wooden planks.
- Above ground level, not only brick but also wood can be used to build a winter hut.
- It is better to make windows under the ceiling to avoid artificial lighting.
- The roof can be made gable or single-pitched.
Wintering
To ensure that bees successfully survive the cold, you need to ensure they have a comfortable wintering environment.
Preparatory work
The beehive needs to be prepared long before the hives are placed there.
- Disinfect the premises with a solution of slaked lime.
- Install grilles on ventilation pipes to protect against rodents.
- Place rodent poison in the corners of the room.
What you need to do:
- Drying the room. To achieve this, during warmer months, open the doors and slide the dampers on the ventilation pipes. To prevent rodents from entering the wintering shed, grates are installed.
- Cooling. The wintering area needs to be cooled to avoid strong temperature fluctuations in the future.
- Disinfection. The ceiling and walls are treated with a slaked lime solution. This is necessary to prevent insect pests from entering the wintering shed.
- Soundproofing. To avoid disturbing the bees, lay a layer of sand on the floor. This will make the beekeeper's steps as quiet as possible. For the same purpose, lubricate the bolts and hinges to prevent them from creaking.
- Protection. The area should be fumigated to prevent fungal and parasite infestations. During the procedure, wear protective equipment—a protective suit, mask, and gloves. It's a good idea to place rodent poison in the corners of the moss house, as rodents can damage the wooden structures.
- Checking designs. Before placing the hives on the shelves, make sure they are strong enough to support the weight of the nest. Old or damp shelves are best replaced with new ones.
When to bring in the hives?
When it comes to transferring hives to the wintering house, you should remember the following:
- Time of entry. Hives are moved into the moss house when the outside temperature becomes consistently cold. The bees are no longer able to leave the nest, and the colony prepares for winter. This is usually done in early December. It's best to move the hives in the morning, when the weather is clear and dry.
- Insect protection. Before moving the nest, make sure all entrances are tightly sealed. Carry the hive as carefully and evenly as possible to avoid disturbing the bees.
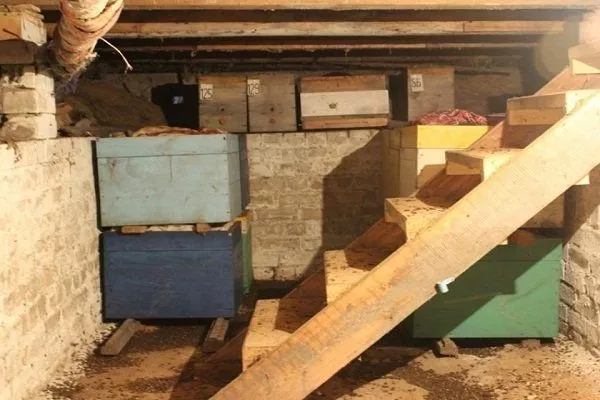
- Accommodation. Nests containing stronger, more robust bee colonies should be placed closer to the exit, where the temperature is typically lower. Weaker and sicker bees are placed on the upper shelves of the racks, deep in the moss house. It's also important to ensure that each hive is easily accessible.
- Opening of the flight holes. Don't do this immediately, as even the most careful movement could alarm the insects, leading to aggression. It's best to wait 2-3 hours.
- Ventilation. For 2-3 days after transferring the nests to the wintering house, the room must be thoroughly ventilated. This is necessary to dry the hives, which become saturated with moisture during their exposure to cold air.
- Measuring indicators. It's essential to constantly monitor the humidity and heat levels in the hive. This can be done using specialized instruments. If humidity levels are high, regular table salt in small bags can be placed in the corners. This will absorb excess moisture.
The hives are removed when warm spring weather arrives and the bees can begin their flight. The ideal time is when the first honey plants are blooming. At this time, there is no longer any snow, and the risk of frost is reduced.
After the hive is placed on the ground, a bundle of straw is placed in front of it. This will help protect the emerging insects from the cold.
Sometimes the temperature in the wintering house rises even before warm weather sets in outside. At this time, the bees become more active. They feel the need to fly and replenish their honey reserves. To calm the insects, beekeepers artificially cool the room.
Care
If the wintering structure is created correctly, then no special care is required.
Features of insect care in winter:
- Frequency of visits. At the beginning of winter, bees should be visited no more than twice a month. If the winter is cold, inspect the bees living in the above-ground structure more frequently to monitor the temperature. As the weather warms, visit the wintering house once or twice a week, as the bees become more restless. Before removing the bees from the moss house, inspect the bees daily.
- Behavior. Entering and exiting the wintering house should be as quiet as possible. Open the hives carefully, without making any sudden movements. Close the door as tightly as possible to keep out the cold and noise from outside.
- Observing the hive. Even without opening the nest, you can tell if the bees are doing well. If they hum quietly and evenly, wintering is proceeding smoothly. Excessive noise from the hive is a bad sign. This is usually due to a drop in temperature, but if the temperature is normal, you should check the bees. It's quite possible that the queen has died or the honey reserves have been depleted.
- Insulation. Hives containing small bee colonies require additional insulation. To achieve this, the space between the nests, as well as the surface facing the wall, is lined with a warm mesh.
- Feed. In the initial period, bees are relatively unpretentious. They require about 700 grams of honey per colony. However, as the weather warms, consumption doubles. This is due to the formation of brood and the expansion of the colony. Food is usually placed at the top of the nest, near the wall. At the bottom, the bees gather in a ball, which provides warmth to each other.
The choice of moss house design depends on the living conditions. It's best to build a warm and practical underground structure, but if that's not possible, an above-ground or semi-underground option will do. The key is to plan the wintering house in advance and ensure you have the necessary materials.